verify Command in Linux
Digital certificates that follow the X.509 standard are used to establish secure communications over networks. They bind public keys to the identities of entities (such as servers, clients, or users) and are signed by Certificate Authorities (CAs) to attest to that binding.
However, the mere presence of a certificate is not proof of its trustworthiness. One must verify that a certificate −
- Has been correctly signed by a known and trusted CA.
- Is issued for the proper purpose (e.g., SSL server, email protection, code signing).
- Has not expired.
- Has not been revoked (if CRL or OCSP checks are performed).
- Follows the proper chain of trust from the certificate presented up through one or more intermediate CAs to a trusted root certificate.
Table of Contents
Here is a comprehensive guide to the options available with the verify command −
Syntax of verify Command
The simplest invocation of the verify command is as follows −
openssl verify [options] cert1 [cert2 ...]
Here, cert1, cert2, etc., are certificate files to verify. Typically, if you pass a single certificate, OpenSSL will try to build a chain from that certificate to a trusted root using the provided (or default) trusted certificates.
verify Command Options
Let's now explore in detail each of the available options that are commonly used with the verify command.
-CAfile
Purpose − This option specifies a file that contains one or more trusted CA certificates in PEM format. OpenSSL uses these certificates as trust anchors when verifying a certificate chain. It compares the issuer information and signature on the certificate under test to one of the certificates in the provided CAfile.
Its syntax is as follows −
-CApath file
Example − If you have a file called ca.pem that contains your trusted CA certificates −
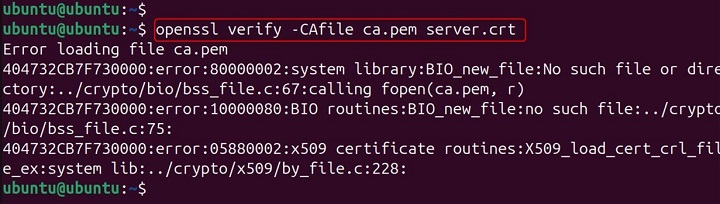
openssl verify -CAfile ca.pem server.crt

Explanation − Here, OpenSSL attempts to verify server.crt by building a chain from it back to one of the certificates contained within ca.pem. This file is crucial when you have a custom root or intermediate CA not installed by default in the system's trust store.
-CApath
Purpose − Alternatively to -CAfile, you can provide a directory containing trusted CA certificates. The directory must be organized in a specific hash-based naming format (often created by the c_rehash utility) so that OpenSSL can properly index the certificates.
Its syntax is as follows −
-CApath directory
Example −
openssl verify -CApath /etc/ssl/certs server.crt
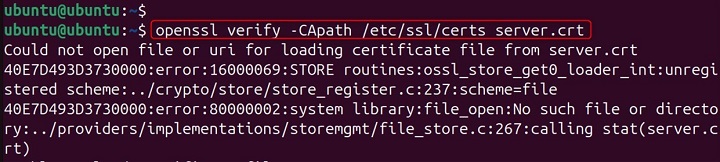
Explanation − This command tells OpenSSL to use all certificates in /etc/ssl/certs as trust anchors. This method is beneficial on systems that maintain a directory of trusted certificates rather than a single file.
-untrusted
Purpose − The -untrusted option is used to provide an additional set of certificates that are not directly trusted but are necessary as intermediates in the certificate chain. They help OpenSSL build a complete chain from the certificate you are verifying back to a trusted root provided by -CAfile or -CApath.
Its syntax is as follows −
-untrusted file
Example − If you have an intermediate certificate file called intermediate.pem −
openssl verify -CAfile ca.pem -untrusted intermediate.pem server.crt

Explanation − Here, server.crt might be signed by an intermediate CA whose certificate is in intermediate.pem. By supplying this file, you allow OpenSSL to complete the chain when checking against the CA certificates in ca.pem.
-purpose
Purpose − This option limits the verification to certificates that are appropriate for a particular purpose. Valid purpose options include (but may not be limited to) values such as "sslclient", "sslserver", "nssslserver", "smimesign", "smimeencrypt", "crlsign", etc.
Its syntax is as follows −
-purpose purpose
Example − To verify that the certificate is valid for an SSL server −
openssl verify -purpose sslserver -CAfile ca.pem server.crt

Explanation − This instructs OpenSSL not only to check the certificate's basic validity but also to ensure that the certificate's Key Usage and Extended Key Usage extensions permit it to be used as an SSL server certificate.
-attime
Purpose − The -attime option tells OpenSSL to verify the certificate as if the current time were the specified timestamp. This is useful when you want to check whether a certificate was valid at a specific point in the past or will be valid at some future time. The timestamp format is often Unix time (seconds since the Epoch).
Its syntax is as follows −
-attime timestamp
Example − To verify a certificate's validity at a given timestamp (say, 1609459200, which corresponds to January 1, 2021) −
openssl verify -attime 1609459200 -CAfile ca.pem server.crt

Explanation − The command simulates the verification process as though the system time were January 1, 2021. This is especially useful in auditing historical logs or planning future certificate rotations.
-crl_check and -crl_check_all
Its syntax is as follows −
-crl_check
-crl_check_all
Purpose − These options instruct OpenSSL to perform a Certificate Revocation List (CRL) check during the verification process.
- -crl_check − Validates that none of the certificates in the chain (excluding the root) have been revoked according to the CRL distribution points included in the certificate.
- -crl_check_all − Performs the CRL check on all certificates in the chain, even the intermediate ones.
Example −
openssl verify -CAfile ca.pem -crl_check server.crt

Explanation − If the certificate or any intermediate in its chain has been revoked, verification will fail. This provides additional security, ensuring that certificates no longer considered valid by their issuer are not trusted.
-verbose
Purpose − Activating verbose mode causes OpenSSL to print additional diagnostic information during the verification process. It may show details about each step of chain building, the reason for any failure, and other helpful debugging information.
Example −
openssl verify -verbose -CAfile ca.pem server.crt

Explanation − If verification fails unexpectedly, the verbose output can be invaluable in determining what went wrong by logging each decision made by the verification engine.
Examples of verify Command in Linux
In this section, we have provided a set of examples to illustrate the typical scenarios with "openssl verify".
Verifying a Basic Certificate
Suppose you have a certificate server.crt and a trusted certificate file ca.pem. Verify the certificate by running −
openssl verify -CAfile ca.pem server.crt
If it fails, you might receive messages like "unable to get local issuer certificate".
Using an Untrusted Intermediate
If your server certificate is signed by an intermediate CA that is not in your trusted CA file, provide it with the -untrusted option. For example −
openssl verify -CAfile ca.pem -untrusted intermediate.pem server.crt

This tells OpenSSL to use the certificates in intermediate.pem as building blocks for the certificate chain. OpenSSL will then use the CA certificates in ca.pem as trust anchors.
Verifying for a Specific Purpose
To ensure that server.crt is valid for SSL server use, include the -purpose option −
openssl verify -purpose sslserver -CAfile ca.pem server.crt

If the certificate isn't intended for SSL server usage (for instance, if it is only permitted for client authentication), the verification will fail.
Verifying at a Specific Time
To verify whether a certificate was valid on January 1, 2021 (Unix timestamp 1609459200) −
openssl verify -attime 1609459200 -CAfile ca.pem server.crt

It simulates the conditions of that date and time, allowing you to assess whether the certificate was valid retrospectively.
Conclusion
The "openssl verify" command is a powerful and versatile tool for certificate validation on Linux systems. Whether you're verifying that a web server's certificate can be trusted, ensuring that a certificate was valid at a given time, or debugging complex certificate chain issues, the array of options available lets you tailor the verification process to your needs.
