apachectl Command in Linux
The apachectl command is your trusty companion for managing the Apache HTTP server in Linux. It acts as a control interface, allowing you to start, stop, restart, and configure the server with ease. The "apachectl" command is a powerful and versatile tool for managing the Apache HTTP Server. It acts as a control interface for the server, providing administrators with a convenient way to perform various server operations.
Apache is one of the most popular web servers in the world, known for its versatility and compatibility with various operating systems, including Linux. Whether you're setting up a personal blog or a corporate website, Apache serves as a robust platform to host your content.
This comprehensive guide will explain the "apachectl" command in detail, exploring its options and providing detailed examples to illustrate its capabilities.
Table of Contents
- Understanding apachectl Command in Linux
- Prerequisites: Install Apache in Linux
- Apachectl Common Options and Examples
Understanding apachectl Command in Linux
The "apachectl" command is essentially a front-end to the "httpd" daemon, which is the core of the Apache HTTP Server. It simplifies the process of controlling the server by wrapping complex server operations into straightforward commands. apachectl operates in two primary modes −
Simple Front-End − It sets necessary environment variables and invokes the httpd daemon (the actual Apache server process) along with any provided arguments.
SysV init Script − It functions like a system startup script, taking one-word commands like start, stop, and restart and translating them into appropriate signals for httpd.
Prerequisites: Install Apache in Linux
Before proceeding with the installation, ensure that you have a regular, non-root user account with sudo privileges set up on your server. It's also recommended to have a basic firewall configured to block non-essential ports.
Step 1: Update the Local Package Index
Start by updating your package manager's database to ensure you have access to the latest versions of packages −
sudo apt update
Step 2: Install Apache in Linux
With the package index updated, you can install Apache using the following command −
sudo apt install apache2
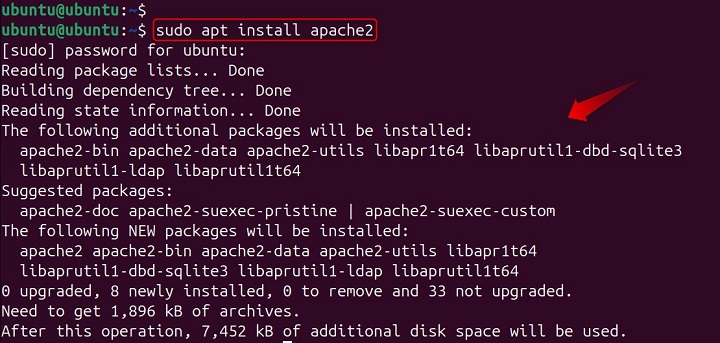
After confirming the installation, your system will install Apache along with any required dependencies.
Step 3: Adjust the Firewall
To allow web traffic to your server, you'll need to adjust the firewall settings. If you're using UFW (Uncomplicated Firewall), you can enable Apache like so
- Apache (For HTTP) − Opens only 80.
- Apache Secure (For HTTPS) − Opens only 443.
- Apache Full (HTTP and HTTPS both) − Opens both 80 and 443 −
sudo ufw allow 'Apache'
sudo ufw allow 'Apache Full'
sudo ufw allow 80

Verify the changes with −
sudo ufw enable
sudo ufw reload
sudo ufw status
Step 4: Verify Installation
After the installation, you can verify that Apache is running by requesting your server's IP in a web browser, which should display the default Apache landing page.
xdg-open http://localhost
Step 5: Manage Apache Process
With Apache installed, you can manage the web server process using the following commands −
sudo systemctl start apache2 #Start Apache
sudo systemctl stop apache2 #Halt/Stop the Apache Daemon
sudo systemctl enable apache2 #Enable Apache to start auto
sudo systemctl disable apache2 #Disable Apache Daemon

sudo systemctl status apache2 #Check the Status
sudo systemctl reload apache2 #Reload the Apache Configurations

Step 6: Configure Virtual Hosts (Optional)
For hosting multiple websites on a single server, you can set up virtual hosts. This involves creating configuration files for each site and pointing them to different directories where your website files are located.
sudo mkdir /var/www/your-domain
sudo chown -R $USER:$USER /var/www/your-domain
sudo chmod -R 755 /var/www/your-domain
sudo nano /var/www/your-domain/index.html
sudo apache2ctl configtest
sudo systemctl reload apache2
Additional Notes
Always use sudo before apachectl commands as they require administrative privileges.
Refer to your specific Linux distribution documentation for any slight variations in apachectl behavior. By mastering these apachectl options, you gain confident control over your Apache web server in Linux, ensuring it runs smoothly and efficiently.
Apachectl Common Options and Examples
The "apachectl" command is a powerful and versatile tool for managing the Apache HTTP Server. It acts as a control interface for the server, providing administrators with a convenient way to perform various server operations.
Here are some of the most commonly used "apachectl" options −
| Option | Description |
|---|---|
| -D name | This option is used to define a name for use in "<IfDefine name>" directives within the configuration files. It allows for conditional execution of directives based on the presence of the specified name. |
| -d directory | With this option, you can specify an alternate initial "ServerRoot". The "ServerRoot" is the top-level directory of the Apache server's configuration, where it looks for global configuration files. |
| -f file | This allows you to specify an alternate "ServerConfigFile", which is the main configuration file for the server, typically named "httpd.conf". |
| -C "directive" | This option processes a particular directive before reading the configuration files. It's useful for setting conditions or defining variables that need to be in place before the server reads its configuration. |
| -c "directive" | Similar to "-C", this processes the directive after the configuration files have been read. |
| -e level | This option shows startup errors of a specified level. The level corresponds to the "LogLevel" directive, which defines the verbosity of error messages. |
| -E file | With -E, you can log startup errors to a specific file, which can be helpful for debugging purposes. |
| -v | This simply shows the version number of the Apache server. |
| -V | This option is more verbose than "-v", showing the compile settings of the Apache server, which includes information such as compiler flags, modules included, and more. |
| -h | This lists all the available command line options for "apachectl", essentially providing a help page. |
| -l | Lists all the compiled-in modules for the server. This is useful to verify which modules are available in your Apache installation. |
| -L | Lists all available configuration directives. This can be used to review which directives can be used within the configuration files. |
| -t -D DUMP_VHOSTS | Shows the parsed virtual host (vhost) settings. This is crucial for debugging issues with vhost configurations. |
| -t -D DUMP_RUN_CFG | Shows the parsed run settings of the server. |
| -S | This is a synonym for -t -D DUMP_VHOSTS -D DUMP_RUN_CFG, combining both options for a comprehensive overview. |
| -t -D DUMP_MODULES | Displays all loaded modules within the Apache server. |
| -M | A synonym for -t -D DUMP_MODULES, providing a quick way to list all active modules. |
| -t -D DUMP_INCLUDES | Shows all included configuration files, which is helpful for understanding the full scope of the server's configuration. |
| -t | Runs a syntax check for configuration files, ensuring there are no errors before the server is started or restarted. |
| -T | Starts the server without a "DocumentRoot(s)" check. This can be useful in certain debugging scenarios. |
| -X | Starts the server in debug mode, which runs only one worker and does not detach from the console. This mode is intended for debugging in a development environment. |
Checking Server Status
Use this command to view a summary of the server's current state, including uptime, worker processes, and resource usage −
apachectl status

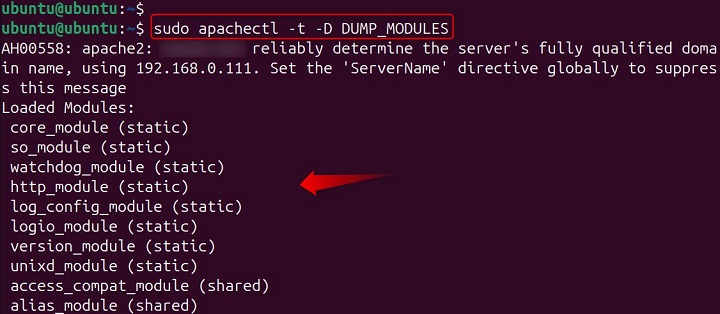
Displaying Loaded Modules
This command shows a list of all modules currently loaded by the Apache server. This provides a concise list of all loaded Apache modules, both compiled-in and dynamically linked −
sudo apachectl -M
sudo apachectl -t -D DUMP_MODULES
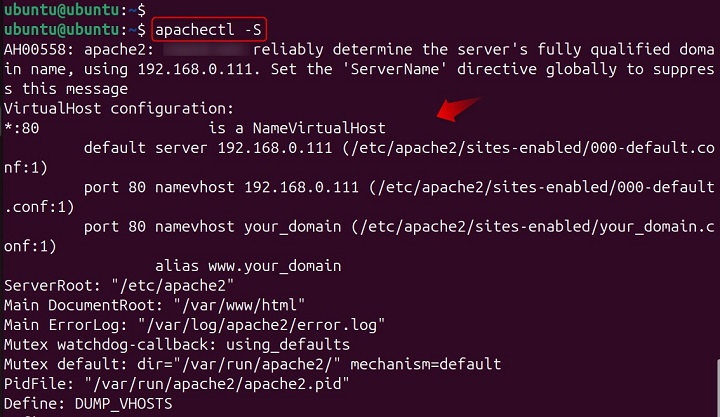
Viewing Virtual Host Configuration (if applicable)
If you have virtual hosts configured, use this command to see the parsed settings for them −
sudo apachectl -S
sudo apachectl -t -D DUMP_VHOSTS
Debugging with Debug Mode
This option is for advanced users. It starts the server in a special mode with only one worker process and doesn't detach from the terminal, allowing for more detailed debugging −
sudo apachectl -X

This initiates the Apache server if it's not already running.
sudo apachectl start
sudo systemctl start apache2

If users find any error, install lynx using the sudo apt install lynx command in Linux.
Viewing Server Status
"apachectl" can also provide status reports from the server, which require "mod_status" to be enabled −
apachectl

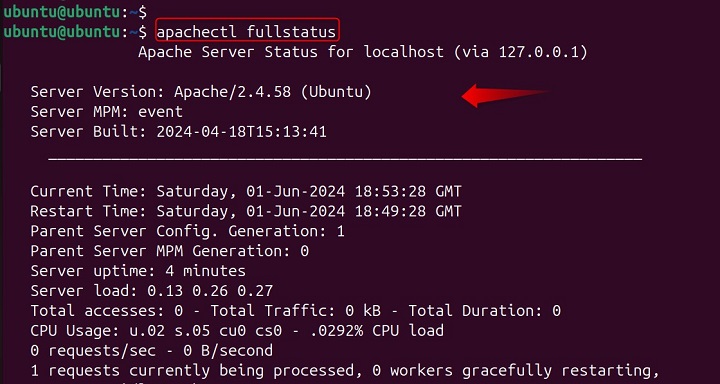
A full status report −
apachectl status  # A brief status report
apachectl fullstatus
Check Configuration Syntax
This meticulously examines the Apache configuration files for syntax errors. It's recommended to run this before restarting, especially after making configuration changes.
sudo apachectl configtest

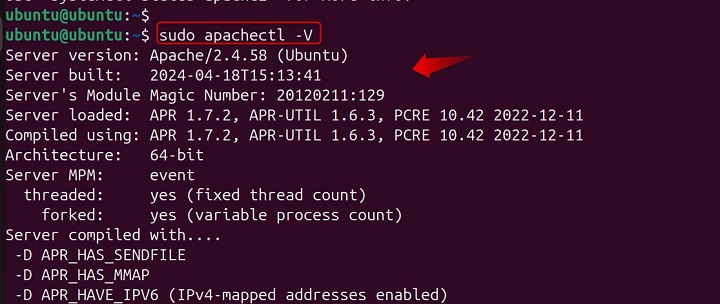
Check Apache Version
To check version of Apache, use the V option −
sudo apachectl -V
Stop Apache
This gracefully halts the server, allowing existing connections to finish before shutting down completely.
sudo apachectl stop
Restart Apache
This gracefully restarts the server, combining a stop and start sequence. It also performs a configuration syntax check (configtest) before restarting to ensure everything is in order −
sudo apachectl restart
Graceful Stop (Similar to stop)
This gracefully stops the server, ensuring a clean shutdown. A graceful restart, which tells the server to reload its configuration files and restart without interrupting current connections −
sudo apachectl graceful (or -k graceful)
Foreground Mode
This starts Apache in the foreground, allowing you to see its console output in real-time (useful for debugging).
sudo apachectl foreground (or -f)
Specify Configuration File: (Use with Caution)
This allows you to launch Apache using a non-standard configuration file (replace /path/to/custom.conf with the actual file path).
sudo apachectl -f /path/to/custom.conf start
Advanced Usage
Beyond the basic start, stop, and restart commands, "apachectl" allows for more advanced operations. For example, you can specify a different configuration file when starting the server −
apachectl -f /path/to/custom/httpd.conf
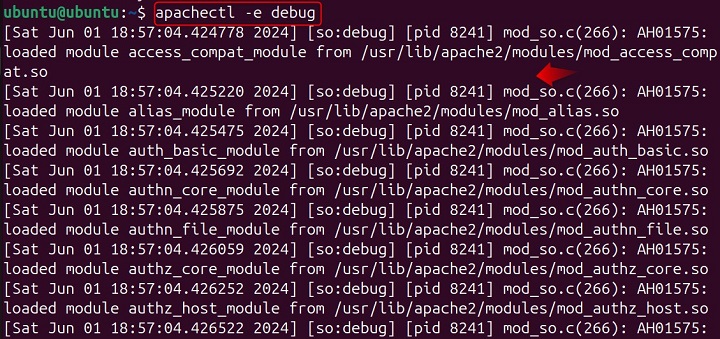
Or you can temporarily increase the LogLevel to debug for troubleshooting −
apachectl -e debug
Changing the DocumentRoot Temporarily
To test a new website layout without altering the default DocumentRoot −
httpd -k start -c "DocumentRoot /path/to/new/root"
These examples only scratch the surface of what "apachectl" can do. For a deeper dive into its capabilities, the official Apache documentation provides a wealth of information and examples.
Here are some of the other used apachectl options −
- "start" − Launches the Apache HTTP Server.
- "stop" − Halts the server.
- "restart" − Restarts the server, first checking the configuration files for errors.
- "fullstatus" − Provides a comprehensive status report from "mod_status", requiring a text-based browser like lynx.
- "status" − Offers a brief status report.
- "graceful" − Restarts the server without aborting open connections, ideal for log rotation scripts.
- "configtest" − Checks the configuration files for syntax errors.
Conclusion
The "apachectl" command is an indispensable tool for Apache HTTP Server administrators. Its range of options and ease of use make it ideal for both routine and advanced server management tasks. By understanding and utilizing the full potential of "apachectl", administrators can ensure their servers are running smoothly and efficiently.
For more detailed information and additional options, you can refer to the official Apache documentation or explore practical tips from experienced users. Remember, always test new configurations in a controlled environment before applying them to a production server to avoid unexpected downtime.
