install Command in Linux
The install command in Linux copies files and sets their attributes. The attributes refer to the file properties that can be set during the copying process. These attributes include permissions, ownership, and timestamps. They ensure that when files are copied to their destination, they retain or are assigned the correct permissions, ownership, and security settings required for the system or application to function correctly.
The install command is commonly used for installing binaries and files, typically after compiling software, but it should not be confused with a package manager like yum or apt.
Table of Contents
Here is a comprehensive guide to the options available with the Linux install command −
Syntax of install Command
The syntax of the install command is as follows −
install [options] <source> <dest>
The [options] field allows you to modify the command's behavior, while the <source> argument specifies the file to be copied, and <dest> defines the destination path for that file.
install Command Options
The options of the install command are listed below −
| Flags | Options | Description |
|---|---|---|
| --backup[=CONTROL] | Create a backup of destination files | |
| -b | --backup | like --backup but does not accept an argument |
| -C | --compare | Only copy if source and destination differ in content, ownership, or permissions |
| -d | --directory | Treat arguments as directories and create them |
| -D | Create all leading directory components, then copy the source | |
| --debug | Explain the copy process (implies -v) | |
| -g GROUP | --group=GROUP | Set group ownership |
| -m MODE | --mode=MODE | Set file permissions (as in chmod) |
| -o OWNER | --owner=OWNER | Set file ownership (requires sudo permissions) |
| -p | --preserve-timestamps | Preserve source file timestamps |
| -s | --strip | Strip symbol tables |
| --strip-program=PROGRAM | Specify the program to strip binaries | |
| -S SUFFIX | --suffix=SUFFIX | Override the default backup suffix |
| -t DIRECTORY | --target-directory=DIRECTORY | Copy all sources into the directory. |
| -v | --verbose | Print each file/directory created |
| --preserve-context | Preserve SELinux security context | |
| -Z | Set the SELinux security context to the default type. | |
| --context[=CTX] | Set SELinux/SMACK security context to CTX | |
| --help | Display help and exit | |
| --version | Display version info and exit |
Examples of install Command in Linux
This section demonstrates the usage of the install command in Linux with examples.
Copying a File to a Directory
To copy a file to a directory, use the install command in the following way −
sudo install file.txt Documents/Source
The file is in the current working directory in the above command.

The file can also be copied by using its path. For example, to copy a file from the /mydocuments directory to the /Documents/Source directory, use the install command in the following way −
sudo install mydocuments/file.txt Documents/Source

Copying Multiple Files to a Directory
To copy multiple files to a directory, use the install command with the source filenames or paths and destination directory. For example, to copy file1.txt and file2.txt to the /Documents/Source directory, use the following command −
sudo install file1.txt file2.txt Documents/Source

Similarly, source file paths can also be used.
Copying a File while Setting its Permissions
Use the -m or --mode option to set permission while copying files. For example, to make the file read-only for the owner, group, and others, use 444 with the -m option −
sudo install -m 444 file.txt Documents/Source

Comparing the Files before Copying
To compare the files before copying, use the -C option −
sudo install -C file.txt Documents/Source
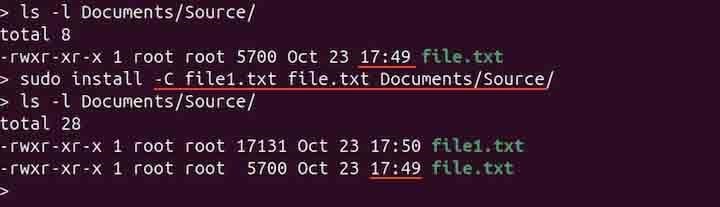
If the file is identical to the file present in the destination folder, then it will not be copied. The file will only be copied if there are differences in content, ownership, or permissions.
Copying a File while Preserving its Timestamps
To preserve timestamps of the source file, use the -p or --preserve option with the install command −
sudo install -p file.txt Documents/Source
The above command copies file.txt to /Documents/Source and preserves the original access and modification times.
Making a Backup
To make a backup of the file while copying, use the -b or --backup option −
sudo install -b file.txt Documents/Source
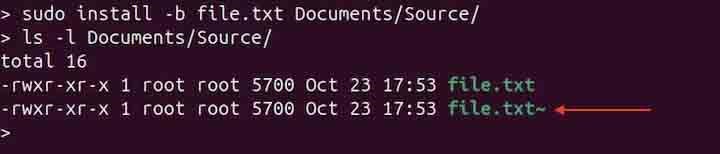
Note that the install command will only create a backup if the file already exists in the destination directory. A backup will be created with the tilde (~) suffix as shown in the output image.
Creating a Directory
The install command can also be used to create directories. For example, to create a directory with the name of mydirectory, use the -d or --directory option −
sudo install -d mydirectory
Getting Verbose Output
To get the verbose output, use the -v or --verbose option with the install command −
sudo install -v file.txt Documents/Source

It will display the name of each file or directory as it is copied.
Copying a File while Changing its Ownership
To copy the file while changing the ownership, use the -o or --owner option.
sudo install -o alex file.txt Documents/Source
To verify the ownership, use the ls command −

Copying a File while Setting its SELinux Context
To copy a file named file.txt to the Documents/Source directory and set its SELinux context to user_home_t, use the --context option −
sudo install --context=user_home_t file.txt Documents/Source
After copying, check the SELinux context of the copied file using the -Z option with the ls command −
ls -Z Documents/file.txt
Note: The above command requires a SELinux-enabled kernel.
Displaying Help
To display a brief help related to the command, use the --help option with the command −
install --help
Conclusion
The install command in Linux is a handy tool for copying files while setting essential attributes such as permissions, ownership, and timestamps. It is particularly useful for installing binaries and files post-compilation.
With options for creating backups, comparing files, preserving timestamps, and changing ownership, the install command ensures that files are correctly configured for proper functionality within the system.
This tutorial explained the install command in detail including its syntax, options, and usage in Linux with examples.
