hdparm Command in Linux
The hdparm command is a versatile tool you can use to view the hardware parameters of hard disk drives (HDDs) and solid-state drives (SSDs). You can also use the command-line utility for tuning performance, managing power settings, and troubleshooting disk issues.
hdparm interacts with the Linux ATA/IDE device driver subsystem and utilizes various IOCTL (input/output control) commands to manage hard drives. This allows you to perform a range of operations on your hard drives, from querying information to setting parameters.
Some hdparm features may require the latest kernel or specific kernel configurations to function properly. Therefore, it is a good practice to ensure your system is running up-to-date for optimal compatibility.
hdparm relies on IOCTL to communicate with the drives. Some options may behave differently based on the drive model, firmware, and specific Linux kernel version. For the best results, compile hdparm with the include files from the latest kernel source code. This ensures compatibility and access to the latest features and fixes.
In addition, most hdparm commands require root or sudo privileges. Changing hard drive parameters can affect system stability and performance. Use these commands carefully and ensure you understand their impact. Besides that, some operations, especially secure erase, can permanently delete data. Always back up important data before proceeding.
Table of Contents
Here is a comprehensive guide to the options available with the hdparm command −
- Syntax for the hdparm Command
- Options Available for the hdparm Command
- Examples of hdparm Command in Linux
Syntax for the hdparm Command
The following is the general syntax for the hdparm command −
hdparm [options] [device]
Options Available for the hdparm Command
The following is a list of hdparm options alongside their descriptions:
| Tag | Desciption |
|---|---|
| -a | Get or set the sector count for filesystem read-ahead. This feature prefetches additional blocks of data during sequential reads to improve performance, particularly for large files. The default setting is 8 sectors (4KB), which is suitable for most cases. However, for systems with random file accesses, a smaller setting may perform better. Many IDE drives also have built-in read-ahead features, potentially reducing the need for this option. |
| -A | Enable or disable the drive's read-lookahead feature, which is usually turned on by default. Use -A0 to disable and -A1 to enable. |
| -b | Get or set the bus state for the drive. |
| -B | Set the Advanced Power Management (APM) feature if the drive supports it. A low value means more aggressive power saving, while a high value prioritizes performance. Setting it to 255 disables APM entirely. |
| -c | Query or enable (E)IDE 32-bit I/O support. You can use numeric values to enable (1) or disable (0) 32-bit data transfers. Value 3 enables 32-bit transfers with a special sync sequence, compatible with most chipsets but incurs slight overhead. |
| -C | Check the current IDE power mode of the drive, which can indicate whether the drive is active, in standby, or sleeping. The -S, -y, -Y, and -Z flags can be used to manipulate the IDE power modes. |
| -d | Enable or disable the "using_dma" flag for the drive. Enabling DMA (Direct Memory Access) typically improves performance by allowing the drive to transfer data without CPU intervention. Use alongside the -X option to ensure the drive is set to the correct DMA mode. |
| --direct | Use the kernel's O_DIRECT flag during timing tests, which allows for raw I/O operations. This bypasses the page cache, providing a more accurate measurement of the drive's performance without the influence of cached dat |
| -D | Enable or disable on-drive defect management. This feature allows the drive's firmware to manage defective sectors by relocating them to reserved spare sectors, enhancing reliability. |
| -E | Set the speed of a CD-ROM drive. While not needed for standard operation, it allows manual control over the speed for testing or specific use cases. But if you want to play with it, just supply a speed number after the option, usually a number like 2 or 4. |
| -f | Sync and flush the buffer cache for the device on exit. This operation is also performed as part of the -t and -T timings. |
| -g | Display the drive geometry (cylinders, heads, sectors), the size (in sectors) of the device, and the starting offset (in sectors) of the device from the beginning of the drive. |
| -h | Display terse usage information (help). |
| -i | Display identification information retrieved from the drive at boot time. This may not reflect current state if the drive has changed since booting. |
| -l | Request identification info directly from the drive, which is displayed in a new expanded format with considerably more detail than with the older -i flag. |
| --Istdin | Accept a drive identification block from standard input instead of a device file. This allows for processing identification information from other sources, useful for libraries of drive data. |
| --Istdout | This option simply dumps the identify data in hex to stdout, in a format similar to that from /proc/, and suitable for later use with the --Istdin option. |
| -k | Get or set the keep_settings_over_reset flag for the drive. When enabled, this flag allows the drive to retain certain settings after a soft reset. It's advised to use this option cautiously. |
| -K | Set the keep_features_over_reset flag, which enables the drive to retain specific settings across resets. Not all drives support this feature. |
| -L | Set the drive's doorlock flag. Setting this to 1 will lock the door mechanism of some removable hard drives (eg. Syquest, ZIP, Jazz..), and setting it to 0 will unlock the door mechanism. |
| -m | Get or set the sector count for multiple sector I/O operations. This feature allows transferring multiple sectors in a single I/O operation, reducing overhead and potentially increasing throughput. Values of 2, 4, 8, or 16 are common, but some drives may perform better with specific settings. |
| M | Get or set the Automatic Acoustic Management (AAM) setting, which adjusts head movement speed to reduce noise. Values range from 0 (off) to 254 (fastest). Most drives support basic quiet/fast options. |
| -n | Get or set the "ignore write errors" flag in the driver. Do NOT play with this without grokking the driver source code first. |
| -p | Attempt to set or auto-tune the PIO (Programmed Input/Output) mode for the IDE interface. This can optimize performance but may cause instability if not compatible with the hardware. |
| -P | Set the maximum sector count for the drive's internal prefetch mechanism. Not all drives support this feature. |
| -q | Handle the next flag quietly, suppressing normal output. This is useful for reducing screen clutter when running from system startup scripts. Not applicable to the -i or -v or -t or -T flags. |
| -Q | Set tagged queue depth (1 or greater), or turn tagged queuing off (0). This only works with the newer 2.5.xx (or later) kernels, and only with the few drives that currently support it. |
| -r | Get/set read-only flag for the device. When set, Linux disallows write operations on the device. |
| -R | Register an IDE interface. Dangerous. See the -U option for more information. |
| -S | Set the standby (spindown) timeout for the drive. This determines how long the drive waits without activity before turning off to save power. Various values represent different timeout periods. |
| -T | Perform timing tests for cache reads, providing insights into the system's throughput without accessing the disk. |
| -t | Conduct timing tests for device reads, measuring how fast the drive can read data directly. This provides a benchmark for drive performance under normal operating conditions. |
| -u | Get or set the interrupt-unmask flag for the drive, which can improve system responsiveness but may risk data integrity in some configurations. |
| -U | Un-register an IDE interface, also a dangerous operation. This should be done with caution as it can lead to system instability. |
| -v | Display all current settings for the drive, which is the default action if no other flags are specified. |
| -w | Perform a device reset, a dangerous operation that can lead to data loss or corruption. Use only as a last resort. |
| -W | Enable or disable the drive's write-caching feature. This setting can influence write performance but may also risk data loss in the event of a power failure. |
| -x | Tristate the device for hot-swapping, which is a potentially risky operation. |
| -X | Set the IDE transfer mode for (E)IDE/ATA drives. This is generally used alongside the DMA setting to optimize data transfer speeds. Exercise caution when changing modes |
| -y | Force the drive into standby mode, causing it to spin down to save power. |
| -Y | Force the drive into sleep mode, where it shuts down completely and requires a reset to access again. |
| -z | Force the kernel to re-read the partition table for specified devices, useful after making changes to the disk layout. |
| -Z | Disable the automatic power-saving function of certain Seagate drives (ST3xxx models?), to prevent them from idling/spinning-down at inconvenient times. |
Examples of hdparm Command in Linux
The following are some practical examples of how you can use the hdparm command to perform disk operations −
Get Device Information
To retrieve detailed identification information about a device, such as model number, serial number, and firmware version, you can use the following syntax −
sudo hdparm -I /dev/sda

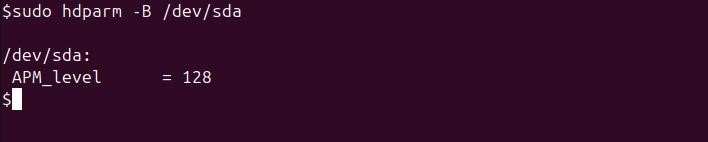
Check Power Management Level
Checking the Advanced Power Management (APM) level of your device can enable you to optimize power consumption if necessary. To check the current APM level, you can use −
sudo hdparm -B /dev/sda
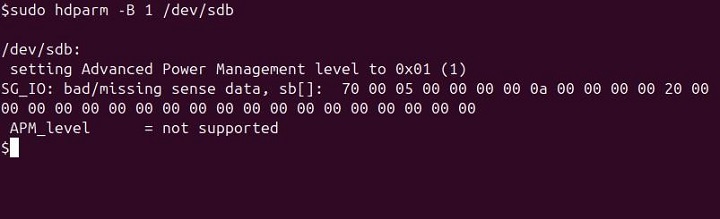
Set Power Management Level
To set the Advanced Power Management (APM) level of your hard drive to the most aggressive power-saving mode, you can use the following command −
sudo hdparm -B 1 /dev/sdb
-B 1: Sets the APM level to 1, which is the most aggressive power-saving mode. This can help save power but might reduce performance and increase wear on the drive due to frequent spin-downs.
Display Current Power Mode
To check the current power mode status of your hard drive, you can simply run the following command −
sudo hdparm -C /dev/sda
This command shows whether your device is currently active, idle, or in standby mode.

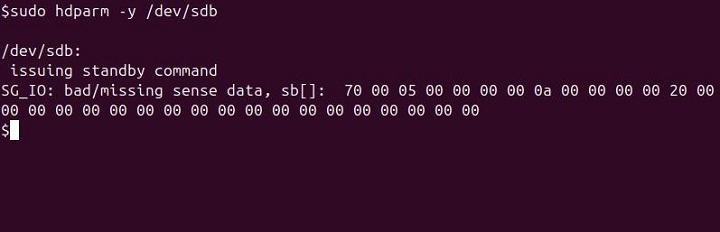
Force a Drive to Enter Standby Mode
To force a drive to enter standby mode, you can use the hdparm command with the “-y” option −
sudo hdparm -y /dev/sdb
This command puts the drive into standby mode, which can help save power and reduce wear on the drive.
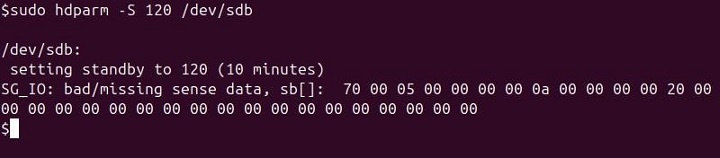
Put the Drive into Idle Mode and Set its Standby Timeout
To put a drive into idle (low-power) mode and set its standby timeout, you can use the hdparm command with the “-S” option −
sudo hdparm -S 120 /dev/sdb
This command puts the drive into idle mode and sets it to enter standby mode after 10 minutes of inactivity.
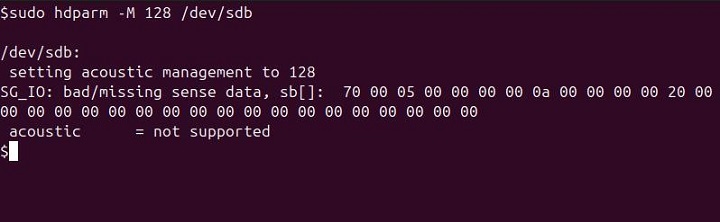
Set Acoustic Management
To set the Acoustic Management level of your drive, you can use the hdparm command with the “-M” option as shown −
sudo hdparm -M 128 /dev/sda
In this command, 128 is the value for the Acoustic Management level. Values range from 0 (quietest) to 254 (fastest). A value of 128 is typically a balance between noise and performance.
Display Drive Geometry
To display the drive’s geometry, which includes details like the number of cylinders, heads, sectors, and the total size of the drive, you can use the hdparm command with the “-g” option −
sudo hdparm -g /dev/sdb

Conclusion
The hdparm command offers powerful functionalities for managing and fine-tuning SATA and IDE hard drives. Its array of options enables users to optimize performance, control power management settings, and conduct performance assessments.
However, it is essential to approach certain options, particularly those related to the ATA Security Feature Set, with caution. Features such as setting or disabling passwords, erasing data, and locking drives are marked as experimental and potentially dangerous.
Misuse of these commands can lead to irreversible data loss or render the drive inaccessible, particularly if the commands do not align with the current kernel or drive capabilities. Therefore, while hdparm is a valuable tool, you should thoroughly understand each option and exercise care to ensure their data and drives remain secure and functional.
