- Selenium - Home
- Selenium - Overview
- Selenium - Components
- Selenium - Automation Testing
- Selenium - Environment Setup
- Selenium - Remote Control
- Selenium - IDE Introduction
- Selenium - Features
- Selenium - Limitations
- Selenium - Installation
- Selenium - Creating Tests
- Selenium - Creating Script
- Selenium - Control Flow
- Selenium - Store Variables
- Selenium - Alerts & Popups
- Selenium - Selenese Commands
- Selenium - Actions Commands
- Selenium - Accessors Commands
- Selenium - Assertions Commands
- Selenium - Assert/Verify Methods
- Selenium - Locating Strategies
- Selenium - Script Debugging
- Selenium - Verification Points
- Selenium - Pattern Matching
- Selenium - JSON Data File
- Selenium - Browser Execution
- Selenium - User Extensions
- Selenium - Code Export
- Selenium - Emitting Code
- Selenium - JavaScript Functions
- Selenium - Plugins
- Selenium WebDriver Tutorial
- Selenium - Introduction
- Selenium WebDriver vs RC
- Selenium - Installation
- Selenium - First Test Script
- Selenium - Driver Sessions
- Selenium - Browser Options
- Selenium - Chrome Options
- Selenium - Edge Options
- Selenium - Firefox Options
- Selenium - Safari Options
- Selenium - Double Click
- Selenium - Right Click
- HTML Report in Python
- Handling Edit Boxes
- Selenium - Single Elements
- Selenium - Multiple Elements
- Selenium Web Elements
- Selenium - File Upload
- Selenium - Locator Strategies
- Selenium - Relative Locators
- Selenium - Finders
- Selenium - Find All Links
- Selenium - User Interactions
- Selenium - WebElement Commands
- Selenium - Browser Interactions
- Selenium - Browser Commands
- Selenium - Browser Navigation
- Selenium - Alerts & Popups
- Selenium - Handling Forms
- Selenium - Windows and Tabs
- Selenium - Handling Links
- Selenium - Input Boxes
- Selenium - Radio Button
- Selenium - Checkboxes
- Selenium - Dropdown Box
- Selenium - Handling IFrames
- Selenium - Handling Cookies
- Selenium - Date Time Picker
- Selenium - Dynamic Web Tables
- Selenium - Actions Class
- Selenium - Action Class
- Selenium - Keyboard Events
- Selenium - Key Up/Down
- Selenium - Copy and Paste
- Selenium - Handle Special Keys
- Selenium - Mouse Events
- Selenium - Drag and Drop
- Selenium - Pen Events
- Selenium - Scroll Operations
- Selenium - Waiting Strategies
- Selenium - Explicit/Implicit Wait
- Selenium - Support Features
- Selenium - Multi Select
- Selenium - Wait Support
- Selenium - Select Support
- Selenium - Color Support
- Selenium - ThreadGuard
- Selenium - Errors & Logging
- Selenium - Exception Handling
- Selenium - Miscellaneous
- Selenium - Handling Ajax Calls
- Selenium - JSON Data File
- Selenium - CSV Data File
- Selenium - Excel Data File
- Selenium - Cross Browser Testing
- Selenium - Multi Browser Testing
- Selenium - Multi Windows Testing
- Selenium - JavaScript Executor
- Selenium - Headless Execution
- Selenium - Capture Screenshots
- Selenium - Capture Videos
- Selenium - Page Object Model
- Selenium - Page Factory
- Selenium - Record & Playback
- Selenium - Frameworks
- Selenium - Browsing Context
- Selenium - DevTools
- Selenium Grid Tutorial
- Selenium - Overview
- Selenium - Architecture
- Selenium - Components
- Selenium - Configuration
- Selenium - Create Test Script
- Selenium - Test Execution
- Selenium - Endpoints
- Selenium - Customizing a Node
- Selenium Reporting Tools
- Selenium - Reporting Tools
- Selenium - TestNG
- Selenium - JUnit
- Selenium - Allure
- Selenium & Other Technologies
- Selenium - Java Tutorial
- Selenium - Python Tutorial
- Selenium - C# Tutorial
- Selenium - Javascript Tutorial
- Selenium - Kotlin Tutorial
- Selenium - Ruby Tutorial
- Selenium - Maven & Jenkins
- Selenium - LogExpert Logging
- Selenium - Log4j Logging
- Selenium - Robot Framework
- Selenium - Github Tutorial
- Selenium - IntelliJ
- Selenium - XPath
- Selenium Miscellaneous Concepts
- Selenium - IE Driver
- Selenium - Automation Frameworks
- Selenium - Keyword Driven Framework
- Selenium - Data Driven Framework
- Selenium - Hybrid Driven Framework
- Selenium - SSL Certificate Error
- Selenium - Alternatives
- Selenium Useful Resources
- Selenium - Questions & Answers
- Selenium - Quick Guide
- Selenium - Useful Resources
- Selenium - Automation Practice
- Selenium - Discussion
Selenium - Quick Guide
Selenium - Overview
Introduction
Selenium is an open-source and a portable automated software testing tool for testing web applications. It has capabilities to operate across different browsers and operating systems. Selenium is not just a single tool but a set of tools that helps testers to automate web-based applications more efficiently.
Let us now understand each one of the tools available in the Selenium suite and their usage.
| Sr.No. | Tool & Description |
|---|---|
| 1 | Selenium IDE Selenium Integrated Development Environment (IDE) is a Firefox plugin that lets testers to record their actions as they follow the workflow that they need to test. |
| 2 | Selenium RC Selenium Remote Control (RC) was the flagship testing framework that allowed more than simple browser actions and linear execution. It makes use of the full power of programming languages such as Java, C#, PHP, Python, Ruby and PERL to create more complex tests. |
| 3 | Selenium WebDriver Selenium WebDriver is the successor to Selenium RC which sends commands directly to the browser and retrieves results. |
| 4 | Selenium Grid Selenium Grid is a tool used to run parallel tests across different machines and different browsers simultaneously which results in minimized execution time. |
Advantages of Selenium
QTP and Selenium are the most used tools in the market for software automation testing. Hence it makes sense to compare the pros of Selenium over QTP.
| Selenium | QTP |
|---|---|
| Selenium is an open-source tool. | QTP is a commercial tool and there is a cost involved in each one of the licenses. |
| Can be extended for various technologies that expose DOM. | Limited add-ons and needs add-ons for each one of the technologies. |
| Has capabilities to execute scripts across different browsers. | Can run tests in specific versions of Firefox , IE, and Chrome. |
| Can execute scripts on various operating systems. | Works only with Windows. |
| Supports mobile devices. | Supports mobile devices with the help of third-party tools. |
| Executes tests within the browser, so focus is NOT required while script execution is in progress. | Needs Focus during script execution, as the tool acts on the browser (mimics user actions). |
| Can execute tests in parallel with the use of Selenium Grids. | QTP cannot execute tests in parallel, however integrating QTP with QC allows testers to execute in parallel. QC is also a commercial tool. |
Disadvantages of Selenium
Let us now discuss the pitfalls of Selenium over QTP.
| Selenium | QTP |
|---|---|
| Supports only web based applications. | Can test both web and desktop applications. |
| No feature such as Object Repository/Recovery Scenario | QTP has built-in object repositories and recovery scenarios. |
| No IDE, so the script development won't be as fast as QTP. | More intuitive IDE; automation can be achieved faster. |
| Cannot access controls within the browser. | Can access controls within the browser such as favorites bar, backward, and forward buttons. |
| No default test report generation. | Default test result generation within the tool. |
| For parameterization, users has to rely on the programming language. | Parameterization is built-in and easy to implement. |
Selenium - IDE
The Selenium-IDE (Integrated Development Environment) is an easy-to-use Firefox plug-in to develop Selenium test cases. It provides a Graphical User Interface for recording user actions using Firefox which is used to learn and use Selenium, but it can only be used with Firefox browser as other browsers are not supported.
However, the recorded scripts can be converted into various programming languages supported by Selenium and the scripts can be executed on other browsers as well.
The following table lists the sections that we are going to cover in this chapter.
| Sr.No. | Title & Description |
|---|---|
| 1 | Download Selenium IDE
This section deals with how to download and configure Selenium IDE. |
| 2 | Selenium IDE Features
This section deals with the features available in Selenium IDE. |
| 3 | Creating Selenium IDE Tests
This section deals with how to create IDE tests using recording feature. |
| 4 | Selenium IDE Script Debugging
This section deals with debugging the Selenium IDE script. |
| 5 | Inserting Verification Points
This section describes how to insert verification points in Selenium IDE. |
| 6 | Selenium Pattern Matching
This section deals with how to work with regular expressions using IDE. |
| 7 | Selenium User Extensions
The Java script that allows users to customize or add new functionality. |
| 8 | Different Browser Execution
This section deals with how to execute Selenium IDE scripts on different browsers. |
Selenium - Environment Setup
In order to develop Selenium RC or WebDriver scripts, users have to ensure that they have the initial configuration done. Setting up the environment involves the following steps.
- Download and Install Java
- Download and Configure Eclipse
- Configure FireBug and FirePath
- Configure Selenium RC
- Configure Selenium WebDriver
Download and Install Java
We need to have JDK (Java Development Kit) installed in order to work with Selenium WebDriver/Selenium. Let us see how to download and install Java.
Step 1 − Navigate to the UR.
https://www.oracle.com/technetwork/java/javase/downloads/index.html
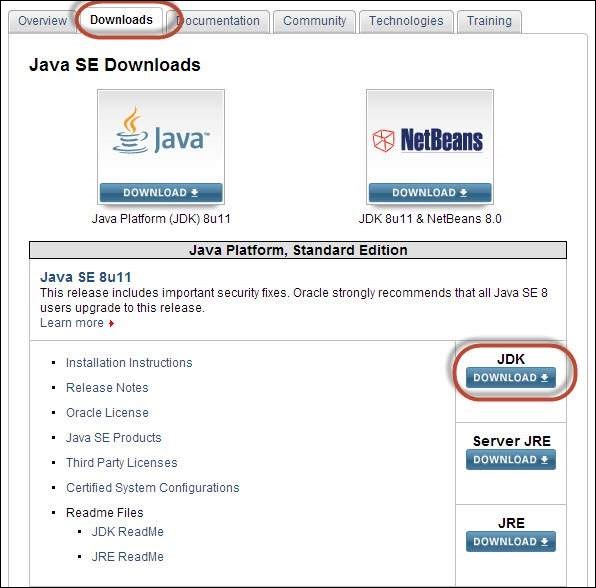
Step 2 − Go to "Downloads" section and select "JDK Download".
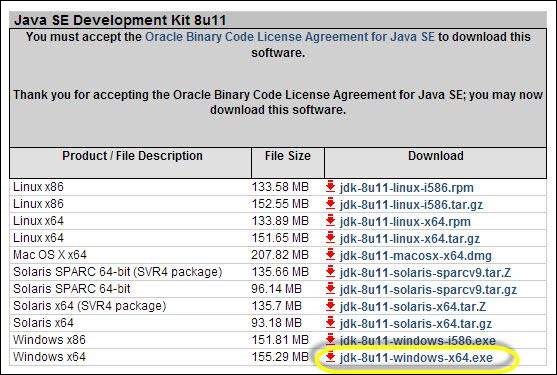
Step 3 − Select "Accept License Agreement" radio button.
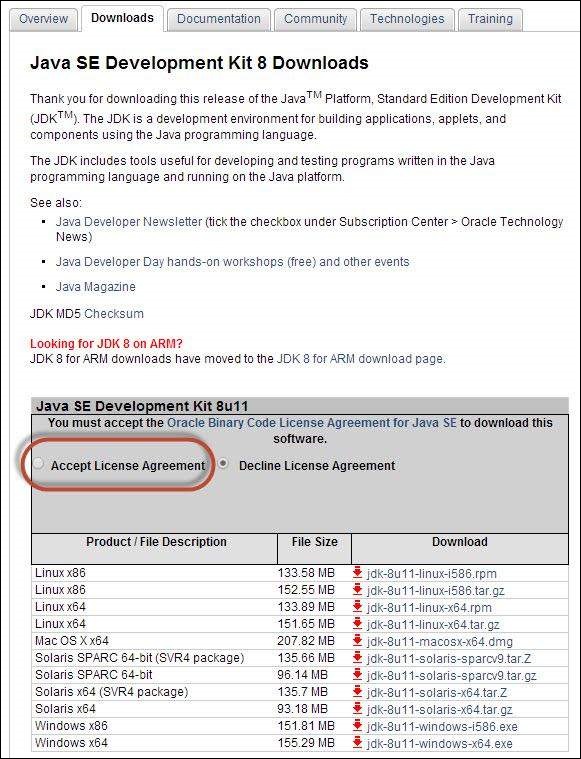
Step 4 − Select the appropriate installation. In this case, it is 'Windows 7-64' bit. Click the appropriate link and save the .exe file to your disk.
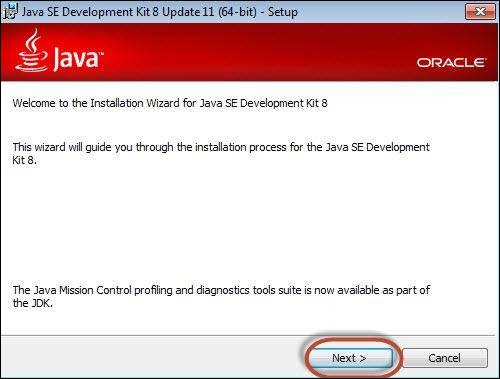
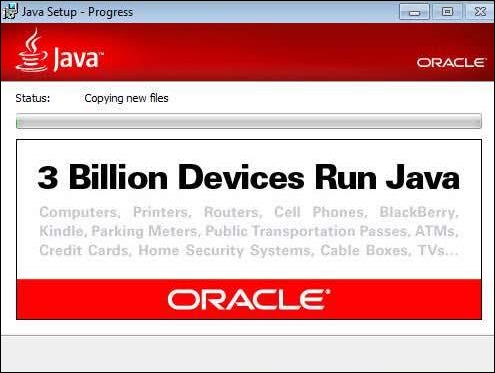
Step 5 − Run the downloaded exe file to launch the Installer wizard. Click 'Next' to continue.
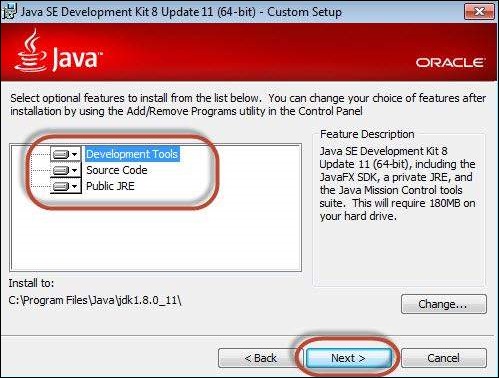
Step 6 − Select the features and click 'Next'.
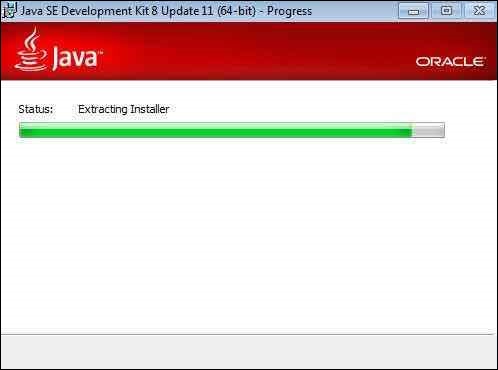
Step 7 − The installer is extracted and its progress is shown in the wizard.
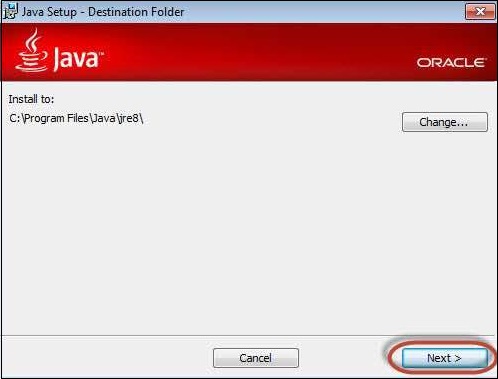
Step 8 − The user can choose the install location and click 'Next'.
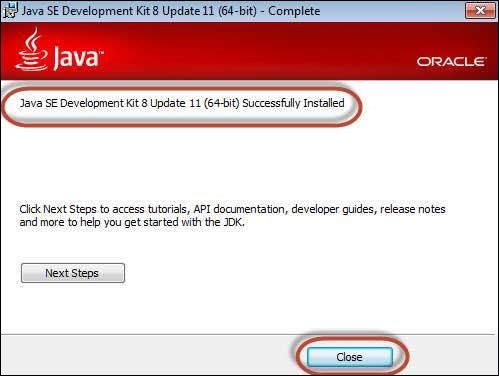
Step 9 − The installer installs the JDK and new files are copied across.
Step 10 − The Installer installs successfully and displays the same to the user.
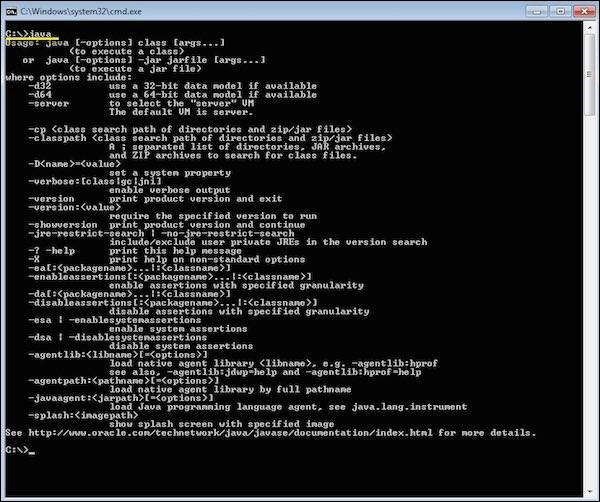
Step 11 − To verify if the installation was successful, go to the command prompt and just type 'java' as a command. The output of the command is shown below. If the Java installation is unsuccessful or if it had NOT been installed, it would throw an "unknown command" error.
Download and Configure Eclipse
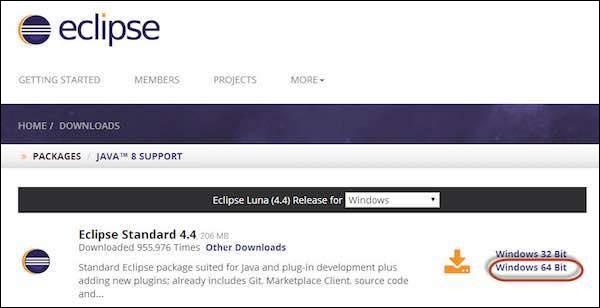
Step 1 − Navigate to the URL: https://www.eclipse.org/downloads/ and download the appropriate file based on your OS architecture.
Step 2 − Click the 'Download' button.
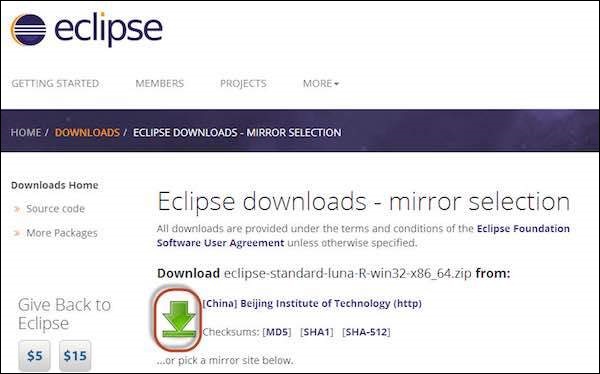
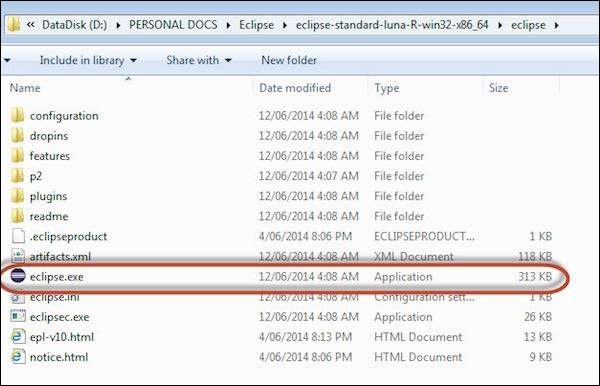
Step 3 − The download would be in a Zipped format. Unzip the contents.

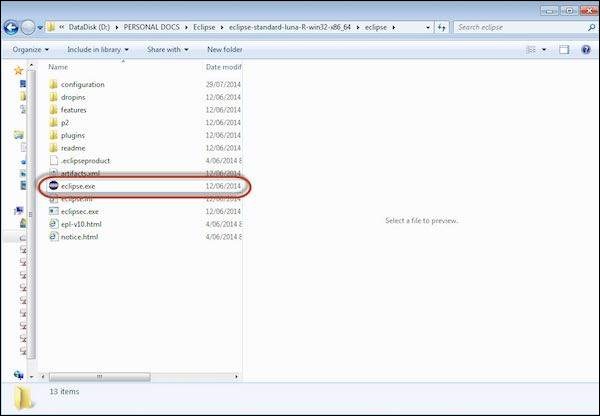
Step 4 − Locate Eclipse.exe and double click on the file.
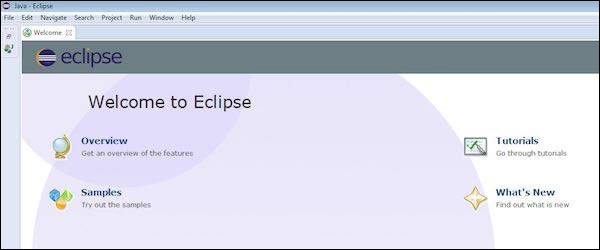
Step 5 − To configure the workspace, select the location where the development has to take place.

Step 6 − The Eclipse window opens as shown below.
Configure FireBug and FirePath
To work with Selenium RC or WebDriver, we need to locate elements based on their XPath or ID or name, etc. In order to locate an element, we need tools/plugins.
Step 1 − Navigate to the URL : https://addons.mozilla.org/en-US/firefox/addon/firebug-and-web-development/ and download plugin.
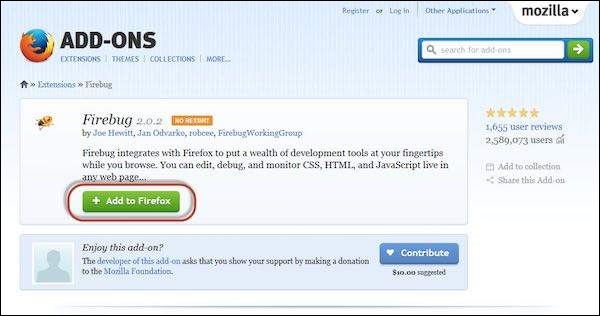
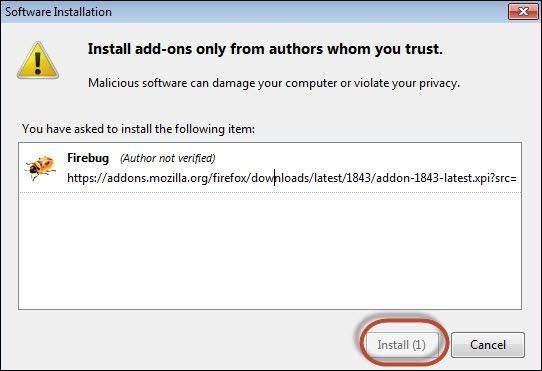
Step 2 − The add-on installer is shown to the user and it is installed upon clicking the 'Install' button.
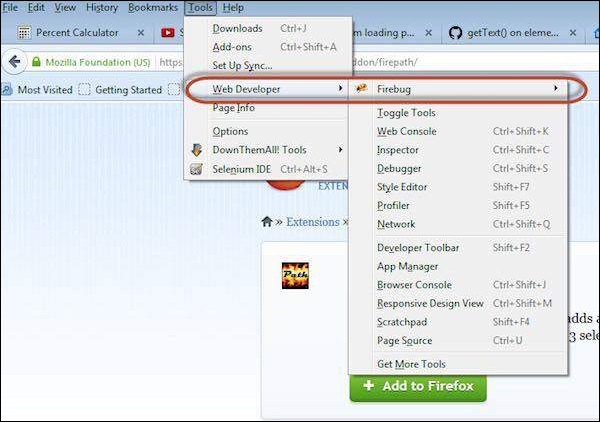
Step 3 − After installing, we can launch the plugin by navigating to "Web Developer" >> "Firebug".
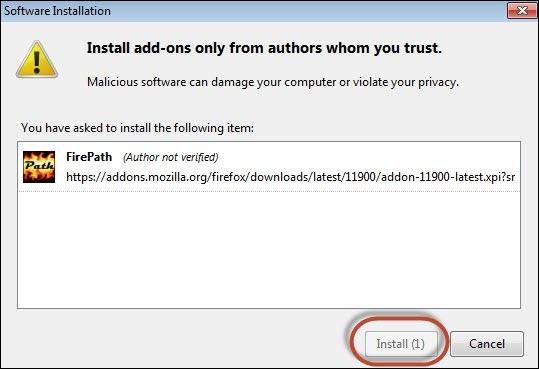
Step 4 − FirePath, a plugin that works within Firebug, helps users to grab the 'XPath' of an element. Install FirePath by navigating to "https://automationtestingqa.wordpress.com/firebug-and-firepath-addon-for-firefox/"

Step 5 − The add-on installer is shown to the user and it is installed upon clicking the 'Install' button.
Step 6 − Now launch "Firebug" by navigating to "Tools" >> "Webdeveloper" >> "Firebug".

Example
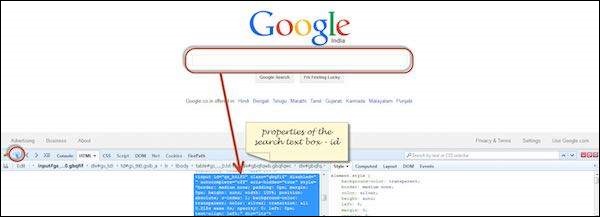
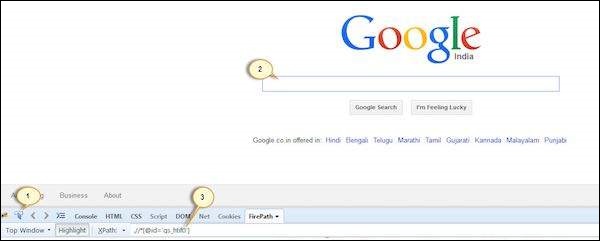
Now let us understand how to use FireBug and FirePath with an example. For demonstration, we will use www.google.com and capture the properties of the text box of "google.com".
Step 1 − First click on the arrow icon as highlighted in the following screenshot and drag it to the object for which we would like to capture the properties. The HTML/DOM of the object would be displayed as shown below. We are able to capture the 'ID' of the input text box with which we can interact.
Step 2 − To fetch the XPath of the object, go to 'firepath' tab and perform the following steps.
- Click the Spy icon.
- Select the Control for which we would like to capture the XPath.
- XPath of the selected control would be generated.
Configure Selenium RC
Now let us look at how to configure Selenium Remote control. We will understand how to develop scripts with Selenium RC in later chapters, however for now, we will understand just the configuration part of it.
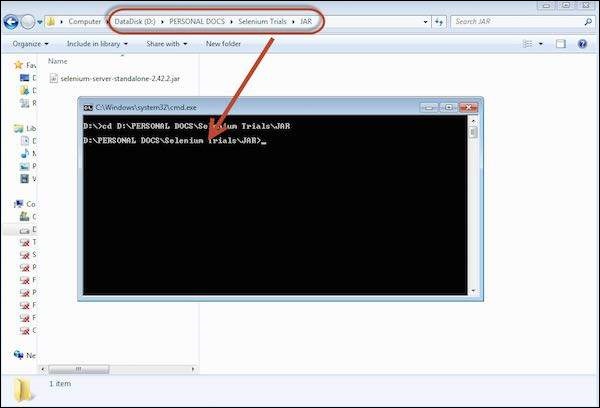
Step 1 − Navigate to the Selenium downloads section http://www.seleniumhq.org/download/ and download Selenium Server by clicking on its version number as shown below.

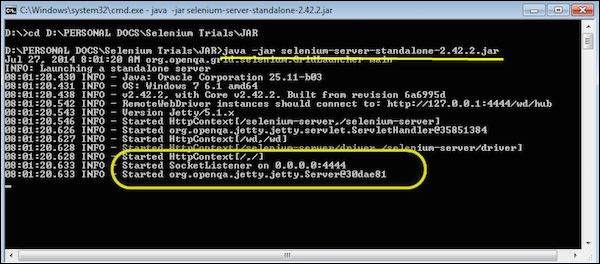
Step 2 − After downloading, we need to start the Selenium Server. To do so, open command prompt and navigate to the folder where the downloaded JAR file is kept as shown below.
Step 3 − To start the server, use the command 'java -jar <<downloaded jar name >> and if java JDK is installed properly, you would get a success message as shown below. Now we can start writing Selenium RC scripts.
Configure Selenium WebDriver
Now let us look at how to configure Selenium WebDriver. We will understand how to develop scripts with Selenium WebDriver in later chapters, however for now, we will understand just the configuration part of it.
Step 1 − Navigate to the selenium downloads section http://www.seleniumhq.org/download/ and download Selenium WebDriver by clicking on its version number as shown below.
Step 2 − The downloaded file is in Zipped format and one has to unzip the contents to map it to the project folder.
Step 3 − The Unzipped contents would be displayed as shown below. How to map it to the project folder and how to start scripting would be dealt in the webDriver chapter.
Selenium - Remote Control
What is Selenium RC?
Selenium Remote Control (RC) was the main Selenium project that sustained for a long time before Selenium WebDriver(Selenium 2.0) came into existence. Now Selenium RC is hardly in use, as WebDriver offers more powerful features, however users can still continue to develop scripts using RC.
It allows us to write automated web application UI tests with the help of full power of programming languages such as Java, C#, Perl, Python and PHP to create more complex tests such as reading and writing files, querying a database, and emailing test results.
Selenium RC Architecture
Selenium RC works in such a way that the client libraries can communicate with the Selenium RC Server passing each Selenium command for execution. Then the server passes the Selenium command to the browser using Selenium-Core JavaScript commands.
The browser executes the Selenium command using its JavaScript interpreter.

Selenium RC comes in two parts.
The Selenium Server launches and kills browsers. In addition to that, it interprets and executes the Selenese commands. It also acts as an HTTP proxy by intercepting and verifying HTTP messages passed between the browser and the application under test.
Client libraries that provide an interface between each one of the programming languages (Java, C#, Perl, Python and PHP) and the Selenium-RC Server.
RC Scripting
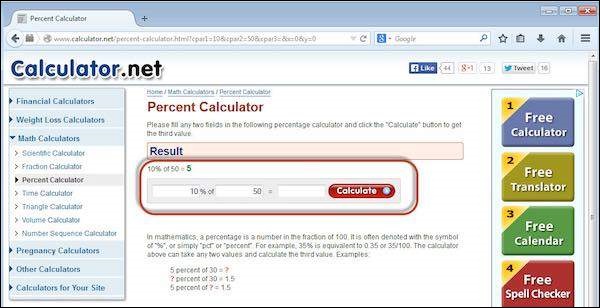
Now let us write a sample script using Selenium Remote Control. Let us use http://www.calculator.net/ for understanding Selenium RC. We will perform a Percent calculation using 'Percent Calculator' that is present under the 'Math Calculators' module.
Step 1 − Start Selenium Remote Control (with the help of command prompt).
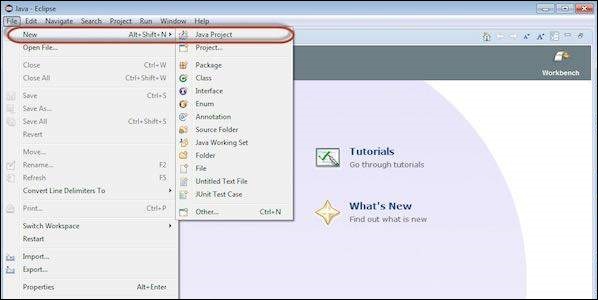
Step 2 − After launching Selenium RC, open Eclipse and create a "New Project" as shown below.
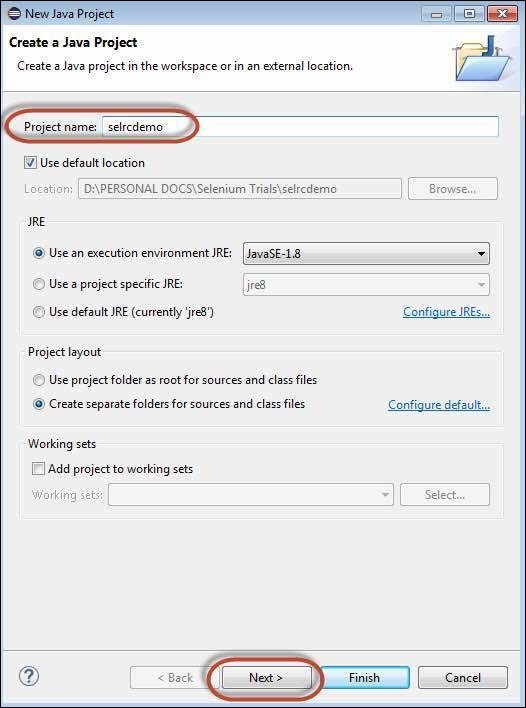
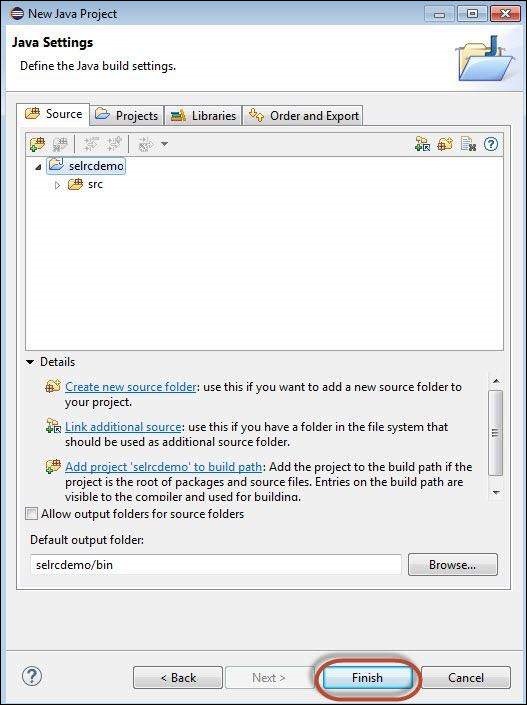
Step 3 − Enter the project name and click 'Next' button.
Step 4 − Verify the Source, Projects, Libraries, and Output folder and click 'Finish'.
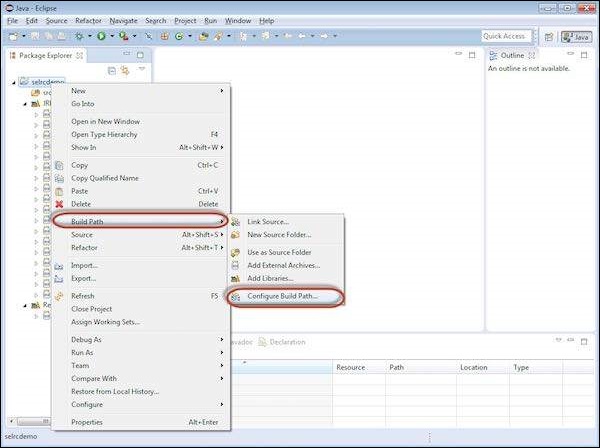
Step 5 − Right click on 'project' container and choose 'Configure Build Path'.
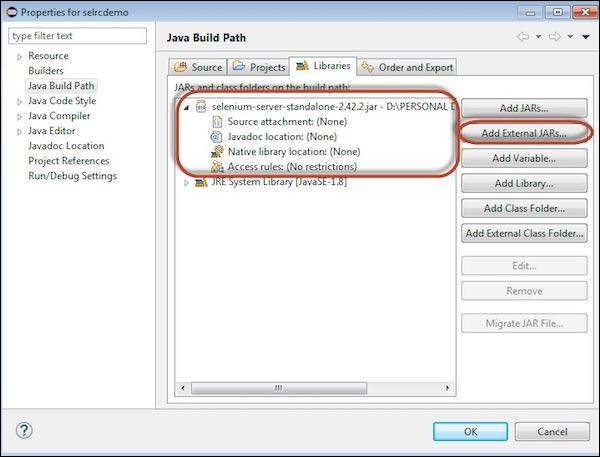
Step 6 − Properties for 'selrcdemo' opens up. Navigate to 'Libraries' tab and select 'Add External JARs'. Choose the Selenium RC jar file that we have downloaded and it would appear as shown below.
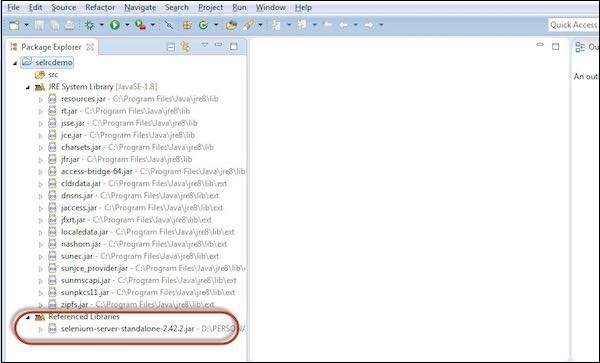
Step 7 − The referenced Libraries are shown as displayed below.
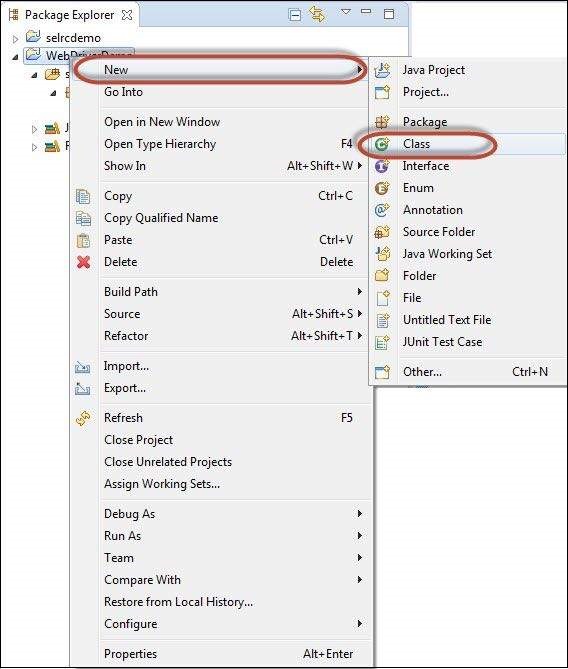
Step 8 − Create a new class file by performing a right click on 'src' folder and select 'New' >> 'class'.
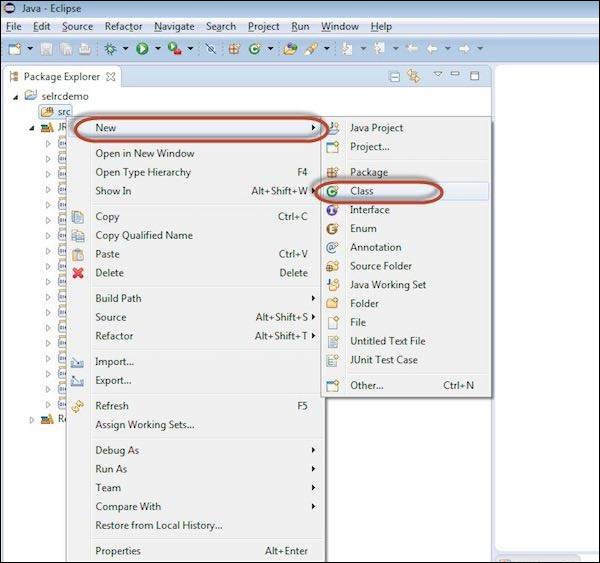
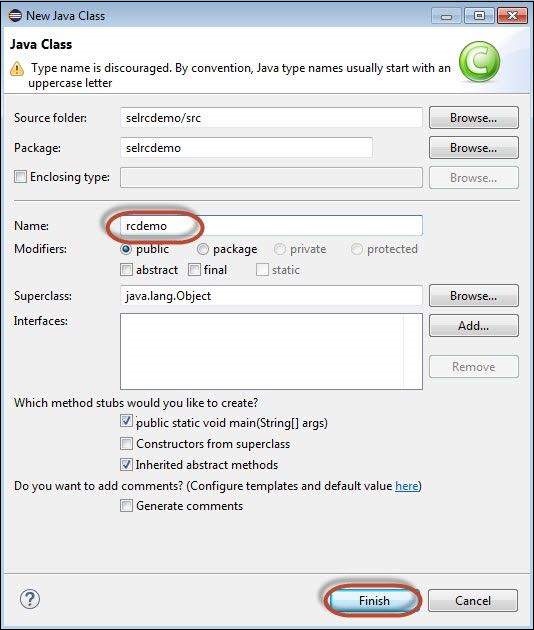
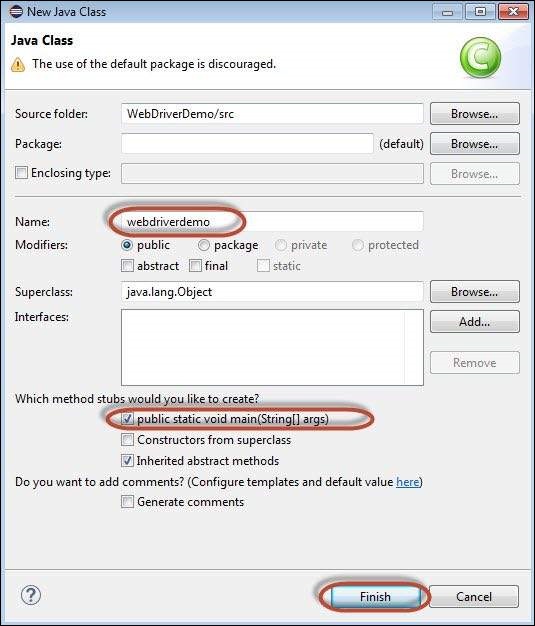
Step 9 − Enter a name of the class file and enable 'public static void main' as shown below.
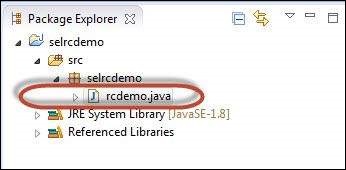
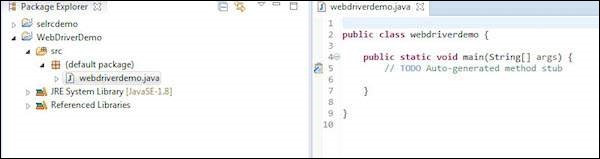
Step 10 − The Created Class is created under the folder structure as shown below.
Step 11 − Now it is time for coding. The following code has comments embedded in it to make the readers understand what has been put forth.
package selrcdemo;

import com.thoughtworks.selenium.DefaultSelenium;
import com.thoughtworks.selenium.Selenium;

public class rcdemo {
   public static void main(String[] args) throws InterruptedException {

      // Instatiate the RC Server
      Selenium selenium = new DefaultSelenium("localhost", 4444 , "firefox", "http://www.calculator.net");
      selenium.start();   // Start
      selenium.open("/");  // Open the URL
      selenium.windowMaximize();

      // Click on Link Math Calculator
      selenium.click("xpath = .//*[@id = 'menu']/div[3]/a");
      Thread.sleep(2500); // Wait for page load

      // Click on Link Percent Calculator
      selenium.click("xpath = .//*[@id = 'menu']/div[4]/div[3]/a");
      Thread.sleep(4000); // Wait for page load

      // Focus on text Box
      selenium.focus("name = cpar1");

      // enter a value in Text box 1
      selenium.type("css=input[name = \"cpar1\"]", "10");

      // enter a value in Text box 2
      selenium.focus("name = cpar2");
      selenium.type("css = input[name = \"cpar2\"]", "50");

      // Click Calculate button
      selenium.click("xpath = .//*[@id = 'content']/table/tbody/tr/td[2]/input");

      // verify if the result is 5
      String result = selenium.getText(".//*[@id = 'content']/p[2]");

      if (result == "5") {
         System.out.println("Pass");
      } else {
         System.out.println("Fail");
      }
   }
}
Step 12 − Now, let us execute the script by clicking 'Run' Button.

Step 13 − The script would start executing and user would be able to see the command history under 'Command History' Tab.
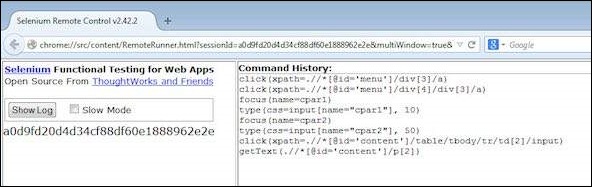
Step 14 − The final state of the application is shown as below. The percentage is calculated and it displayed the result on screen as shown below.
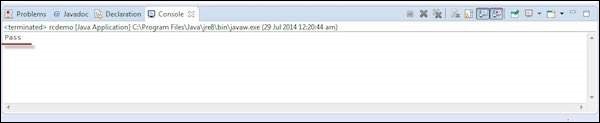
Step 15 − The output of the test is printed on the Eclipse console as shown below as we have printed the output to the console. In real time the output is written to an HTML file or in a simple Text file.
Selenium - Selenese Commands
A command refers to what Selenium has to do and commands in selenium are of three types. Click on each one of them to know more about the commands.
Locators
Element Locators help Selenium to identify the HTML element the command refers to. All these locators can be identified with the help of FirePath and FireBug plugin of Mozilla. Please refer the Environment Setup chapter for details.
identifier = id Select the element with the specified "id" attribute and if there is no match, select the first element whose @name attribute is id.
id = id Select the element with the specified "id" attribute.
name = name Select the first element with the specified "name" attribute
dom = javascriptExpression Selenium finds an element by evaluating the specified string that allows us to traverse through the HTML Document Object Model using JavaScript. Users cannot return a value but can evaluate as an expression in the block.
xpath = xpathExpression Locate an element using an XPath expression.
link = textPattern Select the link element (within anchor tags) which contains text matching the specified pattern.
css = cssSelectorSyntax Select the element using css selector.
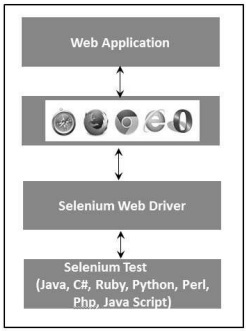
Selenium - Webdriver
WebDriver is a tool for automating testing web applications. It is popularly known as Selenium 2.0. WebDriver uses a different underlying framework, while Selenium RC uses JavaScript Selenium-Core embedded within the browser which has got some limitations. WebDriver interacts directly with the browser without any intermediary, unlike Selenium RC that depends on a server. It is used in the following context −
Multi-browser testing including improved functionality for browsers which is not well-supported by Selenium RC (Selenium 1.0).
Handling multiple frames, multiple browser windows, popups, and alerts.
Complex page navigation.
Advanced user navigation such as drag-and-drop.
AJAX-based UI elements.
Architecture
WebDriver is best explained with a simple architecture diagram as shown below.
Selenium RC Vs WebDriver
| Selenium RC | Selenium WebDriver |
|---|---|
| The architecture of Selenium RC is complicated, as the server needs to be up and running before starting a test. | WebDriver's architecture is simpler than Selenium RC, as it controls the browser from the OS level. |
| Selenium server acts as a middleman between the browser and Selenese commands. | WebDriver interacts directly with the browser and uses the browser's engine to control it. |
| Selenium RC script execution is slower, since it uses a Javascript to interact with RC. | WebDriver is faster, as it interacts directly with the browser. |
| Selenium RC cannot support headless execution as it needs a real browser to work with. | WebDriver can support the headless execution. |
| It's a simple and small API. | Complex and a bit large API as compared to RC. |
| Less object-oriented API. | Purely object oriented API. |
| Cannot test mobile Applications. | Can test iPhone/Android applications. |
Scripting using WebDriver
Let us understand how to work with WebDriver. For demonstration, we would use https://www.calculator.net/. We will perform a "Percent Calculator" which is located under "Math Calculator". We have already downloaded the required WebDriver JAR's. Refer the chapter "Environmental Setup" for details.
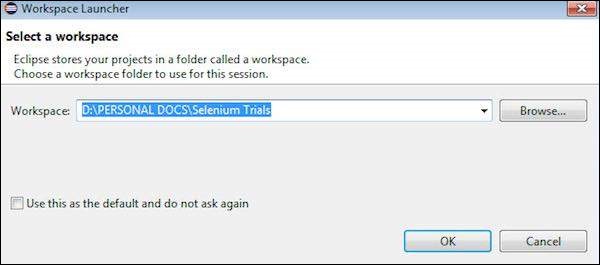
Step 1 − Launch "Eclipse" from the Extracted Eclipse folder.
Step 2 − Select the Workspace by clicking the 'Browse' button.
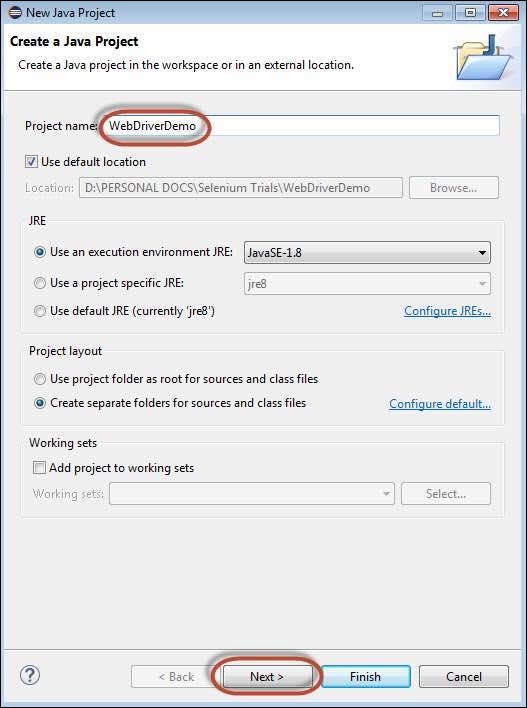
Step 3 − Now create a 'New Project' from 'File' menu.
Step 4 − Enter the Project Name and Click 'Next'.
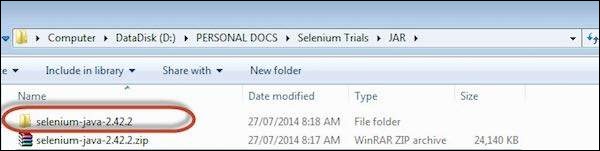
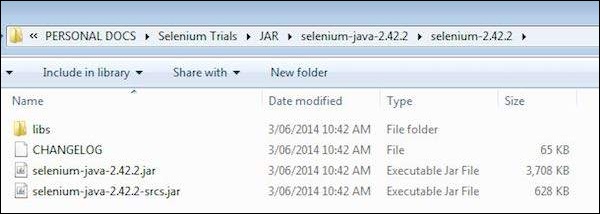
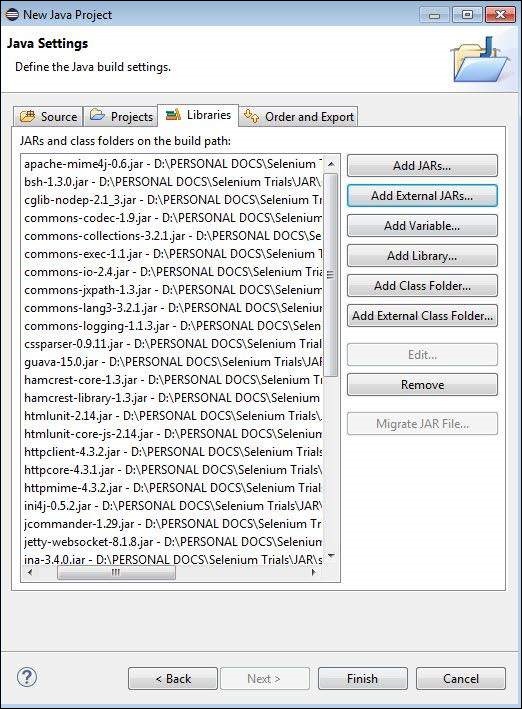
Step 5 − Go to Libraries Tab and select all the JAR's that we have downloaded. Add reference to all the JAR's of Selenium WebDriver Library folder and also selenium-java-2.42.2.jar and selenium-java-2.42.2-srcs.jar.
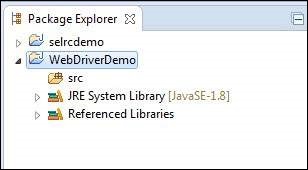
Step 6 − The Package is created as shown below.
Step 7 − Now right-click on the package and select 'New' >> 'Class' to create a 'class'.
Step 8 − Now name the class and make it the main function.
Step 9 − The class outline is shown as below.
Step 10 − Now it is time to code. The following script is easier to understand, as it has comments embedded in it to explain the steps clearly. Please take a look at the chapter "Locators" to understand how to capture object properties.
import java.util.concurrent.TimeUnit;

import org.openqa.selenium.*;
import org.openqa.selenium.firefox.FirefoxDriver;

public class webdriverdemo {
   public static void main(String[] args) {

      WebDriver driver = new FirefoxDriver();
      //Puts an Implicit wait, Will wait for 10 seconds before throwing exception
      driver.manage().timeouts().implicitlyWait(10, TimeUnit.SECONDS);

      //Launch website
      driver.navigate().to("http://www.calculator.net/");

      //Maximize the browser
      driver.manage().window().maximize();

      // Click on Math Calculators
      driver.findElement(By.xpath(".//*[@id = 'menu']/div[3]/a")).click();

      // Click on Percent Calculators
      driver.findElement(By.xpath(".//*[@id = 'menu']/div[4]/div[3]/a")).click();

      // Enter value 10 in the first number of the percent Calculator
      driver.findElement(By.id("cpar1")).sendKeys("10");

      // Enter value 50 in the second number of the percent Calculator
      driver.findElement(By.id("cpar2")).sendKeys("50");

      // Click Calculate Button
      driver.findElement(By.xpath(".//*[@id = 'content']/table/tbody/tr[2]/td/input[2]")).click();


      // Get the Result Text based on its xpath
      String result =
         driver.findElement(By.xpath(".//*[@id = 'content']/p[2]/font/b")).getText();


      // Print a Log In message to the screen
      System.out.println(" The Result is " + result);

      //Close the Browser.
      driver.close();
   }
}
Step 11 − The output of the above script would be printed in Console.

Most Used Commands
The following table lists some of the most frequently used commands in WebDriver along with their syntax.
| Sr.No. | Command & Description |
|---|---|
| 1 | driver.get("URL") To navigate to an application. |
| 2 | element.sendKeys("inputtext") Enter some text into an input box. |
| 3 | element.clear() Clear the contents from the input box. |
| 4 | select.deselectAll() Deselect all OPTIONs from the first SELECT on the page. |
| 5 | select.selectByVisibleText("some text") Select the OPTION with the input specified by the user. |
| 6 | driver.switchTo().window("windowName") Move the focus from one window to another. |
| 7 | driver.switchTo().frame("frameName") Swing from frame to frame. |
| 8 | driver.switchTo().alert() Helps in handling alerts. |
| 9 | driver.navigate().to("URL") Navigate to the URL. |
| 10 | driver.navigate().forward() To navigate forward. |
| 11 | driver.navigate().back() To navigate back. |
| 12 | driver.close() Closes the current browser associated with the driver. |
| 13 | driver.quit() Quits the driver and closes all the associated window of that driver. |
| 14 | driver.refresh() Refreshes the current page. |
Selenium - Locators
Locating elements in Selenium WebDriver is performed with the help of findElement() and findElements() methods provided by WebDriver and WebElement class.
findElement() returns a WebElement object based on a specified search criteria or ends up throwing an exception if it does not find any element matching the search criteria.
findElements() returns a list of WebElements matching the search criteria. If no elements are found, it returns an empty list.
The following table lists all the Java syntax for locating elements in Selenium WebDriver.
| Method | Syntax | Description |
|---|---|---|
| By ID | driver.findElement(By.id (<element ID>)) | Locates an element using the ID attribute |
| By name | driver.findElement(By.name (<element name>)) | Locates an element using the Name attribute |
| By class name | driver.findElement(By.className (<element class>)) | Locates an element using the Class attribute |
| By tag name | driver.findElement(By.tagName (<htmltagname>)) | Locates an element using the HTML tag |
| By link text | driver.findElement(By.linkText (<linktext>)) | Locates a link using link text |
| By partial link text | driver.findElement(By.partialLinkText (<linktext>)) | Locates a link using the link's partial text |
| By CSS | driver.findElement(By.cssSelector (<css selector>)) | Locates an element using the CSS selector |
| By XPath | driver.findElement(By.xpath (<xpath>)) | Locates an element using XPath query |
Locators Usage
Now let us understand the practical usage of each of the locator methods with the help of https://www.calculator.net
By ID
Here an object is accessed with the help of IDs. In this case, it is the ID of the text box. Values are entered into the text box using the sendkeys method with the help of ID(cdensity).
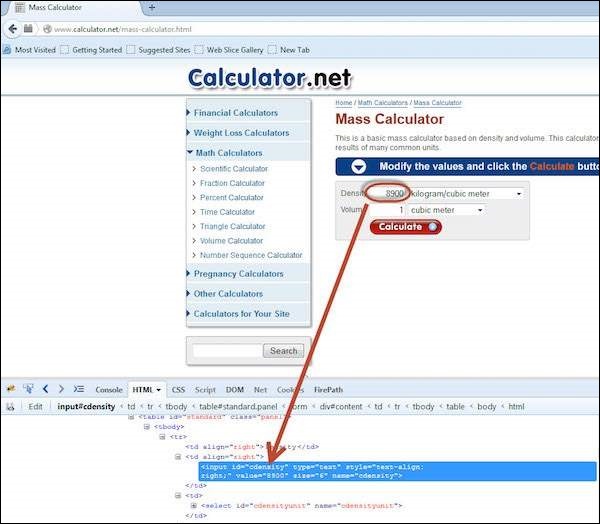
driver.findElement(By.id("cdensity")).sendKeys("10");
By Name
Here an object is accessed with the help of names. In this case, it is the name of the text box. Values are entered into the text box using the sendkeys method with the help of ID(cdensity).
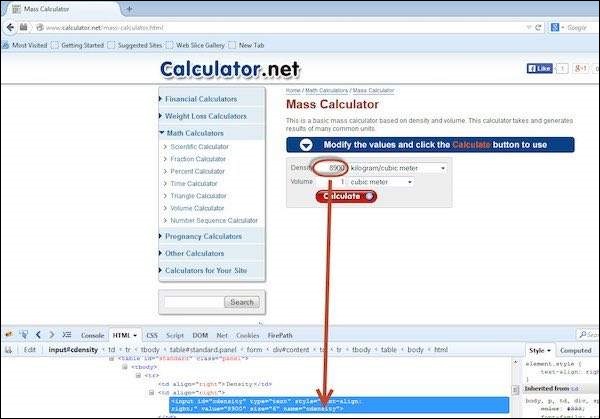
driver.findElement(By.name("cdensity")).sendKeys("10");
By Class Name
Here an object is accessed with the help of Class Names. In this case, it is the Class name of the WebElement. The Value can be accessed with the help of the gettext method.
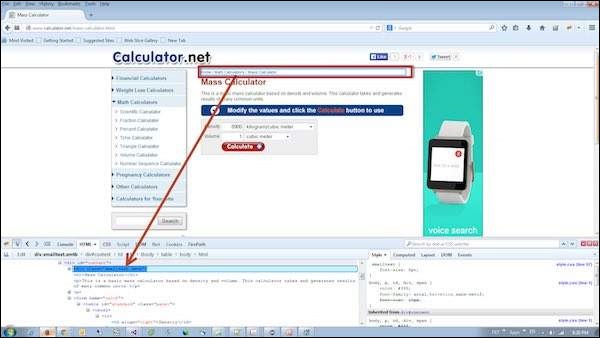
List<WebElement> byclass = driver.findElements(By.className("smalltext smtb"));
By Tag Name
The DOM Tag Name of an element can be used to locate that particular element in the WebDriver. It is very easy to handle tables with the help of this method. Take a look at the following code.
WebElement table = driver.findElement(By.id("calctable"));
List<WebElement> row = table.findElements(By.tagName("tr"));
int rowcount = row.size();
By Link Text
This method helps to locate a link element with matching visible text.
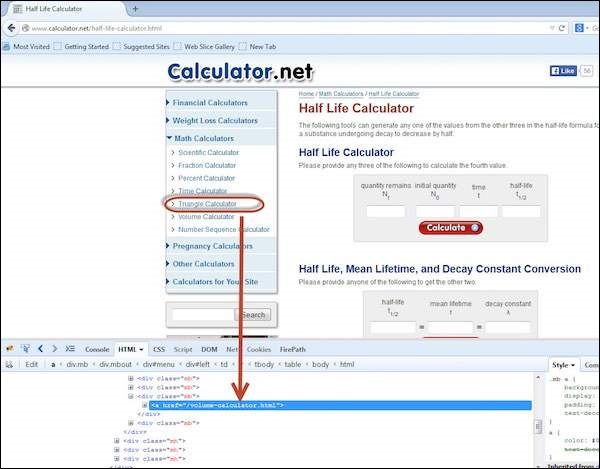
driver.findElements(By.linkText("Volume")).click();
By partial link text
This methods helps locate a link element with partial matching visible text.
driver.findElement(By.partialLinkText("Volume")).click();
By CSS
The CSS is used as a method to identify the webobject, however NOT all browsers support CSS identification.
WebElement loginButton = driver.findElement(By.cssSelector("input.login"));
By XPath
XPath stands for XML path language. It is a query language for selecting nodes from an XML document. XPath is based on the tree representation of XML documents and provides the ability to navigate around the tree by selecting nodes using a variety of criteria.
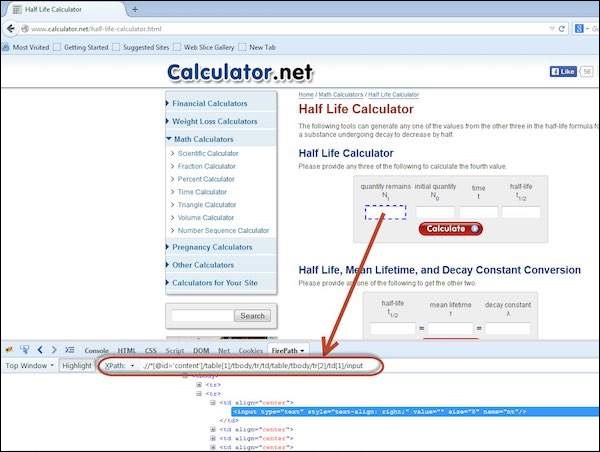
driver.findElement(By.xpath(".//*[@id = 'content']/table[1]/tbody/tr/td/table/tbody/tr[2]/td[1]/input")).sendkeys("100");
Selenium - User Interactions
Selenium WebDriver is the most frequently used tool among all the tools available in the Selenium tool set. Therefore it is important to understand how to use Selenium to interact with web apps. In this module, let us understand how to interact with GUI objects using Selenium webDriver.
We need to interact with the application using some basic actions or even some advanced user action by developing user-defined functions for which there are no predefined commands.
Listed below are the different kinds of actions against those GUI objects −
Selenium - Test design techniques
There are various components involved in designing the tests. Let us understand some of the important components involved in designing a framework as well. We will learn the following topics in this chapter −
Selenium - TestNG
TestNG is a powerful testing framework, an enhanced version of JUnit which was in use for a long time before TestNG came into existence. NG stands for 'Next Generation'.
TestNG framework provides the following features −
- Annotations help us organize the tests easily.
- Flexible test configuration.
- Test cases can be grouped more easily.
- Parallelization of tests can be achieved using TestNG.
- Support for data-driven testing.
- Inbuilt reporting.
Installing TestNG for Eclipse
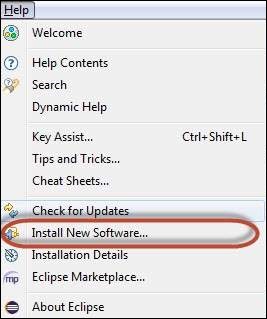
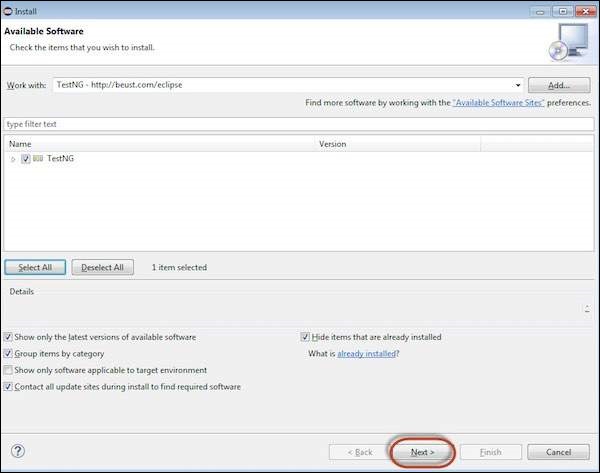
Step 1 − Launch Eclipse and select 'Install New Software'.
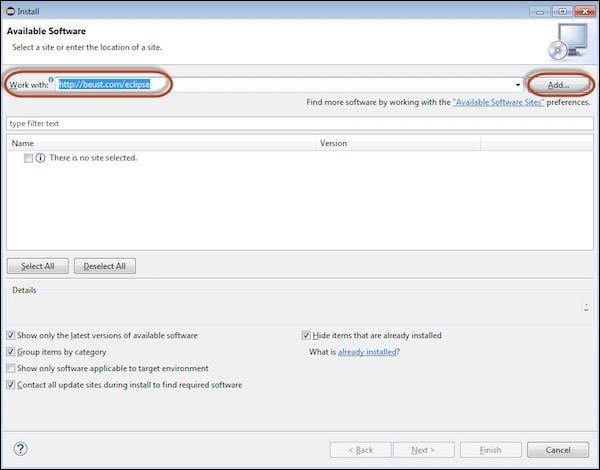
Step 2 − Enter the URL as 'http://beust.com/eclipse' and click 'Add'.
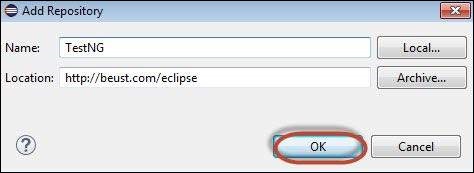
Step 3 − The dialog box 'Add Repository' opens. Enter the name as 'TestNG' and click 'OK'
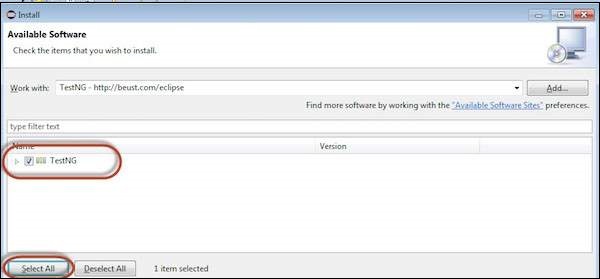
Step 4 − Click 'Select All' and 'TestNG' would be selected as shown in the figure.
Step 5 − Click 'Next' to continue.
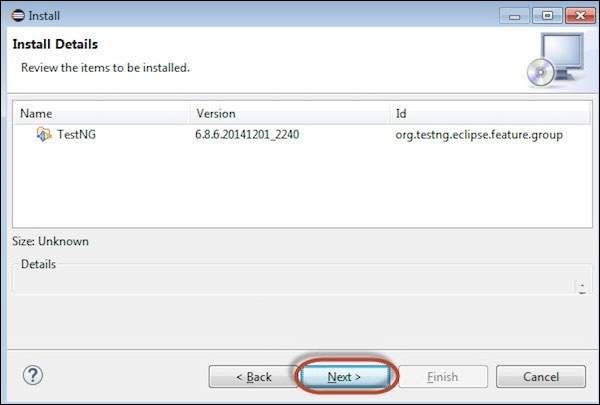
Step 6 − Review the items that are selected and click 'Next'.
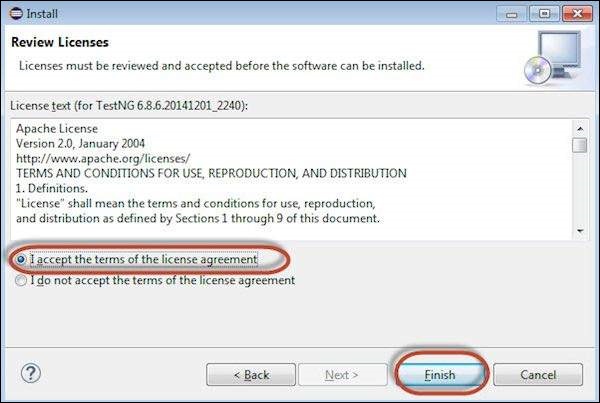
Step 7 − "Accept the License Agreement" and click 'Finish'.
Step 8 − TestNG starts installing and the progress would be shown follows.
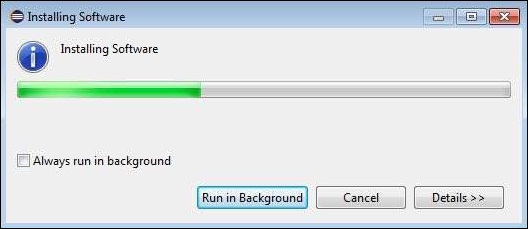
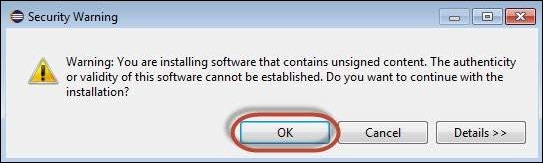
Step 9 − Security Warning pops up as the validity of the software cannot be established. Click 'Ok'.
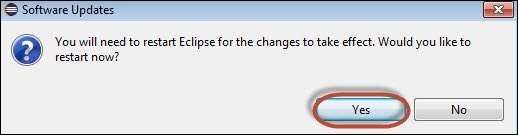
Step 10 − The Installer prompts to restart Eclipse for the changes to take effect. Click 'Yes'.
Annotations in TestNG
Annotations were formally added to the Java language in JDK 5 and TestNG made the choice to use annotations to annotate test classes. Following are some of the benefits of using annotations. More about TestNG can be found here
TestNG identifies the methods it is interested in by looking up annotations. Hence, method names are not restricted to any pattern or format.
We can pass additional parameters to annotations.
Annotations are strongly typed, so the compiler will flag any mistakes right away.
Test classes no longer need to extend anything (such as TestCase, for JUnit 3).
| Sr.No. | Annotation & Description |
|---|---|
| 1 | @BeforeSuite The annotated method will be run only once before all the tests in this suite have run. |
| 2 | @AfterSuite The annotated method will be run only once after all the tests in this suite have run. |
| 3 | @BeforeClass The annotated method will be run only once before the first test method in the current class is invoked. |
| 4 | @AfterClass The annotated method will be run only once after all the test methods in the current class have run. |
| 5 | @BeforeTest The annotated method will be run before any test method belonging to the classes inside the <test> tag is run. |
| 6 | @AfterTest The annotated method will be run after all the test methods belonging to the classes inside the <test> tag have run. |
| 7 | @BeforeGroups The list of groups that this configuration method will run before. This method is guaranteed to run shortly before the first test method that belongs to any of these groups is invoked. |
| 8 | @AfterGroups The list of groups that this configuration method will run after. This method is guaranteed to run shortly after the last test method that belongs to any of these groups is invoked. |
| 9 | @BeforeMethod The annotated method will be run before each test method. |
| 10 | @AfterMethod The annotated method will be run after each test method. |
| 11 | @DataProvider Marks a method as supplying data for a test method. The annotated method must return an Object[ ][ ] where each Object[ ] can be assigned the parameter list of the test method. The @Test method that wants to receive data from this DataProvider needs to use a dataProvider name equals to the name of this annotation. |
| 12 | @Factory Marks a method as a factory that returns objects that will be used by TestNG as Test classes. The method must return Object[ ]. |
| 13 | @Listeners Defines listeners on a test class. |
| 14 | @Parameters Describes how to pass parameters to a @Test method. |
| 15 | @Test Marks a class or a method as part of the test. |
TestNG-Eclipse Setup
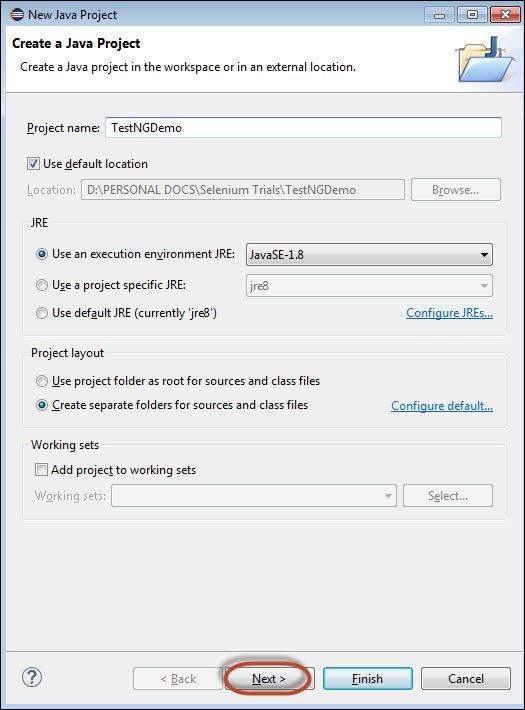
Step 1 − Launch Eclipse and create a 'New Java Project' as shown below.
Step 2 − Enter the project name and click 'Next'.
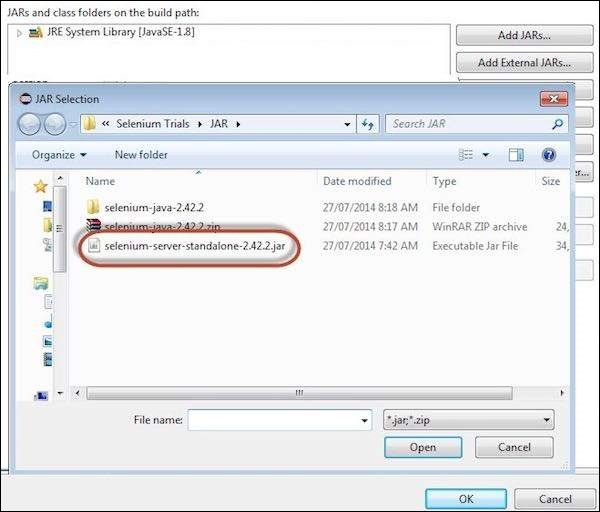
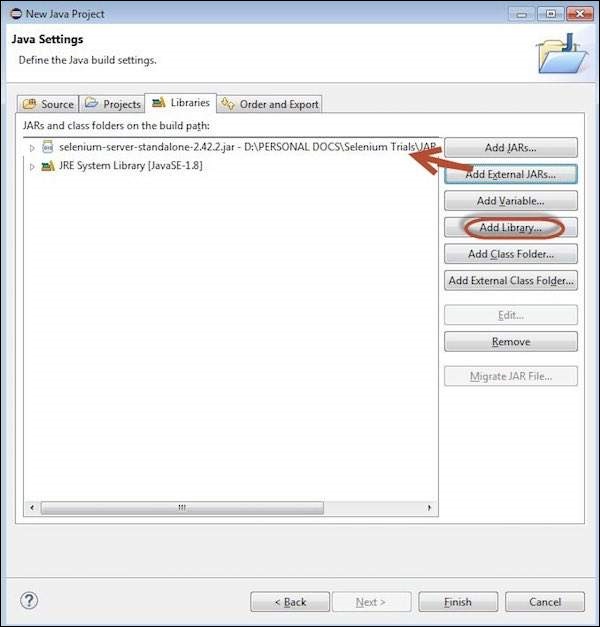
Step 3 − Navigate to "Libraries" Tab and Add the Selenium Remote Control Server JAR file by clicking on "Add External JAR's" as shown below.
Step 4 − The added JAR file is shown here. Click 'Add Library'.
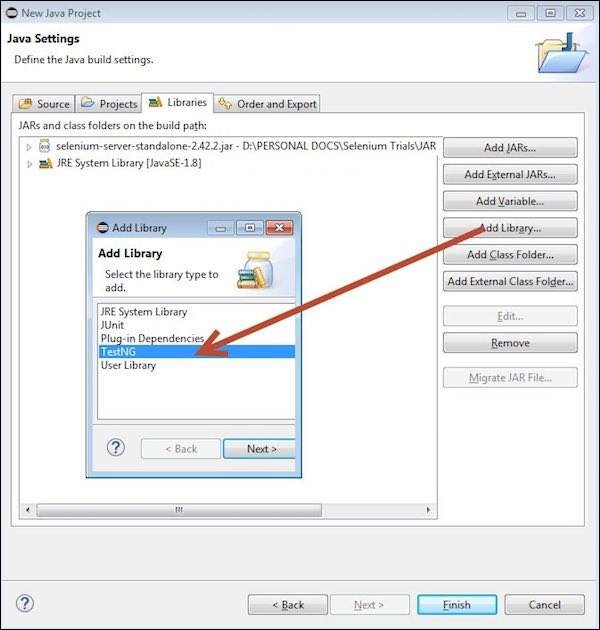
Step 5 − The 'Add Library' dialog opens. Select 'TestNG' and click 'Next' in the 'Add Library' dialog box.
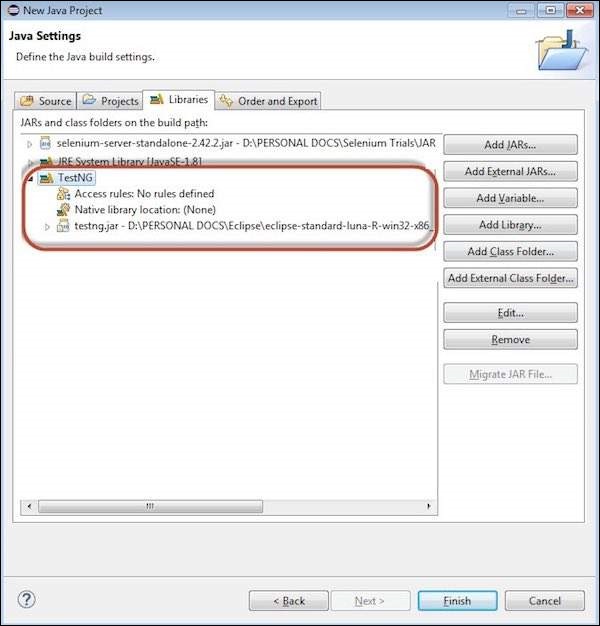
Step 6 − The added 'TestNG' Library is added and it is displayed as shown below.
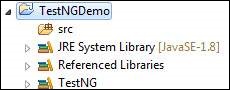
Step 7 − Upon creating the project, the structure of the project would be as shown below.
Step 8 − Right-click on 'src' folder and select New >> Other.
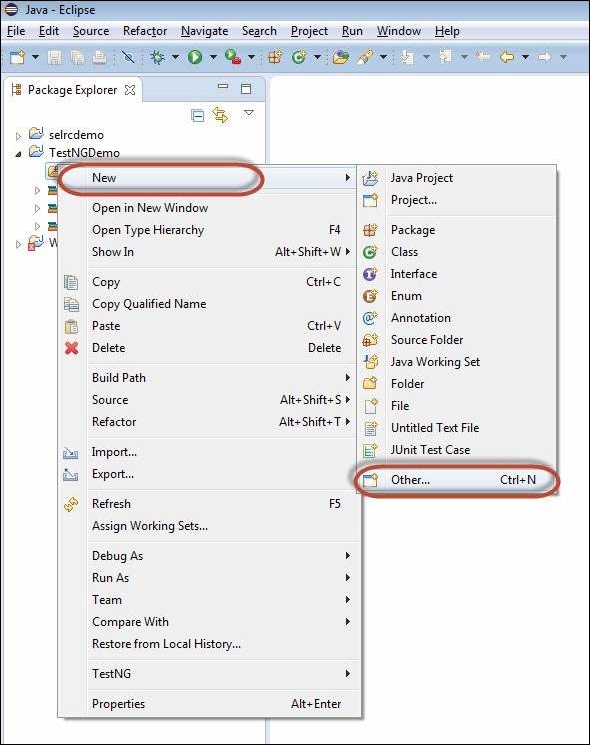
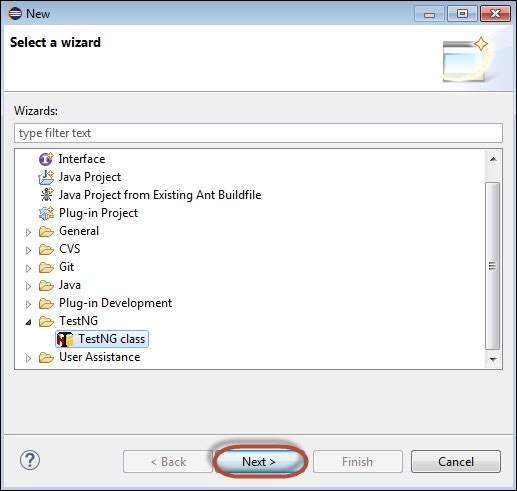
Step 9 − Select 'TestNG' and click 'Next'.
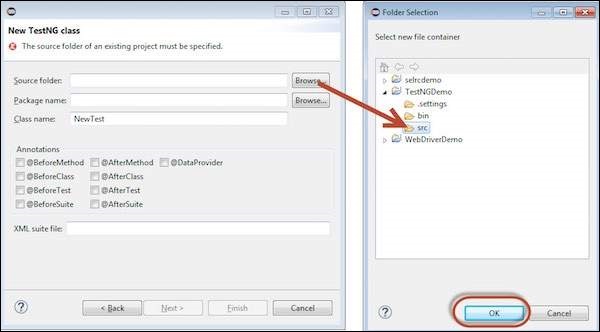
Step 10 − Select the 'Source Folder' name and click 'Ok'.
Step 11 − Select the 'Package name', the 'class name', and click 'Finish'.
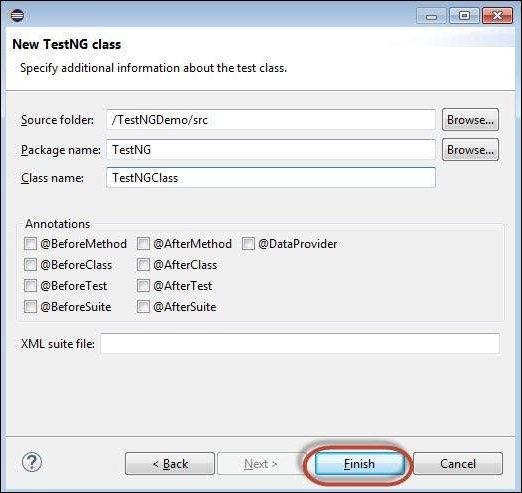
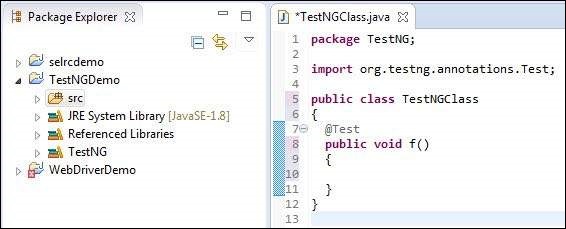
Step 12 − The Package explorer and the created class would be displayed.
First Test in TestNG
Now let us start scripting using TestNG. Let us script for the same example that we used for understanding the WebDriver. We will use the demo application, www.calculator.net, and perform percent calculator.
In the following test, you will notice that there is NO main method, as testNG will drive the program execution flow. After initializing the driver, it will execute the '@BeforeTest' method followed by '@Test' and then '@AfterTest'. Please note that there can be any number of '@Test' annotation in a class but '@BeforeTest' and '@AfterTest' can appear only once.
package TestNG;
import java.util.concurrent.TimeUnit;
import org.openqa.selenium.*;
import org.openqa.selenium.firefox.FirefoxDriver;
import org.testng.annotations.AfterTest;
import org.testng.annotations.BeforeTest;
import org.testng.annotations.Test;
public class TestNGClass {
WebDriver driver = new FirefoxDriver();
@BeforeTest
public void launchapp() {
// Puts an Implicit wait, Will wait for 10 seconds before throwing exception
driver.manage().timeouts().implicitlyWait(10, TimeUnit.SECONDS);
// Launch website
driver.navigate().to("http://www.calculator.net");
driver.manage().window().maximize();
}
@Test
public void calculatepercent() {
// Click on Math Calculators
driver.findElement(By.xpath(".//*[@id='menu']/div[3]/a")).click();
// Click on Percent Calculators
driver.findElement(By.xpath(".//*[@id='menu']/div[4]/div[3]/a")).click();
// Enter value 10 in the first number of the percent Calculator
driver.findElement(By.id("cpar1")).sendKeys("10");
// Enter value 50 in the second number of the percent Calculator
driver.findElement(By.id("cpar2")).sendKeys("50");
// Click Calculate Button
driver.findElement(By.xpath(".//*[@id='content']/table/tbody/tr/td[2]/input")).click();
// Get the Result Text based on its xpath
String result =
driver.findElement(By.xpath(".//*[@id='content']/p[2]/span/font/b")).getText();
// Print a Log In message to the screen
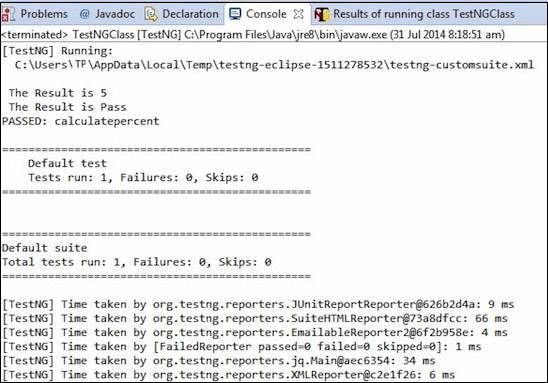
System.out.println(" The Result is " + result);
if(result.equals("5")) {
System.out.println(" The Result is Pass");
} else {
System.out.println(" The Result is Fail");
}
}
@AfterTest
public void terminatetest() {
driver.close();
}
}
Execution
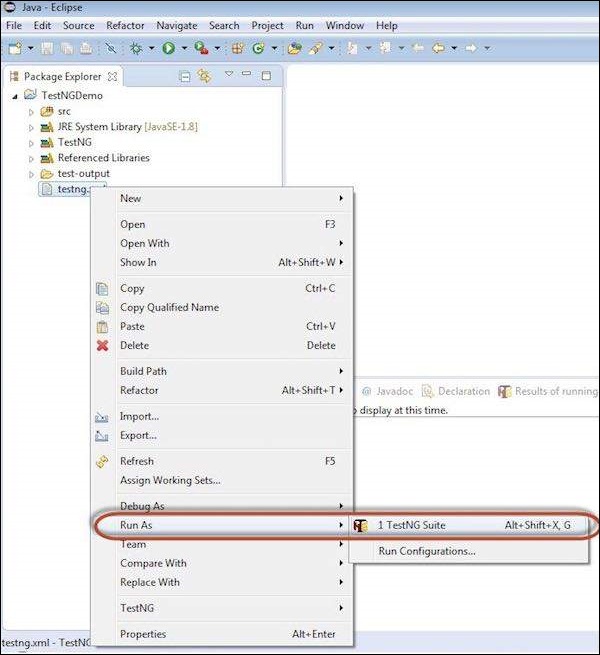
To execute, right click on the created XML and select "Run As" >> "TestNG Suite"
Result Analysis
The output is thrown to the console and it would appear as shown below. The console output also has an execution summary.
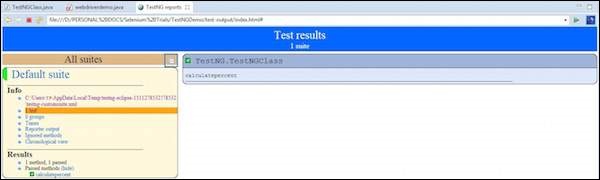
The result of TestNG can also be seen in a different tab. Click on 'HTML Report View' button as shown below.

The HTML result would be displayed as shown below.
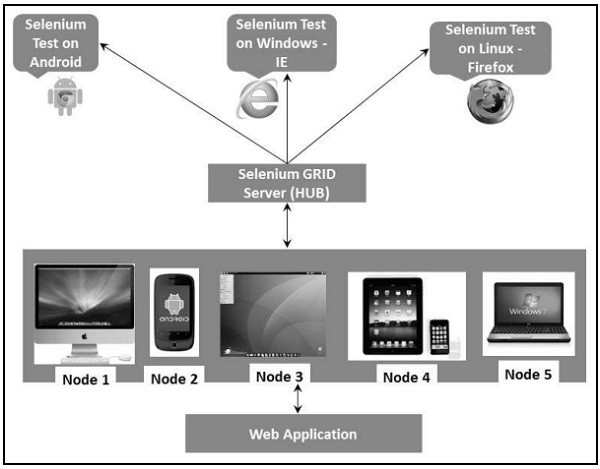
Selenium - Grid
Selenium Grid is a tool that distributes the tests across multiple physical or virtual machines so that we can execute scripts in parallel (simultaneously). It dramatically accelerates the testing process across browsers and across platforms by giving us quick and accurate feedback.
Selenium Grid allows us to execute multiple instances of WebDriver or Selenium Remote Control tests in parallel which uses the same code base, hence the code need NOT be present on the system they execute. The selenium-server-standalone package includes Hub, WebDriver, and Selenium RC to execute the scripts in grid.
Selenium Grid has a Hub and a Node.
Hub − The hub can also be understood as a server which acts as the central point where the tests would be triggered. A Selenium Grid has only one Hub and it is launched on a single machine once.
Node − Nodes are the Selenium instances that are attached to the Hub which execute the tests. There can be one or more nodes in a grid which can be of any OS and can contain any of the Selenium supported browsers.
Architecture
The following diagram shows the architecture of Selenium Grid.
Working with Grid
In order to work with the Grid, we need to follow certain protocols. Listen below are the major steps involved in this process −
- Configuring the Hub
- Configuring the Nodes
- Develop the Script and Prepare the XML File
- Test Execution
- Result Analysis
Let us discuss each of these steps in detail.
Configuring the Hub
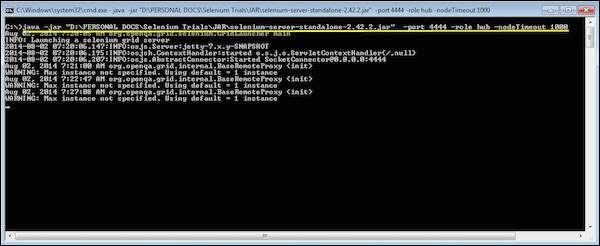
Step 1 − Download the latest Selenium Server standalone JAR file from http://docs.seleniumhq.org/download/. Download it by clicking on the version as shown below.
Step 2 − Start the Hub by launching the Selenium Server using the following command. Now we will use the port '4444' to start the hub.
Note − Ensure that there are no other applications that are running on port# 4444.
java -jar selenium-server-standalone-2.25.0.jar -port 4444 -role hub -nodeTimeout 1000
Step 3 − Now open the browser and navigate to the URL http//localhost:4444 from the Hub (The system where you have executed Step#2).
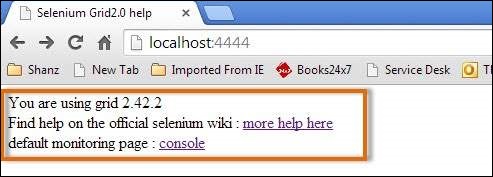
Step 4 − Now click on the 'console' link and click 'view config'. The config of the hub would be displayed as follows. As of now, we haven't got any nodes, hence we will not be able to see the details.

Configuring the Nodes
Step 1 − Logon to the node (where you would like to execute the scripts) and place the 'selenium-server-standalone-2.42.2' in a folder. We need to point to the selenium-server-standalone JAR while launching the nodes.
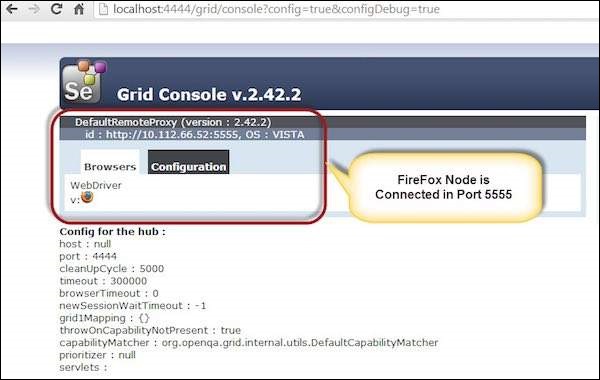
Step 2 − Launch FireFox Node using the following below command.
java -jar D:\JAR\selenium-server-standalone-2.42.2.jar
   -role node -hub http://10.30.217.157:4444/grid/register
   -browser browserName = firefox -port 5555
Where,
D:\JAR\selenium-server-standalone-2.42.2.jar = Location of the Selenium Server Standalone Jar File(on the Node Machine)
http://10.30.217.157:4444 = IP Address of the Hub and 4444 is the port of the Hub
browserName = firefox (Parameter to specify the Browser name on Nodes)
5555 = Port on which Firefox Node would be up and running.

Step 3 − After executing the command, come back to the Hub. Navigate to the URL - http://10.30.217.157:4444 and the Hub would now display the node attached to it.
Step 4 − Now let us launch the Internet Explorer Node. For launching the IE Node, we need to have the Internet Explorer driver downloaded on the node machine.
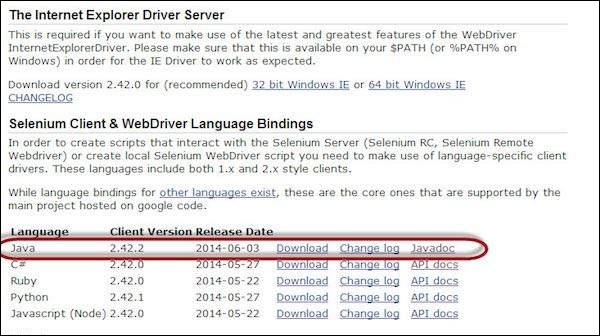
Step 5 − To download the Internet Explorer driver, navigate to http://docs.seleniumhq.org/download/ and download the appropriate file based on the architecture of your OS. After you have downloaded, unzip the exe file and place in it a folder which has to be referred while launching IE nodes.
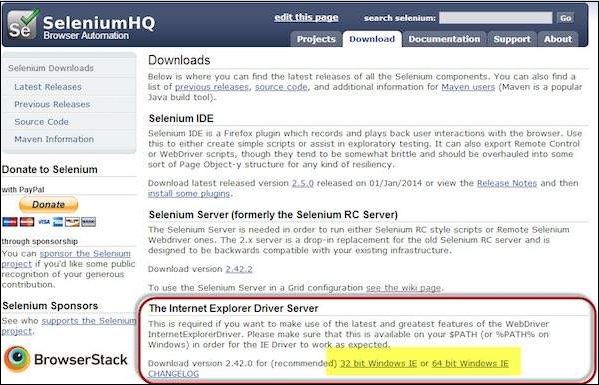
Step 6 − Launch IE using the following command.
C:\>java -Dwebdriver.ie.driver = D:\IEDriverServer.exe
   -jar D:\JAR\selenium-server-standalone-2.42.2.jar
   -role webdriver -hub http://10.30.217.157:4444/grid/register
   -browser browserName = ie,platform = WINDOWS -port 5558
Where,
D:\IEDriverServer.exe = The location of the downloaded the IE Driver(on the Node Machine)
D:\JAR\selenium-server-standalone-2.42.2.jar = Location of the Selenium Server Standalone Jar File(on the Node Machine)
http://10.30.217.157:4444 = IP Address of the Hub and 4444 is the port of the Hub
browserName = ie (Parameter to specify the Browser name on Nodes)
5558 = Port on which IE Node would be up and running.
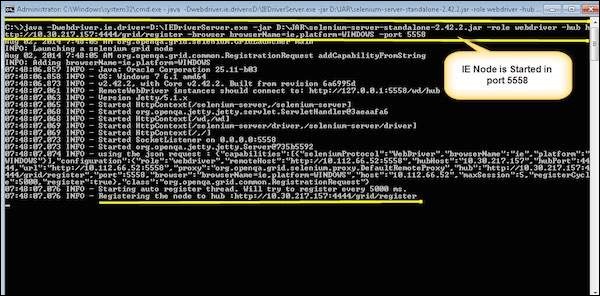
Step 7 − After executing the command, come back to the Hub. Navigate to the URL - http://10.30.217.157:4444 and the Hub would now display the IE node attached to it.

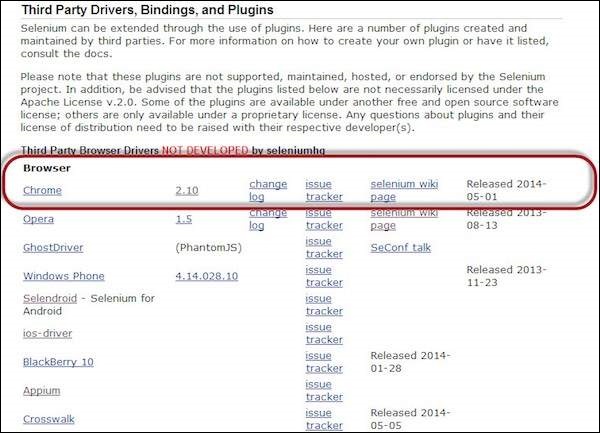
Step 8 − Let us now launch Chrome Node. For launching the Chrome Node, we need to have the Chrome driver downloaded on the node machine.
Step 9 − To download the Chrome Driver, navigate to http://docs.seleniumhq.org/download/ and then navigate to Third Party Browser Drivers area and click on the version number '2.10' as shown below.
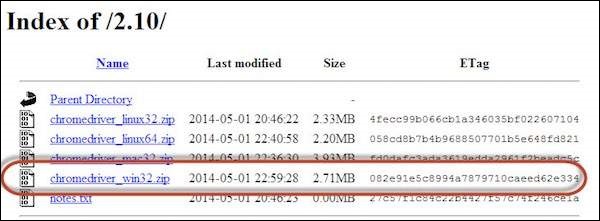
Step 10 − Download the driver based on the type of your OS. We will execute it on Windows environment, hence we will download the Windows Chrome Driver. After you have downloaded, unzip the exe file and place it in a folder which has to be referred while launching chrome nodes.
Step 11 − Launch Chrome using the following command.
C:\>java -Dwebdriver.chrome.driver = D:\chromedriver.exe
   -jar D:\JAR\selenium-server-standalone-2.42.2.jar
   -role webdriver -hub  http://10.30.217.157:4444/grid/register
   -browser browserName = chrome, platform = WINDOWS -port 5557
Where,
D:\chromedriver.exe = The location of the downloaded the chrome Driver(on the Node Machine)
D:\JAR\selenium-server-standalone-2.42.2.jar = Location of the Selenium Server Standalone Jar File(on the Node Machine)
http://10.30.217.157:4444 = IP Address of the Hub and 4444 is the port of the Hub
browserName = chrome (Parameter to specify the Browser name on Nodes)
5557 = Port on which chrome Node would be up and running.
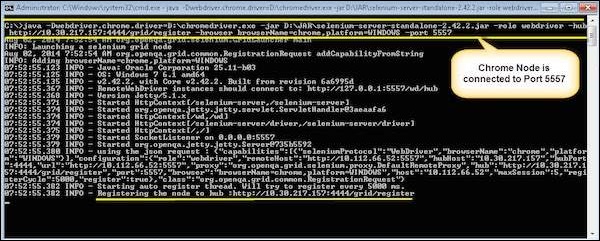
Step 12 − After executing the command, come back to the Hub. Navigate to the URL - http://10.30.217.157:4444 and the Hub would now display the chrome node attached to it.

Develop the Script and Prepare the XML File
Step 1 − We will develop a test using TestNG. In the following example, we will launch each one of those browsers using remote webDriver. It can pass on their capabilities to the driver so that the driver has all information to execute on Nodes.
The Browser Parameter would be passed from the "XML" file.
package TestNG;

import org.openqa.selenium.*;
import org.openqa.selenium.remote.RemoteWebDriver;
import org.openqa.selenium.remote.DesiredCapabilities;

import org.testng.annotations.AfterTest;
import org.testng.annotations.BeforeTest;
import org.testng.annotations.Parameters;
import org.testng.annotations.Test;

import java.net.URL;
import java.util.concurrent.TimeUnit;
import java.net.MalformedURLException;

public class TestNGClass {
   public WebDriver driver;
   public String URL, Node;
   protected ThreadLocal<RemoteWebDriver> threadDriver = null;

   @Parameters("browser")
   @BeforeTest
   public void launchapp(String browser) throws MalformedURLException {
      String URL = "http://www.calculator.net";

      if (browser.equalsIgnoreCase("firefox")) {
         System.out.println(" Executing on FireFox");
         String Node = "http://10.112.66.52:5555/wd/hub";
         DesiredCapabilities cap = DesiredCapabilities.firefox();
         cap.setBrowserName("firefox");

         driver = new RemoteWebDriver(new URL(Node), cap);
         // Puts an Implicit wait, Will wait for 10 seconds before throwing exception
         driver.manage().timeouts().implicitlyWait(10, TimeUnit.SECONDS);

         // Launch website
         driver.navigate().to(URL);
         driver.manage().window().maximize();
      } else if (browser.equalsIgnoreCase("chrome")) {
         System.out.println(" Executing on CHROME");
         DesiredCapabilities cap = DesiredCapabilities.chrome();
         cap.setBrowserName("chrome");
         String Node = "http://10.112.66.52:5557/wd/hub";
         driver = new RemoteWebDriver(new URL(Node), cap);
         driver.manage().timeouts().implicitlyWait(10, TimeUnit.SECONDS);

         // Launch website
         driver.navigate().to(URL);
         driver.manage().window().maximize();
      } else if (browser.equalsIgnoreCase("ie")) {
         System.out.println(" Executing on IE");
         DesiredCapabilities cap = DesiredCapabilities.chrome();
         cap.setBrowserName("ie");
         String Node = "http://10.112.66.52:5558/wd/hub";
         driver = new RemoteWebDriver(new URL(Node), cap);
         driver.manage().timeouts().implicitlyWait(10, TimeUnit.SECONDS);

         // Launch website
         driver.navigate().to(URL);
         driver.manage().window().maximize();
      } else {
         throw new IllegalArgumentException("The Browser Type is Undefined");
      }
   }

   @Test
   public void calculatepercent() {
      // Click on Math Calculators
      driver.findElement(By.xpath(".//*[@id = 'menu']/div[3]/a")).click();

      // Click on Percent Calculators
      driver.findElement(By.xpath(".//*[@id = 'menu']/div[4]/div[3]/a")).click();

      // Enter value 10 in the first number of the percent Calculator
      driver.findElement(By.id("cpar1")).sendKeys("10");

      // Enter value 50 in the second number of the percent Calculator
      driver.findElement(By.id("cpar2")).sendKeys("50");

      // Click Calculate Button
      // driver.findElement(By.xpath(".//*[@id = 'content']/table/tbody/tr/td[2]/input")).click();
      // Get the Result Text based on its xpath
      String result =
         driver.findElement(By.xpath(".//*[@id = 'content']/p[2]/span/font/b")).getText();

      // Print a Log In message to the screen
      System.out.println(" The Result is " + result);

      if(result.equals("5")) {
         System.out.println(" The Result is Pass");
      } else {
         System.out.println(" The Result is Fail");
      }
   }

   @AfterTest
   public void closeBrowser() {
      driver.quit();
   }
}
Step 2 − The Browser parameter will be passed using XML. Create an XML under the project folder.
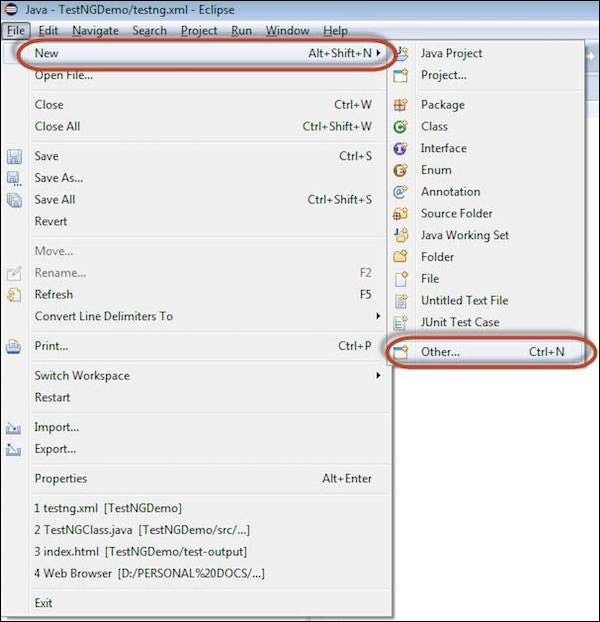
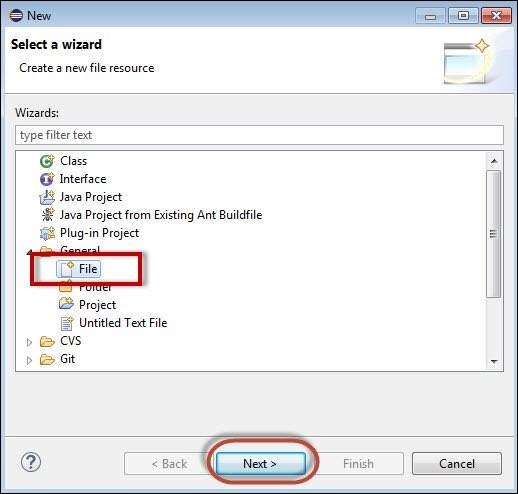
Step 3 − Select 'File' from 'General' and click 'Next'.
Step 4 − Enter the name of the file and click 'Finish'.
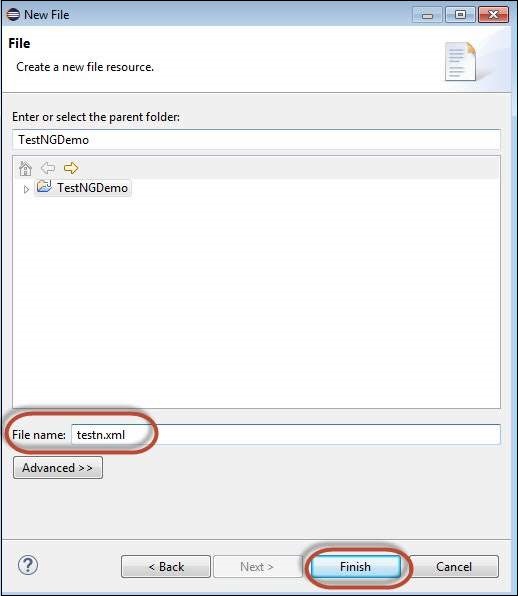
Step 5 − TestNg.XML is created under the project folder as shown below.
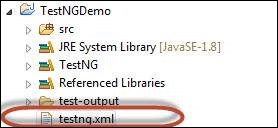
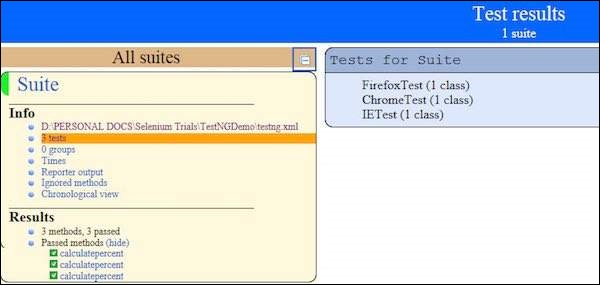
Step 6 − The contents of the XML file are shown below. We create 3 tests and put them in a suite and mention parallel="tests" so that all the tests would be executed in parallel.
<?xml version = "1.0" encoding = "UTF-8"?>
<!DOCTYPE suite SYSTEM "http://testng.org/testng-1.0.dtd">
<suite name = "Suite" parallel = "tests">

   <test name = "FirefoxTest">
   <parameter name = "browser" value = "firefox" />
      <classes>
         <class name = "TestNG.TestNGClass" />
      </classes>
   </test>

   <test name = "ChromeTest">
   <parameter name = "browser" value = "chrome" />
      <classes>
         <class name = "TestNG.TestNGClass" />
      </classes>
   </test>

   <test name = "IETest">
   <parameter name = "browser" value = "ie" />
      <classes>
         <class name = "TestNG.TestNGClass" />
      </classes>
   </test>

</suite>
Test Execution
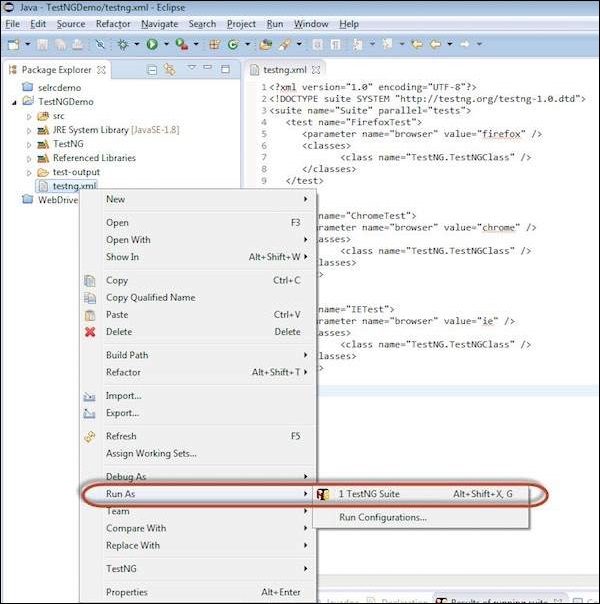
Step 1 − Select the created XML; right-click and choose 'Run As' >> 'TestNG Suite'.
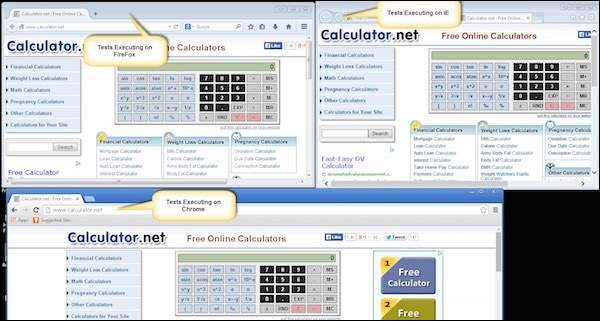
Step 2 − Now open the Node, where we have launched all the browser nodes. You will see all the three browsers in execution simultaneously.
Result Analysis
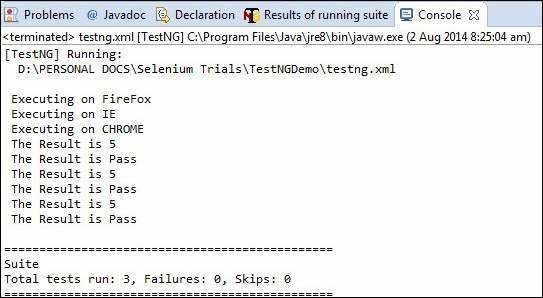
Step 1 − Upon completing the execution, we can analyze the result like any other execution. The result summary is printed in the console as shown in the following snapshot.
Step 2 − Navigate to the 'Results of Running Suite' Tab and TestNG would display the result summary as shown below.

Step 3 − Upon generating the HTML, we will be able to see the test results in HTML format.