
- Selenium - Home
- Selenium - Overview
- Selenium - Components
- Selenium - Automation Testing
- Selenium - Environment Setup
- Selenium - Remote Control
- Selenium - IDE Introduction
- Selenium - Features
- Selenium - Limitations
- Selenium - Installation
- Selenium - Creating Tests
- Selenium - Creating Script
- Selenium - Control Flow
- Selenium - Store Variables
- Selenium - Alerts & Popups
- Selenium - Selenese Commands
- Selenium - Actions Commands
- Selenium - Accessors Commands
- Selenium - Assertions Commands
- Selenium - Assert/Verify Methods
- Selenium - Locating Strategies
- Selenium - Script Debugging
- Selenium - Verification Points
- Selenium - Pattern Matching
- Selenium - JSON Data File
- Selenium - Browser Execution
- Selenium - User Extensions
- Selenium - Code Export
- Selenium - Emitting Code
- Selenium - JavaScript Functions
- Selenium - Plugins
- Selenium WebDriver Tutorial
- Selenium - Introduction
- Selenium WebDriver vs RC
- Selenium - Installation
- Selenium - First Test Script
- Selenium - Driver Sessions
- Selenium - Browser Options
- Selenium - Chrome Options
- Selenium - Edge Options
- Selenium - Firefox Options
- Selenium - Safari Options
- Selenium - Double Click
- Selenium - Right Click
- HTML Report in Python
- Handling Edit Boxes
- Selenium - Single Elements
- Selenium - Multiple Elements
- Selenium Web Elements
- Selenium - File Upload
- Selenium - Locator Strategies
- Selenium - Relative Locators
- Selenium - Finders
- Selenium - Find All Links
- Selenium - User Interactions
- Selenium - WebElement Commands
- Selenium - Browser Interactions
- Selenium - Browser Commands
- Selenium - Browser Navigation
- Selenium - Alerts & Popups
- Selenium - Handling Forms
- Selenium - Windows and Tabs
- Selenium - Handling Links
- Selenium - Input Boxes
- Selenium - Radio Button
- Selenium - Checkboxes
- Selenium - Dropdown Box
- Selenium - Handling IFrames
- Selenium - Handling Cookies
- Selenium - Date Time Picker
- Selenium - Dynamic Web Tables
- Selenium - Actions Class
- Selenium - Action Class
- Selenium - Keyboard Events
- Selenium - Key Up/Down
- Selenium - Copy and Paste
- Selenium - Handle Special Keys
- Selenium - Mouse Events
- Selenium - Drag and Drop
- Selenium - Pen Events
- Selenium - Scroll Operations
- Selenium - Waiting Strategies
- Selenium - Explicit/Implicit Wait
- Selenium - Support Features
- Selenium - Multi Select
- Selenium - Wait Support
- Selenium - Select Support
- Selenium - Color Support
- Selenium - ThreadGuard
- Selenium - Errors & Logging
- Selenium - Exception Handling
- Selenium - Miscellaneous
- Selenium - Handling Ajax Calls
- Selenium - JSON Data File
- Selenium - CSV Data File
- Selenium - Excel Data File
- Selenium - Cross Browser Testing
- Selenium - Multi Browser Testing
- Selenium - Multi Windows Testing
- Selenium - JavaScript Executor
- Selenium - Headless Execution
- Selenium - Capture Screenshots
- Selenium - Capture Videos
- Selenium - Page Object Model
- Selenium - Page Factory
- Selenium - Record & Playback
- Selenium - Frameworks
- Selenium - Browsing Context
- Selenium - DevTools
- Selenium Grid Tutorial
- Selenium - Overview
- Selenium - Architecture
- Selenium - Components
- Selenium - Configuration
- Selenium - Create Test Script
- Selenium - Test Execution
- Selenium - Endpoints
- Selenium - Customizing a Node
- Selenium Reporting Tools
- Selenium - Reporting Tools
- Selenium - TestNG
- Selenium - JUnit
- Selenium - Allure
- Selenium & Other Technologies
- Selenium - Java Tutorial
- Selenium - Python Tutorial
- Selenium - C# Tutorial
- Selenium - Javascript Tutorial
- Selenium - Kotlin Tutorial
- Selenium - Ruby Tutorial
- Selenium - Maven & Jenkins
- Selenium - LogExpert Logging
- Selenium - Log4j Logging
- Selenium - Robot Framework
- Selenium - Github Tutorial
- Selenium - IntelliJ
- Selenium - XPath
- Selenium Miscellaneous Concepts
- Selenium - IE Driver
- Selenium - Automation Frameworks
- Selenium - Keyword Driven Framework
- Selenium - Data Driven Framework
- Selenium - Hybrid Driven Framework
- Selenium - SSL Certificate Error
- Selenium - Alternatives
Selenium IDE - Browser Execution & Command-line Runner
The test case developed in Selenium IDE should be able to run in multiple browsers like Chrome, Firefox, Safari, Edge, and so on with minor updates to the test case. This helps to check if the application under test is working as per the requirements in all the browsers.
Why is Cross Browser Execution Beneficial?
Often on working on any applications for example, e-commerce or on travel reservations, and so on, we observe that while doing the payment, or adding products to cart, the applications are taking too much time for page load on a specific browser.
As a user, we promptly infer that there may be an error or an ongoing issue in that application, and we move towards a different company website having the similar products and functionalities.
Read More - Selenium Webdriver Cross Browser Testing
Prerequisites for Selenium IDE cross browser execution
- Install Selenium IDE in the local system in Chrome or Firefox. To get more information about its installation, please refer to the link Selenium IDE Installation.
- Install Node.js(version above 10) using the link https://nodejs.org/en/download/.
- Check Node.js installed successfully by running the command in the terminal: node -v. The version of Node.js installed should be returned. Along with the Node.js installation, the npm should be installed as well. Check npm has been installed by running the command in the terminal: npm -v. The version of npm installed should be returned.
- Install Selenium side runner, by running the command in the terminal: npm install -g selenium-side-runner.
How to run Selenium IDE tests in multiple browsers?
Step 1 − Click on the Selenium IDE extension visible on the browser after its installation.
Step 2 − Selenium IDE should be launched along with it, a welcome message should be displayed with the version of the tool. In the below image, the version installed is 3.17.2.
Along with this, it gives us the option to select what we would like to do with the tool, like Record a new test in a new project, Open an existing project, Create a new project, and Close Selenium IDE.
Also, a link with the text - the Selenium IDE project page is provided, which on clicking would land us to the Selenium Integrated Development Environment documentation page.
https://www.selenium.dev/selenium-ide/.
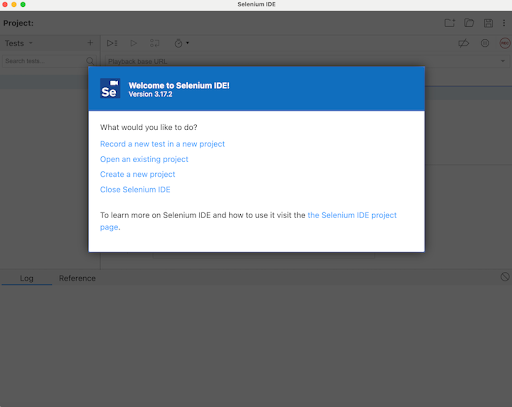
Step 3 − Click on the Create a new project link, then enter a project name, say, Test7 under the Please provide a name for your new project. Finally, we would click on the OK button.
Step 4 − We would have the workspace ready in the Selenium IDE now.
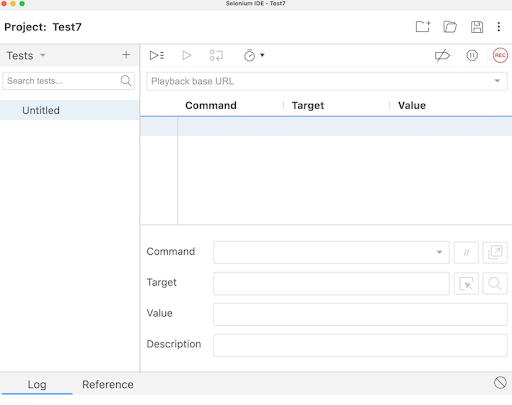
Step 5 − Enter open in the Command field, and https://www.tutorialspoint.com/selenium/ in the Target field, to launch the application.
Step 6 − Enter type in the Command field, id=name in the Target field, and Selenium in the Value field. Please note, id=name is the locator value of the input box and Selenium is the value to be entered.
Step 7 − Enter close in the Command field to close the browser window.
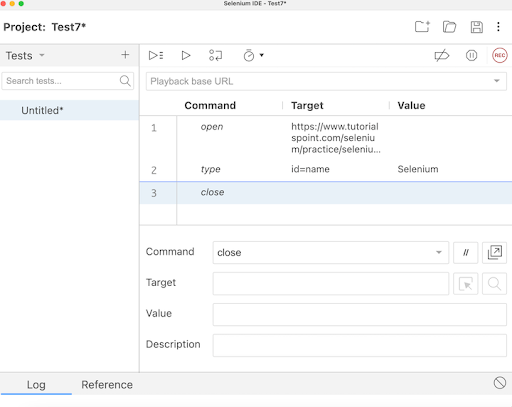
Step 8 − Click on the three dots appearing at the left pane, then select the Rename option.
Step 9 − Enter a name, say Test7 under the Rename Test case field, then click on Rename. The entered name would appear on the left of Selenium IDE.
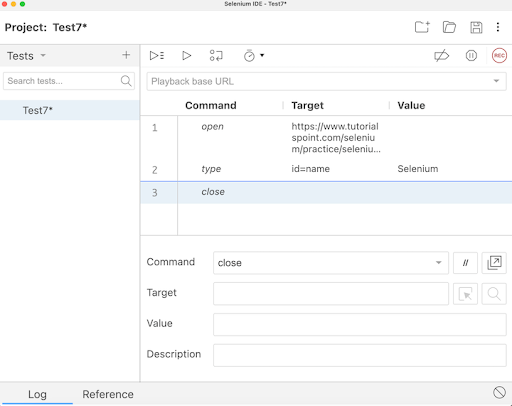
Step 10 − Click on the Run all tests from the top, and wait for the test execution to complete. In our example, we would see Runs: 1, Failures: 0, and a green bar denoting the test ran successfully without any failures. Also, the message Test7 completed successfully appeared under the Log.
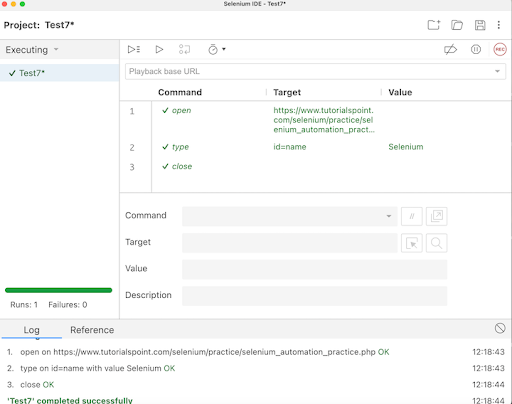
In the example above, we entered the text Selenium in an input box using the id locator which appeared under the Log. Besides, we got a green tick beside the test case name - Test7 at the top, signifying a passed test. All these were performed successfully using the actions commands like open, type, and close.
Apart from that, all the test steps, along with the test case name turned green, reflecting a PASS for all the steps. All the steps which reflected under the Log tab, showed an OK in green
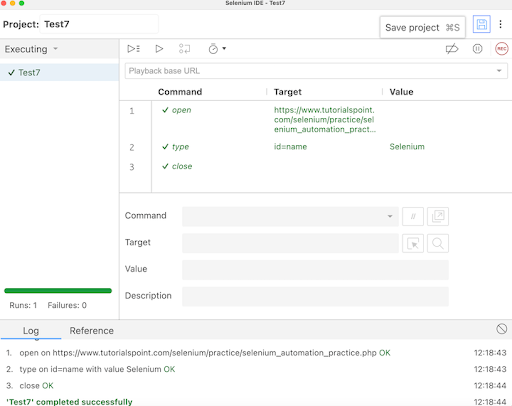
Step 11 − Click on Save Project, and this project would be saved with Test7.side file.
Step 12 − To run this test in the Chrome browser, we would need to run the command: npm install -g chromedriver. Similarly, for running the test in Firefox, we would need to run the command: npm install -g geckodriver. For running the test in Edge, we would need to run the command: npm install -g edgedriver. For running the test in Internet Explorer, we would need to run the command: npm install -g iedriver.
Step 13 − To launch the Selenium Side Runner, and run the test we had just saved in Step11, we would need to run the command: selenium-side-runner /path/to/<project name>.side.
Browser Capabilities for Different Browser Execution
To add Chrome browser capabilities for local execution, the command would be −
selenium-side-runner -c "browserName=chrome".
To add Safari browser capabilities for local execution, the command would be −
selenium-side-runner -c "browserName=safari".
To add Edge browser capabilities for local execution, the command would be −
selenium-side-runner -c "browserName=edge".
To add Internet Explorer browser capabilities for local execution, the command would be −
selenium-side-runner -c "browserName=internet explorer".
To add Internet Firefox browser capabilities for local execution, the command would be −
selenium-side-runner -c "browserName=firefox".
Conclusion
This concludes our comprehensive take on the tutorial on Selenium IDE Browser Execution & Command-line Runner. Weve started with describing the meaning of browser execution, why cross execution is beneficial, prerequisites to run Selenium IDE tests in cross browsers, how to run them in different browsers, and how to add browser capabilities while executing them in different browsers. This equips you with in-depth knowledge of the browser execution and command line runner in Selenium IDE. It is wise to keep practicing what youve learned and exploring others relevant to Selenium to deepen your understanding and expand your horizons.