
- Selenium - Home
- Selenium - Overview
- Selenium - Components
- Selenium - Automation Testing
- Selenium - Environment Setup
- Selenium - Remote Control
- Selenium - IDE Introduction
- Selenium - Features
- Selenium - Limitations
- Selenium - Installation
- Selenium - Creating Tests
- Selenium - Creating Script
- Selenium - Control Flow
- Selenium - Store Variables
- Selenium - Alerts & Popups
- Selenium - Selenese Commands
- Selenium - Actions Commands
- Selenium - Accessors Commands
- Selenium - Assertions Commands
- Selenium - Assert/Verify Methods
- Selenium - Locating Strategies
- Selenium - Script Debugging
- Selenium - Verification Points
- Selenium - Pattern Matching
- Selenium - JSON Data File
- Selenium - Browser Execution
- Selenium - User Extensions
- Selenium - Code Export
- Selenium - Emitting Code
- Selenium - JavaScript Functions
- Selenium - Plugins
- Selenium WebDriver Tutorial
- Selenium - Introduction
- Selenium WebDriver vs RC
- Selenium - Installation
- Selenium - First Test Script
- Selenium - Driver Sessions
- Selenium - Browser Options
- Selenium - Chrome Options
- Selenium - Edge Options
- Selenium - Firefox Options
- Selenium - Safari Options
- Selenium - Double Click
- Selenium - Right Click
- HTML Report in Python
- Handling Edit Boxes
- Selenium - Single Elements
- Selenium - Multiple Elements
- Selenium Web Elements
- Selenium - File Upload
- Selenium - Locator Strategies
- Selenium - Relative Locators
- Selenium - Finders
- Selenium - Find All Links
- Selenium - User Interactions
- Selenium - WebElement Commands
- Selenium - Browser Interactions
- Selenium - Browser Commands
- Selenium - Browser Navigation
- Selenium - Alerts & Popups
- Selenium - Handling Forms
- Selenium - Windows and Tabs
- Selenium - Handling Links
- Selenium - Input Boxes
- Selenium - Radio Button
- Selenium - Checkboxes
- Selenium - Dropdown Box
- Selenium - Handling IFrames
- Selenium - Handling Cookies
- Selenium - Date Time Picker
- Selenium - Dynamic Web Tables
- Selenium - Actions Class
- Selenium - Action Class
- Selenium - Keyboard Events
- Selenium - Key Up/Down
- Selenium - Copy and Paste
- Selenium - Handle Special Keys
- Selenium - Mouse Events
- Selenium - Drag and Drop
- Selenium - Pen Events
- Selenium - Scroll Operations
- Selenium - Waiting Strategies
- Selenium - Explicit/Implicit Wait
- Selenium - Support Features
- Selenium - Multi Select
- Selenium - Wait Support
- Selenium - Select Support
- Selenium - Color Support
- Selenium - ThreadGuard
- Selenium - Errors & Logging
- Selenium - Exception Handling
- Selenium - Miscellaneous
- Selenium - Handling Ajax Calls
- Selenium - JSON Data File
- Selenium - CSV Data File
- Selenium - Excel Data File
- Selenium - Cross Browser Testing
- Selenium - Multi Browser Testing
- Selenium - Multi Windows Testing
- Selenium - JavaScript Executor
- Selenium - Headless Execution
- Selenium - Capture Screenshots
- Selenium - Capture Videos
- Selenium - Page Object Model
- Selenium - Page Factory
- Selenium - Record & Playback
- Selenium - Frameworks
- Selenium - Browsing Context
- Selenium - DevTools
- Selenium Grid Tutorial
- Selenium - Overview
- Selenium - Architecture
- Selenium - Components
- Selenium - Configuration
- Selenium - Create Test Script
- Selenium - Test Execution
- Selenium - Endpoints
- Selenium - Customizing a Node
- Selenium Reporting Tools
- Selenium - Reporting Tools
- Selenium - TestNG
- Selenium - JUnit
- Selenium - Allure
- Selenium & Other Technologies
- Selenium - Java Tutorial
- Selenium - Python Tutorial
- Selenium - C# Tutorial
- Selenium - Javascript Tutorial
- Selenium - Kotlin Tutorial
- Selenium - Ruby Tutorial
- Selenium - Maven & Jenkins
- Selenium - LogExpert Logging
- Selenium - Log4j Logging
- Selenium - Robot Framework
- Selenium - Github Tutorial
- Selenium - IntelliJ
- Selenium - XPath
- Selenium Miscellaneous Concepts
- Selenium - IE Driver
- Selenium - Automation Frameworks
- Selenium - Keyword Driven Framework
- Selenium - Data Driven Framework
- Selenium - Hybrid Driven Framework
- Selenium - SSL Certificate Error
- Selenium - Alternatives
Selenium IDE - JavaScript Functions
Selenium IDE can be used to execute JavaScript commands to interact with the elements appearing within a browser on a page using the Target field. Sometimes, the locators available in Selenium Webdriver fail to interact with the elements on a page, in those scenarios we can take the help of the JavaScript functions.
Basic Commands to run JavaScript Functions
Execute Script Command
This command is used to execute JavaScript in a window or frame currently active. It is an anonymous function, supports various data types like WebElements, Long, String, Lists, and Boolean. In order to store the return value of the JavaScript in a variable, the return keyword is used.
Execute Async Script Command
It is a multi-threaded approach to execute individual JavaScript tasks on window or frame in currently active. It allows page parsing to continue, optimizing performance and providing great flexibility. This method enables the asynchronous JavaScript to be executed in an optimal way.
Run Script Command
This command allows to run JavaScript functions from the Selenium IDE.
Example 1
Let us create an alert - Tutorialspoint on the below web page using JavaScript functions
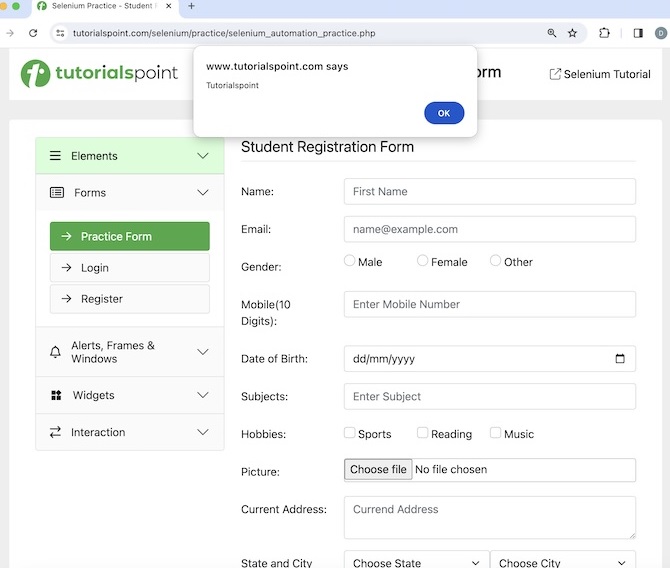
The steps to be followed are listed below −
Step 1 − Click on the Selenium IDE extension visible on the browser after its installation.
Step 2 − Selenium IDE should be launched along with it, a welcome message should be displayed with the version of the tool. In the below image, the version installed is 3.17.2.
Along with this, it gives us the option to select what we would like to do with the tool, like Record a new test in a new project, Open an existing project, Create a new project, and Close Selenium IDE.
Also, a link with the text - the Selenium IDE project page is provided, which on clicking would land us to the Selenium Integrated Development Environment documentation page.
https://www.selenium.dev/selenium-ide/.
Step 3 − Click on the Create a new project link, then enter a project name, say, Test11 under the Please provide a name for your new project. Finally, we would click on the OK button.
Step 4 − We would have the workspace ready in the Selenium IDE now.
Step 5 − Enter open in the Command field, and https://www.tutorialspoint.com/selenium/ in the Target field, to launch the application.
Step 6 − Enter execute script in the Command field and alert("Tutorialspoint") in the Target field.
Step 7 − Enter close in the Command field to close the browser window.
Step 8 − Click on the three dots appearing at the left pane, then select the Rename option.
Step 9 − Enter a name, say Test11 under the Rename Test case field, then click on Rename. The entered name would appear on the left of Selenium IDE.
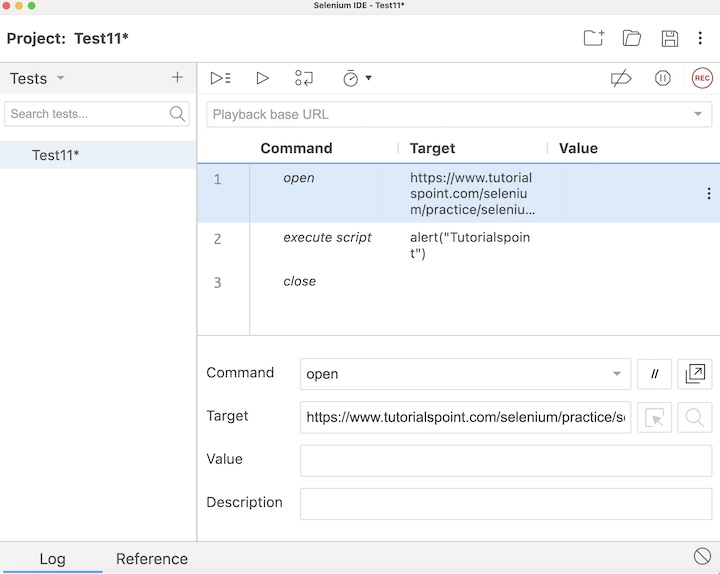
Step 10 − Click on the Run all tests from the top, and wait for the test execution to complete. In our example, we would see Runs: 1, Failures: 0, and a green bar denoting the test ran successfully without any failures. Also, the message that the completed successfully appeared under the Log.
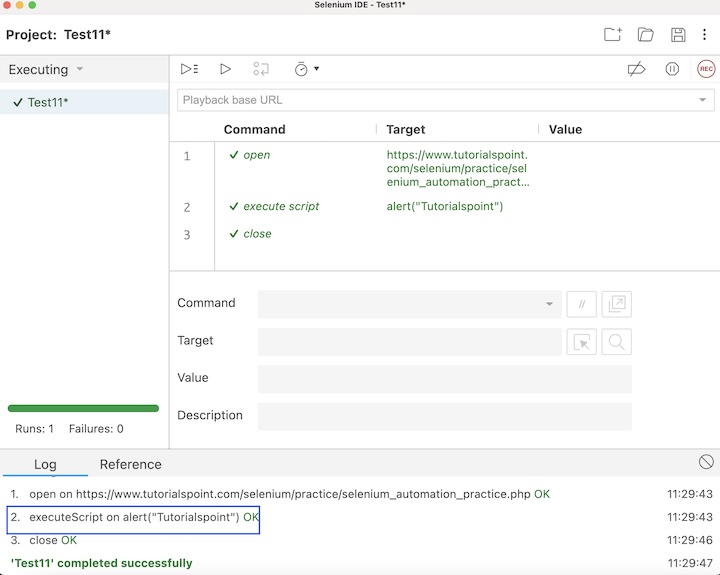
In the example above, we had launched the application, created an alert with the text Tutorialspoint using the JavaScript functions and executed script command in Selenium IDE.
Apart from that, all the test steps, along with the test case name turned green, reflecting a PASS for all the steps. All the steps which reflected under the Log tab, showed an OK in green.
Example 2
Let us take another example of the below page, where we will access the text - Selenium - Automation Practice and also retrieve the value Selenium entered in the input box beside the Name: label.
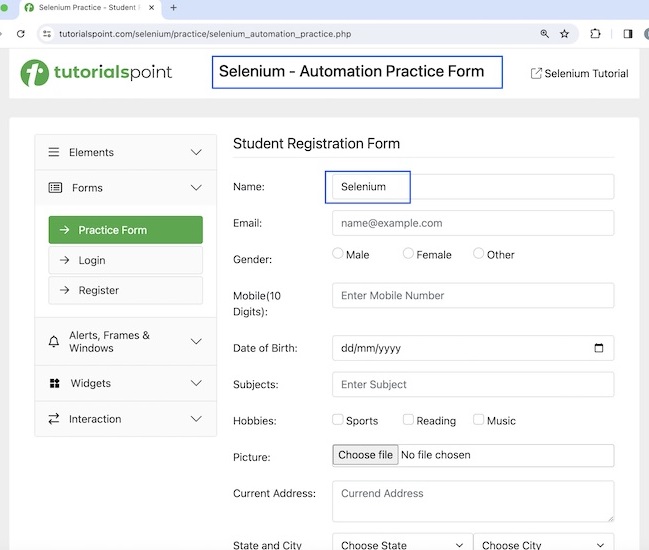
The steps to be followed are listed below −
Step 1 − Follow Steps 1 to 5 as described in the Example 1.
Step 2 − Enter execute script in the Command field and return document.getElementsByTagName('h1')[0].innerHTML in the Target field and value in the Value field.
Please note, document.getElementsByTagName('h1')[0] is the locator value of the text Selenium - Automation Practice Form.
Step 3 − Enter echo in the Command field, ${value} in the Target field. Please note, this would print the text we accessed in Step2 on the web page under the Log in Selenium IDE.
Step 4 − Enter type in the Command field, id=name in the Target field, and Selenium in the Value field. Please note, id=name is the locator value of the input box.
Step 5 − Enter execute script in the Command field and return document.getElementById('name').value in the Target field and valueEntered in the Value field.
Please note, document.getElementById('name') is the locator value of the input box.
Step 6 − Enter echo in the Command field, ${valueEntered} in the Target field. Please note, this would print the text we entered in Step4 on the web page under the Log in Selenium IDE.
Step 7 − Enter close in the Command field to close the browser window.
Step 8 − Click on the Run all tests from the top, and wait for the test execution to complete. In our example, we would see Runs: 1, Failures: 0, and a green bar denoting the test ran successfully without any failures. Also, the message that the completed successfully appeared under the Log.
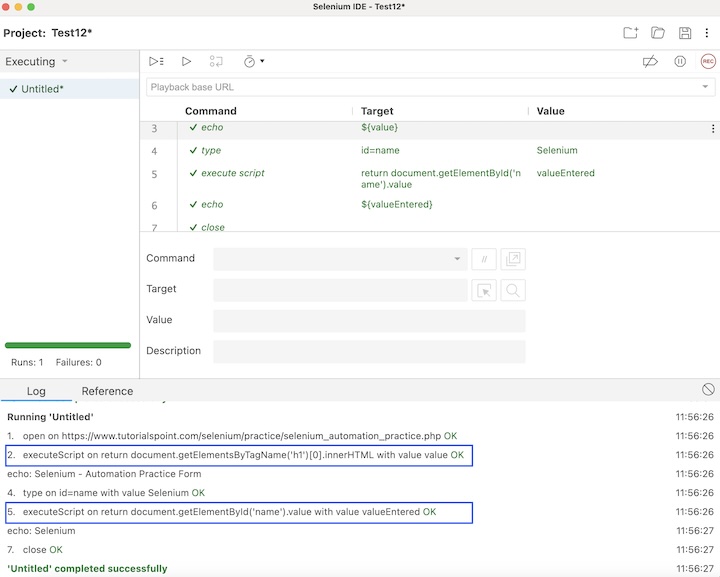
In the example above, we had launched the application and accessed the text - Selenium - Automation Practice Form using the JavaScript command - return document.getElementsByTagName('h1')[0].innerHTML. Then obtained the value entered in the input box with the JavaScript command - return document.getElementById('name').value.
Apart from that, all the test steps, along with the test case name turned green, reflecting a PASS for all the steps. All the steps which reflected under the Log tab, showed an OK in green.
Example 3
Let us take another example of the below page, where we will disable the input box beside the Full Name: label using the JavaScript functions and run script command in Selenium IDE. In the original state, the input box looks like the below image.
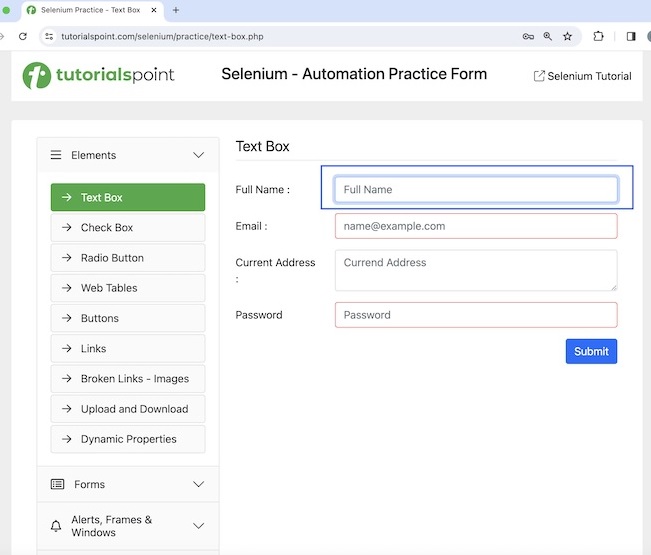
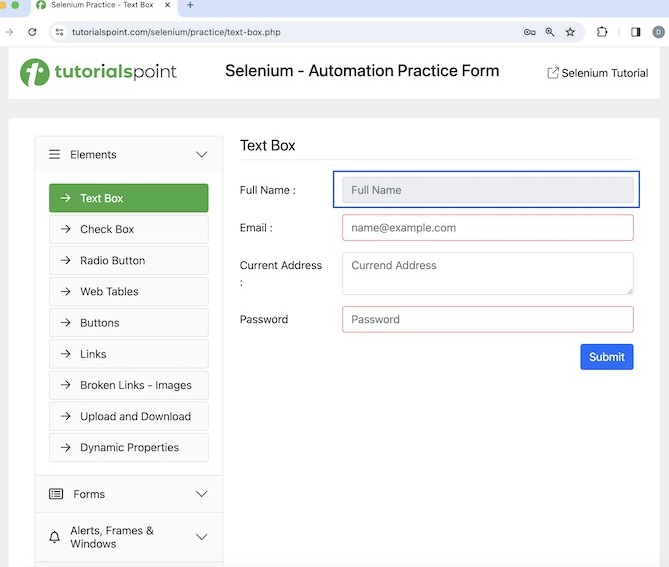
After disabling, the input box will look like the highlighted element in the below image, then we will encounter error if we try to add some text into that disabled field.
The steps to be followed are listed below −
Step 1 − Follow Steps 1 to 5 as described in the Example 1.
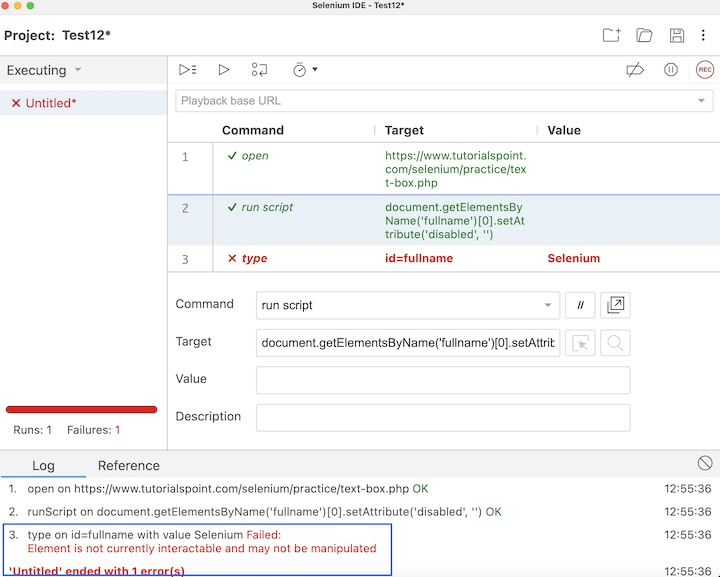
Step 2 − Enter run script in the Command field and document.getElementsByName('fullname')[0].setAttribute('disabled', '') in the Target field.
Please note, document.getElementsName('fullname')[0] is the locator value of the input box.
Step 3 − Enter type in the Command field, id=fullname in the Target field, and Selenium in the Value field. Please note, id=fullname is the locator value of the input box.
Step 4 − Click on the Run all tests from the top, and wait for the test execution to complete. In our example, we would see Runs: 1, Failures: 1, and a red bar denoting the test ran unsuccessfully with failures since we were trying to enter text in a disabled input box. Also, the error message - Element is not currently interactable and may not be manipulated appeared under the Log for the type command.
Example 4
Let us take another example of the same page, where we will first disable the input box beside the Full Name: label, then enable it using the JavaScript functions and run script command in Selenium IDE. We will also refresh the web page and navigate back and forward in the browser taking help of the JavaScript functions and execute script commands.
The steps to be followed are listed below −
Step 1 − Follow Steps 1 to 5 as described in the Example 1.
Step 2 − Enter run script in the Command field and document.getElementsByName('fullname')[0].setAttribute('disabled', '') in the Target field.
Please note, document.getElementsName('fullname')[0] is the locator value of the input box.
Step 3 − Enter run script in the Command field and document.getElementsByName('fullname')[0].removeAttribute('disabled') in the Target field.
Please note, document.getElementsName('fullname')[0] is the locator value of the input box.
Step 4 − Enter type in the Command field, id=fullname in the Target field, and Selenium in the Value field. Please note, id=fullname is the locator value of the input box.
Step 5 − Enter execute script in the Command field and history.go[0] in the Target field to refresh the browser.
Step 6 − Enter open in the Command field, and https://www.tutorialspoint.com/selenium/practice/links.php in the Target field, to launch another application.
Step 7 − Enter execute script in the Command field and window.history.go(-1) in the Target field to navigate back to the browser history.
Step 8 − Enter store title in the Command field, and val in the Value field. Please note, the page title is stored in the variable val.
Step 9 − Enter echo in the Command field, ${val} in the Target field. Please note, this would print the page title we obtained in Step8 on the web page under the Log in Selenium IDE.
Step 10 − Enter execute script in the Command field and window.history.go(1) in the Target field to navigate forward to the browser history.
Step 11 − Enter store title in the Command field, and val1 in the Value field. Please note, the page title is stored in the variable val1.
Step 12 − Enter echo in the Command field, ${val1} in the Target field. Please note, this would print the page title we obtained in Step11 on the web page under the Log in Selenium IDE.
Step 13 − Enter close in the Command field to close the browser window.
Step 14 − Click on the Run all tests from the top, and wait for the test execution to complete. In our example, we would see Runs: 1, Failures: 0, and a green bar denoting the test ran successfully without any failures. Also, the message that the completed successfully appeared under the Log.
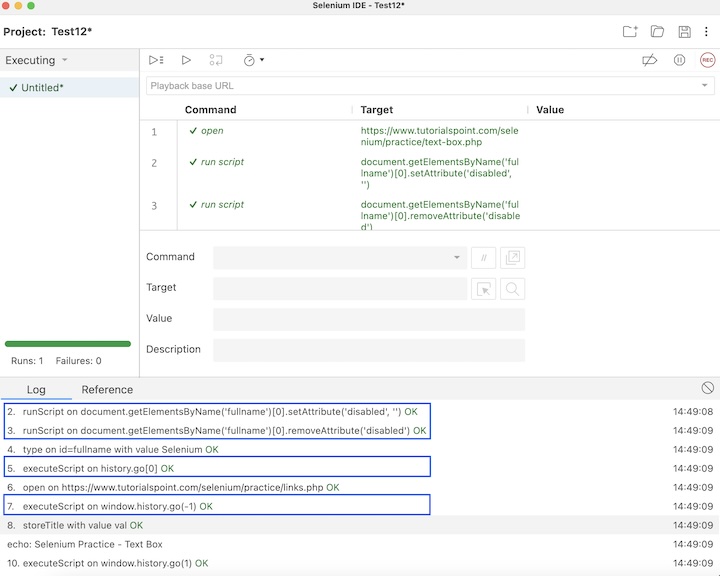
In the example above, we had disabled the input box with the JavaScript function: document.getElementsByName('fullname')[0].setAttribute('disabled', '') along with the run script command, then enabled the same input box with the JavaScript function - document.getElementsByName('fullname')[0].removeAttribute('disabled') using the run script command. We had also refreshed the browser page with the JavaScript function: history.go[0] along with the execute script command.
We had also navigated backward and forward in browser history using the JavaScript functions window.history.go(-1), and window.history.go(1) respectively with the help of the execute script command. Besides, we got a green tick beside the test case name at the top, signifying a passed test.
This concludes our comprehensive take on the tutorial on Selenium IDE - JavaScript functions. Weve started with describing some basic Selenium IDE commands to run JavaScript functions, and examples to walk through how to use the JavaScript functions along with Selenium IDE. This equips you with in-depth knowledge of the JavaScript functions in Selenium IDE. It is wise to keep practicing what youve learned and exploring others relevant to Selenium to deepen your understanding and expand your horizons.