- Selenium - Home
- Selenium - Overview
- Selenium - Components
- Selenium - Automation Testing
- Selenium - Environment Setup
- Selenium - Remote Control
- Selenium - IDE Introduction
- Selenium - Features
- Selenium - Limitations
- Selenium - Installation
- Selenium - Creating Tests
- Selenium - Creating Script
- Selenium - Control Flow
- Selenium - Store Variables
- Selenium - Alerts & Popups
- Selenium - Selenese Commands
- Selenium - Actions Commands
- Selenium - Accessors Commands
- Selenium - Assertions Commands
- Selenium - Assert/Verify Methods
- Selenium - Locating Strategies
- Selenium - Script Debugging
- Selenium - Verification Points
- Selenium - Pattern Matching
- Selenium - JSON Data File
- Selenium - Browser Execution
- Selenium - User Extensions
- Selenium - Code Export
- Selenium - Emitting Code
- Selenium - JavaScript Functions
- Selenium - Plugins
- Selenium WebDriver Tutorial
- Selenium - Introduction
- Selenium WebDriver vs RC
- Selenium - Installation
- Selenium - First Test Script
- Selenium - Driver Sessions
- Selenium - Browser Options
- Selenium - Chrome Options
- Selenium - Edge Options
- Selenium - Firefox Options
- Selenium - Safari Options
- Selenium - Double Click
- Selenium - Right Click
- HTML Report in Python
- Handling Edit Boxes
- Selenium - Single Elements
- Selenium - Multiple Elements
- Selenium Web Elements
- Selenium - File Upload
- Selenium - Locator Strategies
- Selenium - Relative Locators
- Selenium - Finders
- Selenium - Find All Links
- Selenium - User Interactions
- Selenium - WebElement Commands
- Selenium - Browser Interactions
- Selenium - Browser Commands
- Selenium - Browser Navigation
- Selenium - Alerts & Popups
- Selenium - Handling Forms
- Selenium - Windows and Tabs
- Selenium - Handling Links
- Selenium - Input Boxes
- Selenium - Radio Button
- Selenium - Checkboxes
- Selenium - Dropdown Box
- Selenium - Handling IFrames
- Selenium - Handling Cookies
- Selenium - Date Time Picker
- Selenium - Dynamic Web Tables
- Selenium - Actions Class
- Selenium - Action Class
- Selenium - Keyboard Events
- Selenium - Key Up/Down
- Selenium - Copy and Paste
- Selenium - Handle Special Keys
- Selenium - Mouse Events
- Selenium - Drag and Drop
- Selenium - Pen Events
- Selenium - Scroll Operations
- Selenium - Waiting Strategies
- Selenium - Explicit/Implicit Wait
- Selenium - Support Features
- Selenium - Multi Select
- Selenium - Wait Support
- Selenium - Select Support
- Selenium - Color Support
- Selenium - ThreadGuard
- Selenium - Errors & Logging
- Selenium - Exception Handling
- Selenium - Miscellaneous
- Selenium - Handling Ajax Calls
- Selenium - JSON Data File
- Selenium - CSV Data File
- Selenium - Excel Data File
- Selenium - Cross Browser Testing
- Selenium - Multi Browser Testing
- Selenium - Multi Windows Testing
- Selenium - JavaScript Executor
- Selenium - Headless Execution
- Selenium - Capture Screenshots
- Selenium - Capture Videos
- Selenium - Page Object Model
- Selenium - Page Factory
- Selenium - Record & Playback
- Selenium - Frameworks
- Selenium - Browsing Context
- Selenium - DevTools
- Selenium Grid Tutorial
- Selenium - Overview
- Selenium - Architecture
- Selenium - Components
- Selenium - Configuration
- Selenium - Create Test Script
- Selenium - Test Execution
- Selenium - Endpoints
- Selenium - Customizing a Node
- Selenium Reporting Tools
- Selenium - Reporting Tools
- Selenium - TestNG
- Selenium - JUnit
- Selenium - Allure
- Selenium & Other Technologies
- Selenium - Java Tutorial
- Selenium - Python Tutorial
- Selenium - C# Tutorial
- Selenium - Javascript Tutorial
- Selenium - Kotlin Tutorial
- Selenium - Ruby Tutorial
- Selenium - Maven & Jenkins
- Selenium - LogExpert Logging
- Selenium - Log4j Logging
- Selenium - Robot Framework
- Selenium - Github Tutorial
- Selenium - IntelliJ
- Selenium - XPath
- Selenium Miscellaneous Concepts
- Selenium - IE Driver
- Selenium - Automation Frameworks
- Selenium - Keyword Driven Framework
- Selenium - Data Driven Framework
- Selenium - Hybrid Driven Framework
- Selenium - SSL Certificate Error
- Selenium - Alternatives
Selenium WebDriver - Radio Buttons
Selenium Webdriver can be used to handle radio buttons on a web page. In HTML terminology, every radio button is identified by the tagname called input. Also, each radio button on a web page will always have an attribute called type with its value as radio.
Identification of Radio Buttons in HTML
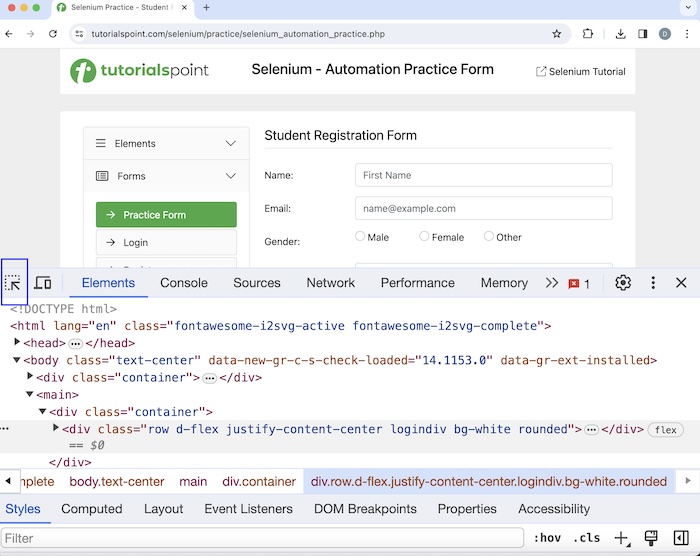
Launch a browser, say Chrome, and right click on the web page, and then click on the Inspect button. For the identifying the radio button on the page, click on the left upward arrow as highlighted below.

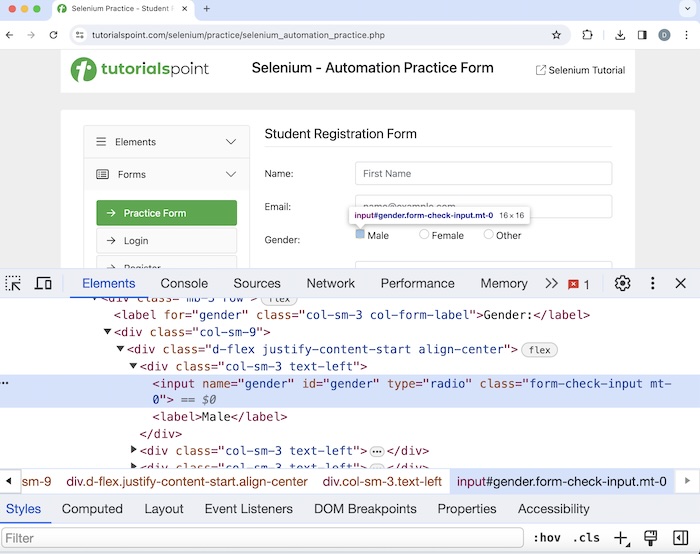
Once we had clicked and pointed the arrow to the radio button (highlighted in the below image), its HTML code was visible, reflecting the input tagname and value of type attribute as radio.

Click and Check Radio Button
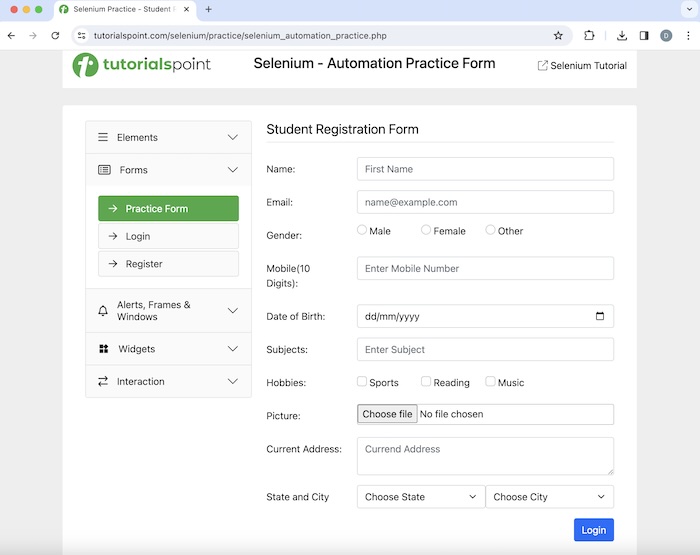
Let us take an example of the above page, where we would click one of the radio buttons with the help of the click() method. Then we would verify if the radio button is clicked using the isSelected() method. This method returns a boolean value (true or false). If a radio button is selected, isSelected() would return true, else false.
Example
package org.example;

import org.openqa.selenium.By;
import org.openqa.selenium.WebDriver;
import org.openqa.selenium.WebElement;
import org.openqa.selenium.chrome.ChromeDriver;
import java.util.concurrent.TimeUnit;

public class HandlingRadioButton {
   public static void main(String[] args) throws InterruptedException {

      // Initiate the Webdriver
      WebDriver driver = new ChromeDriver();

      // adding implicit wait of 15 secs
      driver.manage().timeouts().implicitlyWait(15, TimeUnit.SECONDS);

      // Opening the webpage where we will identify radio button
      driver.get("https://www.tutorialspoint.com/selenium/practice/selenium_automation_practice.php");

      // identify radio button then click
      WebElement radiobtn = driver.findElement(By.xpath("//*[@id='gender']"));
      radiobtn.click();

      // verify if radio button is selected
      boolean result = radiobtn.isSelected();
      System.out.println("Checking if a radio button is selected: " + result);

      // Closing browser
      driver.quit();
   }
}
Output
Checking if a radio button is selected: true

Process finished with exit code 0
In the above example, we had first clicked on a radio button, and then verified if the radio button was clicked in the console with the message - Checking if a radio button is selected: true.
Finally, the message Process finished with exit code 0 was received, signifying successful execution of the code.
Count Radio Buttons
Let us take an example of the below page, where we would count the total number of radio buttons. In this example, the total number of radio buttons should be 3.

Example
package org.example;

import org.openqa.selenium.By;
import org.openqa.selenium.WebDriver;
import org.openqa.selenium.WebElement;
import org.openqa.selenium.chrome.ChromeDriver;
import java.util.List;
import java.util.concurrent.TimeUnit;

public class HandlingRadioButton {
   public static void main(String[] args) throws InterruptedException {

      // Initiate the Webdriver
      WebDriver driver = new ChromeDriver();

      // adding implicit wait of 15 secs
      driver.manage().timeouts().implicitlyWait(15, TimeUnit.SECONDS);

      // Opening the webpage where we will identify radio button
      driver.get("https://www.tutorialspoint.com/selenium/practice/selenium_automation_practice.php");

      // Retrieve all radio buttons using locator and storing in List
      List<WebElement> totalRadioBtns = driver.findElements(By.xpath("//input[@type='radio']"));

      // count number of radio buttons
      int count = totalRadioBtns.size();
      System.out.println("Count the radio buttons: " + count);

      // Closing browser
      driver.quit();
   }
}
Output
Count the radio buttons: 3
In the above example, we had counted the total number of radio buttons on a web page, and received the messages in the console - Count the radio buttons: 3.
Validate Radio Buttons
Let us take an example of the above web page, where we would perform some validations on the radio buttons. First, we would check if the radio button is enabled/disabled using the isEnabled() method. Also, we would verify if it is displayed and selected/unselected using the isDisplayed() and isSelected() methods respectively.
These methods return a boolean value(true or false). If a radio button is selected, enabled and displayed it would return true, else false.
Example
package org.example;

import org.openqa.selenium.By;
import org.openqa.selenium.WebDriver;
import org.openqa.selenium.WebElement;
import org.openqa.selenium.chrome.ChromeDriver;
import java.util.concurrent.TimeUnit;

public class ValidateRadioButton {
   public static void main(String[] args) throws InterruptedException {

      // Initiate the Webdriver
      WebDriver driver = new ChromeDriver();

      // adding implicit wait of 15 secs
      driver.manage().timeouts().implicitlyWait(15, TimeUnit.SECONDS);

      // Opening the webpage where we will click radio button
      driver.get("https://www.tutorialspoint.com/selenium/selenium_automation_practice.htm");

      // identify radio button then click
      WebElement radiobtn = driver.findElement
         (By.xpath("//*[@id='practiceForm']/div[3]/div/div/div[2]/input"));
      radiobtn.click();

      // verify if radio button is selected
      boolean result = radiobtn.isSelected();
      System.out.println("Checking if a radio button is selected: " + result);

      // verify if radio button is displayed
      boolean result1 = radiobtn.isDisplayed();
      System.out.println("Checking if a radio button is displayed: " + result1);

      // verify if radio button is enabled
      boolean result2 = radiobtn.isEnabled();
      System.out.println("Checking if a radio button is enabled: " + result2);

      // identify another radio button
      WebElement radiobtn1 = driver.findElement(By.xpath("//*[@id='gender']"));

      // verify if radio button is not selected
      boolean result3 = radiobtn1.isSelected();
      System.out.println("Checking if the other radio button is unselected: " + result3);

      // Closing browser
      driver.quit();
   }
}
Output
Checking if a radio button is selected: true
Checking if a radio button is displayed: true
Checking if a radio button is enabled: true
Checking if the other radio button is unselected: false
In the above example, we had validated if a radio button was displayed, enabled, and selected, and received the following messages in the console - Checking if a radio button is selected: true, Checking if a radio button is displayed: true, Checking if a radio button is enabled: true and Checking if the other radio button is unselected: false.
Conclusion
This concludes our comprehensive take on the tutorial on Selenium Webdriver Radio Buttons. Weve started with describing identification of radio buttons in HTML, and examples to illustrate how to handle radio buttons in Selenium Webdriver. This equips you with in-depth knowledge of the Selenium Webdriver Radio Buttons. It is wise to keep practicing what youve learned and exploring others relevant to Selenium to deepen your understanding and expand your horizons.