
- Selenium - Home
- Selenium - Overview
- Selenium - Components
- Selenium - Automation Testing
- Selenium - Environment Setup
- Selenium - Remote Control
- Selenium - IDE Introduction
- Selenium - Features
- Selenium - Limitations
- Selenium - Installation
- Selenium - Creating Tests
- Selenium - Creating Script
- Selenium - Control Flow
- Selenium - Store Variables
- Selenium - Alerts & Popups
- Selenium - Selenese Commands
- Selenium - Actions Commands
- Selenium - Accessors Commands
- Selenium - Assertions Commands
- Selenium - Assert/Verify Methods
- Selenium - Locating Strategies
- Selenium - Script Debugging
- Selenium - Verification Points
- Selenium - Pattern Matching
- Selenium - JSON Data File
- Selenium - Browser Execution
- Selenium - User Extensions
- Selenium - Code Export
- Selenium - Emitting Code
- Selenium - JavaScript Functions
- Selenium - Plugins
- Selenium WebDriver Tutorial
- Selenium - Introduction
- Selenium WebDriver vs RC
- Selenium - Installation
- Selenium - First Test Script
- Selenium - Driver Sessions
- Selenium - Browser Options
- Selenium - Chrome Options
- Selenium - Edge Options
- Selenium - Firefox Options
- Selenium - Safari Options
- Selenium - Double Click
- Selenium - Right Click
- HTML Report in Python
- Handling Edit Boxes
- Selenium - Single Elements
- Selenium - Multiple Elements
- Selenium Web Elements
- Selenium - File Upload
- Selenium - Locator Strategies
- Selenium - Relative Locators
- Selenium - Finders
- Selenium - Find All Links
- Selenium - User Interactions
- Selenium - WebElement Commands
- Selenium - Browser Interactions
- Selenium - Browser Commands
- Selenium - Browser Navigation
- Selenium - Alerts & Popups
- Selenium - Handling Forms
- Selenium - Windows and Tabs
- Selenium - Handling Links
- Selenium - Input Boxes
- Selenium - Radio Button
- Selenium - Checkboxes
- Selenium - Dropdown Box
- Selenium - Handling IFrames
- Selenium - Handling Cookies
- Selenium - Date Time Picker
- Selenium - Dynamic Web Tables
- Selenium - Actions Class
- Selenium - Action Class
- Selenium - Keyboard Events
- Selenium - Key Up/Down
- Selenium - Copy and Paste
- Selenium - Handle Special Keys
- Selenium - Mouse Events
- Selenium - Drag and Drop
- Selenium - Pen Events
- Selenium - Scroll Operations
- Selenium - Waiting Strategies
- Selenium - Explicit/Implicit Wait
- Selenium - Support Features
- Selenium - Multi Select
- Selenium - Wait Support
- Selenium - Select Support
- Selenium - Color Support
- Selenium - ThreadGuard
- Selenium - Errors & Logging
- Selenium - Exception Handling
- Selenium - Miscellaneous
- Selenium - Handling Ajax Calls
- Selenium - JSON Data File
- Selenium - CSV Data File
- Selenium - Excel Data File
- Selenium - Cross Browser Testing
- Selenium - Multi Browser Testing
- Selenium - Multi Windows Testing
- Selenium - JavaScript Executor
- Selenium - Headless Execution
- Selenium - Capture Screenshots
- Selenium - Capture Videos
- Selenium - Page Object Model
- Selenium - Page Factory
- Selenium - Record & Playback
- Selenium - Frameworks
- Selenium - Browsing Context
- Selenium - DevTools
- Selenium Grid Tutorial
- Selenium - Overview
- Selenium - Architecture
- Selenium - Components
- Selenium - Configuration
- Selenium - Create Test Script
- Selenium - Test Execution
- Selenium - Endpoints
- Selenium - Customizing a Node
- Selenium Reporting Tools
- Selenium - Reporting Tools
- Selenium - TestNG
- Selenium - JUnit
- Selenium - Allure
- Selenium & Other Technologies
- Selenium - Java Tutorial
- Selenium - Python Tutorial
- Selenium - C# Tutorial
- Selenium - Javascript Tutorial
- Selenium - Kotlin Tutorial
- Selenium - Ruby Tutorial
- Selenium - Maven & Jenkins
- Selenium - LogExpert Logging
- Selenium - Log4j Logging
- Selenium - Robot Framework
- Selenium - Github Tutorial
- Selenium - IntelliJ
- Selenium - XPath
- Selenium Miscellaneous Concepts
- Selenium - IE Driver
- Selenium - Automation Frameworks
- Selenium - Keyword Driven Framework
- Selenium - Data Driven Framework
- Selenium - Hybrid Driven Framework
- Selenium - SSL Certificate Error
- Selenium - Alternatives
Selenium with Python Tutorial
Selenium is used for developing test cases for mostly web based applications. It can be used with various programming languages like Java, Python, Kotlin, and so on.
Setup Selenium with Python and Launch Browser
Step 1 − Download and install Python from the link Latest Version for Windows.
To get a more detailed view on how setup Python, refer to the link Python Environment Setup.
Once we have successfully installed Python, confirm its installation by running the command: python version, from the command prompt. The output of the command executed would point to the Python version installed in the machine.
Step 2 − Install the Python code editor called the PyCharm from the link PyCharm.
Using this editor, we can start working on a Python project to start our test automation. To get a more detailed view on how to set up PyCharm, refer to the below link Pycharm Tutorial.
Step 3 − Run the command: pip install selenium from the command prompt. This is done to install the Selenium. To confirm the version of Selenium installed in the machine, run the command −
pip show selenium
The output of this command gave the below result −
Name: selenium
Version: 4.19.0
Summary: None
Home-page: https://www.selenium.dev
Author: None
Author-email: None
License: Apache 2.0.
Step 4 − Restart PyCharm once Step 3 has been completed.
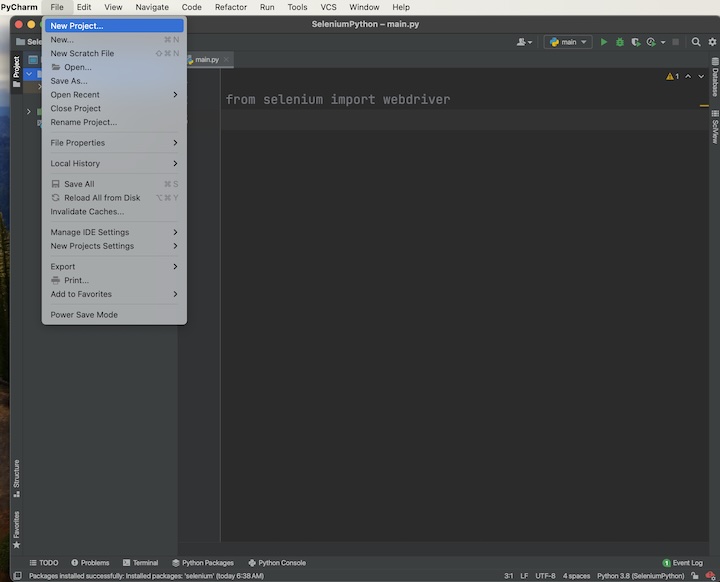
Step 5 − Open PyCharm and create a New Project by navigating to the File menu.
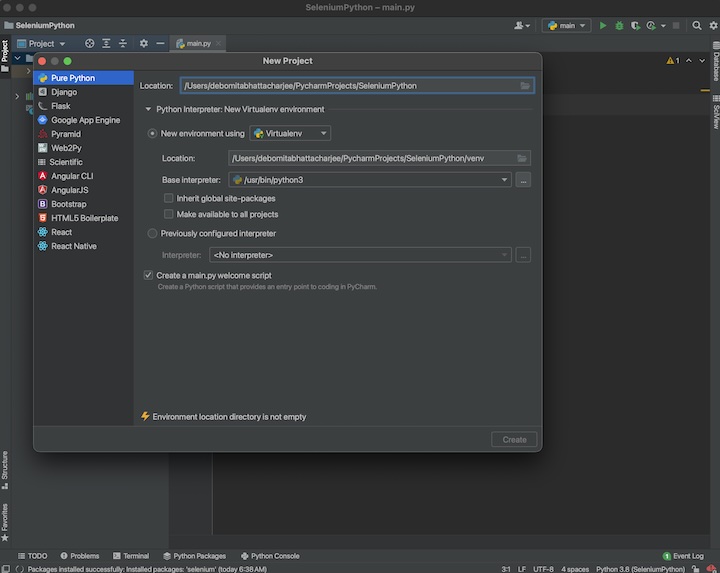
Enter the project name and location within the Location field, and then click on the Create button.
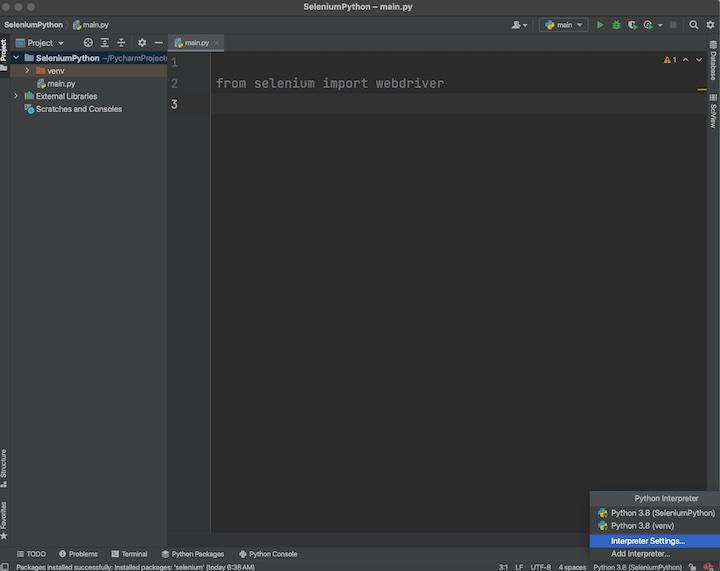
Step 6 − From the right bottom corner of the PyCharm editor, select the option Interpreter Settings.
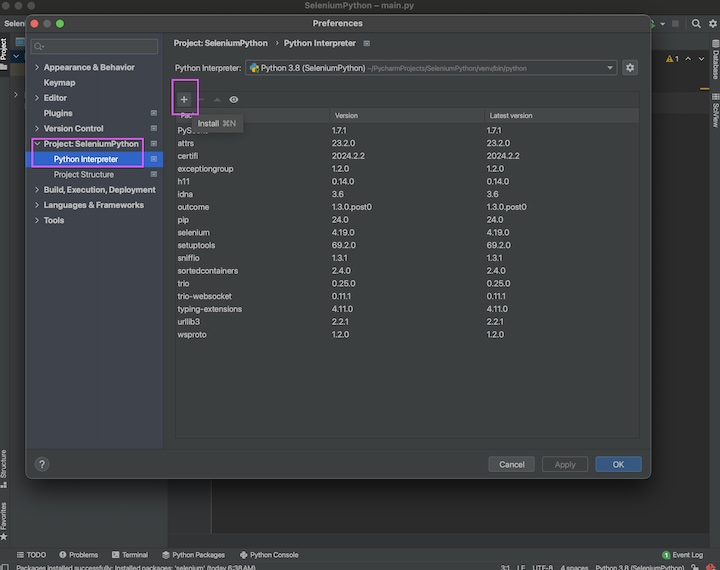
Select the option Python Interpreter from the left, then click on '+'.
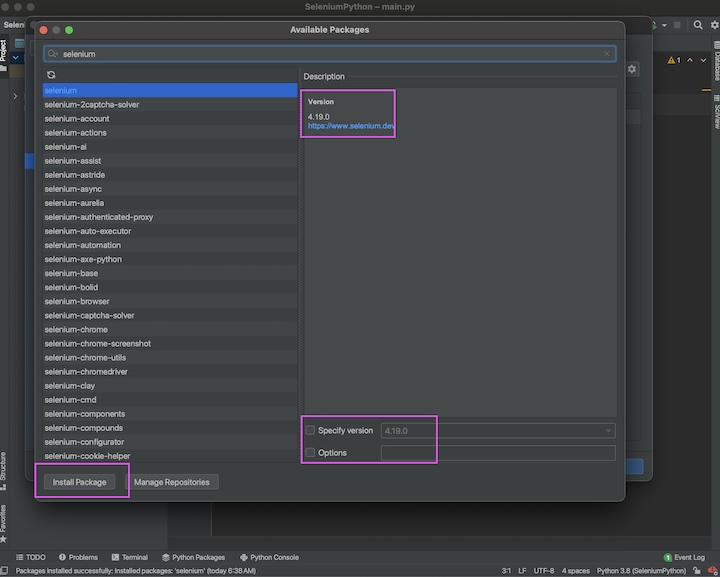
Step 7 − Enter selenium in the package search box inside the Available Packages popup, then the search results appear along with the Description to the right. The Description contains information about the version of the Selenium package that shall be installed.
There is also an option to install a specific version of the Selenium package beside the Specify version field. Then click on the Install Package button. After successful installation, the message Package 'selenium' installed successfully should display.
Step 8 − Enter webdriver-manager in the package search box inside the Available Packages popup, and install it in the same way.
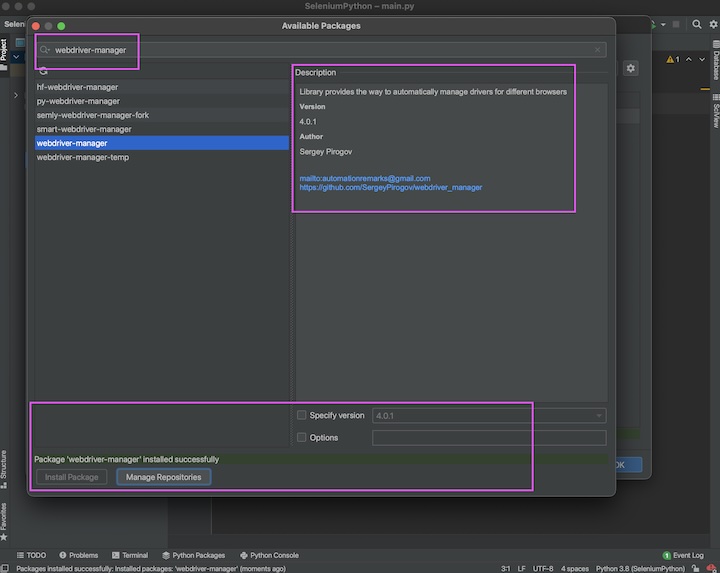
Exit out of the Available Packages popup.
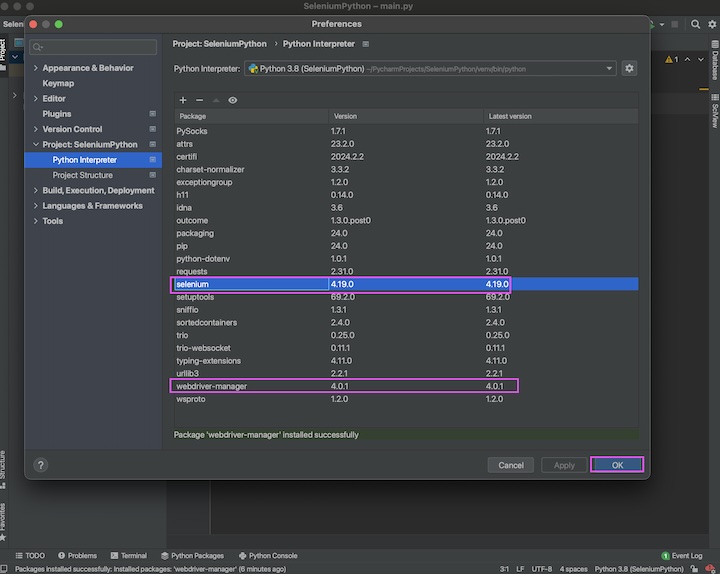
Step 9 − Both the packages selenium, and webdriver-manager should reflect under the Package. Click on the OK button. Restart PyCharm.
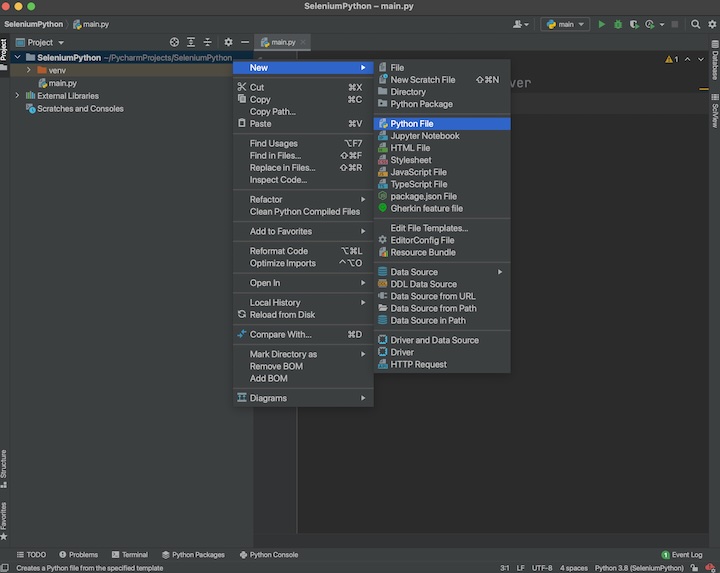
Step 10 − Create the first test case, by right clicking on the Project folder. Here, we have given the project name as SeleniumPython. Then click on New and finally click on the Python File option.
Step 11 − Enter a filename, say Test1.py and select the option Python File, finally click on Enter.
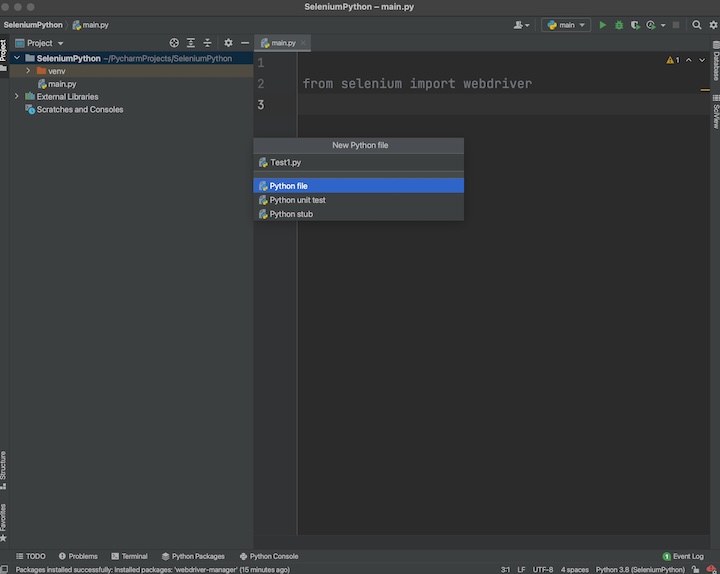
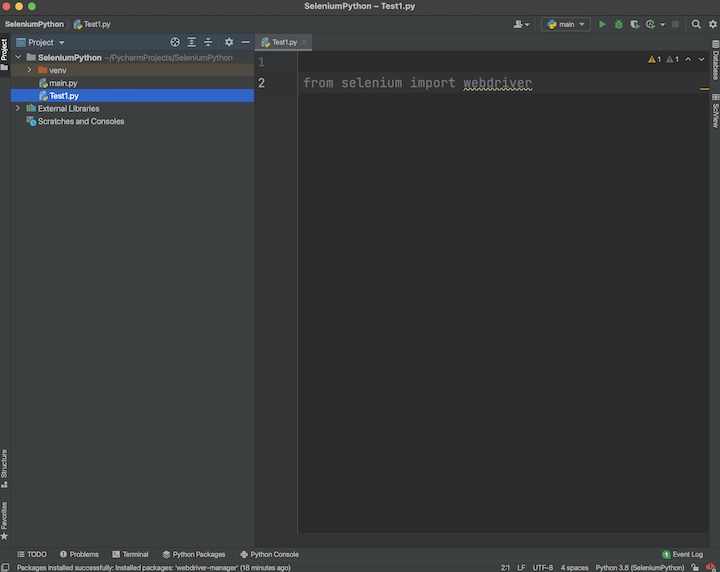
The Test1.py should appear in the left under the SeleniumPython project folder.
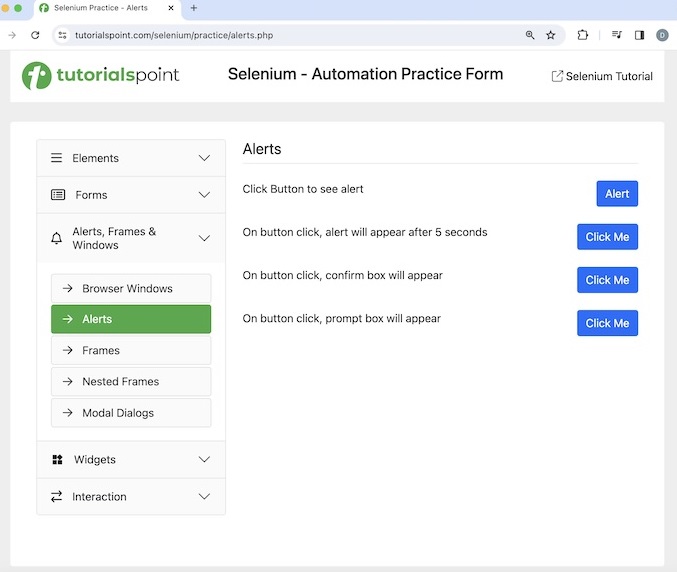
Step 12 − Open the newly created Python file with the name Test1.py, and obtain the page title - Selenium Practice - Alerts of the below page.
Example
from selenium import webdriver

# create instance of webdriver
driver = webdriver.Chrome()

# launch application
driver.get("https://www.tutorialspoint.com/selenium/practice/alerts.php")

# get page title
print("Page title is: " + driver.title)

# quitting browser
driver.quit
Output
Page title is: Selenium Practice - Alerts

Process finished with exit code 0
In the above example, we had launched an application and obtained its page title in the console with the message - Page title is: Selenium Practice - Alerts.
The output shows the message - Process with exit code 0 meaning that the above code executed successfully.
Identify Element and Check Its Functionality using Selenium Python
As an application gets launched, the users perform actions on the web elements on the web page like clicking on a link or a button, entering text within an input box, submitting a form, and so on for automating the test cases.
The first step is to locate the elements. There are various locators available in Selenium like the id, class name, class, name, tagname, partial link text, link text, tagname, xpath, and css. These locators are used with the find_element() method in Python.
For example, driver.find_element("classname", 'btn-primary') locates the first element with the class name attribute value as btn-primary. In case there is no element with that matching value of the class name attribute, NoSuchElementException is thrown.
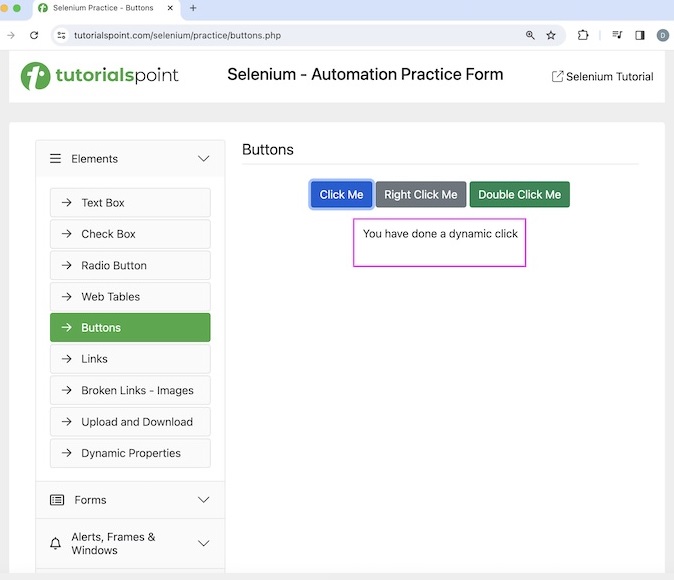
Let us see the html code of the Click Me button highlighted in the below image −
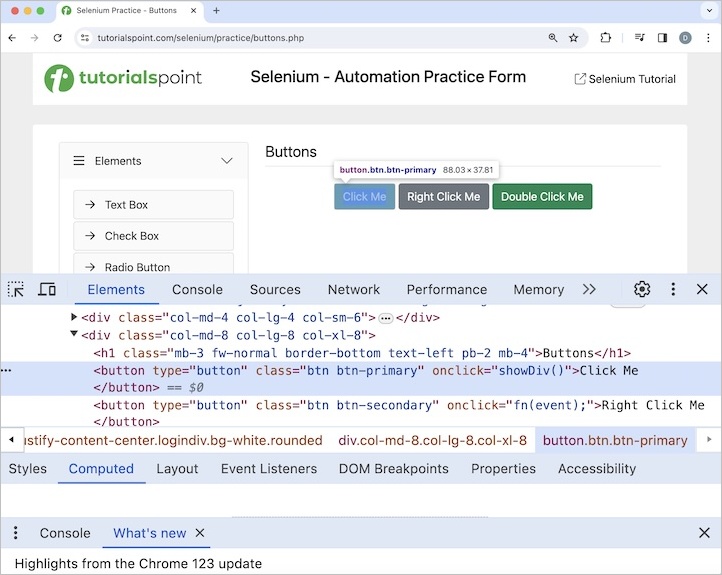
Its class name attribute with value btn-primary. Click on Click Me button, post that the text You have done a dynamic click appears on the page.
Example
from selenium import webdriver
from selenium.webdriver.common.by import By

# create instance of webdriver
driver = webdriver.Chrome()

# implicit wait of 15 seconds
driver.implicitly_wait(15)

# launch application
driver.get("https://www.tutorialspoint.com/selenium/practice/buttons.php")

# identify element with class name
button = driver.find_element(By.CLASS_NAME, 'btn-primary')

# click on button
button.click()

# identify element with id
txt = driver.find_element(By.ID, 'welcomeDiv')

# get text
print("Text obtained is: " + txt.text)

# quitting browser
driver.quit
Output
Text obtained is: You have done a dynamic click
We had retrieved the text after clicking Click Me with the message in the console - Text obtained is: You have done a dynamic click.
Conclusion
This concludes our comprehensive take on the tutorial on Selenium Python Tutorial. Weve started with describing how to set up Selenium with Python and launch a browser, and how to identify an element and check its functionality using Selenium Python. This equips you with in-depth knowledge of the Selenium Python Tutorial. It is wise to keep practicing what youve learned and exploring others relevant to Selenium to deepen your understanding and expand your horizons.