- Selenium - Home
- Selenium - Overview
- Selenium - Components
- Selenium - Automation Testing
- Selenium - Environment Setup
- Selenium - Remote Control
- Selenium - IDE Introduction
- Selenium - Features
- Selenium - Limitations
- Selenium - Installation
- Selenium - Creating Tests
- Selenium - Creating Script
- Selenium - Control Flow
- Selenium - Store Variables
- Selenium - Alerts & Popups
- Selenium - Selenese Commands
- Selenium - Actions Commands
- Selenium - Accessors Commands
- Selenium - Assertions Commands
- Selenium - Assert/Verify Methods
- Selenium - Locating Strategies
- Selenium - Script Debugging
- Selenium - Verification Points
- Selenium - Pattern Matching
- Selenium - JSON Data File
- Selenium - Browser Execution
- Selenium - User Extensions
- Selenium - Code Export
- Selenium - Emitting Code
- Selenium - JavaScript Functions
- Selenium - Plugins
- Selenium WebDriver Tutorial
- Selenium - Introduction
- Selenium WebDriver vs RC
- Selenium - Installation
- Selenium - First Test Script
- Selenium - Driver Sessions
- Selenium - Browser Options
- Selenium - Chrome Options
- Selenium - Edge Options
- Selenium - Firefox Options
- Selenium - Safari Options
- Selenium - Double Click
- Selenium - Right Click
- HTML Report in Python
- Handling Edit Boxes
- Selenium - Single Elements
- Selenium - Multiple Elements
- Selenium Web Elements
- Selenium - File Upload
- Selenium - Locator Strategies
- Selenium - Relative Locators
- Selenium - Finders
- Selenium - Find All Links
- Selenium - User Interactions
- Selenium - WebElement Commands
- Selenium - Browser Interactions
- Selenium - Browser Commands
- Selenium - Browser Navigation
- Selenium - Alerts & Popups
- Selenium - Handling Forms
- Selenium - Windows and Tabs
- Selenium - Handling Links
- Selenium - Input Boxes
- Selenium - Radio Button
- Selenium - Checkboxes
- Selenium - Dropdown Box
- Selenium - Handling IFrames
- Selenium - Handling Cookies
- Selenium - Date Time Picker
- Selenium - Dynamic Web Tables
- Selenium - Actions Class
- Selenium - Action Class
- Selenium - Keyboard Events
- Selenium - Key Up/Down
- Selenium - Copy and Paste
- Selenium - Handle Special Keys
- Selenium - Mouse Events
- Selenium - Drag and Drop
- Selenium - Pen Events
- Selenium - Scroll Operations
- Selenium - Waiting Strategies
- Selenium - Explicit/Implicit Wait
- Selenium - Support Features
- Selenium - Multi Select
- Selenium - Wait Support
- Selenium - Select Support
- Selenium - Color Support
- Selenium - ThreadGuard
- Selenium - Errors & Logging
- Selenium - Exception Handling
- Selenium - Miscellaneous
- Selenium - Handling Ajax Calls
- Selenium - JSON Data File
- Selenium - CSV Data File
- Selenium - Excel Data File
- Selenium - Cross Browser Testing
- Selenium - Multi Browser Testing
- Selenium - Multi Windows Testing
- Selenium - JavaScript Executor
- Selenium - Headless Execution
- Selenium - Capture Screenshots
- Selenium - Capture Videos
- Selenium - Page Object Model
- Selenium - Page Factory
- Selenium - Record & Playback
- Selenium - Frameworks
- Selenium - Browsing Context
- Selenium - DevTools
- Selenium Grid Tutorial
- Selenium - Overview
- Selenium - Architecture
- Selenium - Components
- Selenium - Configuration
- Selenium - Create Test Script
- Selenium - Test Execution
- Selenium - Endpoints
- Selenium - Customizing a Node
- Selenium Reporting Tools
- Selenium - Reporting Tools
- Selenium - TestNG
- Selenium - JUnit
- Selenium - Allure
- Selenium & Other Technologies
- Selenium - Java Tutorial
- Selenium - Python Tutorial
- Selenium - C# Tutorial
- Selenium - Javascript Tutorial
- Selenium - Kotlin Tutorial
- Selenium - Ruby Tutorial
- Selenium - Maven & Jenkins
- Selenium - LogExpert Logging
- Selenium - Log4j Logging
- Selenium - Robot Framework
- Selenium - Github Tutorial
- Selenium - IntelliJ
- Selenium - XPath
- Selenium Miscellaneous Concepts
- Selenium - IE Driver
- Selenium - Automation Frameworks
- Selenium - Keyword Driven Framework
- Selenium - Data Driven Framework
- Selenium - Hybrid Driven Framework
- Selenium - SSL Certificate Error
- Selenium - Alternatives
IntelliJ for Selenium
We would need to configure Selenium with an editor to execute the automated tests. There are several editors available for example: Eclipse, IntelliJ, Atom, Sublime, and so on. Using these editors, we can begin working on a Java project to start test automation.
Prerequisites to set up IntelliJ for Selenium
Download and install Java (version above 17) with the below link, and validate if it is available with the following command −
java version
https://www.oracle.com/java/technologies/downloads/.
To get more about Java configuration, please refer to the below link −
https://www.youtube.com/watch?v=bxIZ1GVWYkQ.
Download and install maven with the below link, and validate if it is available with the following command −
mvn -version
https://maven.apache.org/download.cgi.
To get more about Maven configuration, refer to the link Maven Environment Setup
Sets up IntelliJ for Selenium
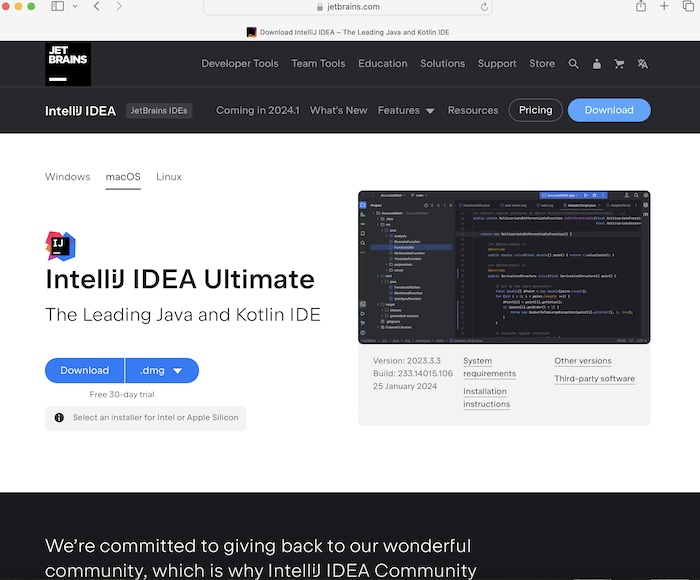
Step 1 − Navigate to the official website of IntelliJ (which is a product of Jetbrains) using the below link and then click on Download −
https://www.jetbrains.com/idea/.

Step 2 − Once we navigate to the next page, we will get the option to download IntelliJ in various operating systems, like Windows, macOS, and Linux. Click on the tab based on the current operating system.
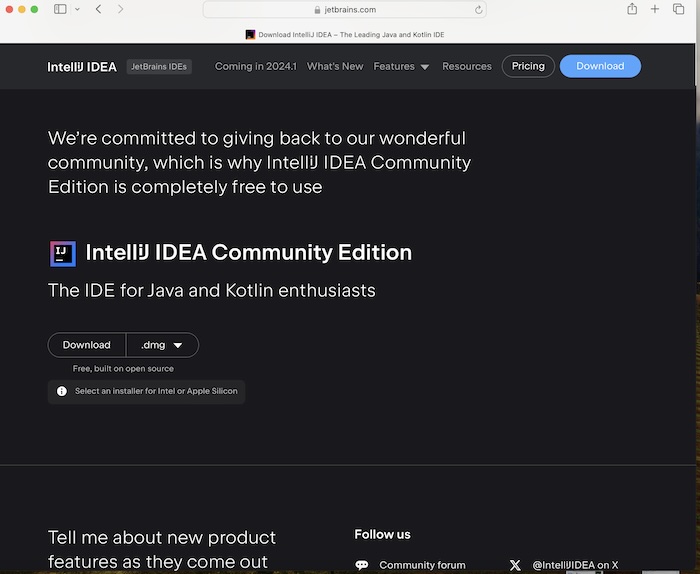
IntelliJ comes in two versions, Paid and Community(which is free).

Step 3 − We would download the Community version. For that we would move down to the IntelliJ IDEA Community Edition section and then click on Download.

Step 4 − IntelliJ logo should display for a few seconds, and next the JETBRAINS COMMUNITY EDITION TERMS should appear. Click the checkbox to accept the terms and conditions, then click on Continue.
Step 5 − Welcome to IntelliJ IDEA should appear. Click on the New Project button.
Step 6 − Enter a name under Name: field. Select Language as Java, Build System as Maven, and a JDK version, then click on Create.
Step 7 − Enter an ArtifactId and then click on Create.
Step 8 − IntelliJ editor setup should be completed successfully.
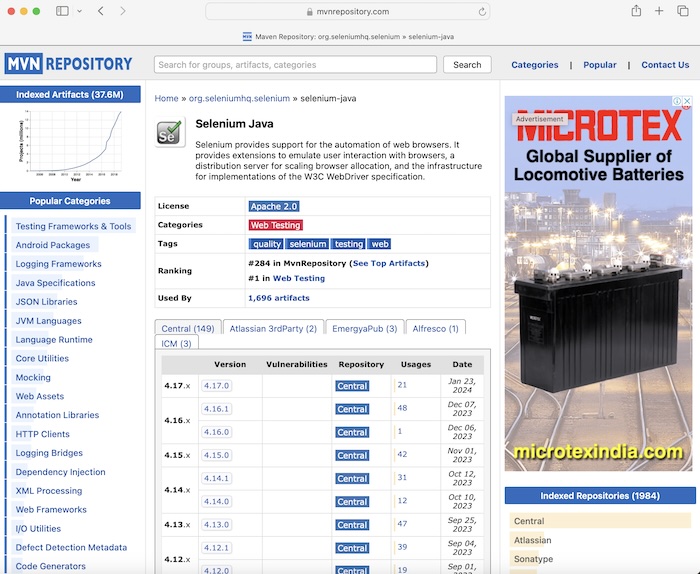
Step 9 − Add the Selenium Maven dependencies to the pom.xml file from the link Selenium Java

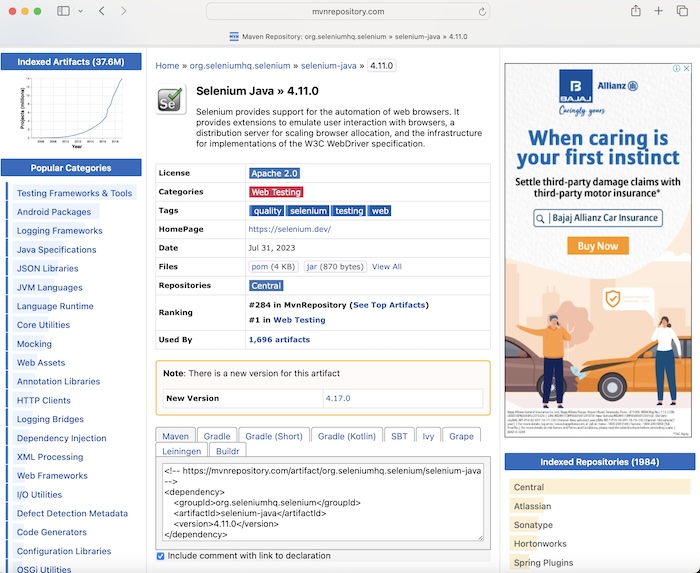
Step 10 − Selected and clicked on a version link under the Central tab. We navigated to the Selenium Java >> <version> page. Copied the dependency under Maven tab.

Dependency example −
<!-- https://mvnrepository.com/artifact/org.seleniumhq.selenium/selenium-java -->
<dependency>
   <groupId>org.seleniumhq.selenium</groupId>
   <artifactId>selenium-java</artifactId>
   <version>4.11.0</version>
</dependency>
Step 11 − Pasted the dependency copied in the Step 9 in the pom.xml file (available under the Maven Project created in the IntelliJ workspace).
Step 12 − Added the below code in the Main.java file.
Code Implementation
package org.example;

import org.openqa.selenium.WebDriver;
import org.openqa.selenium.chrome.ChromeDriver;

public class Main {
   public static void main(String[] args) throws InterruptedException {
      WebDriver driver = new ChromeDriver();
      driver.get("https://www.google.com");
      System.out.println("Browser title: " + driver.getTitle());
   }
}
Dependencies added in pom.xml file −
<?xml version="1.0" encoding="UTF-8"?>
<project xmlns="http://maven.apache.org/POM/4.0.0"
   xmlns:xsi="http://www.w3.org/2001/XMLSchema-instance"
   xsi:schemaLocation="http://maven.apache.org/POM/4.0.0
   http://maven.apache.org/xsd/maven-4.0.0.xsd">

   <modelVersion>4.0.0</modelVersion>
   <groupId>org.example</groupId>
   <artifactId>SeleniumJava</artifactId>
   <version>1.0-SNAPSHOT</version>

   <properties>
      <maven.compiler.source>16</maven.compiler.source>
      <maven.compiler.target>16</maven.compiler.target>
      <project.build.sourceEncoding>UTF-8</project.build.sourceEncoding>
   </properties>

   <!-- https://mvnrepository.com/artifact/org.seleniumhq.selenium/selenium-java -->
   <dependencies>
      <dependency>
         <groupId>org.seleniumhq.selenium</groupId>
         <artifactId>selenium-java</artifactId>
         <version>4.11.0</version>
      </dependency>
   </dependencies>
</project>
Step 13 − Right click and select Run Main.main() option. Wait till the run has completed.
Step 14 − Chrome browser got launched, and we had got the output in the console- Browser Title: Google with the message Process finished with exit code 0, signifying successful execution of the code.
Along with that Chrome browser got launched with the message Chrome is being controlled by automated test software.
Conclusion
This concludes our comprehensive take on the tutorial on Intellij Selenium. Weve started with describing prerequisites to set up IntelliJ for Selenium, and walked through steps to set up IntelliJ along with Selenium. This equips you with in-depth knowledge of the Intellij Selenium. It is wise to keep practicing what youve learned and exploring others relevant to Selenium to deepen your understanding and expand your horizons.