
- Selenium - Home
- Selenium - Overview
- Selenium - Components
- Selenium - Automation Testing
- Selenium - Environment Setup
- Selenium - Remote Control
- Selenium - IDE Introduction
- Selenium - Features
- Selenium - Limitations
- Selenium - Installation
- Selenium - Creating Tests
- Selenium - Creating Script
- Selenium - Control Flow
- Selenium - Store Variables
- Selenium - Alerts & Popups
- Selenium - Selenese Commands
- Selenium - Actions Commands
- Selenium - Accessors Commands
- Selenium - Assertions Commands
- Selenium - Assert/Verify Methods
- Selenium - Locating Strategies
- Selenium - Script Debugging
- Selenium - Verification Points
- Selenium - Pattern Matching
- Selenium - JSON Data File
- Selenium - Browser Execution
- Selenium - User Extensions
- Selenium - Code Export
- Selenium - Emitting Code
- Selenium - JavaScript Functions
- Selenium - Plugins
- Selenium WebDriver Tutorial
- Selenium - Introduction
- Selenium WebDriver vs RC
- Selenium - Installation
- Selenium - First Test Script
- Selenium - Driver Sessions
- Selenium - Browser Options
- Selenium - Chrome Options
- Selenium - Edge Options
- Selenium - Firefox Options
- Selenium - Safari Options
- Selenium - Double Click
- Selenium - Right Click
- HTML Report in Python
- Handling Edit Boxes
- Selenium - Single Elements
- Selenium - Multiple Elements
- Selenium Web Elements
- Selenium - File Upload
- Selenium - Locator Strategies
- Selenium - Relative Locators
- Selenium - Finders
- Selenium - Find All Links
- Selenium - User Interactions
- Selenium - WebElement Commands
- Selenium - Browser Interactions
- Selenium - Browser Commands
- Selenium - Browser Navigation
- Selenium - Alerts & Popups
- Selenium - Handling Forms
- Selenium - Windows and Tabs
- Selenium - Handling Links
- Selenium - Input Boxes
- Selenium - Radio Button
- Selenium - Checkboxes
- Selenium - Dropdown Box
- Selenium - Handling IFrames
- Selenium - Handling Cookies
- Selenium - Date Time Picker
- Selenium - Dynamic Web Tables
- Selenium - Actions Class
- Selenium - Action Class
- Selenium - Keyboard Events
- Selenium - Key Up/Down
- Selenium - Copy and Paste
- Selenium - Handle Special Keys
- Selenium - Mouse Events
- Selenium - Drag and Drop
- Selenium - Pen Events
- Selenium - Scroll Operations
- Selenium - Waiting Strategies
- Selenium - Explicit/Implicit Wait
- Selenium - Support Features
- Selenium - Multi Select
- Selenium - Wait Support
- Selenium - Select Support
- Selenium - Color Support
- Selenium - ThreadGuard
- Selenium - Errors & Logging
- Selenium - Exception Handling
- Selenium - Miscellaneous
- Selenium - Handling Ajax Calls
- Selenium - JSON Data File
- Selenium - CSV Data File
- Selenium - Excel Data File
- Selenium - Cross Browser Testing
- Selenium - Multi Browser Testing
- Selenium - Multi Windows Testing
- Selenium - JavaScript Executor
- Selenium - Headless Execution
- Selenium - Capture Screenshots
- Selenium - Capture Videos
- Selenium - Page Object Model
- Selenium - Page Factory
- Selenium - Record & Playback
- Selenium - Frameworks
- Selenium - Browsing Context
- Selenium - DevTools
- Selenium Grid Tutorial
- Selenium - Overview
- Selenium - Architecture
- Selenium - Components
- Selenium - Configuration
- Selenium - Create Test Script
- Selenium - Test Execution
- Selenium - Endpoints
- Selenium - Customizing a Node
- Selenium Reporting Tools
- Selenium - Reporting Tools
- Selenium - TestNG
- Selenium - JUnit
- Selenium - Allure
- Selenium & Other Technologies
- Selenium - Java Tutorial
- Selenium - Python Tutorial
- Selenium - C# Tutorial
- Selenium - Javascript Tutorial
- Selenium - Kotlin Tutorial
- Selenium - Ruby Tutorial
- Selenium - Maven & Jenkins
- Selenium - LogExpert Logging
- Selenium - Log4j Logging
- Selenium - Robot Framework
- Selenium - Github Tutorial
- Selenium - IntelliJ
- Selenium - XPath
- Selenium Miscellaneous Concepts
- Selenium - IE Driver
- Selenium - Automation Frameworks
- Selenium - Keyword Driven Framework
- Selenium - Data Driven Framework
- Selenium - Hybrid Driven Framework
- Selenium - SSL Certificate Error
- Selenium - Alternatives
Selenium IDE - Creating Script
Selenium IDE can be used to create test scripts for automation. The latest version of Selenium IDE is available as extensions for both Chrome and Firefox. In order to create tests on Selenium IDE, the basic prerequisite would be to download the Chrome or Firefox extension for Selenium IDE from their respective web stores.
Once we would start creating a script in Selenium IDE, we would get hold of the test script editor box where each part of the script editor box has a specific functionality to perform.
Creating a Test Script in Selenium IDE
The steps to create a test script in Selenium IDE are listed below −
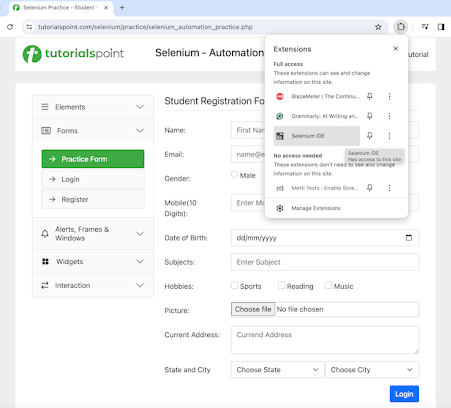
Step 1 − Click on the Selenium IDE extension visible on the browser after its installation.
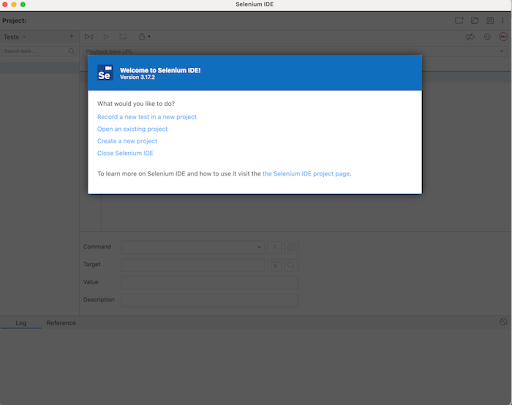
Step 2 − Selenium IDE should be launched along with it, a welcome message should be displayed with the version of the tool. In the below image, the version installed is 3.17.2.
Along with this, it gives us the option to select what we would like to do with the tool, like Record a new test in a new project, Open an existing project, Create a new project, and Close Selenium IDE.
Also, a link with the text - the Selenium IDE project page is provided, which on clicking would land us to the Selenium Integrated Development Environment documentation page.
https://www.selenium.dev/selenium-ide/
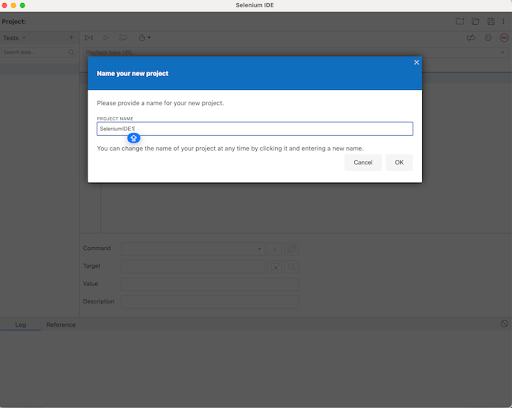
Step 3 − We would click on the option Record a new test in a new project. After which we would need to enter the PROJECT NAME, say SeleniumIDE1. Finally, we would click OK.
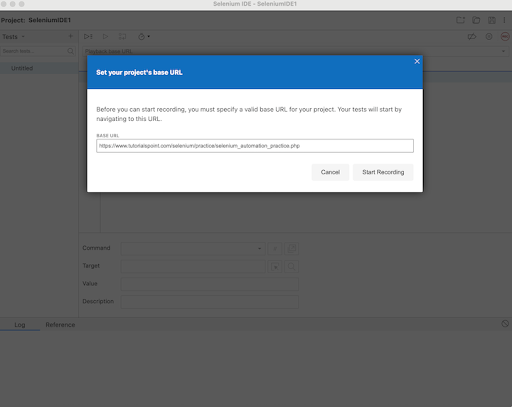
Step 4 − Before starting with creating a test in Selenium IDE, we would need to specify the application Base URL, where we would record and create the test. In the below image, we had entered the Base URL: https://www.tutorialspoint.com/selenium/. Finally, we would need to click on the Start Recording.
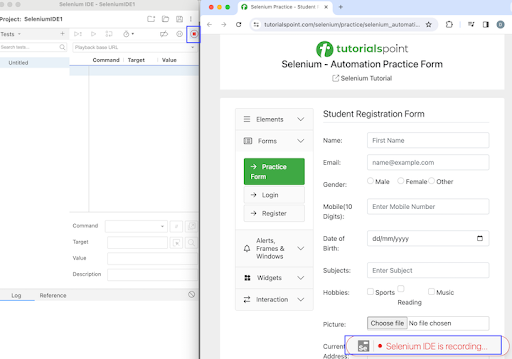
Step 5 − The corresponding application whose Base URL had been provided in Step4 should be opened with Selenium IDE logo and Selenium IDE recording message in red. Also, a red icon (highlighted in the below image) should be visible at the top of the Selenium IDE, denoting recording is in progress in the application.
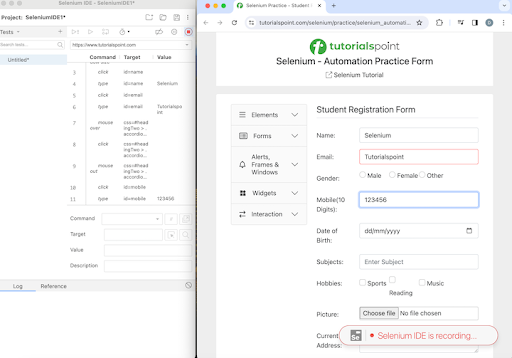
Step 6 − We would perform some steps on the application and corresponding steps would be recorded in the Selenium IDE as well.
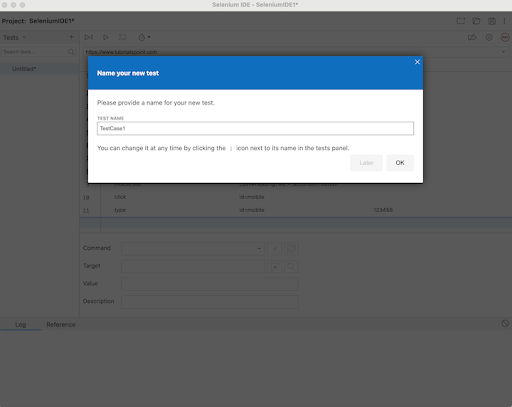
Step 7 − Once all the tests have been performed, we would stop the recording by clicking on the red icon as mentioned above in Step5. After which, we would need to enter a name for the test. In the below image, we had entered the TEST NAME as TestCase1. Finally, we would click on the OK.
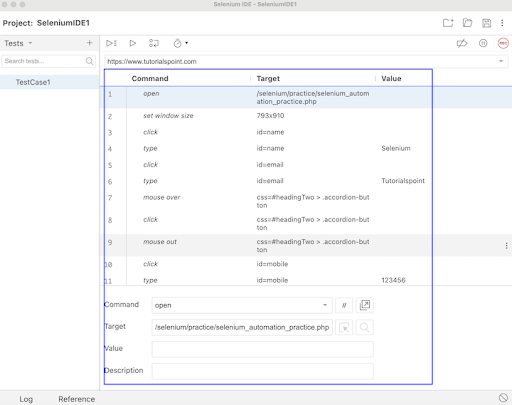
Step 8 − All the steps that we had performed on the application would be recorded in the Selenium IDE under the Command, Target, and Value fields. Also, the test case name - TestCase1, would be visible to the left pane along with a REC button to the top right.
The portion highlighted in the below image depicts the Text Script Editor Panel in Selenium IDE. It comprises user interactions that are recorded in the form of test steps that are recorded while recording is enabled. The Text Script Editor Panel also has three columns - Command, Target, and Value.
The Command column comprises Selenium commands, Target column contains locator values, URL, and so on. Finally, the Value column can be used to pass on the value to be entered.
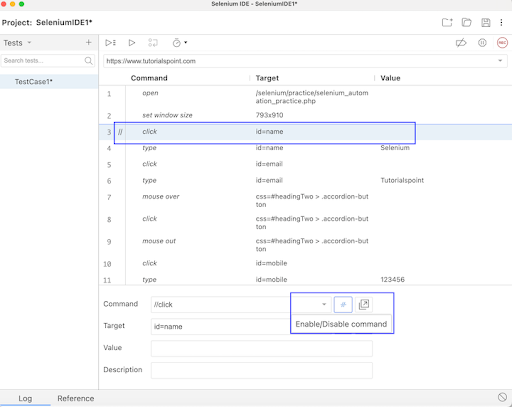
If a particular step is selected (just like the step 3 in the below image), the Enable/Disable command option would be enabled. On selecting it, that specific step command would get disabled with a // sign at the left.
Once the test is triggered, all the steps excluding the disabled command would get executed. We can enable the same step by clicking the Enable/Disable command button again and // sign would also disappear. So the Enable/Disable command is another important part of the Text Script Editor.
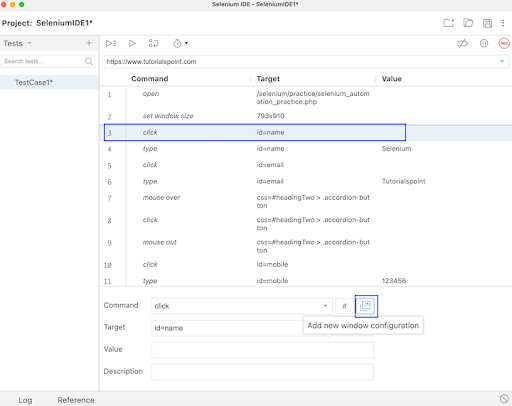
In some cases, it is observed that on clicking a link/button on a web page, a new window would appear, this type of situation can be handled using the Add new window configuration button as highlighted in the below image.
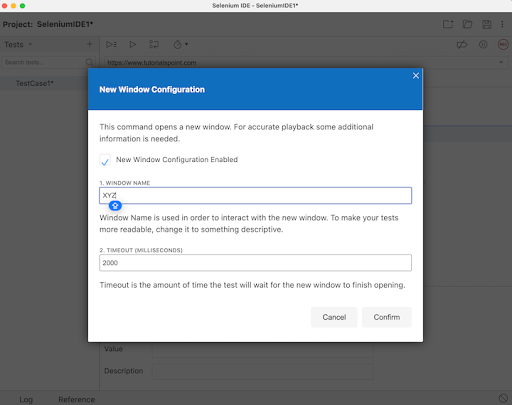
On clicking it, a popup with the message New Window Configuration would appear. We would need to check the checkbox New Window Configuration Enabled, enter a WINDOW NAME, and click on Confirm.
In order to locate an element automatically by Selenium IDE, we can use the Select target in page button.
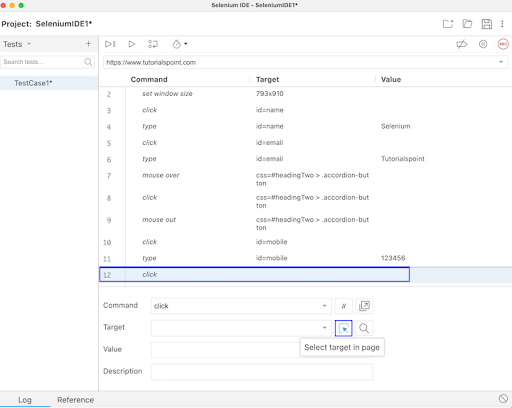
Once clicked, it would give the user the option to Select an element, and based on that, its locator value will be generated automatically by Selenium IDE.
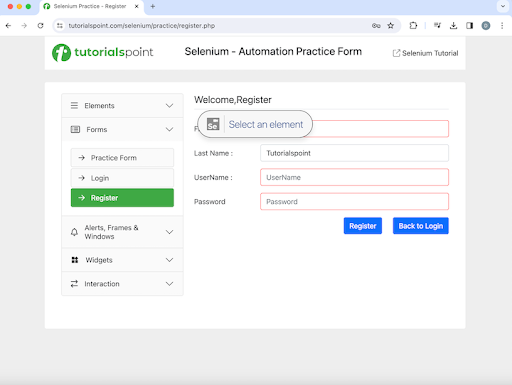
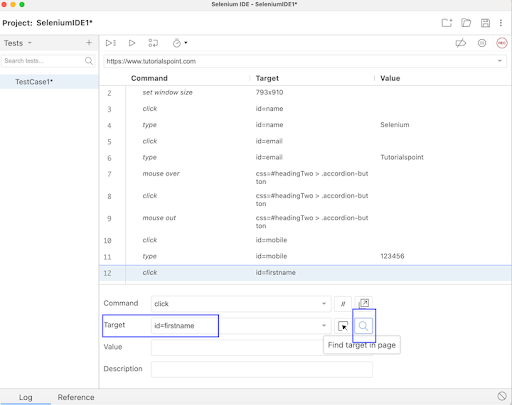
The corresponding locator value would be generated in the Target. Also, after which, if the Find target in page is selected, the element whose locator value is generated, will be highlighted.
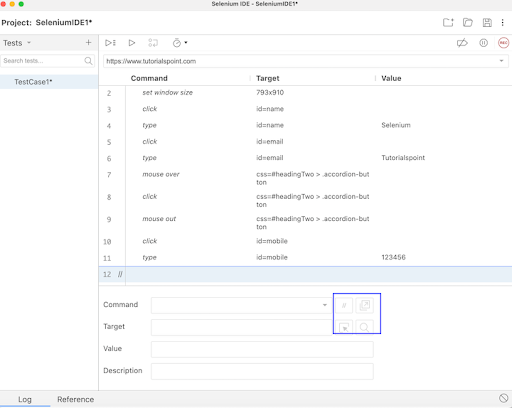
Please note that, the buttons - Find target in page, Select target in page, Add new window configuration, and Enable/Disable command become enabled only if we have something in the Command field else they remain disabled as highlighted in the below image.
Step 9 − Once the test would be created, we would be able to get the details on that step, by clicking on it. Once done, it would be visible under the Command, Target, and Value fields at the bottom. In the below example, we had clicked on the fourth step, where the values of Command, Target, and Value fields are type, id=name, and Selenium respectively. In this step, we had basically entered the text Selenium in an input box which was identified with the id locator having the value as name.
Within the Text Script Editor Panel, we can edit Command, Target, and Value by selecting a step.
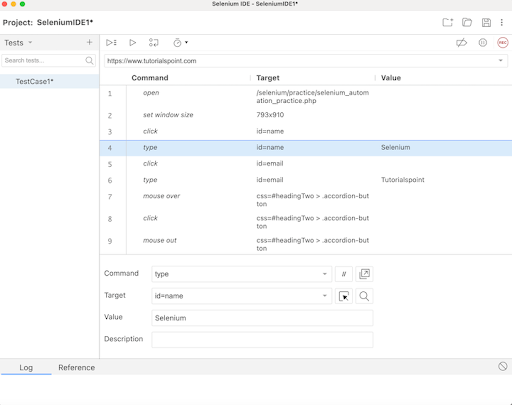
Step 10 − If we would click on the dropdown in the Target field, we would observe that Selenium IDE while recording was successful in capturing all the other locator values for an element. In the below example, we had clicked on the fourth step, where the values of Command, Target, and Value fields were type, id=name, and Selenium respectively. In this step, other locator values like the name, css, and so on for that element were visible within the Target dropdown.
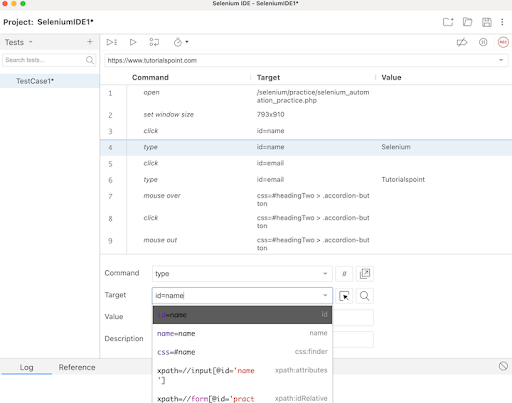
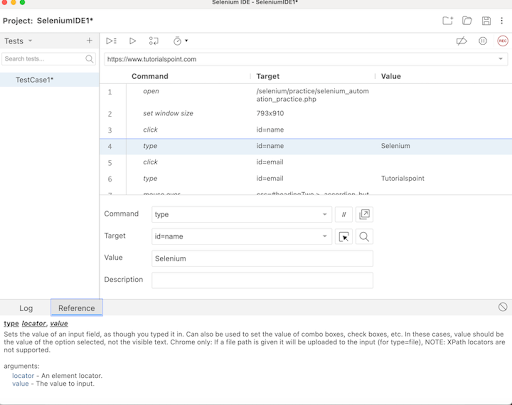
Step 11 − Once we would click on any step of the test we had created, we would get the details of the command and the action taken place, by navigating to the Reference tab at the below.
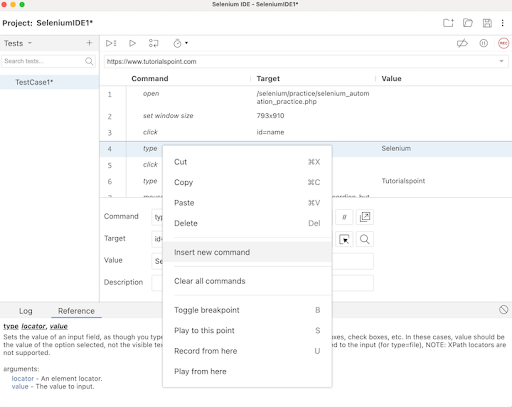
Step 12 − We can right click on any step and get the option to manually insert a new command(for addition of a new step), cut, copy, clear, Toggle breakpoint (used for debugging) on a step, and so on.
Step 13 − To run the test created, we would click on the Run current test button at the top as shown in the below image.
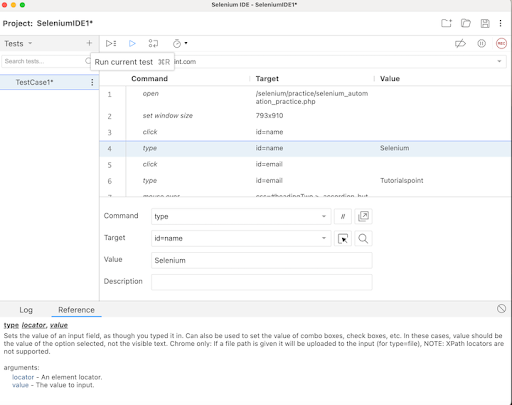
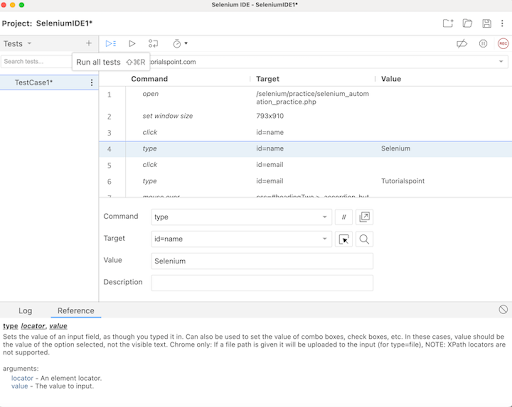
In case, there are multiple tests, we would need to click on the Run all tests button as shown in the below image.
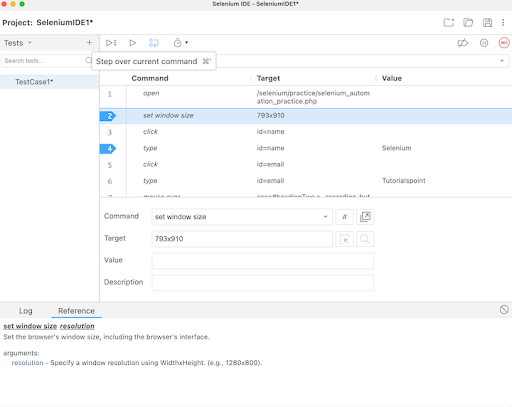
In case there are breakpoints added to steps, we would need to click on the Step over current command button as shown in the below image where the steps 2, and 4 have breakpoints.
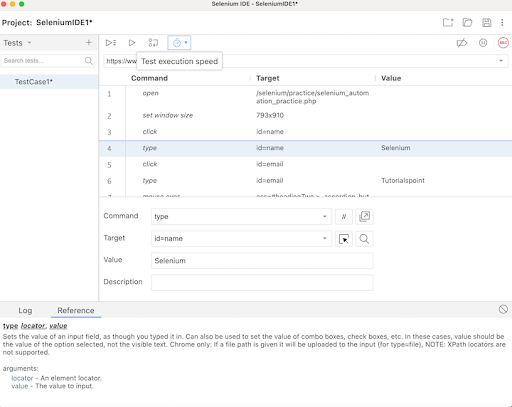
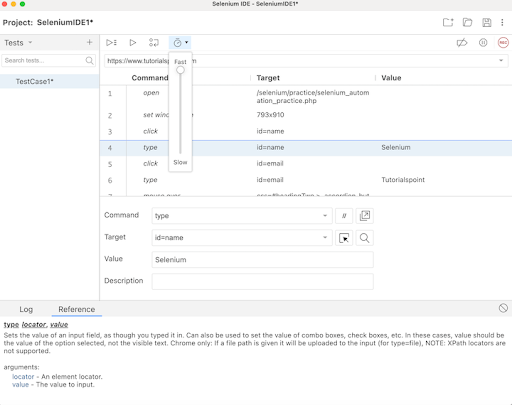
Step 14 − We can control the speed of test execution using the Test execution speed button as shown in the below image.
By default, the speed is set to Fast in Selenium IDE.
Step 15 − Selenium IDE gives the option to Create, Open and Save a project using the icons at the top right upper corner as highlighted on the below image.
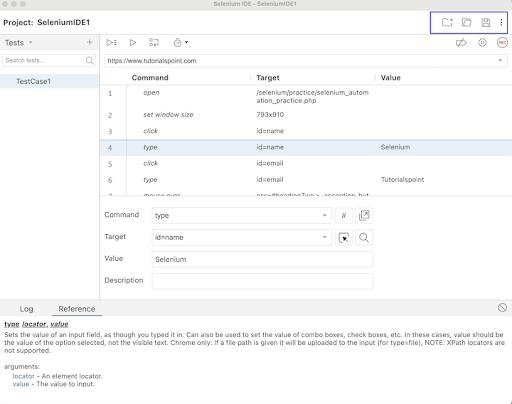
We would Save our project and continue. Once saved, we would be required to give a Name and location where our project would be saved.
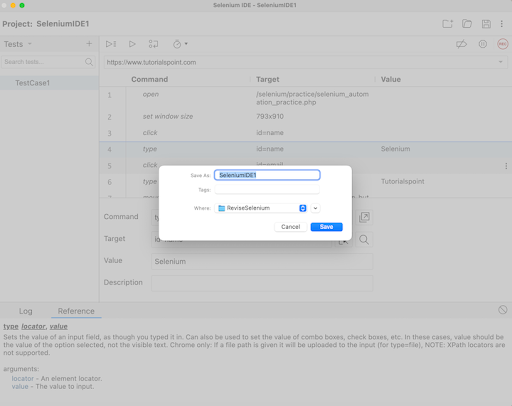
Step 16 − We would run the test - TestCase1 using the Run current test button.
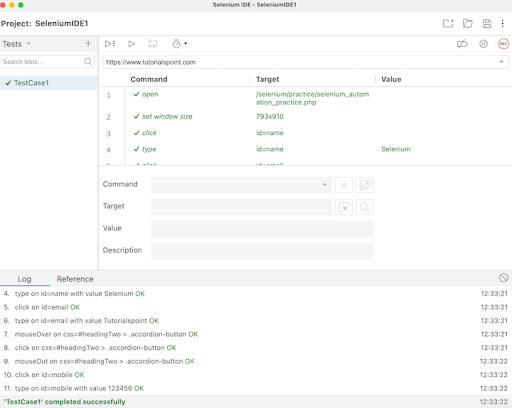
Step 17 − Once the execution would be completed, we would get the message of the result. In case the test passed, we would get the message - <TEST NAME> completed successfully under the Log tab at the bottom of the Selenium IDE. Here, our test name was TestCase1, hence received the message - TestCase1 completed successfully.
Apart from that, all the test steps, along with the test case name turned green, reflecting a PASS for all the steps. All the steps which reflected under the Log tab, showed an OK in green.
Thus, in Selenium IDE, we would get the information about the test results both at the test step level and only if all the steps would be executed successfully, we would get a PASS at the test case level as well.
Thus, in this tutorial, we had discussed creating a script using the Selenium IDE.