- Selenium - Home
- Selenium - Overview
- Selenium - Components
- Selenium - Automation Testing
- Selenium - Environment Setup
- Selenium - Remote Control
- Selenium - IDE Introduction
- Selenium - Features
- Selenium - Limitations
- Selenium - Installation
- Selenium - Creating Tests
- Selenium - Creating Script
- Selenium - Control Flow
- Selenium - Store Variables
- Selenium - Alerts & Popups
- Selenium - Selenese Commands
- Selenium - Actions Commands
- Selenium - Accessors Commands
- Selenium - Assertions Commands
- Selenium - Assert/Verify Methods
- Selenium - Locating Strategies
- Selenium - Script Debugging
- Selenium - Verification Points
- Selenium - Pattern Matching
- Selenium - JSON Data File
- Selenium - Browser Execution
- Selenium - User Extensions
- Selenium - Code Export
- Selenium - Emitting Code
- Selenium - JavaScript Functions
- Selenium - Plugins
- Selenium WebDriver Tutorial
- Selenium - Introduction
- Selenium WebDriver vs RC
- Selenium - Installation
- Selenium - First Test Script
- Selenium - Driver Sessions
- Selenium - Browser Options
- Selenium - Chrome Options
- Selenium - Edge Options
- Selenium - Firefox Options
- Selenium - Safari Options
- Selenium - Double Click
- Selenium - Right Click
- HTML Report in Python
- Handling Edit Boxes
- Selenium - Single Elements
- Selenium - Multiple Elements
- Selenium Web Elements
- Selenium - File Upload
- Selenium - Locator Strategies
- Selenium - Relative Locators
- Selenium - Finders
- Selenium - Find All Links
- Selenium - User Interactions
- Selenium - WebElement Commands
- Selenium - Browser Interactions
- Selenium - Browser Commands
- Selenium - Browser Navigation
- Selenium - Alerts & Popups
- Selenium - Handling Forms
- Selenium - Windows and Tabs
- Selenium - Handling Links
- Selenium - Input Boxes
- Selenium - Radio Button
- Selenium - Checkboxes
- Selenium - Dropdown Box
- Selenium - Handling IFrames
- Selenium - Handling Cookies
- Selenium - Date Time Picker
- Selenium - Dynamic Web Tables
- Selenium - Actions Class
- Selenium - Action Class
- Selenium - Keyboard Events
- Selenium - Key Up/Down
- Selenium - Copy and Paste
- Selenium - Handle Special Keys
- Selenium - Mouse Events
- Selenium - Drag and Drop
- Selenium - Pen Events
- Selenium - Scroll Operations
- Selenium - Waiting Strategies
- Selenium - Explicit/Implicit Wait
- Selenium - Support Features
- Selenium - Multi Select
- Selenium - Wait Support
- Selenium - Select Support
- Selenium - Color Support
- Selenium - ThreadGuard
- Selenium - Errors & Logging
- Selenium - Exception Handling
- Selenium - Miscellaneous
- Selenium - Handling Ajax Calls
- Selenium - JSON Data File
- Selenium - CSV Data File
- Selenium - Excel Data File
- Selenium - Cross Browser Testing
- Selenium - Multi Browser Testing
- Selenium - Multi Windows Testing
- Selenium - JavaScript Executor
- Selenium - Headless Execution
- Selenium - Capture Screenshots
- Selenium - Capture Videos
- Selenium - Page Object Model
- Selenium - Page Factory
- Selenium - Record & Playback
- Selenium - Frameworks
- Selenium - Browsing Context
- Selenium - DevTools
- Selenium Grid Tutorial
- Selenium - Overview
- Selenium - Architecture
- Selenium - Components
- Selenium - Configuration
- Selenium - Create Test Script
- Selenium - Test Execution
- Selenium - Endpoints
- Selenium - Customizing a Node
- Selenium Reporting Tools
- Selenium - Reporting Tools
- Selenium - TestNG
- Selenium - JUnit
- Selenium - Allure
- Selenium & Other Technologies
- Selenium - Java Tutorial
- Selenium - Python Tutorial
- Selenium - C# Tutorial
- Selenium - Javascript Tutorial
- Selenium - Kotlin Tutorial
- Selenium - Ruby Tutorial
- Selenium - Maven & Jenkins
- Selenium - LogExpert Logging
- Selenium - Log4j Logging
- Selenium - Robot Framework
- Selenium - Github Tutorial
- Selenium - IntelliJ
- Selenium - XPath
- Selenium Miscellaneous Concepts
- Selenium - IE Driver
- Selenium - Automation Frameworks
- Selenium - Keyword Driven Framework
- Selenium - Data Driven Framework
- Selenium - Hybrid Driven Framework
- Selenium - SSL Certificate Error
- Selenium - Alternatives
Selenium - Capture Videos
Selenium Webdriver can be used to capture videos with the help of another third party API. Capturing videos help to debug test scripts which fail. Also, the captured video of the test execution can be shared along with the logs to developers for a quicker fix to an issue.
A captured video of a test case can be added as evidence to any test management tool like JIRA, ALM, and so on. It can be shared with other project stakeholders for better understanding, and visibility.
Monte Screen Recorder API
Selenium Webdriver is not capable of capturing videos by default. It has to be integrated with another API called the Monte Screen Recorder. In order to use the Monte Screen Recorder for the purpose of recording videos, we would need to add the Maven dependency related to it.
Steps to Capture Videos Using Monte Screen Recorder API
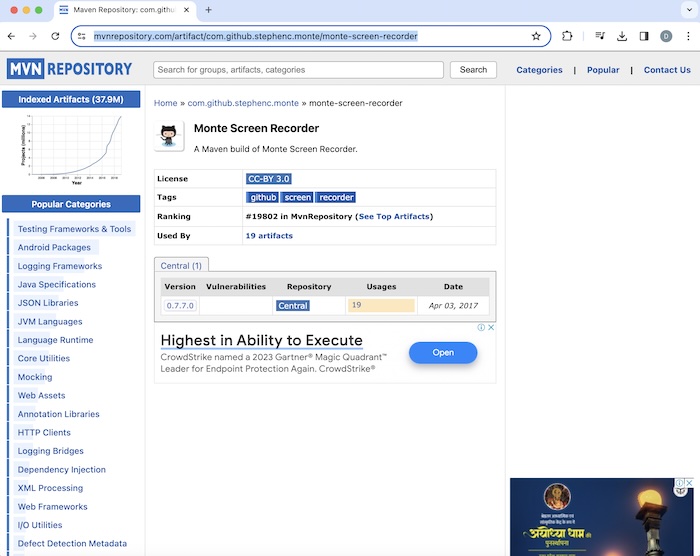
Step 1 − Navigate to the below link −
https://mvnrepository.com/artifact/

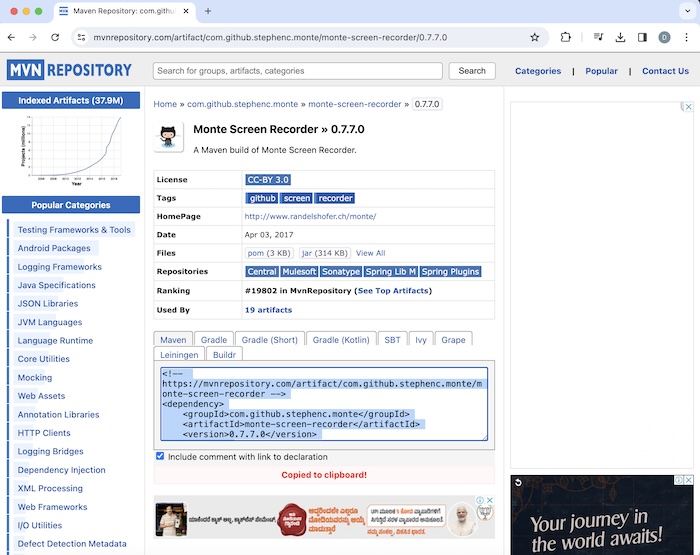
Step 2 − Click on the <version link> below Version. In the above image, the version number is 0.7.7.0.

Add the dependency available under the Maven tab within the pom.xml of the Maven project that we would create. Once we would add this dependency, we would update and refresh our maven project. In the above example, the below dependency is given below −
<!-- https://mvnrepository.com/artifact/com.github.stephenc.monte/monte-screen-recorder -->
<dependency>
   <groupId>com.github.stephenc.monte</groupId>
   <artifactId>monte-screen-recorder</artifactId>
   <version>0.7.7.0</version>
</dependency>
Step 3 − We would take the help of the utility code available from the source: https://www.randelshofer.ch/monte/ to integrate the Monte Screen Recorder API with our test.
Example: Capturing Videos (Recording a Test)
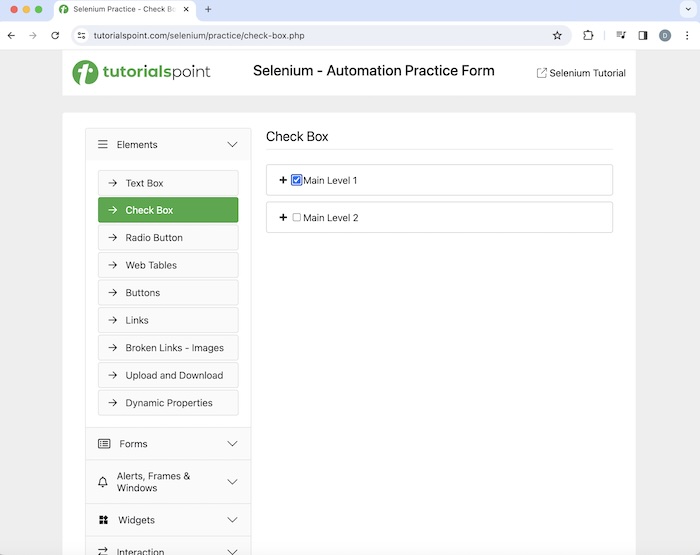
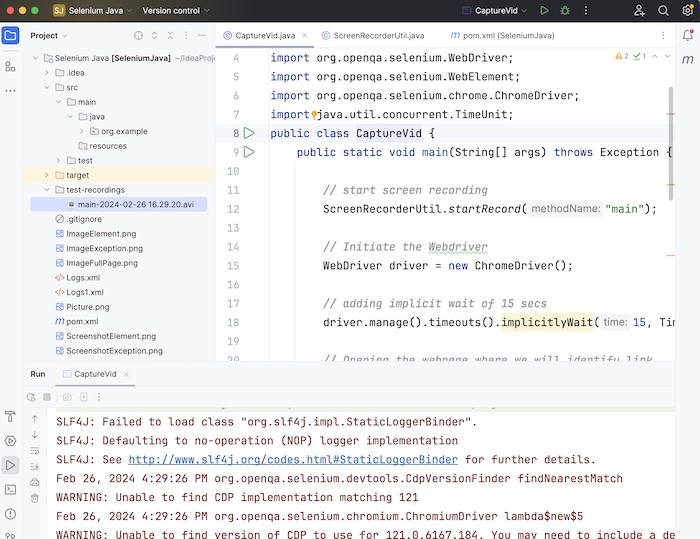
Let us take an example of the page below, where we would record the whole test right from launching the application, clicking the checkbox beside the Main Level 1 label, and quitting the browser. After this, we would stop the recording. Once the test would be completed, the whole recording would be saved in the test project under the newly created test-recordings folder. Under this folder, a .avi file with name - main-<with current date and time> having the whole recording of the test, would be available.

Code Implementation for Utility class ScreenRecorderUtil.java.
package org.example;

import java.awt.AWTException;
import java.awt.Dimension;
import java.awt.GraphicsConfiguration;
import java.awt.GraphicsEnvironment;
import java.awt.Rectangle;
import java.awt.Toolkit;
import java.io.File;
import java.io.IOException;
import java.text.SimpleDateFormat;
import java.util.Date;
import org.monte.media.Format;
import org.monte.media.FormatKeys.MediaType;
import org.monte.media.Registry;
import org.monte.media.math.Rational;
import org.monte.screenrecorder.ScreenRecorder;

import static org.monte.media.AudioFormatKeys.*;
import static org.monte.media.VideoFormatKeys.*;

public class ScreenRecorderUtil extends ScreenRecorder {
   public static ScreenRecorder screenRecorder;
   public String name;
   public ScreenRecorderUtil(GraphicsConfiguration cfg, Rectangle captureArea, Format fileFormat,
   Format screenFormat, Format mouseFormat, Format audioFormat, File movieFolder, String name)
   throws IOException, AWTException {
      super(cfg, captureArea, fileFormat, screenFormat, mouseFormat, audioFormat, movieFolder);
      this.name = name;
   }

   @Override
   protected File createMovieFile(Format fileFormat) throws IOException {
      if (!movieFolder.exists()) {
         movieFolder.mkdirs();
      } else if (!movieFolder.isDirectory()) {
         throw new IOException("\"" + movieFolder + "\" is not a directory.");
      }
      SimpleDateFormat dateFormat = new SimpleDateFormat("yyyy-MM-dd HH.mm.ss");
      return new File(movieFolder,
      name + "-" + dateFormat.format(new Date()) + "." + Registry.getInstance().getExtension(fileFormat));
   }

   public static void startRecord(String methodName) throws Exception {
      File file = new File("./test-recordings/");
      Dimension screenSize = Toolkit.getDefaultToolkit().getScreenSize();
      int width = screenSize.width;
      int height = screenSize.height;

      Rectangle captureSize = new Rectangle(0, 0, width, height);

      GraphicsConfiguration gc =
      GraphicsEnvironment.getLocalGraphicsEnvironment().getDefaultScreenDevice().getDefaultConfiguration();
      screenRecorder = new ScreenRecorderUtil(gc, captureSize,
         new Format(MediaTypeKey, MediaType.FILE, MimeTypeKey, MIME_AVI),
         new Format(MediaTypeKey, MediaType.VIDEO, EncodingKey, ENCODING_AVI_TECHSMITH_SCREEN_CAPTURE,
         CompressorNameKey, ENCODING_AVI_TECHSMITH_SCREEN_CAPTURE, DepthKey, 24, FrameRateKey,
         Rational.valueOf(15), QualityKey, 1.0f, KeyFrameIntervalKey, 15 * 60),
         new Format(MediaTypeKey, MediaType.VIDEO, EncodingKey, "black", FrameRateKey, Rational.valueOf(30)),
         null, file, methodName);
      screenRecorder.start();
   }

   public static void stopRecord() throws Exception {
      screenRecorder.stop();
   }
}
Source for ScreenRecorderUtil.java : https://www.randelshofer.ch/monte/
Code Implementation for test class - CaptureVid.java.
package org.example;

import org.openqa.selenium.By;
import org.openqa.selenium.WebDriver;
import org.openqa.selenium.WebElement;
import org.openqa.selenium.chrome.ChromeDriver;
import java.util.concurrent.TimeUnit;

public class CaptureVid {
   public static void main(String[] args) throws Exception {

      // start screen recording
      ScreenRecorderUtil.startRecord("main");

      // Initiate the Webdriver
      WebDriver driver = new ChromeDriver();

      // adding implicit wait of 15 secs
      driver.manage().timeouts().implicitlyWait(15, TimeUnit.SECONDS);

      // Opening the webpage where we will identify checkbox
      driver.get("https://www.tutorialspoint.com/selenium/practice/check-box.php");

      // Identify element then click
      WebElement c = driver.findElement(By.xpath("//*[@id='c_bs_1']"));
      c.click();

      // verify if checkbox is selected
      Boolean result = c.isSelected();
      System.out.println("Checkbox is selected: " + result);

      //Closing browser
      driver.quit();

      // stop recording
      ScreenRecorderUtil.stopRecord();
   }
}
Dependencies in pom.xml.
<?xml version="1.0" encoding="UTF-8"?>
<project xmlns="http://maven.apache.org/POM/4.0.0"
   xmlns:xsi="http://www.w3.org/2001/XMLSchema-instance"
   xsi:schemaLocation="http://maven.apache.org/POM/4.0.0
   http://maven.apache.org/xsd/maven-4.0.0.xsd">
   <modelVersion>4.0.0</modelVersion>

   <groupId>org.example</groupId>
   <artifactId>SeleniumJava</artifactId>
   <version>1.0-SNAPSHOT</version>

   <properties>
      <maven.compiler.source>16</maven.compiler.source>
      <maven.compiler.target>16</maven.compiler.target>
      <project.build.sourceEncoding>UTF-8</project.build.sourceEncoding>
   </properties>

   <!-- https://mvnrepository.com/artifact/org.seleniumhq.selenium/selenium-java -->
   <dependencies>
      <dependency>
         <groupId>org.seleniumhq.selenium</groupId>
         <artifactId>selenium-java</artifactId>
         <version>4.11.0</version>
      </dependency>

      <!-- https://mvnrepository.com/artifact/com.github.stephenc.monte/monte-screen-recorder -->
      <dependency>
         <groupId>com.github.stephenc.monte</groupId>
         <artifactId>monte-screen-recorder</artifactId>
         <version>0.7.7.0</version>
      </dependency>
   </dependencies>
</project>
Please note that in our example, the utility file ScreenRecorderUtil.java and test class file CaptureVid.java were created under the same package - example.
Dependencies in pom.xml.
<?xml version="1.0" encoding="UTF-8"?>
<project xmlns="http://maven.apache.org/POM/4.0.0"
   xmlns:xsi="http://www.w3.org/2001/XMLSchema-instance"
   xsi:schemaLocation="http://maven.apache.org/POM/4.0.0
   http://maven.apache.org/xsd/maven-4.0.0.xsd">
   <modelVersion>4.0.0</modelVersion>

   <groupId>org.example</groupId>
   <artifactId>SeleniumJava</artifactId>
   <version>1.0-SNAPSHOT</version>

   <properties>
      <maven.compiler.source>16</maven.compiler.source>
      <maven.compiler.target>16</maven.compiler.target>
      <project.build.sourceEncoding>UTF-8</project.build.sourceEncoding>
   </properties>

   <!-- https://mvnrepository.com/artifact/org.seleniumhq.selenium/selenium-java -->
   <dependencies>
      <dependency>
         <groupId>org.seleniumhq.selenium</groupId>
         <artifactId>selenium-java</artifactId>
         <version>4.11.0</version>
      </dependency>

      <!-- https://mvnrepository.com/artifact/com.github.stephenc.monte/monte-screen-recorder -->
      <dependency>
         <groupId>com.github.stephenc.monte</groupId>
         <artifactId>monte-screen-recorder</artifactId>
         <version>0.7.7.0</version>
      </dependency>
   </dependencies>
</project>
Output
Checkbox is selected: true

Process finished with exit code 0
In the above example, we had first launched an application and clicked the checkbox and validated if the checkbox is selected with the message in the console - Checkbox is selected: true.
Finally, the message Process finished with exit code 0 was received, signifying successful execution of the code.
Also, the video recording with the filename main-2024-02-26 16.29.avi under the folder test-recordings got created in the project directory. This folder would be visible once we would refresh the project folder after test execution. On clicking it, we would get the video of all the test steps performed in our example.

Thus, in this tutorial, we had discussed how to capture videos using the Selenium Webdriver.