
- Selenium - Home
- Selenium - Overview
- Selenium - Components
- Selenium - Automation Testing
- Selenium - Environment Setup
- Selenium - Remote Control
- Selenium - IDE Introduction
- Selenium - Features
- Selenium - Limitations
- Selenium - Installation
- Selenium - Creating Tests
- Selenium - Creating Script
- Selenium - Control Flow
- Selenium - Store Variables
- Selenium - Alerts & Popups
- Selenium - Selenese Commands
- Selenium - Actions Commands
- Selenium - Accessors Commands
- Selenium - Assertions Commands
- Selenium - Assert/Verify Methods
- Selenium - Locating Strategies
- Selenium - Script Debugging
- Selenium - Verification Points
- Selenium - Pattern Matching
- Selenium - JSON Data File
- Selenium - Browser Execution
- Selenium - User Extensions
- Selenium - Code Export
- Selenium - Emitting Code
- Selenium - JavaScript Functions
- Selenium - Plugins
- Selenium WebDriver Tutorial
- Selenium - Introduction
- Selenium WebDriver vs RC
- Selenium - Installation
- Selenium - First Test Script
- Selenium - Driver Sessions
- Selenium - Browser Options
- Selenium - Chrome Options
- Selenium - Edge Options
- Selenium - Firefox Options
- Selenium - Safari Options
- Selenium - Double Click
- Selenium - Right Click
- HTML Report in Python
- Handling Edit Boxes
- Selenium - Single Elements
- Selenium - Multiple Elements
- Selenium Web Elements
- Selenium - File Upload
- Selenium - Locator Strategies
- Selenium - Relative Locators
- Selenium - Finders
- Selenium - Find All Links
- Selenium - User Interactions
- Selenium - WebElement Commands
- Selenium - Browser Interactions
- Selenium - Browser Commands
- Selenium - Browser Navigation
- Selenium - Alerts & Popups
- Selenium - Handling Forms
- Selenium - Windows and Tabs
- Selenium - Handling Links
- Selenium - Input Boxes
- Selenium - Radio Button
- Selenium - Checkboxes
- Selenium - Dropdown Box
- Selenium - Handling IFrames
- Selenium - Handling Cookies
- Selenium - Date Time Picker
- Selenium - Dynamic Web Tables
- Selenium - Actions Class
- Selenium - Action Class
- Selenium - Keyboard Events
- Selenium - Key Up/Down
- Selenium - Copy and Paste
- Selenium - Handle Special Keys
- Selenium - Mouse Events
- Selenium - Drag and Drop
- Selenium - Pen Events
- Selenium - Scroll Operations
- Selenium - Waiting Strategies
- Selenium - Explicit/Implicit Wait
- Selenium - Support Features
- Selenium - Multi Select
- Selenium - Wait Support
- Selenium - Select Support
- Selenium - Color Support
- Selenium - ThreadGuard
- Selenium - Errors & Logging
- Selenium - Exception Handling
- Selenium - Miscellaneous
- Selenium - Handling Ajax Calls
- Selenium - JSON Data File
- Selenium - CSV Data File
- Selenium - Excel Data File
- Selenium - Cross Browser Testing
- Selenium - Multi Browser Testing
- Selenium - Multi Windows Testing
- Selenium - JavaScript Executor
- Selenium - Headless Execution
- Selenium - Capture Screenshots
- Selenium - Capture Videos
- Selenium - Page Object Model
- Selenium - Page Factory
- Selenium - Record & Playback
- Selenium - Frameworks
- Selenium - Browsing Context
- Selenium - DevTools
- Selenium Grid Tutorial
- Selenium - Overview
- Selenium - Architecture
- Selenium - Components
- Selenium - Configuration
- Selenium - Create Test Script
- Selenium - Test Execution
- Selenium - Endpoints
- Selenium - Customizing a Node
- Selenium Reporting Tools
- Selenium - Reporting Tools
- Selenium - TestNG
- Selenium - JUnit
- Selenium - Allure
- Selenium & Other Technologies
- Selenium - Java Tutorial
- Selenium - Python Tutorial
- Selenium - C# Tutorial
- Selenium - Javascript Tutorial
- Selenium - Kotlin Tutorial
- Selenium - Ruby Tutorial
- Selenium - Maven & Jenkins
- Selenium - LogExpert Logging
- Selenium - Log4j Logging
- Selenium - Robot Framework
- Selenium - Github Tutorial
- Selenium - IntelliJ
- Selenium - XPath
- Selenium Miscellaneous Concepts
- Selenium - IE Driver
- Selenium - Automation Frameworks
- Selenium - Keyword Driven Framework
- Selenium - Data Driven Framework
- Selenium - Hybrid Driven Framework
- Selenium - SSL Certificate Error
- Selenium - Alternatives
Selenium - XPath
We can identify an element on a web page using the xpath locator. It is basically an XML path to locate an element through the HTML nodes in DOM. Once an application is opened in the browser, the user communicates with the elements on the page to design an automation test case. The primary objective is to locate the elements with help of its attributes. This process of detecting elements can be achieved using the locators like id, xpath, and so on.
In Java, the findElement(By.xpath("<value of xpath>")) method is used to detect an element with the value of the xpath. Using this, the first element with the matching value of the xpath is returned. In case there is no element with the same value of the xpath, NoSuchElementException is thrown.
Syntax
Webdriver driver = new ChromeDriver();
driver.findElement(By.xpath("xpath value"));
Rules to Create Xpath Expression
To locate elements with xpath, the expression is //tagname[@attribute='value']. // denotes the present node, tagname refers to the tagname of the current node, @ is used for attribute selection, attribute refers to the attribute name, and value refers to the attribute value.
There can be two variants of xpath relative and absolute. The absolute xpath begins with / symbol and starts from the root node up to the element that we want to locate. However, if there is a change in path to any element path(in between from the root to the current node), the existing absolute xpath will not work for an element.
Let us identify the below highlighted element starting from the root node.
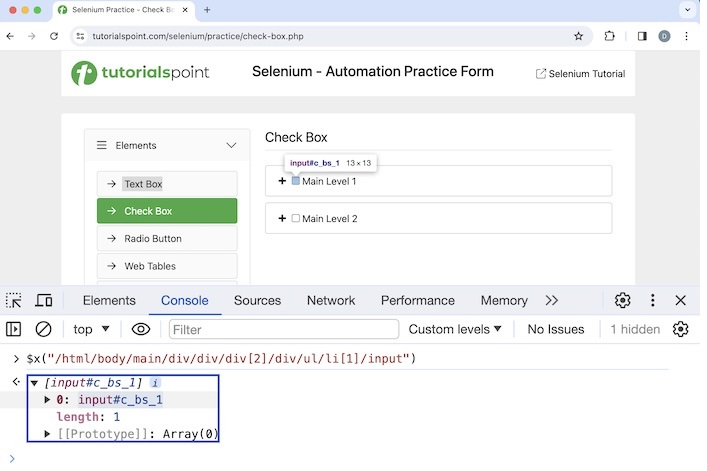
Xpath used: /html/body/main/div/div/div[2]/div/ul/li[1]/input
Please note, we can validate an xpath in the Console, by inserting the xpath value within $x("<value of xpath>"). In case, there is a matching element, we would get length value more 0, else, it would indicate there is no matching element with xpath value we are using. For example, in the above example, we have used the expression $x("/html/body/main/div/div/div[2]/div/ul/li[1]/input"), which yielded length: 1. Also, on hovering over the result, we would get the highlighted element on the page.
The relative xpath begins with // symbol and does not start from the root node. For the same element, discussed in the above example, the relative xpath value would be //*[@id='c_bs_1']".
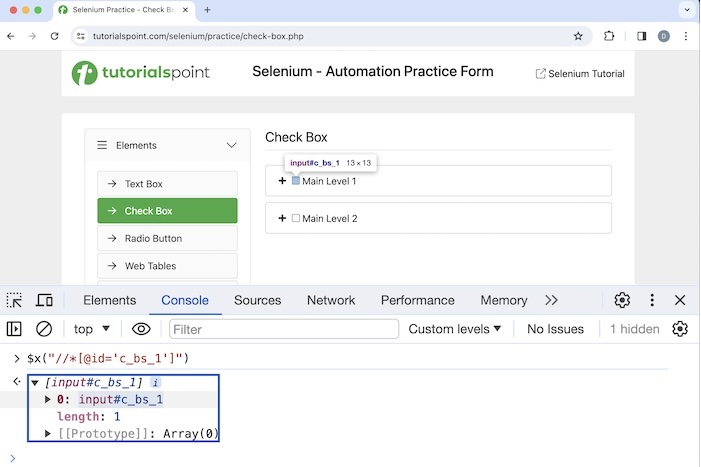
Also, please note the HTML code of the element, we have just identified with the relative and absolute xpath.
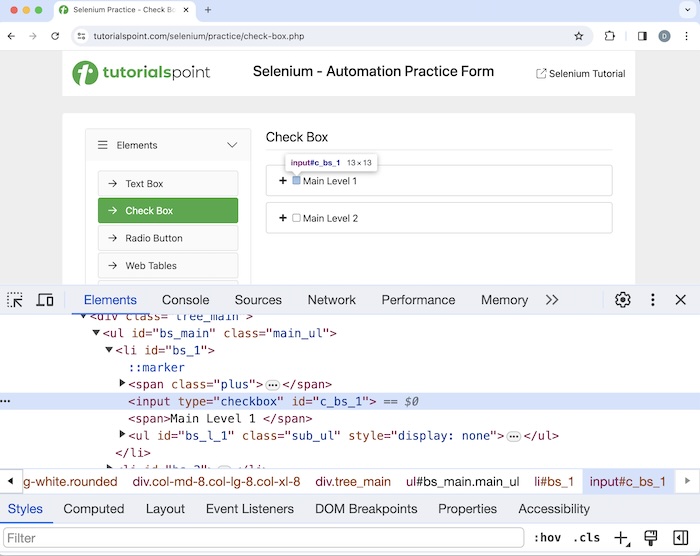
<input type="checkbox" id="c_bs_1">
There are also functions available which help to frame relative xpath expressions like text(). It is used to identify an element with the help of the visible text on the page.
Let us identify the highlighted text Check Box with the help of visible text on the page.
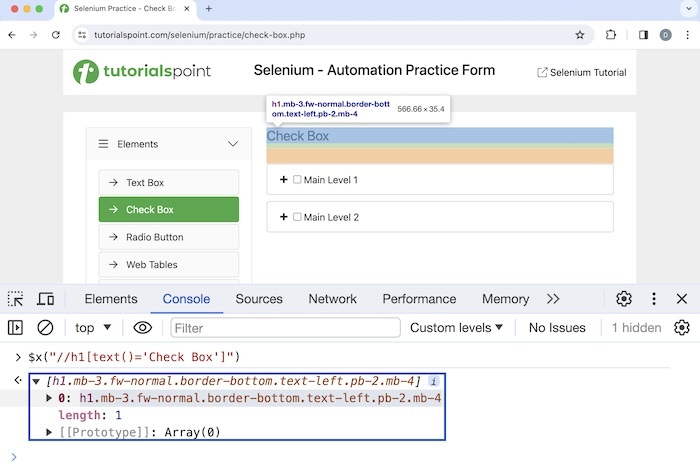
Xpath used: //h1[text()='Check Box'].
There are also functions available which help to frame relative xpath expressions like starts-with(). It is used to identify an element whose attribute value begins with a specific text. This function is normally used for attributes whose value changes on each page load. Let us identify the two checkboxes beside the Main Level 1 and Main Level 2 labels.
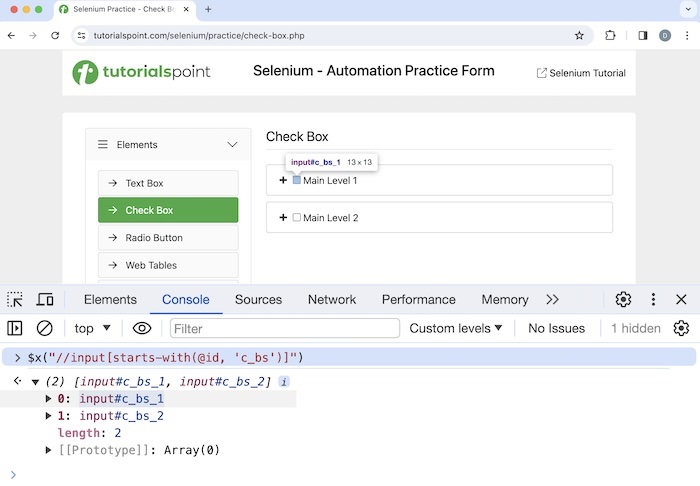
Xpath used: //input[starts-with(@id, 'c_bs')].
In the above example, we saw that the xpath used yielded two matching elements with xpath values, input#c_bs_1, and input#c_bs_2.
There are also functions available which help to frame relative xpath expressions like contains(). It identifies an element whose attribute value contains a sub-text of the actual attribute value. This function is normally used for attributes whose value changes on each page load.
Let us identify the highlighted checkbox beside the Main Level 2 label using contains().
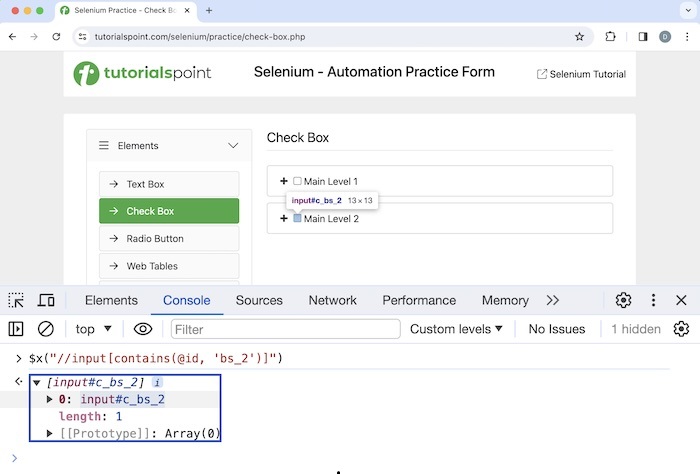
Xpath used://input[contains(@id, 'bs_2')].
We can create xpath using the AND and OR conditions for the value of attributes to be true.
Let us identify the highlighted checkbox beside the Main Level 2 label using OR condition.
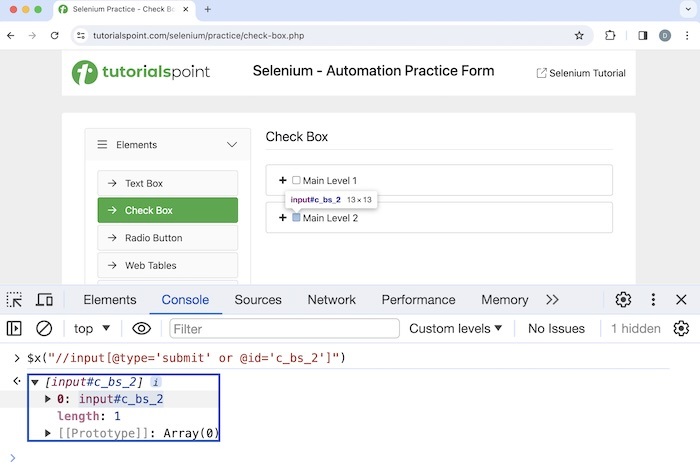
Xpath used: //input[@type='submit' or @id='c_bs_2'].
In the above example, we saw that the xpath used has an OR condition where @type='submit' condition does not match but the @id='c_bs_2' condition matches.
Let us identify the highlighted checkbox beside the Main Level 2 label using AND condition.
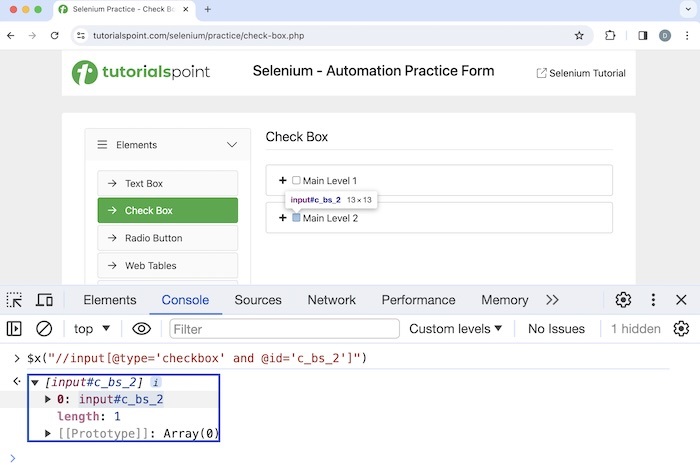
Xpath used: //input[@type='checkbox' and @id='c_bs_2'].
In the above example, we saw that the xpath used has AND condition where both the attribute condition matches.
Also, please note the HTML code of the checkbox beside the Main Level 2, we have just identified xpath.
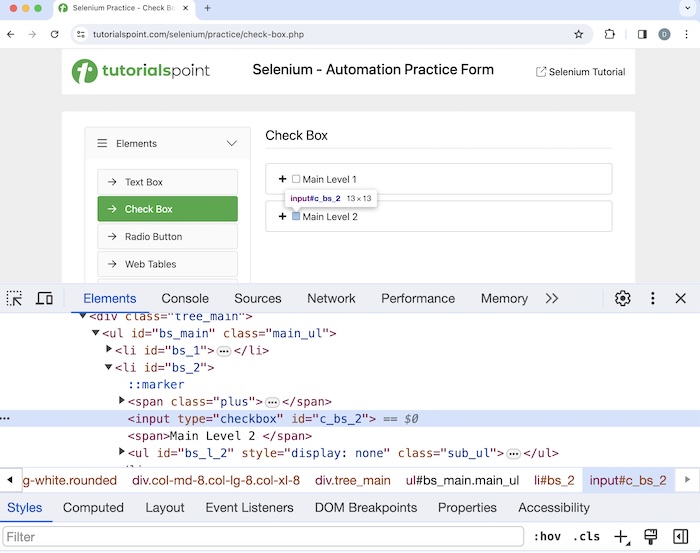
<input type="checkbox" id="c_bs_2">
We can create xpath using the following axes. It represents all nodes that come after the current node.
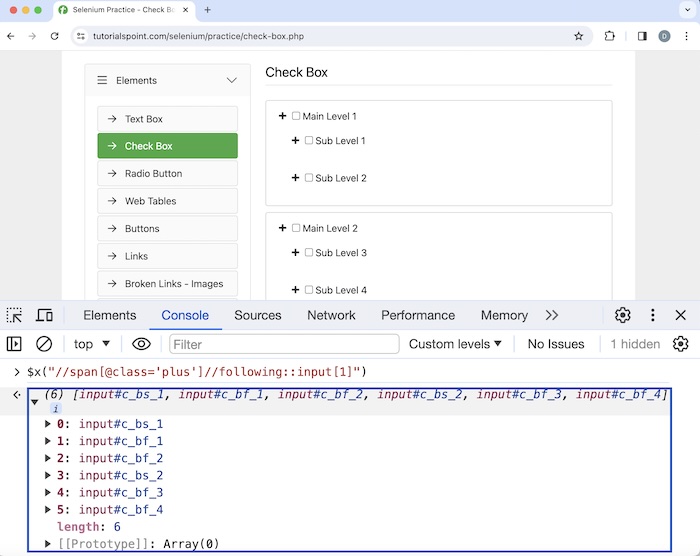
Xpath used: //span[@class='plus']//following::input[1]
We can create xpath using the following-sibling axes. It represents the following siblings of the context node. Siblings are at the same level as the current node and share its parent.
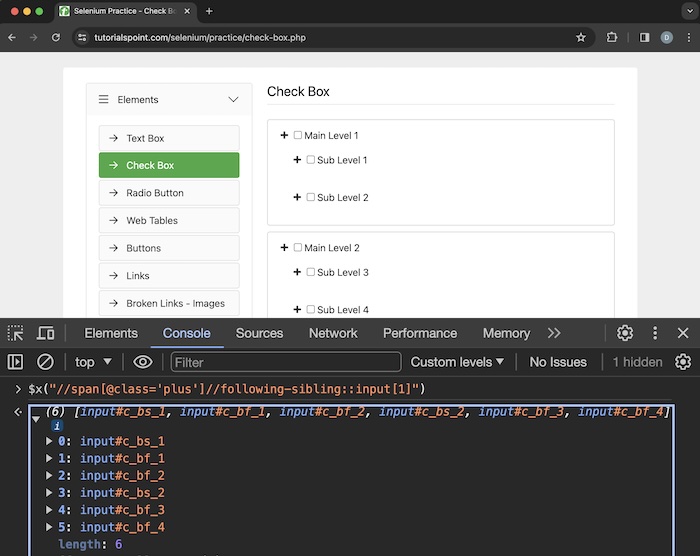
Xpath used: //span[@class='plus']//following-sibling::input[1].
We can create xpath using the parent axes. It represents the parent of the current node.
Let us identify the highlighted checkbox beside the Sub Level 1 label using parent axes.
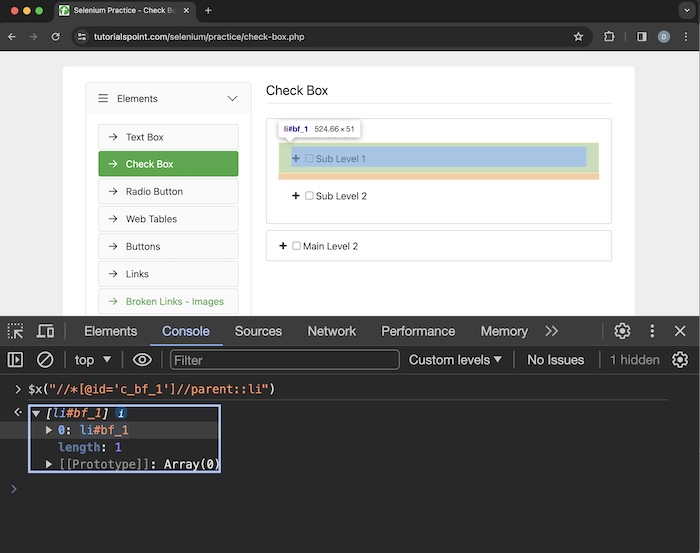
Xpath used: //*[@id='c_bf_1']//parent::li
Also, please note the HTML code of the checkbox beside the Sub Level 1, we have just identified xpath.
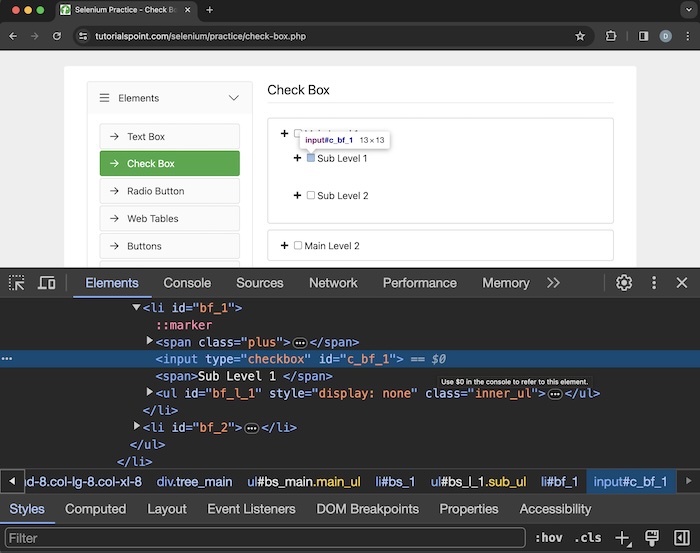
<input type="checkbox" id="c_bf_1">
We can create xpath using the child axes. It represents the child of the current node.
//*[@id='bf_1']//child::input[1].
- We can create xpath using the preceding axes. It represents all nodes that come before the current node.
- We can create xpath using the self axes. It represents all nodes from the current node.
- We can create xpath using the descendant axes. It represents all the descendants from the current node.
Conclusion
This concludes our comprehensive take on the tutorial on Selenium XPath. We've started with describing what is an xpath, and rules to create Xpath expressions along with Selenium. This equips you with in-depth knowledge of the Selenium XPath. It is wise to keep practicing what youve learned and exploring others relevant to Selenium to deepen your understanding and expand your horizons.