Selenium with Github Tutorial
The tests written in Selenium can be maintained in Github for the version control. The version control system is an application which enables the developers to coordinate, work together, and maintain the history of their work. The cloud version of Git is called Github.
Prerequisites to Setup Selenium Tests in Github
Step 1 − Sign up and create a Github account using the link https://github.com/signup
Step 2 − Download and install Java from the below link −
https://www.oracle.com/java/technologies/downloads/.
To get a more detailed view on how set up Java, refer to the below link −
https://www.youtube.com/watch?v=bxIZ1GVWYkQ.
Once we have successfully installed Java, we can confirm its installation by running the command: java, from the command prompt.
C:\java
Step 3 − Confirm the version of the Java installed by running the command −
java version
It will show the following output −
openjdk version "17.0.9" 2023-10-17
OpenJDK Runtime Environment Homebrew (build 17.0.9+0)
OpenJDK 64-Bit Server VM Homebrew (build 17.0.9+0, mixed mode, sharing)
The output of the command executed signified that the java version installed in the system is 17.0.9.
Step 4 − Install Maven in our system using the link https://maven.apache.org/download.cgi.
Confirm the version of the Maven installed by running the command −
mvn version
It will show the following output −
Apache Maven 3.9.6 (bc0240f3c744dd6b6ec2920b3cd08dcc295161ae)
Maven home: /opt/homebrew/Cellar/maven/3.9.6/libexec
Java version: 21.0.1, vendor: Homebrew, runtime: /opt/homebrew/Cellar/openjdk/21.0.1/libexec/openjdk.jdk/Contents/Home
Default locale: en_IN, platform encoding: UTF-8
OS name: "mac os x", version: "14.0", arch: "aarch64", family: "mac"
Step 5 − Download and install the code editor IntelliJ from the below link to write and run the Selenium test −
https://www.jetbrains.com/idea/.
Step 6 − Download and install Git from the link https://git-scm.com/.
Step 7 − Confirm the version of the Git installed by running the below command −
git version
The output of the command executed signified that the Git version installed in the system.
Step 8 − Launch IntelliJ Welcome to IntelliJ IDEA should appear. Clicked on the New Project button.
Step 9 − Enter a name under Name: field. Selected Language as Java, Build System as Maven, and JDK version, then click on the Create button.
Step 10 − Enter an ArtifactId and then click on Create.
Step 11 − IntelliJ editor setup should be completed successfully.
Step 12 − Add the Selenium Maven dependencies from the link https://mvnrepository.com/artifact/.
Step 13 − Paste the dependency copied in the Step12 in the pom.xml file(available under the Maven Project created in the IntelliJ workspace).
Step 14 − Save the pom.xml with all the dependencies and update the maven project.
Step 15 − Within the Maven project SeleniumGit, right click on the java folder within the test folder, and create a package, say TestCases.
Step 16 − Right click on the TestCases package, and select the New menu, then click on the Java Class option.
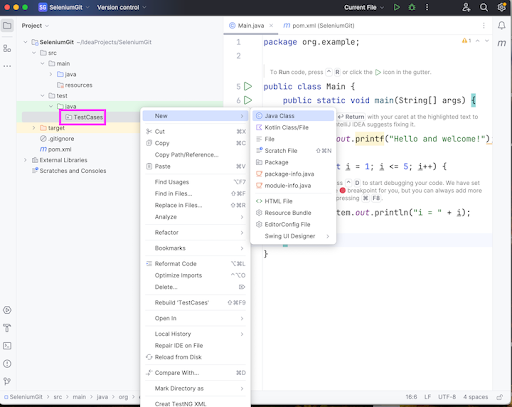
Step 17 − Enter a filename, say MyGitTest within the New Java Class File field and press Enter.
Step 18 − Add the below Selenium code in the MyGitTest.java file.
Code Implementation
package org.example;

import org.openqa.selenium.By;
import org.openqa.selenium.WebDriver;
import org.openqa.selenium.WebElement;
import org.openqa.selenium.edge.EdgeDriver;
import java.util.concurrent.TimeUnit;

public class MyGitTest {
   public static void main(String[] args) throws InterruptedException {

      // Initiate the Webdriver
      WebDriver driver = new EdgeDriver();

      // adding implicit wait of 15 secs
      driver.manage().timeouts().implicitlyWait(15, TimeUnit.SECONDS);

      // Opening the webpage where we will identify an element
      driver.get("https://www.tutorialspoint.com/selenium/practice/links.php");

      // identify link with link text locator then click
      WebElement l = driver.findElement(By.linkText("Created"));
      l.click();

      // identify text locator
      WebElement t = driver.findElement(By.xpath("/html/body/main/div/div/div[2]/div[1]"));
      System.out.println("Text appeared is: " + t.getText());

      // Closing browser
      driver.quit();
   }
}
Overall dependencies added in the pom.xml file −
<?xml version="1.0" encoding="UTF-8"?>
<project xmlns="http://maven.apache.org/POM/4.0.0"
   xmlns:xsi="http://www.w3.org/2001/XMLSchema-instance"
   xsi:schemaLocation="http://maven.apache.org/POM/4.0.0
   http://maven.apache.org/xsd/maven-4.0.0.xsd">

   <modelVersion>4.0.0</modelVersion>
   <groupId>org.example</groupId>
   <artifactId>SeleniumGit</artifactId>
   <version>1.0-SNAPSHOT</version>

   <dependencies>
      <!-- https://mvnrepository.com/artifact/org.seleniumhq.selenium/selenium-java -->
      <dependency>
         <groupId>org.seleniumhq.selenium</groupId>
         <artifactId>selenium-java</artifactId>
         <version>4.19.1</version>
      </dependency>
   </dependencies>

   <properties>
      <maven.compiler.source>21</maven.compiler.source>
      <maven.compiler.target>21</maven.compiler.target>
      <project.build.sourceEncoding>UTF-8</project.build.sourceEncoding>
   </properties>
</project>
Project Structure followed in this example −
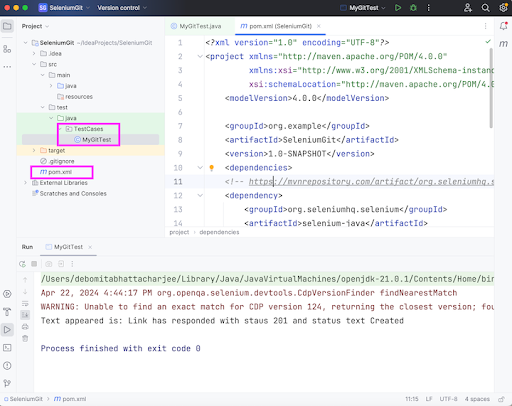
Step 19 − Run the test and wait till the run is completed.
It will show the following output −
Text appeared is: Link has responded with status 201 and status text Created

Process finished with exit code 0
In the above example, the text obtained after performing the click on the link Created with a message was Link has responded with status 201 and status text Created.
Finally, the message Process finished with exit code 0 was received, signifying successful execution of the code.
Step 20 − Restart IntelliJ application.
How to Push the Selenium Code to GitHub?
The steps to push the Selenium code to GitHub are listed below −
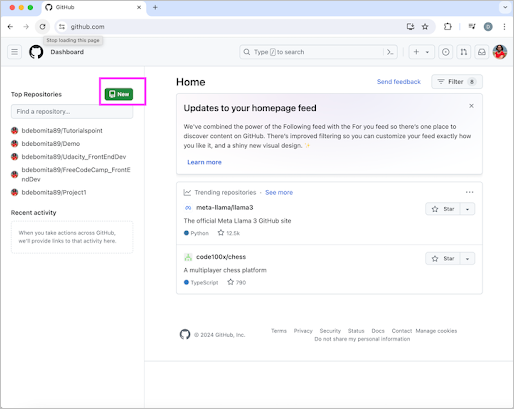
Step 1 − Login to the account set up in GitHub as per Step1 mentioned previously in the Prerequisites section. Then click on the New button to create a repository.
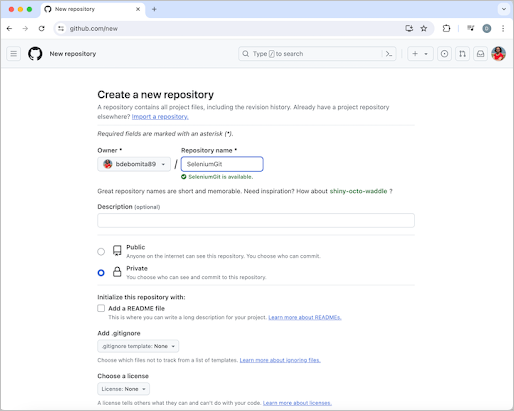
Step 2 − Enter a Repository name, say SeleniumGit and select the repository as Public or Private and then click on the Create button.
Step 3 − Record the HTTPs address of this repository as shown in the below image −
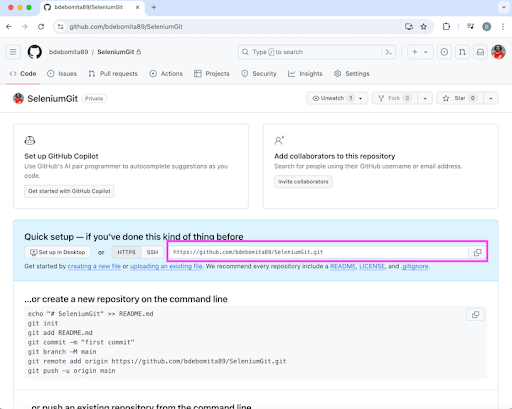
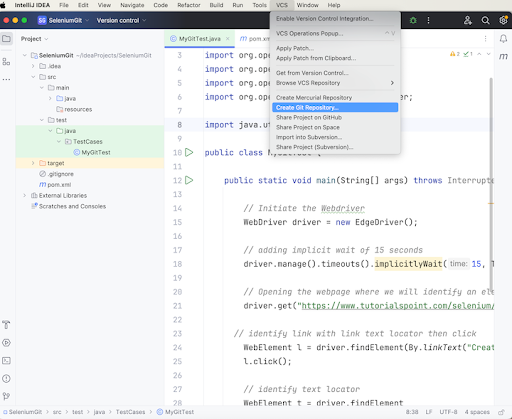
Step 4 − Open the SeleniumGit project in the IntelliJ created previously and click on the VCS menu. Then click on the Create Git Repository button.
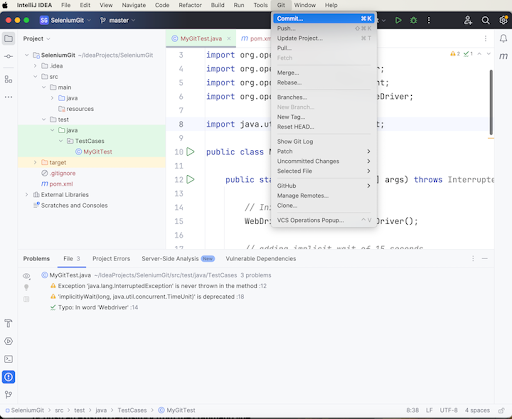
Step 5 − Click on the Git menu, and select the option Commit
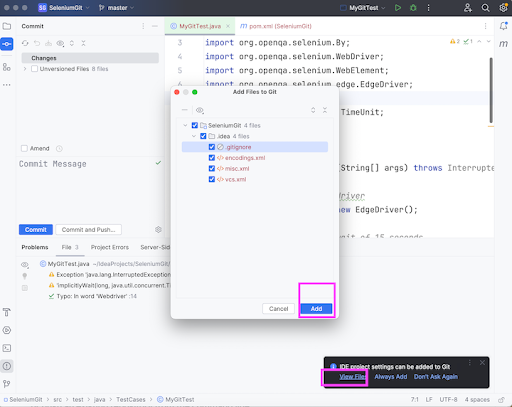
Step 6 − Click on the View Files option, select the files to be pushed then click on the Add button.
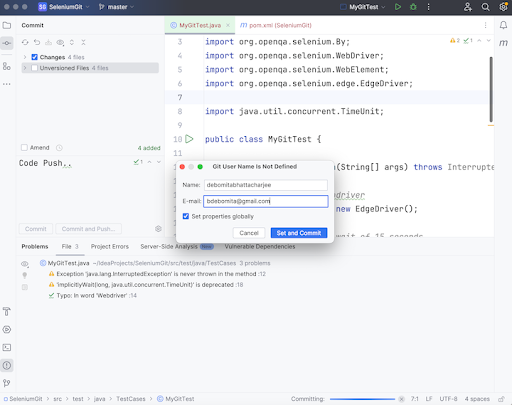
Step 7 − Check the Changes checkbox, and click on the Commit and Push button. Enter the GitHub username and Email address, and click on the Set and Commit button.
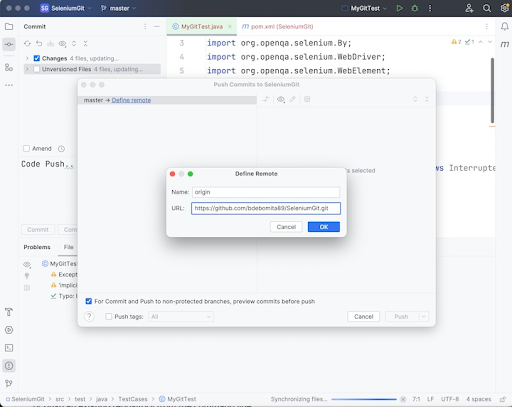
Step 8 − Click on the Define remote link, enter the HTTP address recorded in Step3, then click on the OK button.
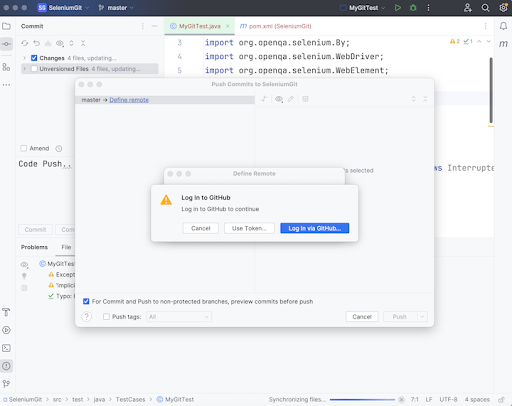
Step 9 − Select either the option Log In Via GitHub or Use Token within the Log In to GitHub.
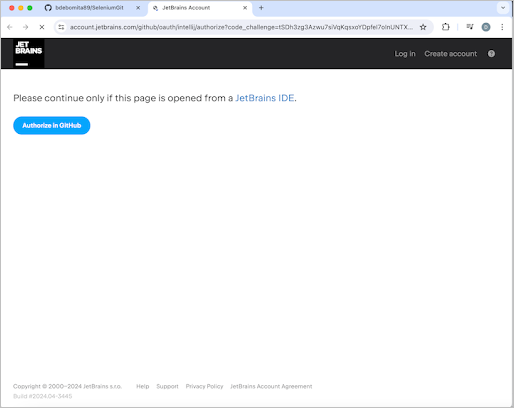
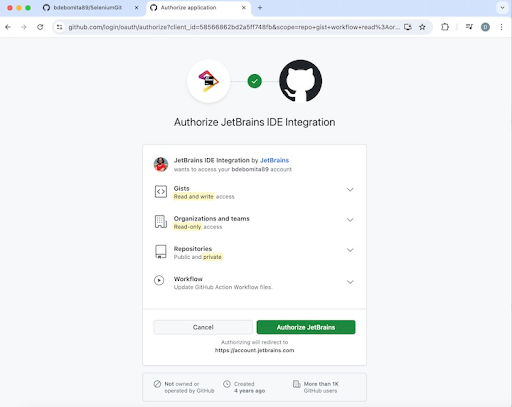
Step 10 − We would be navigated to another page in the browser with the Authorize in GitHub link. Also, the message - Please continue only if the page is opened from a JetBrains IDE should display. Click on the link Authorize in GitHub.
Step 11 − The successful integration of GitHub and IntelliJ should be established. Click on the Authorize JetBrains button.
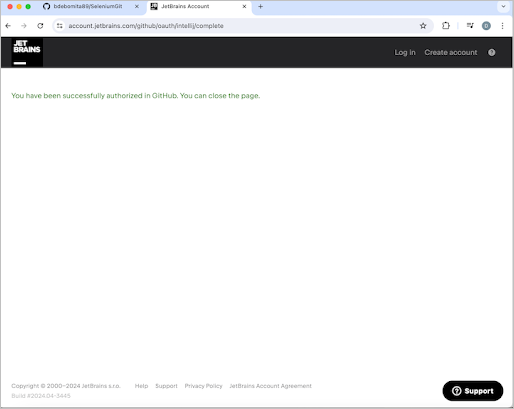
Step 12 − The message - You have been successfully authorized in GitHub. You can close the page should be displayed.
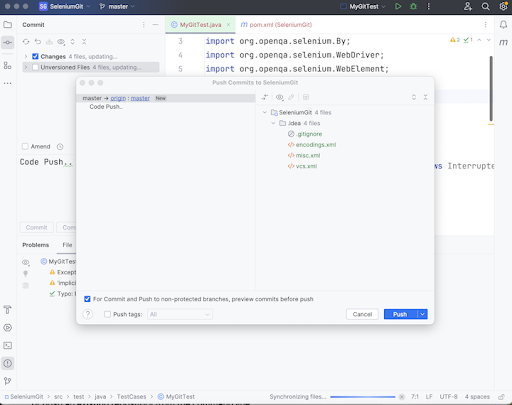
Step 13 − Move to the IntelliJ and click on the Push button.
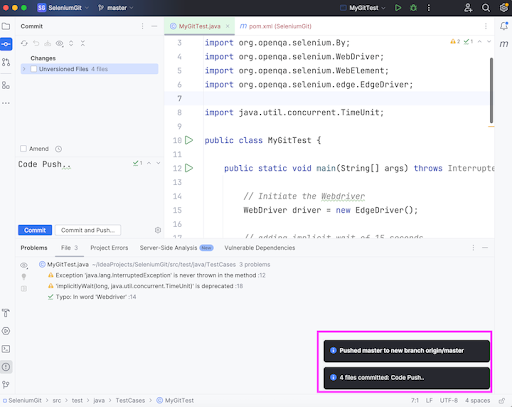
Step 14 − Code should be pushed to the GitHub from IntelliJ with the message - Pushed master to new branch origin/master and the number of files committed.
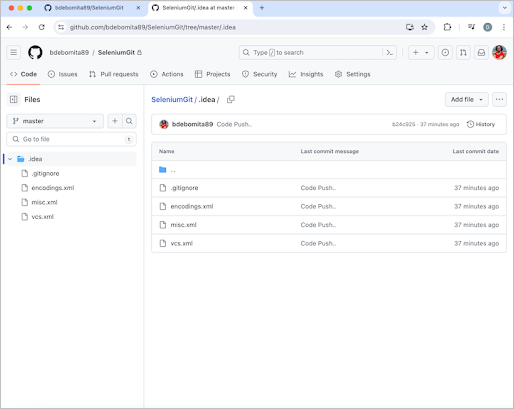
Step 15 − Refresh the new repository created in GitHub and pushed code from the IntelliJ would reflect.
How to Push updates and add new Selenium Code to GitHub?
The steps to push updates and add new Selenium code to the GitHub are listed below −
Step 1 − Make some changes in the MyGitTest.java file written previously. Then click on the Git menu, and select the option Commit.
Step 2 − Select the MyGitTest.java file that was updated under the Changes section, add some commit message, then click on the Commit and Push button.

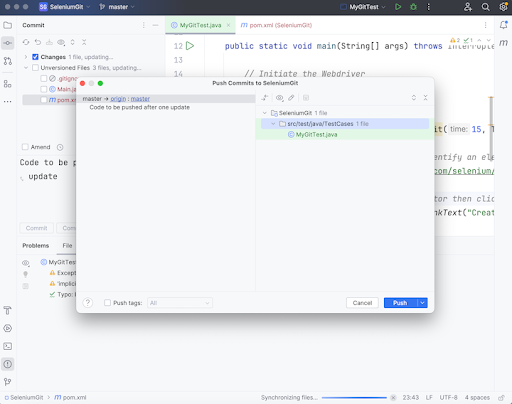
Step 3 − Click on the Push button.
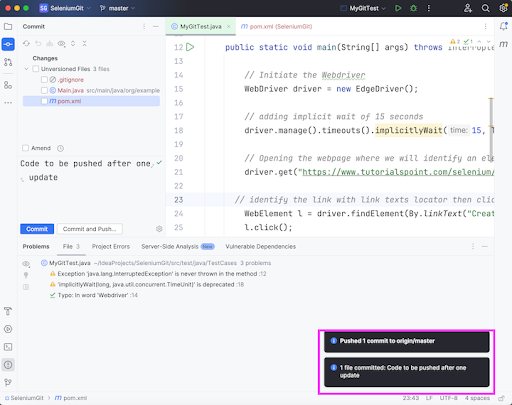
Step 4 − After some time, the code should be pushed to the GitHub from IntelliJ with the messages - Pushed 1 commit to master to origin/master and and the number of files committed.
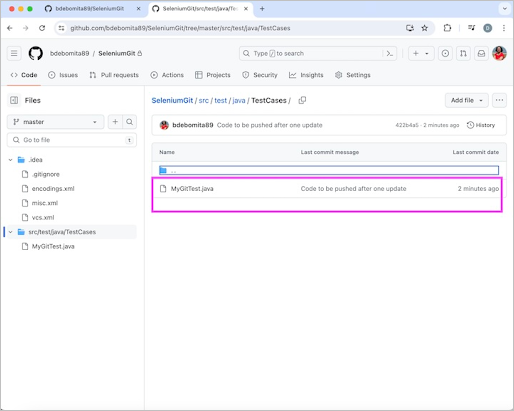
Step 5 − Changed file MyGitTest.java would reflect in the GitHub repository along with time passed after the file had been updated.
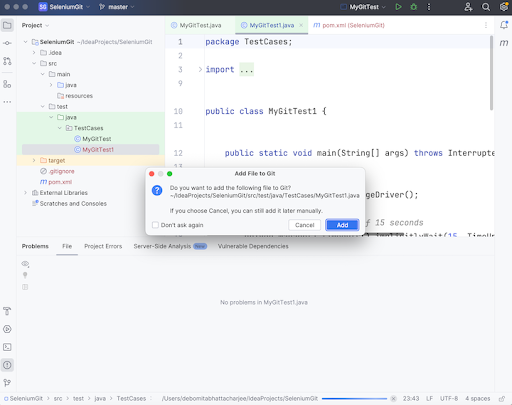
Step 6 − Move to IntelliJ and add another file MyGitTest1.java. Then click on the Add button within the Add File to Git popup.
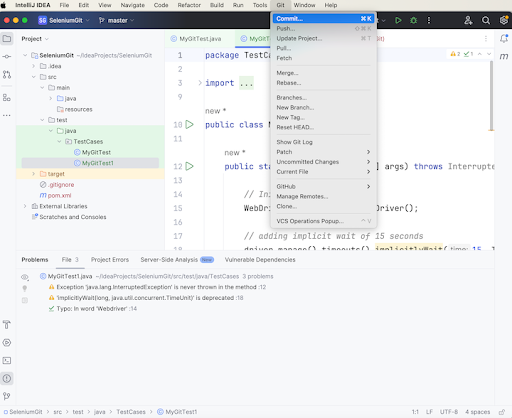
Step 7 − Click on the Git menu. Then click on the Commit option.
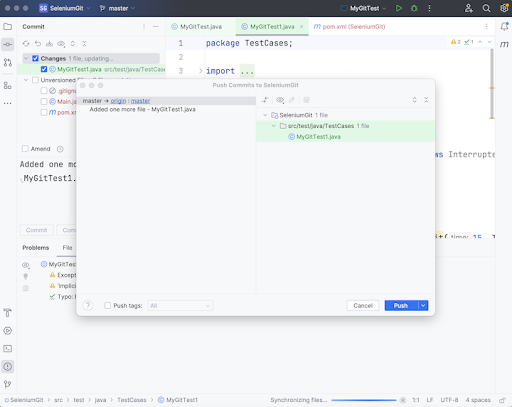
Step 8 − Click on the Push button.
Step 9 − Select the file MyGitTest1.java under the Changes section. Add a commit message and then click on the Commit and Push button.
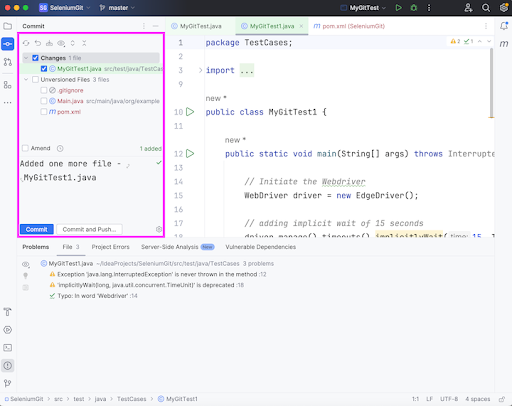
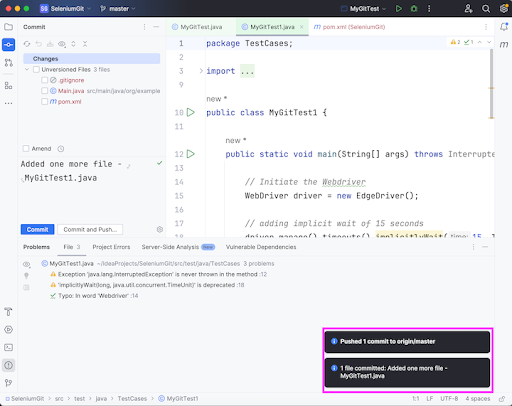
Step 10 − After sometime, the code should be pushed to the GitHub from IntelliJ with the messages - Pushed 1 commit to master to origin/master and the number of files committed: Added one more file - MyGitTest1.java.
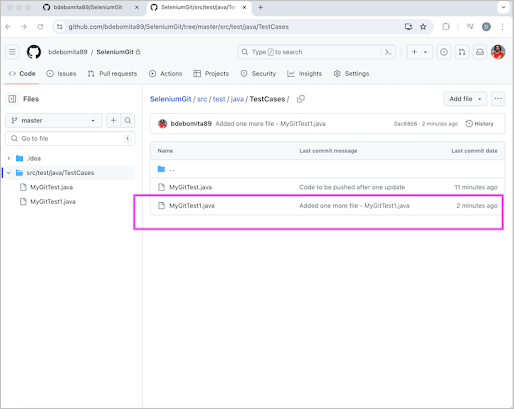
Step 11 − Changed file MyGitTest1.java would reflect in the GitHub repository along with time passed after the file had been updated.
How to Clone a Selenium Repository From the GitHub?
The steps to clone a Selenium repository from the GitHub are listed below −
Step 1 − Open the IntelliJ, and click on the Get from VCS button.

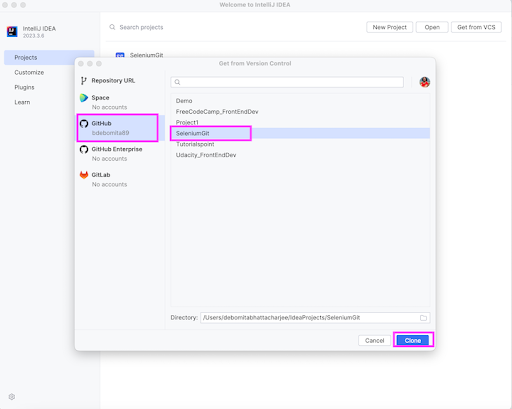
Step 2 − Click on the GitHub tab, select a project say SeleniumGit, and choose a Directory, then click on the Clone button.
Step 3 − Wait for sometime, and then click on the Trust Project button.
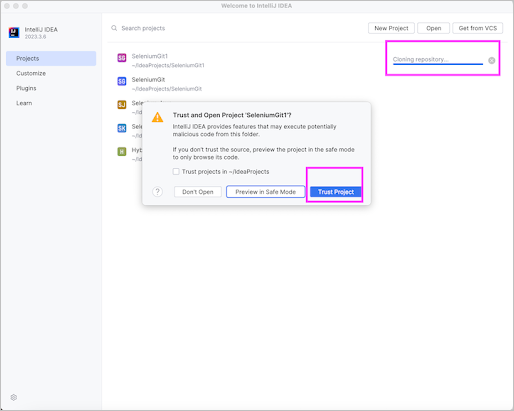
Step 4 − The code from the GitHub should be cloned to the local and opened in the IntelliJ.
Conclusion
This concludes our comprehensive take on the tutorial on Selenium GitHub. Weve started with describing prerequisites to set up Selenium tests in Github, how to push the Selenium Code to GitHub, how to push updates and add new Selenium code to GitHub, and how to clone a Selenium repository from the GitHub. This equips you with in-depth knowledge of the Selenium - GitHub. It is wise to keep practicing what youve learned and exploring others relevant to Selenium to deepen your understanding and expand your horizons.
