- JavaFX Tutorial
- JavaFX - Home
- JavaFX - Overview
- JavaFX Installation and Architecture
- JavaFX - Installation Using Netbeans
- JavaFX - Installation Using Eclipse
- JavaFX - Installation using Visual Studio Code
- JavaFX - Architecture
- JavaFX - Application
- JavaFX 2D Shapes
- JavaFX - 2D Shapes
- JavaFX - Drawing a Line
- JavaFX - Drawing a Rectangle
- JavaFX - Drawing a Rounded Rectangle
- JavaFX - Drawing a Circle
- JavaFX - Drawing an Ellipse
- JavaFX - Drawing a Polygon
- JavaFX - Drawing a Polyline
- JavaFX - Drawing a Cubic Curve
- JavaFX - Drawing a Quad Curve
- JavaFX - Drawing an Arc
- JavaFX - Drawing an SVGPath
- JavaFX Properties of 2D Objects
- JavaFX - Stroke Type Property
- JavaFX - Stroke Width Property
- JavaFX - Stroke Fill Property
- JavaFX - Stroke Property
- JavaFX - Stroke Line Join Property
- JavaFX - Stroke Miter Limit Property
- JavaFX - Stroke Line Cap Property
- JavaFX - Smooth Property
- Operations on 2D Objects
- JavaFX - 2D Shapes Operations
- JavaFX - Union Operation
- JavaFX - Intersection Operation
- JavaFX - Subtraction Operation
- JavaFX Color and Texture
- JavaFX - Colors
- JavaFX Text
- JavaFX - Text
- JavaFX Effects
- JavaFX - Effects
- JavaFX Transformations
- JavaFX - Transformations
- JavaFX Animations
- JavaFX - Animations
- JavaFX Images
- JavaFX - Images
- JavaFX 3D Shapes
- JavaFX - 3D Shapes
- JavaFX - Creating a Box
- JavaFX - Creating a Cylinder
- JavaFX - Creating a Sphere
- Properties of 3D Objects
- JavaFX - Cull Face Property
- JavaFX - Drawing Modes Property
- JavaFX - Material Property
- JavaFX Event Handling
- JavaFX - Event Handling
- JavaFX - Using Convenience Methods
- JavaFX - Event Filters
- JavaFX - Event Handlers
- JavaFX UI Controls
- JavaFX - UI Controls
- JavaFX - ListView
- JavaFX - Accordion
- JavaFX - ButtonBar
- JavaFX - ChoiceBox
- JavaFX - HTMLEditor
- JavaFX - MenuBar
- JavaFX - Pagination
- JavaFX - ProgressIndicator
- JavaFX - ScrollPane
- JavaFX - Separator
- JavaFX - Slider
- JavaFX - Spinner
- JavaFX - SplitPane
- JavaFX - TableView
- JavaFX - TabPane
- JavaFX - ToolBar
- JavaFX - TreeView
- JavaFX - Label
- JavaFX - CheckBox
- JavaFX - RadioButton
- JavaFX - TextField
- JavaFX - PasswordField
- JavaFX - FileChooser
- JavaFX - Hyperlink
- JavaFX - Tooltip
- JavaFX - Alert
- JavaFX - DatePicker
- JavaFX - TextArea
- JavaFX Charts
- JavaFX - Charts
- JavaFX - Creating Pie Chart
- JavaFX - Creating Line Chart
- JavaFX - Creating Area Chart
- JavaFX - Creating Bar Chart
- JavaFX - Creating Bubble Chart
- JavaFX - Creating Scatter Chart
- JavaFX - Creating Stacked Area Chart
- JavaFX - Creating Stacked Bar Chart
- JavaFX Layout Panes
- JavaFX - Layout Panes
- JavaFX - HBox Layout
- JavaFX - VBox Layout
- JavaFX - BorderPane Layout
- JavaFX - StackPane Layout
- JavaFX - TextFlow Layout
- JavaFX - AnchorPane Layout
- JavaFX - TilePane Layout
- JavaFX - GridPane Layout
- JavaFX - FlowPane Layout
- JavaFX CSS
- JavaFX - CSS
- Media with JavaFX
- JavaFX - Playing Video
- JavaFX Useful Resources
- JavaFX - Quick Guide
- JavaFX - Useful Resources
- JavaFX - Discussion
JavaFX - TableView
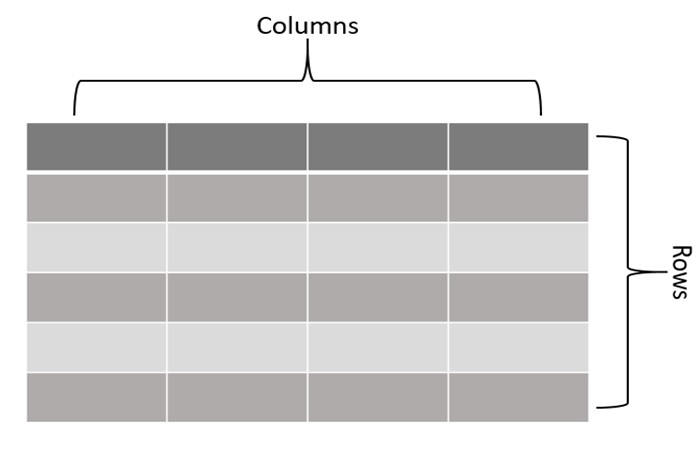
The TableView is a graphical user interface component used to display data in a tabular form. Similar to a typical table, TableView consists of columns, rows, and cells, each of which can hold any type of data. In general, a table is represented as shown in the following figure −
TableView in JavaFX
In JavaFX, the table view is represented by the TableView class. This class is a part of the package named javafx.scene.control. By instantiating this class, we can create a TableView node in JavaFX. It has two constructors namely −
TableView() − It is the default constructor used to create a table view without any predefined data.
TableView(ObservableList items) − It is the parameterized constructor of TableView class which accepts a list of items and creates a new table view with the specified items.
Steps to create a TableView in JavaFX
Follow the steps given below to create a table view in JavaFX.
Step 1: Create a Class to represent Data within the Table
First, we need to create a class that represents the data to display within the TableView. This class should have properties that correspond to the columns of the table. Here, we will create a class named movie with properties title, actor, price and rating by using the below code blocks −
// The data model class
public static class Movie {
    private final SimpleStringProperty title;
    private final SimpleStringProperty actor;
    private final SimpleDoubleProperty price;
    private final SimpleIntegerProperty rating;
Step 2: Create the Columns for the TableView
Create TableColumn objects and set their cell value using the setCellValueFactory() method. A cell value factory is a function that tells the column how to extract the data from the above declared data model class. The following code block shows how to create columns −
// Creating columns for the TableView
TableColumn<Movie, String> titleColumn = new TableColumn<>("Movie Name");
titleColumn.setCellValueFactory(cellData -> cellData.getValue().titleProperty());
TableColumn<Movie, String> actorColumn = new TableColumn<>("Actor");
actorColumn.setCellValueFactory(cellData -> cellData.getValue().authorProperty());
TableColumn<Movie, Number> priceColumn = new TableColumn<>("Price");
priceColumn.setCellValueFactory(cellData -> cellData.getValue().priceProperty());
TableColumn<Movie, Number> ratingColumn = new TableColumn<>("IMDB Rating");
ratingColumn.setCellValueFactory(cellData -> cellData.getValue().ratingProperty());
Step 3: Instantiate TableView class
Instantiate the TableView class of package javafx.scene.control without passing any parameter value to its constructor and add all the columns using the following code blocks −
// Creating a TableView
TableView<Movie> tableView = new TableView<>();
// Adding the columns to the TableView
tableView.getColumns().addAll(titleColumn, actorColumn, priceColumn, ratingColumn);
Step 4: Launching Application
Once the table view is created and all the data are added, follow the given steps below to launch the application properly −
Firstly, instantiate the class named BorderPane by passing the TableView object as a parameter value to its constructor.
Then, instantiate the class named Scene by passing the BorderPane object as a parameter value to its constructor. We can also pass dimensions of the application screen as optional parameters to this constructor.
Then, set the title to the stage using the setTitle() method of the Stage class.
Now, a Scene object is added to the stage using the setScene() method of the class named Stage.
Display the contents of the scene using the method named show().
Lastly, the application is launched with the help of the launch() method.
Example
Following is the program that will create a TableView using JavaFX. Save this code in a file with the name JavafxTableview.java.
import javafx.application.Application;
import javafx.beans.property.SimpleDoubleProperty;
import javafx.beans.property.SimpleIntegerProperty;
import javafx.beans.property.SimpleStringProperty;
import javafx.collections.FXCollections;
import javafx.collections.ObservableList;
import javafx.scene.Scene;
import javafx.scene.control.TableColumn;
import javafx.scene.control.TableView;
import javafx.scene.layout.BorderPane;
import javafx.stage.Stage;
public class JavafxTableview extends Application {
   // The data model class
   public static class Movie {
      private final SimpleStringProperty title;
      private final SimpleStringProperty actor;
      private final SimpleDoubleProperty price;
      private final SimpleIntegerProperty rating;
      // constructor
      public Movie(String title, String actor, double price, int rating) {
         this.title = new SimpleStringProperty(title);
         this.actor = new SimpleStringProperty(actor);
         this.price = new SimpleDoubleProperty(price);
         this.rating = new SimpleIntegerProperty(rating);
      }
      // getters and setters to access the data
      public SimpleStringProperty titleProperty() {
         return title;
      }
      public SimpleStringProperty authorProperty() {
         return actor;
      }
      public SimpleDoubleProperty priceProperty() {
         return price;
      }
      public SimpleIntegerProperty ratingProperty() {
         return rating;
      }
   }
   // main method starts here
   @Override
   public void start(Stage stage) throws Exception {
      // adding some sample data
      ObservableList<Movie> movies = FXCollections.observableArrayList(
         new Movie("The Batman", "Robert Pattinson", 299, 7),
         new Movie("John Wick: Chapter 4", "Keanu Reeves", 199, 7),
         new Movie("12th Fail", "Vikrant Massey", 199, 9),
         new Movie("Money Heist", "Alvaro Morte", 499, 8),
         new Movie("The Family Man", "Manoj Bajpayee", 399, 8)
      );
      // Creating a TableView
      TableView<Movie> tableView = new TableView<>();
      // Creating columns for the TableView
      TableColumn<Movie, String> titleColumn = new TableColumn<>("Movie Name");
      titleColumn.setCellValueFactory(cellData -> cellData.getValue().titleProperty());
      TableColumn<Movie, String> actorColumn = new TableColumn<>("Actor");
      actorColumn.setCellValueFactory(cellData -> cellData.getValue().authorProperty());
      TableColumn<Movie, Number> priceColumn = new TableColumn<>("Price");
      priceColumn.setCellValueFactory(cellData -> cellData.getValue().priceProperty());
      TableColumn<Movie, Number> ratingColumn = new TableColumn<>("IMDB Rating");
      ratingColumn.setCellValueFactory(cellData -> cellData.getValue().ratingProperty());
      // Adding the columns to the TableView
      tableView.getColumns().addAll(titleColumn, actorColumn, priceColumn, ratingColumn);
      // Set the items of the TableView
      tableView.setItems(movies);
      // Create a BorderPane and set the TableView as its center
      BorderPane root = new BorderPane();
      root.setCenter(tableView);
      // Create a Scene and set it on the Stage
      Scene scene = new Scene(root, 400, 300);
      stage.setTitle("Table View in JavaFX");
      stage.setScene(scene);
      stage.show();
   }
   public static void main(String[] args) {
      launch(args);
   }
}
Compile and execute the saved Java file from the command prompt using the following commands.
javac --module-path %PATH_TO_FX% --add-modules javafx.controls JavafxTableview.java
java --module-path %PATH_TO_FX% --add-modules javafx.controls JavafxTableview
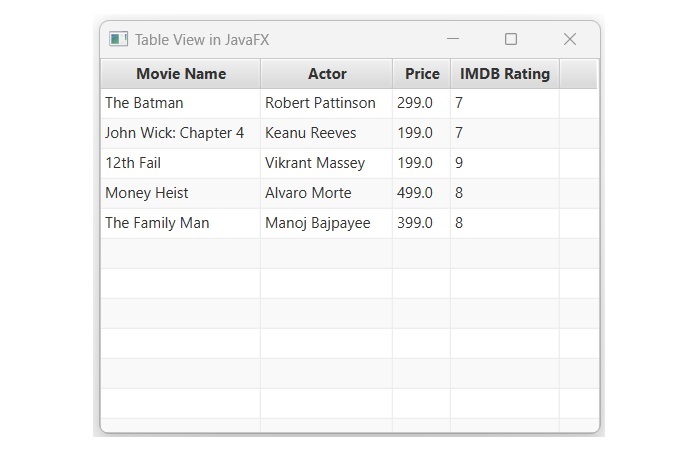
Output
On executing, the above program generates a JavaFX window displaying a Tableview with a list of movies as shown below.
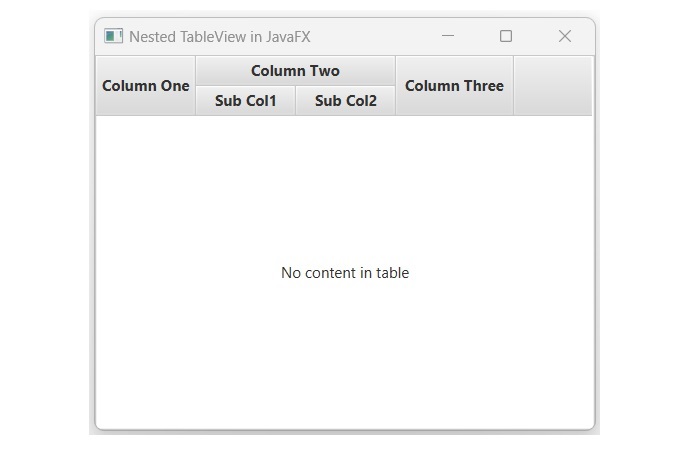
Creating Nested columns of TableView
Sometimes, we are required to display data of a single column in multiple sub-columns. This is common when a single entity has multiple attributes, for instance, a person can have multiple contact numbers or email accounts. In such cases, we create desired columns and add them to the parent column using getColumns() method as shown in the below JavaFX code. Save this code in a file with the name NestedTableview.java.
import javafx.application.Application;
import javafx.geometry.Insets;
import javafx.scene.Group;
import javafx.scene.Scene;
import javafx.scene.control.Label;
import javafx.scene.control.TableColumn;
import javafx.scene.control.TableView;
import javafx.scene.layout.VBox;
import javafx.scene.text.Font;
import javafx.stage.Stage;
public class NestedTableview extends Application {
   @Override
   public void start(Stage stage) {
      // Defining the columns
      TableColumn firstCol = new TableColumn("Column One");
      TableColumn secondCol = new TableColumn("Column Two");
      // creating sub-columns of secondCol
      TableColumn firstSubCol = new TableColumn("Sub Col1");
      TableColumn secondSubCol = new TableColumn("Sub Col2");
      // adding the sub-columns to secondCol
      secondCol.getColumns().addAll(firstSubCol, secondSubCol);
      TableColumn lastCol = new TableColumn("Column Three");
      // instantiating the TableView class
      TableView newTableview = new TableView();
      newTableview.getColumns().addAll(firstCol, secondCol, lastCol);
      VBox root = new VBox();
      root.setSpacing(5);
      root.getChildren().addAll(newTableview);
      // Create a Scene and set it on the Stage
      Scene scene = new Scene(root, 400, 300);
      stage.setTitle("Nested TableView in JavaFX");
      stage.setScene(scene);
      stage.show();
   }
      public static void main(String[] args) {
      launch(args);
   }
}
To compile and execute the saved Java file from the command prompt, use the following commands −
javac --module-path %PATH_TO_FX% --add-modules javafx.controls NestedTableview.java
java --module-path %PATH_TO_FX% --add-modules javafx.controls NestedTableview
Output
On executing the above code, it will generate the following output.