- JavaFX Tutorial
- JavaFX - Home
- JavaFX - Overview
- JavaFX Installation and Architecture
- JavaFX - Installation Using Netbeans
- JavaFX - Installation Using Eclipse
- JavaFX - Installation using Visual Studio Code
- JavaFX - Architecture
- JavaFX - Application
- JavaFX 2D Shapes
- JavaFX - 2D Shapes
- JavaFX - Drawing a Line
- JavaFX - Drawing a Rectangle
- JavaFX - Drawing a Rounded Rectangle
- JavaFX - Drawing a Circle
- JavaFX - Drawing an Ellipse
- JavaFX - Drawing a Polygon
- JavaFX - Drawing a Polyline
- JavaFX - Drawing a Cubic Curve
- JavaFX - Drawing a Quad Curve
- JavaFX - Drawing an Arc
- JavaFX - Drawing an SVGPath
- JavaFX Properties of 2D Objects
- JavaFX - Stroke Type Property
- JavaFX - Stroke Width Property
- JavaFX - Stroke Fill Property
- JavaFX - Stroke Property
- JavaFX - Stroke Line Join Property
- JavaFX - Stroke Miter Limit Property
- JavaFX - Stroke Line Cap Property
- JavaFX - Smooth Property
- Operations on 2D Objects
- JavaFX - 2D Shapes Operations
- JavaFX - Union Operation
- JavaFX - Intersection Operation
- JavaFX - Subtraction Operation
- JavaFX Color and Texture
- JavaFX - Colors
- JavaFX Text
- JavaFX - Text
- JavaFX Effects
- JavaFX - Effects
- JavaFX Transformations
- JavaFX - Transformations
- JavaFX Animations
- JavaFX - Animations
- JavaFX Images
- JavaFX - Images
- JavaFX 3D Shapes
- JavaFX - 3D Shapes
- JavaFX - Creating a Box
- JavaFX - Creating a Cylinder
- JavaFX - Creating a Sphere
- Properties of 3D Objects
- JavaFX - Cull Face Property
- JavaFX - Drawing Modes Property
- JavaFX - Material Property
- JavaFX Event Handling
- JavaFX - Event Handling
- JavaFX - Using Convenience Methods
- JavaFX - Event Filters
- JavaFX - Event Handlers
- JavaFX UI Controls
- JavaFX - UI Controls
- JavaFX - ListView
- JavaFX - Accordion
- JavaFX - ButtonBar
- JavaFX - ChoiceBox
- JavaFX - HTMLEditor
- JavaFX - MenuBar
- JavaFX - Pagination
- JavaFX - ProgressIndicator
- JavaFX - ScrollPane
- JavaFX - Separator
- JavaFX - Slider
- JavaFX - Spinner
- JavaFX - SplitPane
- JavaFX - TableView
- JavaFX - TabPane
- JavaFX - ToolBar
- JavaFX - TreeView
- JavaFX - Label
- JavaFX - CheckBox
- JavaFX - RadioButton
- JavaFX - TextField
- JavaFX - PasswordField
- JavaFX - FileChooser
- JavaFX - Hyperlink
- JavaFX - Tooltip
- JavaFX - Alert
- JavaFX - DatePicker
- JavaFX - TextArea
- JavaFX Charts
- JavaFX - Charts
- JavaFX - Creating Pie Chart
- JavaFX - Creating Line Chart
- JavaFX - Creating Area Chart
- JavaFX - Creating Bar Chart
- JavaFX - Creating Bubble Chart
- JavaFX - Creating Scatter Chart
- JavaFX - Creating Stacked Area Chart
- JavaFX - Creating Stacked Bar Chart
- JavaFX Layout Panes
- JavaFX - Layout Panes
- JavaFX - HBox Layout
- JavaFX - VBox Layout
- JavaFX - BorderPane Layout
- JavaFX - StackPane Layout
- JavaFX - TextFlow Layout
- JavaFX - AnchorPane Layout
- JavaFX - TilePane Layout
- JavaFX - GridPane Layout
- JavaFX - FlowPane Layout
- JavaFX CSS
- JavaFX - CSS
- Media with JavaFX
- JavaFX - Playing Video
- JavaFX Useful Resources
- JavaFX - Quick Guide
- JavaFX - Useful Resources
- JavaFX - Discussion
JavaFX - Drawing an Ellipse
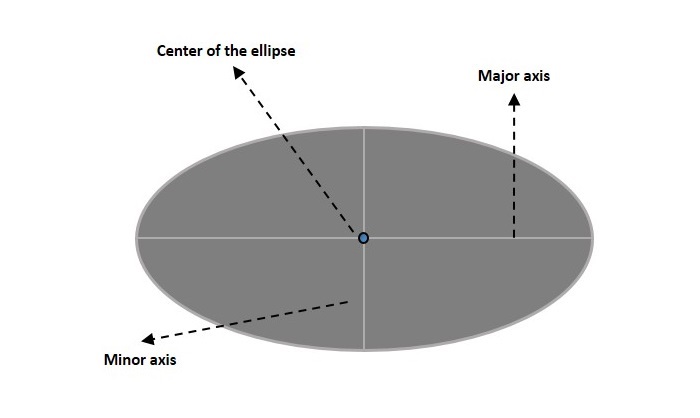
An Ellipse is defined by two points, each called a focus. If any point on the Ellipse is taken, the sum of the distances to the focus points is constant. The size of the Ellipse is determined by the sum of these two distances. The sum of these distances is equal to the length of the major axis (the longest diameter of the ellipse). A circle is, in fact, a special case of an Ellipse.
An Ellipse has three properties which are −
Centre − A point inside the Ellipse which is the midpoint of the line segment linking the two foci. The intersection of the major and minor axes.
Major axis − The longest diameter of an ellipse.
Minor axis − The shortest diameter of an ellipse.

Ellipse in JavaFX
In JavaFX, an Ellipse is represented by a class named Ellipse. This class belongs to the package javafx.scene.shape.
By instantiating this class, you can create an Ellipse node in JavaFX.
This class has 4 properties of the double datatype namely −
centerX − The x coordinate of the center of the ellipse in pixels.
centerY − The y coordinate of the center of the ellipse in pixels.
radiusX − The width of the ellipse pixels.
radiusY − The height of the ellipse pixels.
To draw an ellipse, you need to pass values to these properties, either by passing them to the constructor of this class in the same order, or by using setter methods.
Steps to Draw Ellipse
Follow the steps given below to draw an Ellipse in JavaFX.
Step 1: Creating an Ellipse
You can create an Ellipse in JavaFX by instantiating the class named Ellipse which belongs to a package javafx.scene.shape, inside the start() method. You can instantiate this class as follows.
public class ClassName extends Application {
   public void start(Stage primaryStage) throws Exception {
      //Creating an Ellipse object
      Ellipse ellipse = new Ellipse();
   }
}
Step 2: Setting Properties to the Ellipse
Specify the x, y coordinates of the center of the Ellipse → the width of the Ellipse along x axis and y axis (major and minor axises), of the circle by setting the properties X, Y, RadiusX and RadiusY.
This can be done by using their respective setter methods as shown in the following code block.
ellipse.setCenterX(300.0f);
ellipse.setCenterY(150.0f);
ellipse.setRadiusX(150.0f);
ellipse.setRadiusY(75.0f);
Step 3: Creating a Group Object
In the start() method, create a group object by instantiating the class named Group, which belongs to the package javafx.scene. This class is instantiated by passing the Ellipse (node) object created in the previous step as a parameter to the constructor of the Group class. This should be done in order to add it to the group as shown in the following code block −
Group root = new Group(ellipse);
Step 4: Launching Application
Once the 2D object is created, follow the given steps below to launch the application properly −
Firstly, instantiate the class named Scene by passing the Group object as a parameter value to its constructor. To this constructor, you can also pass dimensions of the application screen as optional parameters.
Then, set the title to the stage using the setTitle() method of the Stage class.
Now, a Scene object is added to the stage using the setScene() method of the class named Stage.
Display the contents of the scene using the method named show().
Lastly, the application is launched with the help of the launch() method.
Example
Following is a program which generates an Ellipse using JavaFX. Save this code in a file with the name EllipseExample.java.
import javafx.application.Application;
import javafx.scene.Group;
import javafx.scene.Scene;
import javafx.stage.Stage;
import javafx.scene.shape.Ellipse;

public class EllipseExample extends Application {
   @Override
   public void start(Stage stage) {
      //Drawing an ellipse
      Ellipse ellipse = new Ellipse();

      //Setting the properties of the ellipse
      ellipse.setCenterX(300.0f);
      ellipse.setCenterY(150.0f);
      ellipse.setRadiusX(150.0f);
      ellipse.setRadiusY(75.0f);

      //Creating a Group object
      Group root = new Group(ellipse);

      //Creating a scene object
      Scene scene = new Scene(root, 600, 300);

      //Setting title to the Stage
      stage.setTitle("Drawing an Ellipse");

      //Adding scene to the stage
      stage.setScene(scene);

      //Displaying the contents of the stage
      stage.show();
   }
   public static void main(String args[]){
      launch(args);
   }
}
Compile and execute the saved Java file from the command prompt using the following commands.
javac --module-path %PATH_TO_FX% --add-modules javafx.controls EllipseExample.java
java --module-path %PATH_TO_FX% --add-modules javafx.controls EllipseExample
Output
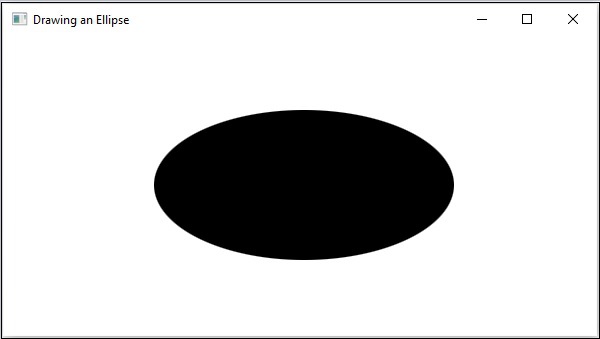
On executing, the above program generates a JavaFX window displaying an ellipse as shown below.

Example
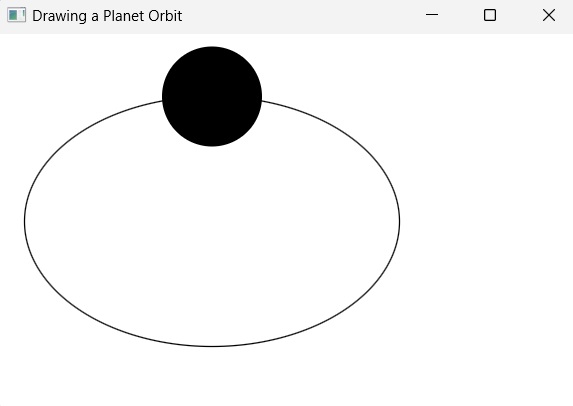
In another example given below, let us try to draw an elliptical orbit of a circular planet. Name this file as PlanetOrbit.java.
import javafx.application.Application;
import javafx.scene.Group;
import javafx.scene.Scene;
import javafx.stage.Stage;
import javafx.scene.shape.Ellipse;
import javafx.scene.shape.Circle;
import javafx.scene.paint.Color;
import javafx.animation.PathTransition;
import javafx.application.Application;
import javafx.stage.Stage;
import javafx.util.Duration;

public class PlanetOrbit extends Application {
   @Override
   public void start(Stage stage) {
      //Drawing an orbit
      Ellipse orbit = new Ellipse();
      orbit.setFill(Color.WHITE);
      orbit.setStroke(Color.BLACK);

      //Setting the properties of the ellipse
      orbit.setCenterX(300.0f);
      orbit.setCenterY(150.0f);
      orbit.setRadiusX(150.0f);
      orbit.setRadiusY(100.0f);

      // Drawing a circular planet
      Circle planet = new Circle(300.0f, 50.0f, 40.0f);

      //Creating the animation
      PathTransition pathTransition = new PathTransition();
      pathTransition.setDuration(Duration.millis(1000));
      pathTransition.setNode(planet);
      pathTransition.setPath(orbit);
      pathTransition.setOrientation(PathTransition.OrientationType.ORTHOGONAL_TO_TANGENT);
      pathTransition.setCycleCount(50);
      pathTransition.setAutoReverse(false);
      pathTransition.play();

      //Creating a Group object
      Group root = new Group();
      root.getChildren().addAll(orbit, planet);

      //Creating a scene object
      Scene scene = new Scene(root, 600, 300);

      //Setting title to the Stage
      stage.setTitle("Drawing a Planet Orbit");

      //Adding scene to the stage
      stage.setScene(scene);

      //Displaying the contents of the stage
      stage.show();
   }
   public static void main(String args[]){
      launch(args);
   }
}
Compile and execute the saved Java file from the command prompt using the following commands.
javac --module-path %PATH_TO_FX% --add-modules javafx.controls PlanetOrbit.java
java --module-path %PATH_TO_FX% --add-modules javafx.controls PlanetOrbit
Output
On executing, the above program generates a JavaFX window displaying an orbit as shown below.
