- JavaFX Tutorial
- JavaFX - Home
- JavaFX - Overview
- JavaFX Installation and Architecture
- JavaFX - Installation Using Netbeans
- JavaFX - Installation Using Eclipse
- JavaFX - Installation using Visual Studio Code
- JavaFX - Architecture
- JavaFX - Application
- JavaFX 2D Shapes
- JavaFX - 2D Shapes
- JavaFX - Drawing a Line
- JavaFX - Drawing a Rectangle
- JavaFX - Drawing a Rounded Rectangle
- JavaFX - Drawing a Circle
- JavaFX - Drawing an Ellipse
- JavaFX - Drawing a Polygon
- JavaFX - Drawing a Polyline
- JavaFX - Drawing a Cubic Curve
- JavaFX - Drawing a Quad Curve
- JavaFX - Drawing an Arc
- JavaFX - Drawing an SVGPath
- JavaFX Properties of 2D Objects
- JavaFX - Stroke Type Property
- JavaFX - Stroke Width Property
- JavaFX - Stroke Fill Property
- JavaFX - Stroke Property
- JavaFX - Stroke Line Join Property
- JavaFX - Stroke Miter Limit Property
- JavaFX - Stroke Line Cap Property
- JavaFX - Smooth Property
- Operations on 2D Objects
- JavaFX - 2D Shapes Operations
- JavaFX - Union Operation
- JavaFX - Intersection Operation
- JavaFX - Subtraction Operation
- JavaFX Color and Texture
- JavaFX - Colors
- JavaFX Text
- JavaFX - Text
- JavaFX Effects
- JavaFX - Effects
- JavaFX Transformations
- JavaFX - Transformations
- JavaFX Animations
- JavaFX - Animations
- JavaFX Images
- JavaFX - Images
- JavaFX 3D Shapes
- JavaFX - 3D Shapes
- JavaFX - Creating a Box
- JavaFX - Creating a Cylinder
- JavaFX - Creating a Sphere
- Properties of 3D Objects
- JavaFX - Cull Face Property
- JavaFX - Drawing Modes Property
- JavaFX - Material Property
- JavaFX Event Handling
- JavaFX - Event Handling
- JavaFX - Using Convenience Methods
- JavaFX - Event Filters
- JavaFX - Event Handlers
- JavaFX UI Controls
- JavaFX - UI Controls
- JavaFX - ListView
- JavaFX - Accordion
- JavaFX - ButtonBar
- JavaFX - ChoiceBox
- JavaFX - HTMLEditor
- JavaFX - MenuBar
- JavaFX - Pagination
- JavaFX - ProgressIndicator
- JavaFX - ScrollPane
- JavaFX - Separator
- JavaFX - Slider
- JavaFX - Spinner
- JavaFX - SplitPane
- JavaFX - TableView
- JavaFX - TabPane
- JavaFX - ToolBar
- JavaFX - TreeView
- JavaFX - Label
- JavaFX - CheckBox
- JavaFX - RadioButton
- JavaFX - TextField
- JavaFX - PasswordField
- JavaFX - FileChooser
- JavaFX - Hyperlink
- JavaFX - Tooltip
- JavaFX - Alert
- JavaFX - DatePicker
- JavaFX - TextArea
- JavaFX Charts
- JavaFX - Charts
- JavaFX - Creating Pie Chart
- JavaFX - Creating Line Chart
- JavaFX - Creating Area Chart
- JavaFX - Creating Bar Chart
- JavaFX - Creating Bubble Chart
- JavaFX - Creating Scatter Chart
- JavaFX - Creating Stacked Area Chart
- JavaFX - Creating Stacked Bar Chart
- JavaFX Layout Panes
- JavaFX - Layout Panes
- JavaFX - HBox Layout
- JavaFX - VBox Layout
- JavaFX - BorderPane Layout
- JavaFX - StackPane Layout
- JavaFX - TextFlow Layout
- JavaFX - AnchorPane Layout
- JavaFX - TilePane Layout
- JavaFX - GridPane Layout
- JavaFX - FlowPane Layout
- JavaFX CSS
- JavaFX - CSS
- Media with JavaFX
- JavaFX - Playing Video
- JavaFX Useful Resources
- JavaFX - Quick Guide
- JavaFX - Useful Resources
- JavaFX - Discussion
JavaFX - Installation Using Eclipse
Eclipse is an integrated development environment (IDE) used in Java programming. It contains a workspace and an extensible plug-in system in order to customize the environment. You can also use JavaFX with Eclipse.
This chapter explains the steps to create a JavaFX application in Eclipse IDE. We will be using the latest versions of both JavaFX SDK and Eclipse.
Installing JavaFX in Eclipse
A plug-in named e(fx)clipse is available in Eclipse IDE to support JavaFX. You can use the following steps to set JavaFX in Eclipse. First of all, make sure that you have Eclipse in your system. If not, download and install Eclipse in your system.
To install Eclipse IDE, follow the given steps below −
Step 1 − Visit the eclipse.org website.
Click the download button for the file named eclipse-inst-jre-win64.exe to be downloaded.
Run the file downloaded for the eclipse installation to begin.
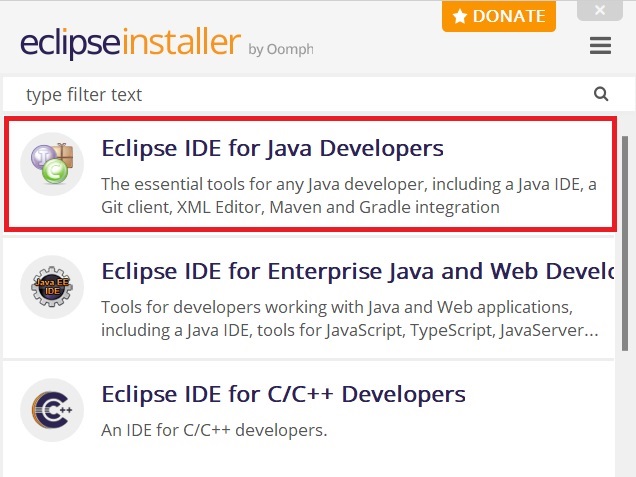
Step 2 − Select the highlighted option in the image below for the installation to begin.
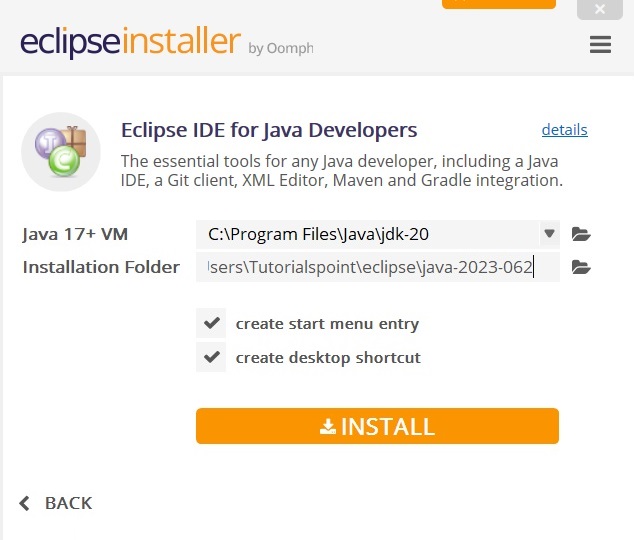
Step 3 − Click on the install button to install the chosen Eclipse IDE version.
Step 4 − This step starts the installation of Eclipse IDE and it may take a while.
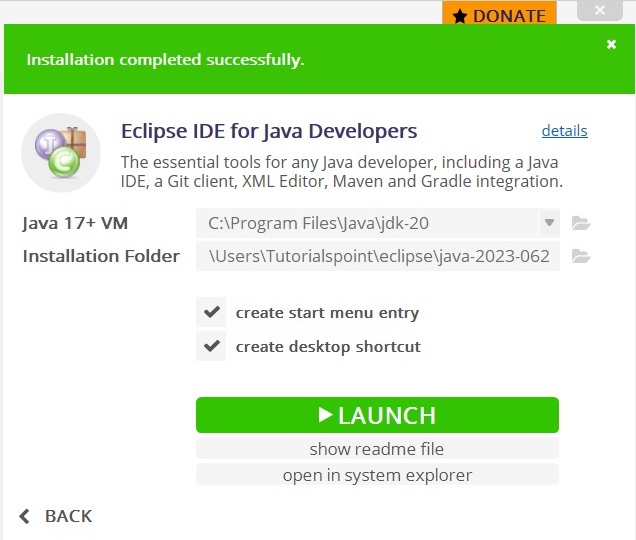
Step 5 − Lastly, launch the application to see the welcome page.
Installing JavaFX Plug-In
Once Eclipse is installed, follow the steps given below to install e(fx)clipse plug-in in your system.
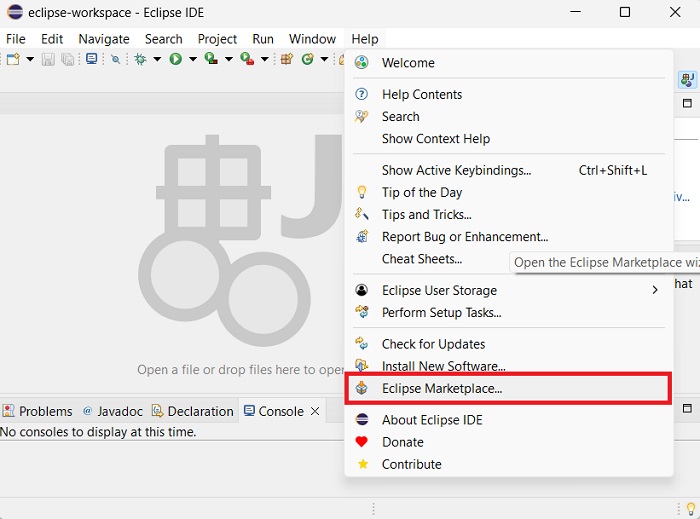
Step 1 − Open the Help menu in Eclipse and select Eclipse Marketplace option as shown below.
Upon clicking, it will display the new window containing all the plug-ins, as shown in the following screenshot.
Step 2 − In the Find text box, search for e(fx)clipse plug-in using the 'fx' keyword.
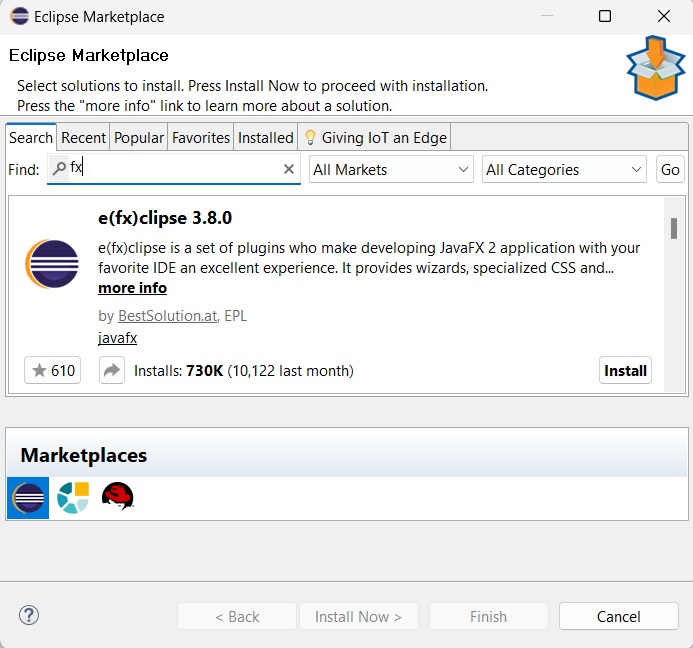
Step 3 − Once retrieved, click the Install button to install JavaFX plug-in in Eclipse.
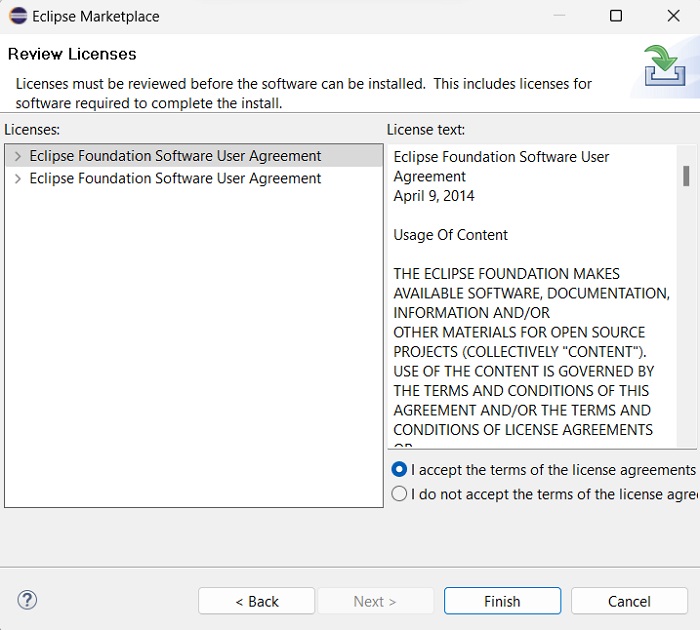
Step 4 − In the next window, you will see a license agreement for JavaFX that you have to agree to. Select "I agree" and click "finish".
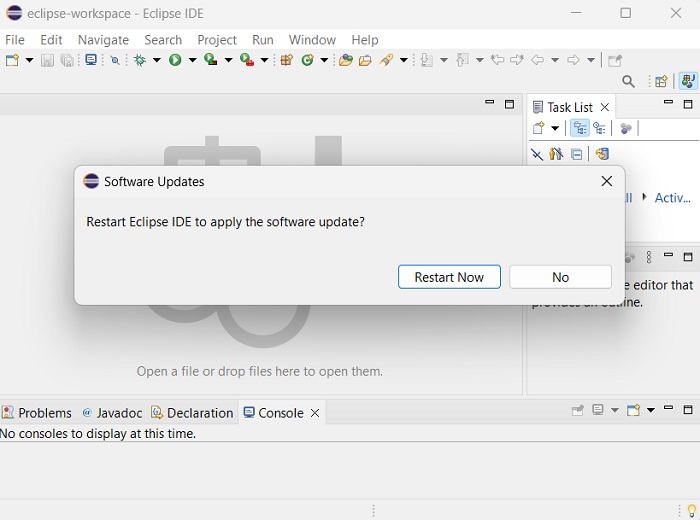
Step 5 − Once the plug-in is installed, the eclipse will need to be restarted. So, click the restart option as shown below.
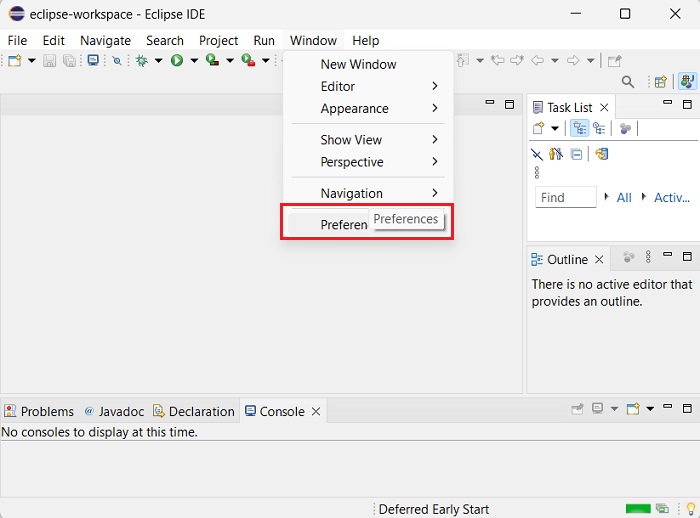
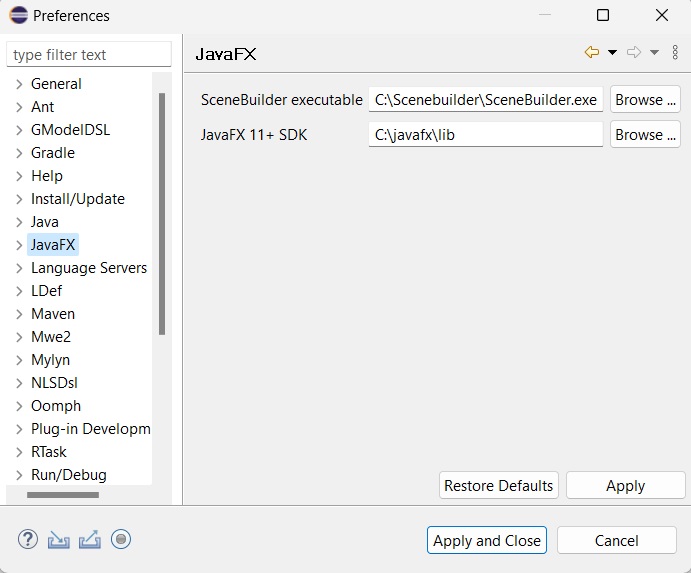
Step 6 − You will have to set the preferences by pointing to the installation directory of JavaFX. For that, in the "Window" menu, click on "Preferences" as shown below.
Step 7 − Click on "JavaFX" option and point to the "lib" directory of JavaFX SDK as shown in the screenshot. If you have "Scenebuilder" installed, you can point to the installation directory of Scenebuilder as well, like shown.
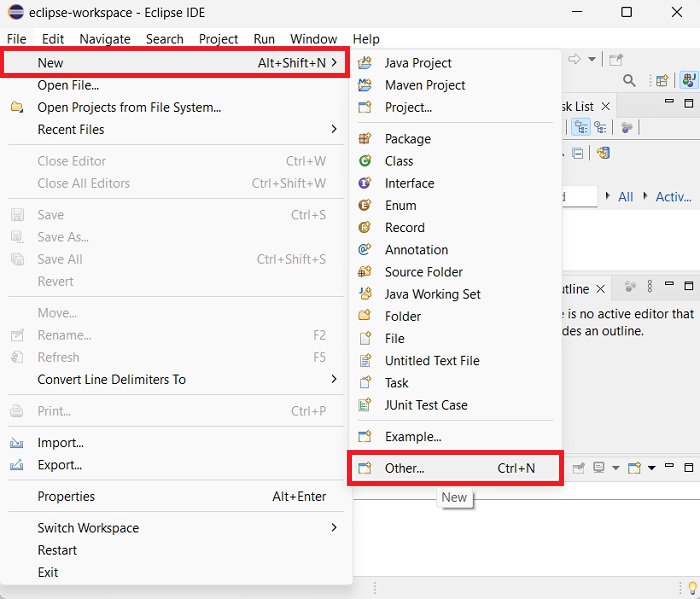
Step 8 − Now that JavaFX preferences are set, you are ready to create a new JavaFX project. Go to "File -> New -> Other".
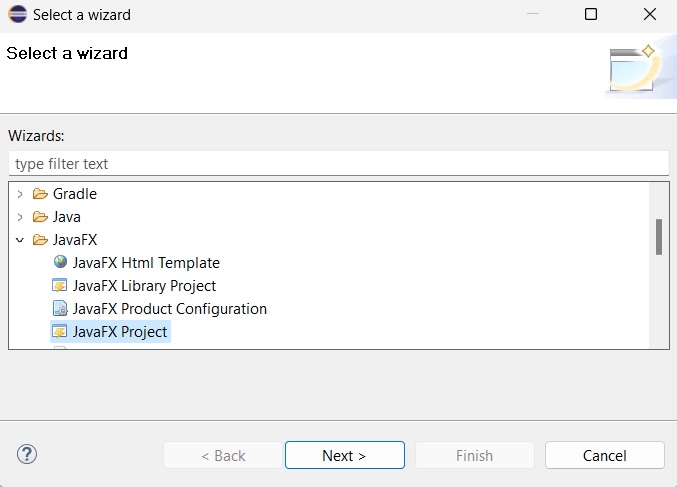
Step 9 − Then, you will get a window where you can see a list of wizards provided by Eclipse to create a project. Expand the JavaFX wizard, select JavaFX Project and click the Next button as shown in the following screenshot.
Step 10 − On clicking Next, a New Project Wizard opens. Here, you can type the required project name and click Finish.
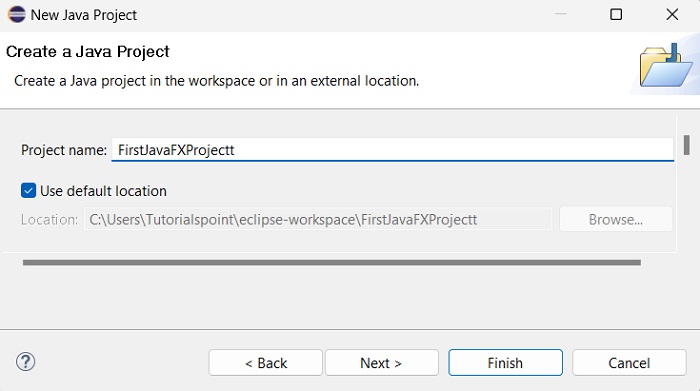
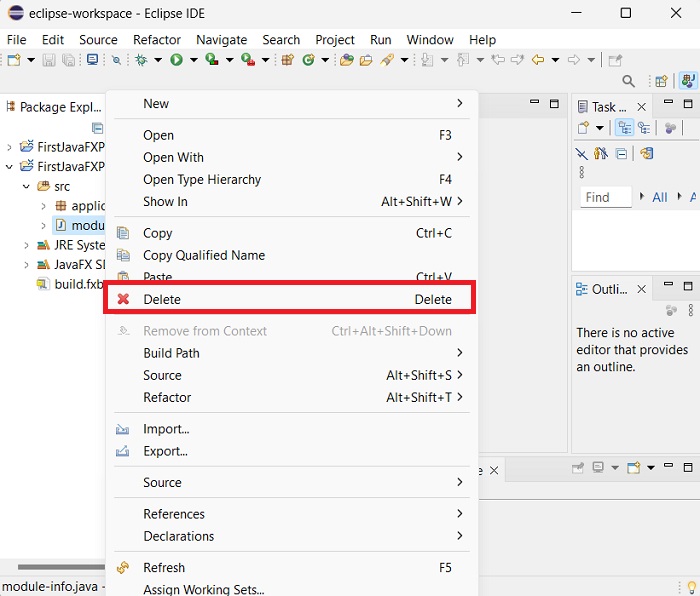
Step 11 − On clicking Finish, an application is created with the given name (FirstJavaFXProjectt). A module_info.java file is automatically created as well, which needs to be deleted in order to avoid errors while running our project.
Step 12 − In the sub-package named application, a program with the name Main.java is created as shown below. Before executing this file, we must add VM arguments. For that, go to the "Run" symbol and click "Run configurations" as shown in the screenshot below.
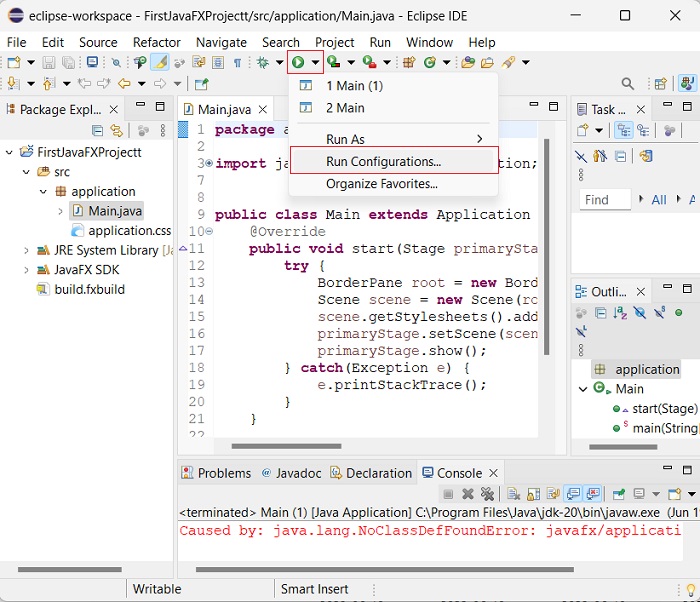
Step 13 − In the "Arguments" tab, add the following VM arguments −
In Windows
--module-path "\path\to\javafx-sdk-20\lib" --add-modules javafx.controls,javafx.fxml
In Linux
--module-path /path/to/javafx-sdk-20/lib --add-modules javafx.controls,javafx.fxml
Look at the screenshot below −
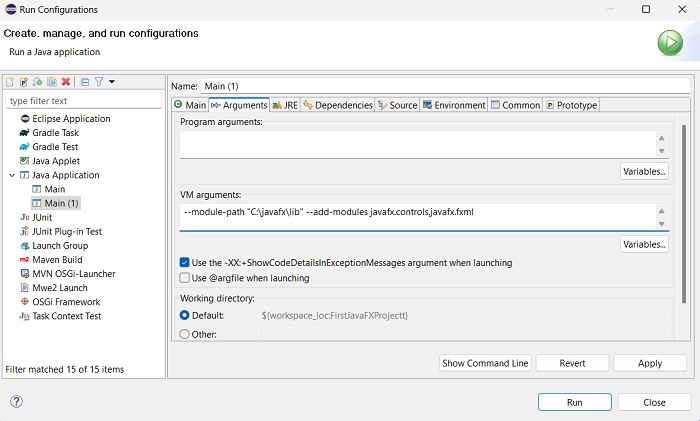
Once added, click "Apply" and "Close".
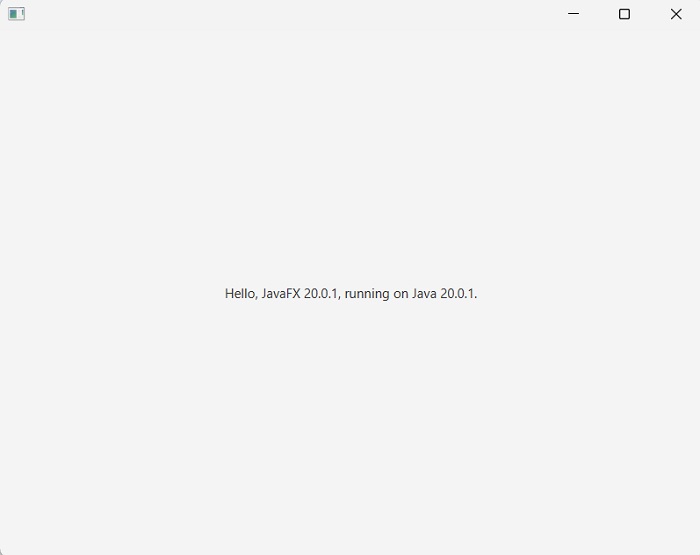
Step 14 − Now, upon executing the Main.java file, a new window pops up containing the given label.
Note − We will learn about the code in further chapters.