- JavaFX - Environment
- JavaFX - Installation Using Netbeans
- JavaFX - Installation Using Eclipse
- JavaFX - Installation using Visual Studio Code
- JavaFX - Architecture
- JavaFX - Application
- JavaFX 2D Shapes
- JavaFX - 2D Shapes
- JavaFX - Drawing a Line
- JavaFX - Drawing a Rectangle
- JavaFX - Drawing a Rounded Rectangle
- JavaFX - Drawing a Circle
- JavaFX - Drawing an Ellipse
- JavaFX - Drawing a Polygon
- JavaFX - Drawing a Polyline
- JavaFX - Drawing a Cubic Curve
- JavaFX - Drawing a Quad Curve
- JavaFX - Drawing an Arc
- JavaFX - Drawing an SVGPath
- JavaFX Properties of 2D Objects
- JavaFX - Stroke Type Property
- JavaFX - Stroke Width Property
- JavaFX - Stroke Fill Property
- JavaFX - Stroke Property
- JavaFX - Stroke Line Join Property
- JavaFX - Stroke Miter Limit Property
- JavaFX - Stroke Line Cap Property
- JavaFX - Smooth Property
- Operations on 2D Objects
- JavaFX - 2D Shapes Operations
- JavaFX - Union Operation
- JavaFX - Intersection Operation
- JavaFX - Subtraction Operation
- JavaFX Path Objects
- JavaFX - Path Objects
- JavaFX - LineTo Path Object
- JavaFX - HLineTo Path Object
- JavaFX - VLineTo Path Object
- JavaFX - QuadCurveTo Path Object
- JavaFX - CubicCurveTo Path Object
- JavaFX - ArcTo Path Object
- JavaFX Color and Texture
- JavaFX - Colors
- JavaFX - Linear Gradient Pattern
- JavaFX - Radial Gradient Pattern
- JavaFX Text
- JavaFX - Text
- JavaFX Effects
- JavaFX - Effects
- JavaFX - Color Adjust Effect
- JavaFX - Color input Effect
- JavaFX - Image Input Effect
- JavaFX - Blend Effect
- JavaFX - Bloom Effect
- JavaFX - Glow Effect
- JavaFX - Box Blur Effect
- JavaFX - GaussianBlur Effect
- JavaFX - MotionBlur Effect
- JavaFX - Reflection Effect
- JavaFX - SepiaTone Effect
- JavaFX - Shadow Effect
- JavaFX - DropShadow Effect
- JavaFX - InnerShadow Effect
- JavaFX - Lighting Effect
- JavaFX - Light.Distant Effect
- JavaFX - Light.Spot Effect
- JavaFX - Point.Spot Effect
- JavaFX - DisplacementMap
- JavaFX - PerspectiveTransform
- JavaFX Transformations
- JavaFX - Transformations
- JavaFX - Rotation Transformation
- JavaFX - Scaling Transformation
- JavaFX - Translation Transformation
- JavaFX - Shearing Transformation
- JavaFX Animations
- JavaFX - Animations
- JavaFX - Rotate Transition
- JavaFX - Scale Transition
- JavaFX - Translate Transition
- JavaFX - Fade Transition
- JavaFX - Fill Transition
- JavaFX - Stroke Transition
- JavaFX - Sequential Transition
- JavaFX - Parallel Transition
- JavaFX - Pause Transition
- JavaFX - Path Transition
- JavaFX Images
- JavaFX - Images
- JavaFX 3D Shapes
- JavaFX - 3D Shapes
- JavaFX - Creating a Box
- JavaFX - Creating a Cylinder
- JavaFX - Creating a Sphere
- Properties of 3D Objects
- JavaFX - Cull Face Property
- JavaFX - Drawing Modes Property
- JavaFX - Material Property
- JavaFX Event Handling
- JavaFX - Event Handling
- JavaFX - Using Convenience Methods
- JavaFX - Event Filters
- JavaFX - Event Handlers
- JavaFX UI Controls
- JavaFX - UI Controls
- JavaFX - ListView
- JavaFX - Accordion
- JavaFX - ButtonBar
- JavaFX - ChoiceBox
- JavaFX - HTMLEditor
- JavaFX - MenuBar
- JavaFX - Pagination
- JavaFX - ProgressIndicator
- JavaFX - ScrollPane
- JavaFX - Separator
- JavaFX - Slider
- JavaFX - Spinner
- JavaFX - SplitPane
- JavaFX - TableView
- JavaFX - TabPane
- JavaFX - ToolBar
- JavaFX - TreeView
- JavaFX - Label
- JavaFX - CheckBox
- JavaFX - RadioButton
- JavaFX - TextField
- JavaFX - PasswordField
- JavaFX - FileChooser
- JavaFX - Hyperlink
- JavaFX - Tooltip
- JavaFX - Alert
- JavaFX - DatePicker
- JavaFX - TextArea
- JavaFX Charts
- JavaFX - Charts
- JavaFX - Creating Pie Chart
- JavaFX - Creating Line Chart
- JavaFX - Creating Area Chart
- JavaFX - Creating Bar Chart
- JavaFX - Creating Bubble Chart
- JavaFX - Creating Scatter Chart
- JavaFX - Creating Stacked Area Chart
- JavaFX - Creating Stacked Bar Chart
- JavaFX Layout Panes
- JavaFX - Layout Panes
- JavaFX - HBox Layout
- JavaFX - VBox Layout
- JavaFX - BorderPane Layout
- JavaFX - StackPane Layout
- JavaFX - TextFlow Layout
- JavaFX - AnchorPane Layout
- JavaFX - TilePane Layout
- JavaFX - GridPane Layout
- JavaFX - FlowPane Layout
- JavaFX CSS
- JavaFX - CSS
- Media with JavaFX
- JavaFX - Handling Media
- JavaFX - Playing Video
- JavaFX Useful Resources
- JavaFX - Quick Guide
- JavaFX - Useful Resources
- JavaFX - Discussion
JavaFX - ToolBar
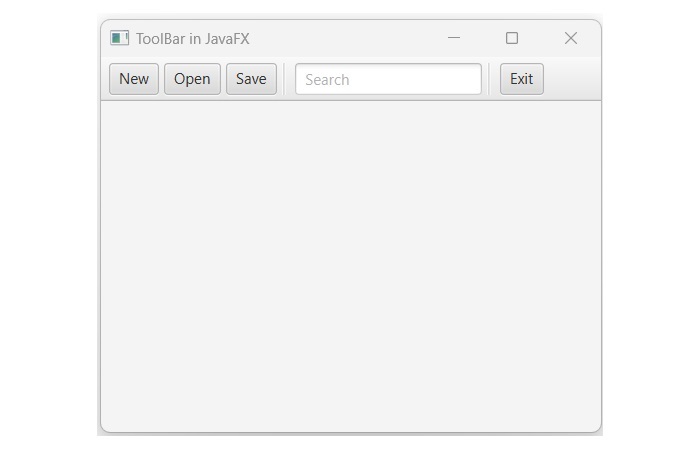
A ToolBar is a graphical user interface control with horizontal or vertical strip of buttons, menus, or other controls. It is often used to provide quick access to frequently used commands or functions. We can locate a toolbar at top of any application or web page as shown in the below figure −

ToolBar in JavaFX
In JavaFX, the tool bar is represented by the ToolBar class. This class is a part of the package named javafx.scene.control. By instantiating this class, we can create a ToolBar node in JavaFX. It has the following constructors −
ToolBar() − It is the default constructor used to create a tool bar without any predefined nodes.
ToolBar(Node nodes) − It is the parameterized constructor of ToolBar class which creates a new tool bar with the specified nodes.
Steps to create a tool bar in JavaFX
Follow the steps given below to create a tool bar in JavaFX.
Step 1: Create nodes to display within the ToolBar
First, we need to create a list of nodes to display within the ToolBar where, each node represents a distinct command or function. Here, we are going to create buttons, separator and text fields by using the below code blocks −
// Creating buttons and a text field
Button btnNew = new Button("New");
Button btnOpen = new Button("Open");
Button btnSave = new Button("Save");
Button btnExit = new Button("Exit");
TextField txtSearch = new TextField();
txtSearch.setPromptText("Search");
// creating separators
Separator sepOne = new Separator();
Separator sepTwo = new Separator();
Step 2: Instantiate the ToolBar class
As mentioned earlier, a tool bar is created using the class named ToolBar. Therefore, instantiate this class as shown in the following code block −
// creating a toolbar
ToolBar toolsB = new ToolBar();
Step 3: Add the nodes to the ToolBar object
To add all the nodes to the ToolBar, we use the getItems() and addAll() methods. The code given below demonstrates it−
// adding the nodes
toolsB.getItems().addAll(btnNew, btnOpen, btnSave, sepOne, txtSearch, sepTwo, btnExit);
Step 4: Launching Application
Once the tool bar is created and all the nodes are added, follow the given steps below to launch the application properly −
Firstly, instantiate the class named BorderPane by passing the ToolBar object as a parameter value to its constructor. However, we can use any of the layout panes such as GridPane or StackPane.
Then, instantiate the class named Scene by passing the BorderPane object as a parameter value to its constructor. We can also pass dimensions of the application screen as optional parameters to this constructor.
Then, set the title to the stage using the setTitle() method of the Stage class.
Now, a Scene object is added to the stage using the setScene() method of the class named Stage.
Display the contents of the scene using the method named show().
Lastly, the application is launched with the help of the launch() method.
Example
Following is the program that will create a ToolBar using JavaFX. Save this code in a file with the name ToolbarExample.java.
import javafx.application.Application;
import javafx.scene.Scene;
import javafx.scene.control.Button;
import javafx.scene.control.Separator;
import javafx.scene.control.TextField;
import javafx.scene.control.ToolBar;
import javafx.scene.layout.BorderPane;
import javafx.stage.Stage;
public class ToolbarExample extends Application {
   @Override
   public void start(Stage stage) throws Exception {
      // Creating buttons and a text field
      Button btnNew = new Button("New");
      Button btnOpen = new Button("Open");
      Button btnSave = new Button("Save");
      Button btnExit = new Button("Exit");
      TextField txtSearch = new TextField();
      txtSearch.setPromptText("Search");
      // creating separators
      Separator sepOne = new Separator();
      Separator sepTwo = new Separator();
      // creating a toolbar
      ToolBar toolsB = new ToolBar();
      // adding the nodes
      toolsB.getItems().addAll(btnNew, btnOpen, btnSave, sepOne, txtSearch, sepTwo, btnExit);
      // Creating a BorderPane as root
      BorderPane root = new BorderPane();
      // adding the ToolBar at the top
      root.setTop(toolsB);
      // Create a Scene and set it to the Stage
      Scene scene = new Scene(root, 400, 300);
      stage.setTitle("ToolBar in JavaFX");
      stage.setScene(scene);
      stage.show();
   }
   public static void main(String[] args) {
      launch(args);
   }
}
Compile and execute the saved Java file from the command prompt using the following commands.
javac --module-path %PATH_TO_FX% --add-modules javafx.controls ToolbarExample.java
java --module-path %PATH_TO_FX% --add-modules javafx.controls ToolbarExample
Output
On executing, the above program generates a JavaFX window displaying a ToolBar with specified buttons and text fields as shown below.

Setting the Orientation of the ToolBar
To change the orientation of the ToolBar, we can use the setOrientation() method and pass either Orientation.HORIZONTAL or Orientation.VERTICAL as the argument.
Example
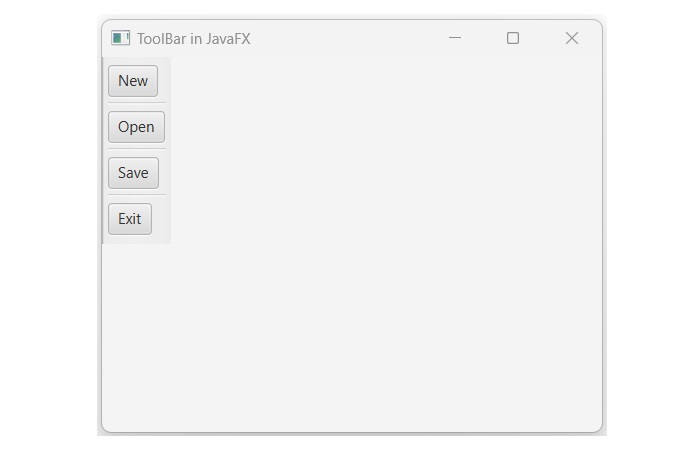
In the following JavaFX program, we will create a vertical ToolBar. Save this code in a file with the name VerticalToolbar.java.
import javafx.application.Application;
import javafx.scene.Scene;
import javafx.scene.control.Button;
import javafx.scene.control.Separator;
import javafx.scene.control.TextField;
import javafx.scene.control.ToolBar;
import javafx.scene.layout.BorderPane;
import javafx.stage.Stage;
import javafx.geometry.Orientation;
public class VerticalToolbar extends Application {
   @Override
   public void start(Stage stage) throws Exception {
      // Creating buttons
      Button btnNew = new Button("New");
      Button btnOpen = new Button("Open");
      Button btnSave = new Button("Save");
      Button btnExit = new Button("Exit");
      // creating separators
      Separator sepOne = new Separator();
      Separator sepTwo = new Separator();
      Separator sepThree = new Separator();
      // creating a toolbar
      ToolBar toolsB = new ToolBar();
      // adding the nodes
      toolsB.getItems().addAll(btnNew, sepOne, btnOpen, sepTwo, btnSave, sepThree, btnExit);
      toolsB.setOrientation(Orientation.VERTICAL);
      // Creating a BorderPane as root
      BorderPane root = new BorderPane();
      // adding the ToolBar at the top
      root.setTop(toolsB);
      // Create a Scene and set it to the Stage
      Scene scene = new Scene(root, 400, 300);
      stage.setTitle("ToolBar in JavaFX");
      stage.setScene(scene);
      stage.show();
   }
   public static void main(String[] args) {
      launch(args);
   }
}
Compile and execute the saved Java file from the command prompt using the following commands.
javac --module-path %PATH_TO_FX% --add-modules javafx.controls VerticalToolbar.java
java --module-path %PATH_TO_FX% --add-modules javafx.controls VerticalToolbar
Output
When we execute the above code, it will generate the following output.
