- JavaFX - Environment
- JavaFX - Installation Using Netbeans
- JavaFX - Installation Using Eclipse
- JavaFX - Installation using Visual Studio Code
- JavaFX - Architecture
- JavaFX - Application
- JavaFX 2D Shapes
- JavaFX - 2D Shapes
- JavaFX - Drawing a Line
- JavaFX - Drawing a Rectangle
- JavaFX - Drawing a Rounded Rectangle
- JavaFX - Drawing a Circle
- JavaFX - Drawing an Ellipse
- JavaFX - Drawing a Polygon
- JavaFX - Drawing a Polyline
- JavaFX - Drawing a Cubic Curve
- JavaFX - Drawing a Quad Curve
- JavaFX - Drawing an Arc
- JavaFX - Drawing an SVGPath
- JavaFX Properties of 2D Objects
- JavaFX - Stroke Type Property
- JavaFX - Stroke Width Property
- JavaFX - Stroke Fill Property
- JavaFX - Stroke Property
- JavaFX - Stroke Line Join Property
- JavaFX - Stroke Miter Limit Property
- JavaFX - Stroke Line Cap Property
- JavaFX - Smooth Property
- Operations on 2D Objects
- JavaFX - 2D Shapes Operations
- JavaFX - Union Operation
- JavaFX - Intersection Operation
- JavaFX - Subtraction Operation
- JavaFX Path Objects
- JavaFX - Path Objects
- JavaFX - LineTo Path Object
- JavaFX - HLineTo Path Object
- JavaFX - VLineTo Path Object
- JavaFX - QuadCurveTo Path Object
- JavaFX - CubicCurveTo Path Object
- JavaFX - ArcTo Path Object
- JavaFX Color and Texture
- JavaFX - Colors
- JavaFX - Linear Gradient Pattern
- JavaFX - Radial Gradient Pattern
- JavaFX Text
- JavaFX - Text
- JavaFX Effects
- JavaFX - Effects
- JavaFX - Color Adjust Effect
- JavaFX - Color input Effect
- JavaFX - Image Input Effect
- JavaFX - Blend Effect
- JavaFX - Bloom Effect
- JavaFX - Glow Effect
- JavaFX - Box Blur Effect
- JavaFX - GaussianBlur Effect
- JavaFX - MotionBlur Effect
- JavaFX - Reflection Effect
- JavaFX - SepiaTone Effect
- JavaFX - Shadow Effect
- JavaFX - DropShadow Effect
- JavaFX - InnerShadow Effect
- JavaFX - Lighting Effect
- JavaFX - Light.Distant Effect
- JavaFX - Light.Spot Effect
- JavaFX - Point.Spot Effect
- JavaFX - DisplacementMap
- JavaFX - PerspectiveTransform
- JavaFX Transformations
- JavaFX - Transformations
- JavaFX - Rotation Transformation
- JavaFX - Scaling Transformation
- JavaFX - Translation Transformation
- JavaFX - Shearing Transformation
- JavaFX Animations
- JavaFX - Animations
- JavaFX - Rotate Transition
- JavaFX - Scale Transition
- JavaFX - Translate Transition
- JavaFX - Fade Transition
- JavaFX - Fill Transition
- JavaFX - Stroke Transition
- JavaFX - Sequential Transition
- JavaFX - Parallel Transition
- JavaFX - Pause Transition
- JavaFX - Path Transition
- JavaFX Images
- JavaFX - Images
- JavaFX 3D Shapes
- JavaFX - 3D Shapes
- JavaFX - Creating a Box
- JavaFX - Creating a Cylinder
- JavaFX - Creating a Sphere
- Properties of 3D Objects
- JavaFX - Cull Face Property
- JavaFX - Drawing Modes Property
- JavaFX - Material Property
- JavaFX Event Handling
- JavaFX - Event Handling
- JavaFX - Using Convenience Methods
- JavaFX - Event Filters
- JavaFX - Event Handlers
- JavaFX UI Controls
- JavaFX - UI Controls
- JavaFX - ListView
- JavaFX - Accordion
- JavaFX - ButtonBar
- JavaFX - ChoiceBox
- JavaFX - HTMLEditor
- JavaFX - MenuBar
- JavaFX - Pagination
- JavaFX - ProgressIndicator
- JavaFX - ScrollPane
- JavaFX - Separator
- JavaFX - Slider
- JavaFX - Spinner
- JavaFX - SplitPane
- JavaFX - TableView
- JavaFX - TabPane
- JavaFX - ToolBar
- JavaFX - TreeView
- JavaFX - Label
- JavaFX - CheckBox
- JavaFX - RadioButton
- JavaFX - TextField
- JavaFX - PasswordField
- JavaFX - FileChooser
- JavaFX - Hyperlink
- JavaFX - Tooltip
- JavaFX - Alert
- JavaFX - DatePicker
- JavaFX - TextArea
- JavaFX Charts
- JavaFX - Charts
- JavaFX - Creating Pie Chart
- JavaFX - Creating Line Chart
- JavaFX - Creating Area Chart
- JavaFX - Creating Bar Chart
- JavaFX - Creating Bubble Chart
- JavaFX - Creating Scatter Chart
- JavaFX - Creating Stacked Area Chart
- JavaFX - Creating Stacked Bar Chart
- JavaFX Layout Panes
- JavaFX - Layout Panes
- JavaFX - HBox Layout
- JavaFX - VBox Layout
- JavaFX - BorderPane Layout
- JavaFX - StackPane Layout
- JavaFX - TextFlow Layout
- JavaFX - AnchorPane Layout
- JavaFX - TilePane Layout
- JavaFX - GridPane Layout
- JavaFX - FlowPane Layout
- JavaFX CSS
- JavaFX - CSS
- Media with JavaFX
- JavaFX - Handling Media
- JavaFX - Playing Video
- JavaFX Useful Resources
- JavaFX - Quick Guide
- JavaFX - Useful Resources
- JavaFX - Discussion
JavaFX Effects - Blend
In general, blend means mixture of two or more different things or substances. If we apply the blend effect, it will take the pixels of two different inputs. This will be done at the same location and it produces a combined output based on the blend mode.
For example, if we draw two objects the top object covers the bottom one. On applying the blend effect, the pixels of the two objects in the overlap area are combined and displayed based on the input mode.
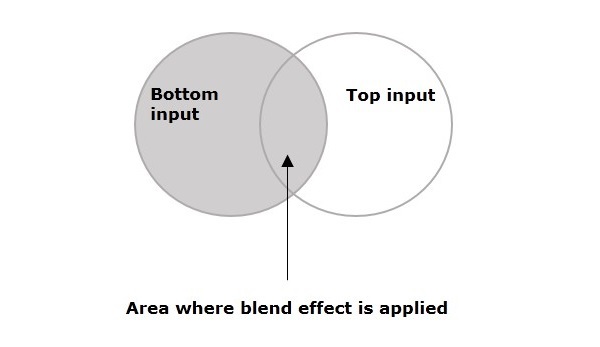
The class named Blend of the package javafx.scene.effect represents the blend effect, this class contains four properties, which are −
bottomInput − This property is of the type Effect and it represents the bottom input to the blend effect.
topInput − This property is of the type Effect and it represents the top input to the blend effect.
opacity − This property is of double type and it represents the opacity value modulated with the top input.
mode − This property is of the type BlendMode and it represents the mode used to blend the two inputs together.
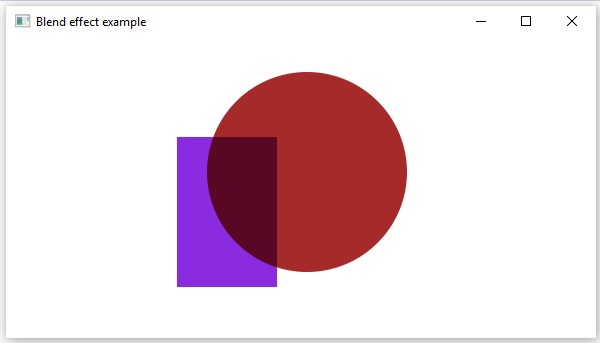
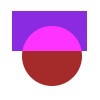
Example
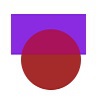
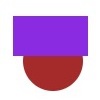
Following is an example demonstrating the blend effect. In here, we are drawing a circle filled with BROWN color, on top of it lies a BLUEVIOLET ColorInput.
We have applied the blend effect choosing a multiply mode In the overlap area, the colors of the two objects were multiplied and displayed.
Save this code in a file with the name BlendEffectExample.java.
import javafx.application.Application;
import javafx.scene.Group;
import javafx.scene.Scene;
import javafx.stage.Stage;
import javafx.scene.shape.Circle;
import javafx.scene.effect.Blend;
import javafx.scene.effect.BlendMode;
import javafx.scene.effect.ColorInput;
import javafx.scene.paint.Color;

public class BlendEffectExample extends Application {
   @Override
   public void start(Stage stage) {
      //Drawing a Circle
      Circle circle = new Circle();

      //Setting the center of the Circle
      circle.setCenterX(75.0f);
      circle.setCenterY(75.0f);

      //Setting radius of the circle
      circle.setRadius(30.0f);

      //Setting the fill color of the circle
      circle.setFill(Color.BROWN);

      //Instantiating the blend class
      Blend blend = new Blend();

      //Preparing the to input object
      ColorInput topInput = new ColorInput(35, 30, 75, 40, Color.BLUEVIOLET);

      //setting the top input to the blend object
      blend.setTopInput(topInput);

      //setting the blend mode
      blend.setMode(BlendMode.SRC_OVER);

      //Applying the blend effect to circle
      circle.setEffect(blend);

      //Creating a Group object
      Group root = new Group(circle);

      //Creating a scene object
      Scene scene = new Scene(root, 150, 150);

      //Setting title to the Stage
      stage.setTitle("Blend Example");

      //Adding scene to the stage
      stage.setScene(scene);

      //Displaying the contents of the stage
      stage.show();
   }
   public static void main(String args[]){
      launch(args);
   }
}
Compile and execute the saved java file from the command prompt using the following commands.
javac BlendEffectExample.java
java BlendEffectExample
On executing, the above program generates a JavaFX window as shown below.
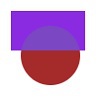
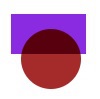
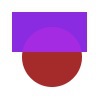
Blend Modes
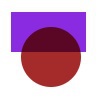
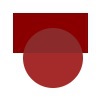
| S.NO | Mode & Description | Output |
|---|---|---|
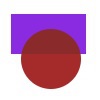
| 1 |
ADD In this mode, the color values of the top and bottom inputs are added and displayed. |
 |
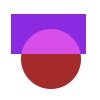
| 2 |
MULTIPLY In this mode, the color values of the top and bottom inputs are multiplied and displayed. |
 |
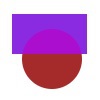
| 3 |
DIFFERENCE In this mode, among the color values of the top and bottom inputs, the darker one is subtracted from the lighter one and displayed. |
 |
| 4 |
RED In this mode, the red components of the bottom input were replaced by the red components of the top input. |
 |
| 5 |
BLUE In this mode, the blue components of the bottom input were replaced by the blue components of the top input. |
 |
| 6 |
GREEN In this mode, the green components of the bottom input were replaced by the green components of the top input. |
 |
| 7 |
EXCLUSION In this mode, the color components of the two inputs were multiplied and doubled. Then they are subtracted from the sum of the color components of the bottom input. The resultant is then displayed. |
 |
| 8 |
COLOR_BURN In this mode, the inverse of the bottom input color component was divided by the top input color component. Thus, the obtained value is inverted and displayed. |
 |
| 9 |
COLOR_DODGE In this mode, the bottom input color components were divided by the inverse of the top input color components and thus obtained value is inverted and displayed. |
 |
| 10 |
LIGHTEN In this mode, the lighter color component, among the both inputs are displayed. |
 |
| 11 |
DARKEN In this mode, the darker color component, among the top and bottom inputs is displayed. |
 |
| 12 |
SCREEN In this mode, the color components of the top and bottom inputs were inverted, multiplied and thus obtained value is inverted and displayed. |
 |
| 13 |
OVERLAY In this mode, based on the bottom input color, the color components of the two input values were multiplied or screened and the resultant is displayed. |
 |
| 14 |
HARD_LIGHT In this mode, based on the top input color, the color components of the two input values were multiplied or screened and the resultant is displayed. |
 |
| 15 |
SOFT_LIGH In this mode, based on the top input color, the color components of the two input values were softened or lightened and the resultant is displayed. |
 |
| 16 |
SRC_ATOP In this mode, the over lapping area is filled with the color component of the bottom input. While the nonoverlapping area is filled with the color component of the top input. |
 |
| 17 |
SRC_OVER In this mode, the top input is drawn over the bottom input. |
 |
