- JavaFX - Environment
- JavaFX - Installation Using Netbeans
- JavaFX - Installation Using Eclipse
- JavaFX - Installation using Visual Studio Code
- JavaFX - Architecture
- JavaFX - Application
- JavaFX 2D Shapes
- JavaFX - 2D Shapes
- JavaFX - Drawing a Line
- JavaFX - Drawing a Rectangle
- JavaFX - Drawing a Rounded Rectangle
- JavaFX - Drawing a Circle
- JavaFX - Drawing an Ellipse
- JavaFX - Drawing a Polygon
- JavaFX - Drawing a Polyline
- JavaFX - Drawing a Cubic Curve
- JavaFX - Drawing a Quad Curve
- JavaFX - Drawing an Arc
- JavaFX - Drawing an SVGPath
- JavaFX Properties of 2D Objects
- JavaFX - Stroke Type Property
- JavaFX - Stroke Width Property
- JavaFX - Stroke Fill Property
- JavaFX - Stroke Property
- JavaFX - Stroke Line Join Property
- JavaFX - Stroke Miter Limit Property
- JavaFX - Stroke Line Cap Property
- JavaFX - Smooth Property
- Operations on 2D Objects
- JavaFX - 2D Shapes Operations
- JavaFX - Union Operation
- JavaFX - Intersection Operation
- JavaFX - Subtraction Operation
- JavaFX Path Objects
- JavaFX - Path Objects
- JavaFX - LineTo Path Object
- JavaFX - HLineTo Path Object
- JavaFX - VLineTo Path Object
- JavaFX - QuadCurveTo Path Object
- JavaFX - CubicCurveTo Path Object
- JavaFX - ArcTo Path Object
- JavaFX Color and Texture
- JavaFX - Colors
- JavaFX - Linear Gradient Pattern
- JavaFX - Radial Gradient Pattern
- JavaFX Text
- JavaFX - Text
- JavaFX Effects
- JavaFX - Effects
- JavaFX - Color Adjust Effect
- JavaFX - Color input Effect
- JavaFX - Image Input Effect
- JavaFX - Blend Effect
- JavaFX - Bloom Effect
- JavaFX - Glow Effect
- JavaFX - Box Blur Effect
- JavaFX - GaussianBlur Effect
- JavaFX - MotionBlur Effect
- JavaFX - Reflection Effect
- JavaFX - SepiaTone Effect
- JavaFX - Shadow Effect
- JavaFX - DropShadow Effect
- JavaFX - InnerShadow Effect
- JavaFX - Lighting Effect
- JavaFX - Light.Distant Effect
- JavaFX - Light.Spot Effect
- JavaFX - Point.Spot Effect
- JavaFX - DisplacementMap
- JavaFX - PerspectiveTransform
- JavaFX Transformations
- JavaFX - Transformations
- JavaFX - Rotation Transformation
- JavaFX - Scaling Transformation
- JavaFX - Translation Transformation
- JavaFX - Shearing Transformation
- JavaFX Animations
- JavaFX - Animations
- JavaFX - Rotate Transition
- JavaFX - Scale Transition
- JavaFX - Translate Transition
- JavaFX - Fade Transition
- JavaFX - Fill Transition
- JavaFX - Stroke Transition
- JavaFX - Sequential Transition
- JavaFX - Parallel Transition
- JavaFX - Pause Transition
- JavaFX - Path Transition
- JavaFX Images
- JavaFX - Images
- JavaFX 3D Shapes
- JavaFX - 3D Shapes
- JavaFX - Creating a Box
- JavaFX - Creating a Cylinder
- JavaFX - Creating a Sphere
- Properties of 3D Objects
- JavaFX - Cull Face Property
- JavaFX - Drawing Modes Property
- JavaFX - Material Property
- JavaFX Event Handling
- JavaFX - Event Handling
- JavaFX - Using Convenience Methods
- JavaFX - Event Filters
- JavaFX - Event Handlers
- JavaFX UI Controls
- JavaFX - UI Controls
- JavaFX - ListView
- JavaFX - Accordion
- JavaFX - ButtonBar
- JavaFX - ChoiceBox
- JavaFX - HTMLEditor
- JavaFX - MenuBar
- JavaFX - Pagination
- JavaFX - ProgressIndicator
- JavaFX - ScrollPane
- JavaFX - Separator
- JavaFX - Slider
- JavaFX - Spinner
- JavaFX - SplitPane
- JavaFX - TableView
- JavaFX - TabPane
- JavaFX - ToolBar
- JavaFX - TreeView
- JavaFX - Label
- JavaFX - CheckBox
- JavaFX - RadioButton
- JavaFX - TextField
- JavaFX - PasswordField
- JavaFX - FileChooser
- JavaFX - Hyperlink
- JavaFX - Tooltip
- JavaFX - Alert
- JavaFX - DatePicker
- JavaFX - TextArea
- JavaFX Charts
- JavaFX - Charts
- JavaFX - Creating Pie Chart
- JavaFX - Creating Line Chart
- JavaFX - Creating Area Chart
- JavaFX - Creating Bar Chart
- JavaFX - Creating Bubble Chart
- JavaFX - Creating Scatter Chart
- JavaFX - Creating Stacked Area Chart
- JavaFX - Creating Stacked Bar Chart
- JavaFX Layout Panes
- JavaFX - Layout Panes
- JavaFX - HBox Layout
- JavaFX - VBox Layout
- JavaFX - BorderPane Layout
- JavaFX - StackPane Layout
- JavaFX - TextFlow Layout
- JavaFX - AnchorPane Layout
- JavaFX - TilePane Layout
- JavaFX - GridPane Layout
- JavaFX - FlowPane Layout
- JavaFX CSS
- JavaFX - CSS
- Media with JavaFX
- JavaFX - Handling Media
- JavaFX - Playing Video
- JavaFX Useful Resources
- JavaFX - Quick Guide
- JavaFX - Useful Resources
- JavaFX - Discussion
JavaFX - Application
As we have already learned, JavaFX is an open source free software platform, that allows a user to develop client applications that work consistently across various devices. Using JavaFX, one can create Graphical User Interface applications (GUIs), and Internet or Desktop applications as well. All these applications will be developed in Java.
In this chapter, we will discuss the structure of a JavaFX application in detail and also learn to create a JavaFX application with an example.
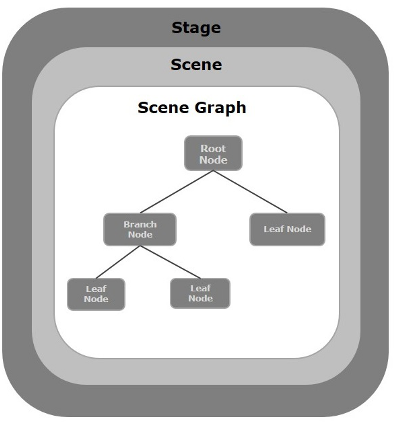
JavaFX Application Structure
In general, a JavaFX application will have three major components namely Stage, Scene and Nodes as shown in the following diagram.
Stage
A stage (a window) contains all the objects of a JavaFX application. It is represented by Stage class of the package javafx.stage. The primary stage is created by the platform itself. The created stage object is passed as an argument to the start() method of the Application class (explained in the next section).
A stage has two parameters determining its position namely Width and Height. It is divided as Content Area and Decorations (Title Bar and Borders).
There are five types of stages available −
- Decorated
- Undecorated
- Transparent
- Unified
- Utility
You have to call the show() method to display the contents of a stage.
Scene
A scene represents the physical contents of a JavaFX application. It contains all the contents of a scene graph. The class Scene of the package javafx.scene represents the scene object. At an instance, the scene object is added to only one stage.
You can create a scene by instantiating the Scene Class. You can opt for the size of the scene by passing its dimensions (height and width) along with the root node to its constructor.
Scene Graph and Nodes
A scene graph is a tree-like data structure (hierarchical) representing the contents of a scene. In contrast, a node is a visual/graphical object of a scene graph.
A node may include −
Geometrical (Graphical) objects (2D and 3D) such as − Circle, Rectangle, Polygon, etc.
UI Controls such as − Button, Checkbox, Choice Box, Text Area, etc.
Containers (Layout Panes) such as Border Pane, Grid Pane, Flow Pane, etc.
Media elements such as Audio, Video and Image Objects.
The Node Class of the package javafx.scene represents a node in JavaFX, this class is the super class of all the nodes.
A node is of three types −
Root Node − The first Scene Graph is known as the Root node.
Branch Node/Parent Node − The node with child nodes are known as branch/parent nodes. The abstract class named Parent of the package javafx.scene is the base class of all the parent nodes, and those parent nodes will be of the following types −
Group − A group node is a collective node that contains a list of children nodes. Whenever the group node is rendered, all its child nodes are rendered in order. Any transformation, effect state applied on the group will be applied to all the child nodes.
Region − It is the base class of all the JavaFX Node based UI Controls, such as Chart, Pane and Control.
WebView − This node manages the web engine and displays its contents.
Leaf Node − The node without child nodes is known as the leaf node. For example, Rectangle, Ellipse, Box, ImageView, MediaView are examples of leaf nodes.
It is mandatory to pass the root node to the scene graph. If the Group is passed as root, all the nodes will be clipped to the scene and any alteration in the size of the scene will not affect the layout of the scene.
Creating a JavaFX Application
To create a JavaFX application, you need to instantiate the Application class and implement its abstract method start(). In this method, we will write the code for the JavaFX Application.
Application Class
The Application class of the package javafx.application is the entry point of the application in JavaFX. To create a JavaFX application, you need to inherit this class and implement its abstract method start(). In this method, you need to write the entire code for the JavaFX graphics
In the main method, you have to launch the application using the launch() method. This method internally calls the start() method of the Application class as shown in the following program.
Example
public class JavafxSample extends Application {
   @Override
   public void start(Stage primaryStage) throws Exception {
      /*
      Code for JavaFX application.
      (Stage, scene, scene graph)
      */
   }
   public static void main(String args[]){
      launch(args);
   }
}
Within the start() method, in order to create a typical JavaFX application, you need to follow the steps given below −
Prepare a scene graph with the required nodes.
Prepare a Scene with the required dimensions and add the scene graph (root node of the scene graph) to it.
Prepare a stage and add the scene to the stage and display the contents of the stage.
Preparing the Scene Graph
As per your application, you need to prepare a scene graph with required nodes. Since the root node is the first node, you need to create a root node. As a root node, you can choose from the Group, Region or WebView.
Group − A Group node is represented by the class named Group which belongs to the package javafx.scene, you can create a Group node by instantiating this class as shown below.
Group root = new Group();
The getChildren() method of the Group class gives you an object of the ObservableList class which holds the nodes. We can retrieve this object and add nodes to it as shown below.
//Retrieving the observable list object
ObservableList list = root.getChildren();

//Setting the text object as a node
list.add(NodeObject);
We can also add Node objects to the group, just by passing them to the Group class and to its constructor at the time of instantiation, as shown below.
Group root = new Group(NodeObject);
Region − It is the Base class of all the JavaFX Node-based UI Controls, such as −
Chart − This class is the base class of all the charts and it belongs to the package javafx.scene.chart.
This class has two sub classes, which are − PieChart and XYChart. These two in turn have subclasses such as AreaChart, BarChart, BubbleChart, etc. used to draw different types of XY-Plane Charts in JavaFX.
You can use these classes to embed charts in your application.
Pane − A Pane is the base class of all the layout panes such as AnchorPane, BorderPane, DialogPane, etc. This class belong to a package that is called as − javafx.scene.layout.
You can use these classes to insert predefined layouts in your application.
Control − It is the base class of the User Interface controls such as Accordion, ButtonBar, ChoiceBox, ComboBoxBase, HTMLEditor, etc. This class belongs to the package javafx.scene.control.
You can use these classes to insert various UI elements in your application.
In a Group, you can instantiate any of the above-mentioned classes and use them as root nodes, as shown in the following program.
Example
//Creating a Stack Pane
StackPane pane = new StackPane();

//Adding text area to the pane
ObservableList list = pane.getChildren();
list.add(NodeObject);
WebView − This node manages the web engine and displays its contents.
Following is a diagram representing the node class hierarchy of JavaFX.

Preparing the Scene
A JavaFX scene is represented by the Scene class of the package javafx.scene. You can create a Scene by instantiating this class as shown in the following code block.
While instantiating, it is mandatory to pass the root object to the constructor of the scene class.
Scene scene = new Scene(root);
You can also pass two parameters of double type representing the height and width of the scene as shown below.
Scene scene = new Scene(root, 600, 300);
Preparing the Stage
This is the container of any JavaFX application and it provides a window for the application. It is represented by the Stage class of the package javafx.stage. An object of this class is passed as a parameter of the start() method of the Application class.
Using this object, you can perform various operations on the stage. Primarily you can perform the following −
Set the title for the stage using the method setTitle().
Attach the scene object to the stage using the setScene() method.
Display the contents of the scene using the show() method as shown below.
//Setting the title to Stage.
primaryStage.setTitle("Sample application");

//Setting the scene to Stage
primaryStage.setScene(scene);

//Displaying the stage
primaryStage.show();
Lifecycle of JavaFX Application
The JavaFX Application class has three life cycle methods, which are −
start() − The entry point method where the JavaFX graphics code is to be written.
stop() − An empty method which can be overridden, here you can write the logic to stop the application.
init() − An empty method which can be overridden, but you cannot create stage or scene in this method.
In addition to these, it provides a static method named launch() to launch JavaFX application.
Since the launch() method is static, you need to call it from a static context (main generally). Whenever a JavaFX application is launched, the following actions will be carried out (in the same order).
An instance of the application class is created.
Init() method is called.
The start() method is called.
The launcher waits for the application to finish and calls the stop() method.
Terminating the JavaFX Application
When the last window of the application is closed, the JavaFX application is terminated implicitly. You can turn this behavior off by passing the Boolean value False to the static method setImplicitExit() (should be called from a static context).
You can terminate a JavaFX application explicitly using the methods Platform.exit() or System.exit(int).
Example - Creating an Empty Window
This section teaches you how to create a JavaFX sample application which displays an empty window. Following are the steps −
Step 1: Creating a Class
Create a Java class and inherit the Application class of the package javafx.application and implement the start() method of this class as follows.
public class JavafxSample extends Application {
   @Override
   public void start(Stage primaryStage) throws Exception {
   }
}
Step 2: Creating a Group Object
In the start() method creates a group object by instantiating the class named Group, which belongs to the package javafx.scene, as follows.
Group root = new Group();
Step 3: Creating a Scene Object
Create a Scene by instantiating the class named Scene which belongs to the package javafx.scene. To this class, pass the Group object (root), created in the previous step.
In addition to the root object, you can also pass two double parameters representing height and width of the screen along with the object of the Group class as follows.
Scene scene = new Scene(root,600, 300);
Step 4: Setting the Title of the Stage
You can set the title to the stage using the setTitle() method of the Stage class. The primaryStage is a Stage object which is passed to the start method of the scene class, as a parameter.
Using the primaryStage object, set the title of the scene as Sample Application as shown below.
primaryStage.setTitle("Sample Application");
Step 5: Adding Scene to the Stage
You can add a Scene object to the stage using the method setScene() of the class named Stage. Add the Scene object prepared in the previous steps using this method as shown below.
primaryStage.setScene(scene);
Step 6: Displaying the Contents of the Stage
Display the contents of the scene using the method named show() of the Stage class as follows.
primaryStage.show();
Step 7: Launching the Application
Launch the JavaFX application by calling the static method launch() of the Application class from the main method as follows.
public static void main(String args[]){
   launch(args);
}
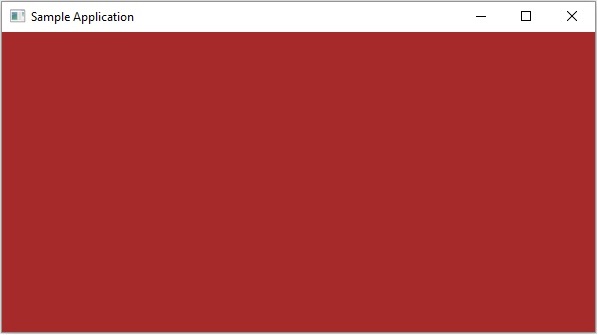
The following program generates an empty JavaFX window. Save this code in a file with the name JavafxSample.java
Example
import javafx.application.Application;
import javafx.scene.Group;
import javafx.scene.Scene;
import javafx.scene.paint.Color;
import javafx.stage.Stage;

public class JavafxSample extends Application {
   @Override
   public void start(Stage primaryStage) throws Exception {
      //creating a Group object
      Group group = new Group();

      //Creating a Scene by passing the group object, height and width
      Scene scene = new Scene(group ,600, 300);

      //setting color to the scene
      scene.setFill(Color.BROWN);

      //Setting the title to Stage.
      primaryStage.setTitle("Sample Application");

      //Adding the scene to Stage
      primaryStage.setScene(scene);

      //Displaying the contents of the stage
      primaryStage.show();
   }
   public static void main(String args[]){
      launch(args);
   }
}
Compile and execute the saved java file from the command prompt using the following commands.
javac --module-path %PATH_TO_FX% --add-modules javafx.controls JavafxSample.java
java --module-path %PATH_TO_FX% --add-modules javafx.controls JavafxSample
Output
On executing, the above program generates a JavaFX window as shown below.
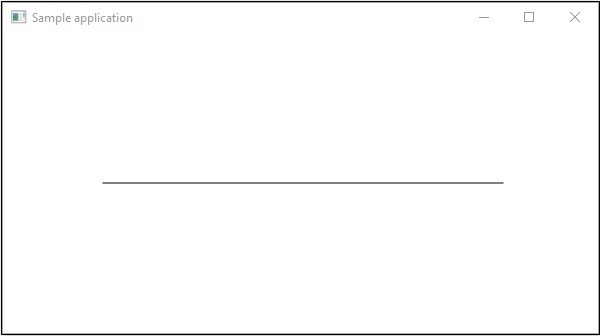
Example - Drawing a Straight Line
In the previous example, we have seen how to create an empty stage, now in this example let us try to draw a straight line using the JavaFX library.
This code to draw a line also follows the same steps mentioned in the previous example. However, the difference occurs in the start() method, where we create a group object by instantiating the class named Group, which belongs to the package javafx.scene. Pass the Line (node) object, that is created using setter methods, as a parameter to the constructor of the Group class, in order to add it to the group.
Save this code in a file with the name DrawingLine.java.
import javafx.application.Application;
import javafx.scene.Group;
import javafx.scene.Scene;
import javafx.scene.shape.Line;
import javafx.stage.Stage;

public class DrawingLine extends Application{
   @Override
   public void start(Stage stage) {
      //Creating a line object
      Line line = new Line();

      //Setting the properties to a line
      line.setStartX(100.0);
      line.setStartY(150.0);
      line.setEndX(500.0);
      line.setEndY(150.0);

      //Creating a Group
      Group root = new Group(line);

      //Creating a Scene
      Scene scene = new Scene(root, 600, 300);

      //Setting title to the scene
      stage.setTitle("Sample application");

      //Adding the scene to the stage
      stage.setScene(scene);

      //Displaying the contents of a scene
      stage.show();
   }
   public static void main(String args[]){
      launch(args);
   }
}
Compile and execute the saved java file from the command prompt using the following commands.
javac --module-path %PATH_TO_FX% --add-modules javafx.controls DrawingLine.java
java --module-path %PATH_TO_FX% --add-modules javafx.controls DrawingLine
Output
On executing, the above program generates a JavaFX window displaying a straight line as shown below.
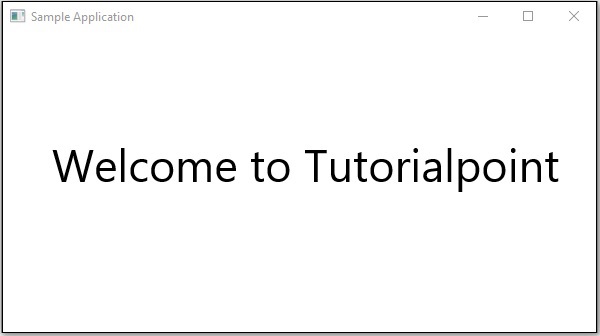
Example - Displaying Text
We can also embed text in JavaFX scene. This example shows how to embed text in JavaFX. Save this code in a file with name DisplayingText.java.
import javafx.application.Application;
import javafx.collections.ObservableList;
import javafx.scene.Group;
import javafx.scene.Scene;
import javafx.stage.Stage;
import javafx.scene.text.Font;
import javafx.scene.text.Text;

public class DisplayingText extends Application {
   @Override
   public void start(Stage stage) {
      //Creating a Text object
      Text text = new Text();

      //Setting font to the text
      text.setFont(new Font(45));

      //setting the position of the text
      text.setX(50);
      text.setY(150);

      //Setting the text to be added.
      text.setText("Welcome to Tutorialspoint");

      //Creating a Group object
      Group root = new Group();

      //Retrieving the observable list object
      ObservableList list = root.getChildren();

      //Setting the text object as a node to the group object
      list.add(text);

      //Creating a scene object
      Scene scene = new Scene(root, 600, 300);

      //Setting title to the Stage
      stage.setTitle("Sample Application");

      //Adding scene to the stage
      stage.setScene(scene);

      //Displaying the contents of the stage
      stage.show();
   }
   public static void main(String args[]){
      launch(args);
   }
}
Compile and execute the saved java file from the command prompt using the following commands.
javac --module-path %PATH_TO_FX% --add-modules javafx.controls DisplayingText.java
java --module-path %PATH_TO_FX% --add-modules javafx.controls DisplayingText
Output
On executing, the above program generates a JavaFX window displaying text as shown below.