- SAP FICO - Home
- SAP FI - Overview
- SAP FI - Submodules
- SAP FI - Company Basics
- SAP FI - Define Business Area
- SAP FI - Define Functional Area
- SAP FI - Define Credit Control
- SAP FI - General Ledger
- SAP FI - COA Group
- SAP FI - Retained Earnings Account
- SAP FI - G/L Account
- SAP FI - Block G/L Account
- SAP FI - Deleting G/L Accounts
- SAP FI - Financial Statement Version
- SAP FI - Journal Entry Posting
- SAP FI - Fiscal Year Variant
- SAP FI - Posting Period Variant
- SAP FI - Field Status Variant
- SAP FI - Field Status Group
- SAP FI - Define Posting Keys
- SAP FI - Define Document Type
- SAP FI - Document Number Ranges
- SAP FI - Post with Reference
- SAP FI - Hold a G/L Document Posting
- SAP FI - Park a G/L Document Posting
- SAP FI - G/L Reporting
- SAP FI - Accounts Receivable
- SAP FI - Customer Master Data
- SAP FI - Block a Customer
- SAP FI - Delete a Customer
- SAP FI - Customer Account Group
- SAP FI - One-Time Customer Master
- SAP FI - Post a Sales Invoice
- SAP FI - Document Reversal
- SAP FI - Sales Returns
- SAP FI - Post Incoming Payment
- SAP FI - Foreign Currency Invoice
- SAP FI - Incoming Partial Payments
- SAP FI - Reset AR Cleared Items
- SAP FI - Credit Control
- SAP FI - Accounts Payable
- SAP FI - Create a Vendor
- SAP FI - Create Vendor Acct Group
- SAP FI - Display Changed Fields
- SAP FI - Block a Vendor
- SAP FI - Delete a Vendor
- SAP FI - One-Time Vendor
- SAP FI - Post Purchase Invoice
- SAP FI - Purchases Returns
- Post Outgoing Vendor Payment
- SAP FI - Foreign Currency Invoice
- Withholding Tax in vendor invoice
- SAP FI - Outgoing Partial Payments
- SAP FI - Reset AP Cleared Items
- SAP FI - Automatic Payment Run
- SAP FI - Posting Rounding Differences
- SAP FI - Month End Closing
- SAP FI - Dunning
- SAP FI - Exchange Rates
- SAP FI - Tables in Module
- SAP FI - AR Invoice Processes
- SAP FI - AR Account Analysis
- SAP FI - AR Reporting
- SAP FI - AA Overview
- SAP FI - AA Asset Explorer
- SAP FI - Cash Management
- SAP CO - Overview
- SAP CO - Submodules
- SAP CO - Cost Center
- SAP CO - Create Cost Center
- SAP CO – Post to a Cost Center
- SAP CO - Internal Orders
- SAP CO - Settlement of IO
- SAP CO - Profit Center
- SAP CO - Postings to Profit Center
- Profit Center Standard Hierarchy
- Assigning Cost to Profit Centers
- Assigning Materials to Profit Center
- SAP CO - Tables in Module
- SAP CO - Product Costing
- SAP CO - Profitability Analysis
- SAP CO - Planning Methods
- SAP FI - Integration
- SAP FICO - Questions Answers
- SAP FICO - Quick Guide
- SAP FICO - Useful Resources
- SAP FICO - Discussion
SAP FICO - Quick Guide
SAP FI - Overview
SAP FI stands for Financial Accounting and it is one of important modules of SAP ERP. It is used to store the financial data of an organization. SAP FI helps to analyze the financial conditions of a company in the market. It can integrate with other SAP modules like SAP SD, SAP PP, SAP MM, SAP SCM, etc.
SAP FI comprises of the following sub-components −
- Finance Accounting General Ledger.
- Finance Accounting Accounts Receivable and Payable.
- Finance Accounting Asset Accounting.
- Finance Accounting Bank Accounting.
- Finance Accounting Travel Management.
- Finance Accounting Fund Management.
- Finance Accounting Legal Consolidation.
Where Do We Use SAP FI?
SAP FI module enables you to manage financial accounting data within an international framework of multiple companies, currencies, and languages. SAP FI module mainly deals with the following financial components −
- Fixed asset
- Accrual
- Cash journal
- Accounts receivable and payable
- Inventory
- Tax accounting
- General ledger
- Fast close functions
- Financial statements
- Parallel valuations
- Master data governance
SAP FI consultants are mainly responsible for implementing Financial Accounting and Cost Accounting with SAP ERP Financials.
SAP FI - Submodules
SAP FI has a collection of submodules, as depicted in the following screenshot −

Finance Accounting - General Ledger
A General Ledger contains all the transaction details of a company. It acts as the primary record to maintain all accounting details. Common general ledger entries are customer transactions, purchases from vendors, and internal company transactions.
Common T-codes that are used to maintain G/L accounting −
- F-06
- F-07
- FBCJ
- FB50
- FB02
Finance Accounting - Accounts Receivable and Payable (AR / AP)
It includes the details of amount that is paid by the customer and the amount that is paid by company to the vendors. In other words, AP includes all the vendor transactions and AR includes all the customer transactions.
Common SAP AR T-codes −
- FD11
- FD10
- FRCA
- VD01
Common SAP AR Tables −
- KNA1
- KNVV
- BSIW
Common SAP AP T-codes −
- XK01
- MK01
- MK02
- FCHU
Common SAP AP Tables −
- LFA1
- LFM2
- LFBK
Finance Accounting Asset Accounting
Asset Accounting deals with all the fixed asset of the company and provides all the transaction details about fixed assets. The asset accounting module of Finance Accounting works closely with other modules like SAP MM, SAP Plant Management, EWM, etc.
Common T-codes used for Asset Accounting −
- AT01
- AT03
- AUN0
- ASEM
Example − When a company purchases an item that can be considered as an asset, the details will be passed to Asset accounting module from the SAP MM module.
Finance Accounting Bank Accounting
It deals with all the transactions done through bank. It includes all the incoming and outgoing transactions performed, balance management and bank transaction master data.
You can create and process any type of bank transactions using the Bank accounting component.
Common Bank Accounting module tables that are used for this are −
- LFBK
- BNKA
- KNBK
Common T-codes with bank accounting −
- FIBLAROP
- OBEBGEN
- FI13
- FF_6
- RVND
Finance Accounting Travel Management
This module is used to manage all the travel expenses of a company. It involves all the travels request, their planning and expenses involved in all the requested trips.
It helps an organization to manage travel expenses in an efficient manner, as it provides integration with all the other modules of SAP.
Common Travel Management T-codes −
- PR05
- PRTS
- TRIP
- PR00
Common Travel Management tables −
- TA22B
- PTRV_HEAD
- FTPT_PLAN
- FTPT_ITEM
Finance Accounting Fund Management
This module is used to manage funds in a company. Fund Management module interacts with other modules like Bank accounting, General Ledger (G/L, SAP AR/AP, and SAP Material Management, etc. to get fund details.
It involves all the transactions for fund receiving, fund expenditure, and future expenses. It helps a company to create budget forecasting and to use the funds in a proper way.
Common tables that store Funds management data −
- FMFCTR
- FMIFIIT
- FMIT
Common SAP Funds Management T-codes −
- FM5I
- FMWA
- FMEQ
Finance Accounting Legal Consolidation
It helps an organization to treat its multiple units as a single company, hence it enables to view all the details as a single financial statement for all the companies under that group. An organization can get a clear idea of its financial conditions as a single entity.
Common tables in FI Legal Consolidation module −
- FILCP
- MCDX
- GLT3
- T000K
Note − FI-Legal Consolidation module was supported in older versions of SAP ERP implementation. This work is performed by SAP Business Process Consolidation BPC and SEM-BCS now.
SAP FI - Company Basics
A company is defined as the smallest unit for which financial statements can be created in accordance with commercial legal regulations.
In SAP FI, a company can comprise of multiple codes, however it acts as a single unit for which financial statements are available. All the company codes must use the same chart of accounts list and fiscal year, however each code can have a different local currency.
A chart of accounts list consists of all the chart of accounts that can be used and each code must have one chart of account.
A fiscal year normally consists of twelve months time period where company creates the financial statements.
SAP FI Create Company
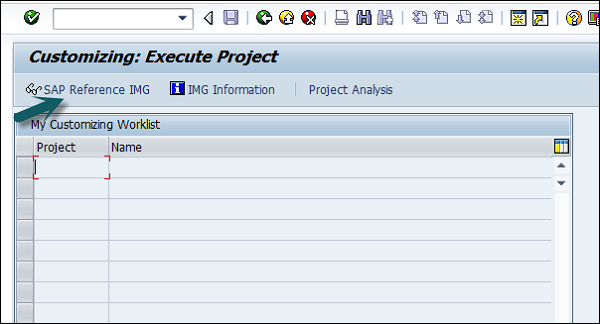
Login to SAP FICO
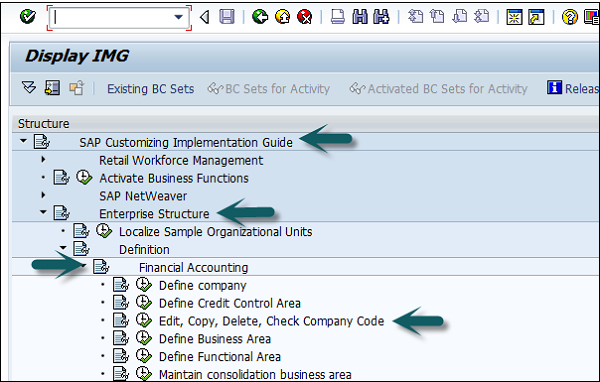
Use T-code SPRO → click on SAP Reference IMG → New window will open.
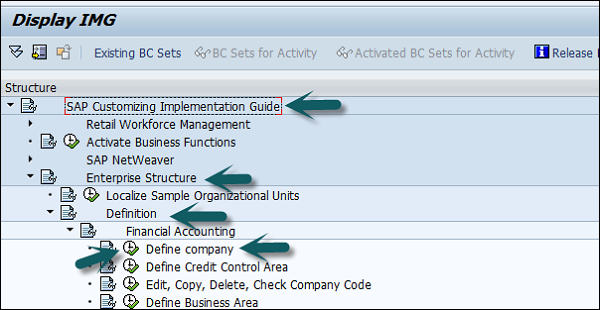
Expand SAP Customizing implementation guide → Enterprise Structure → Definition → Finance Accounting → Define Company → click on Execute (see the pointer in the screenshot).
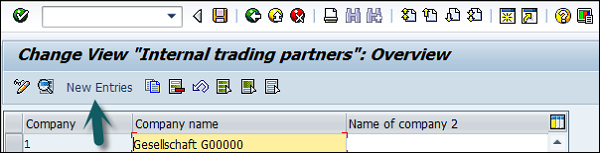
A new window will open → click on New Entries → New Entries: Details of added entry
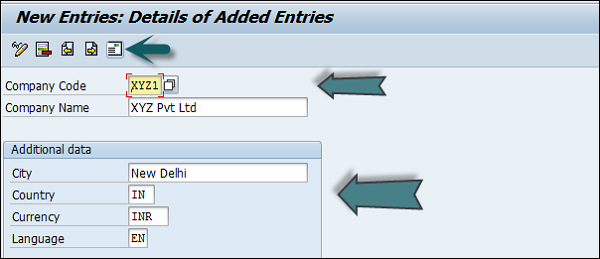
You need to provide the following details to create a new company −
- Enter the company code to represents group of company.
- Enter the company name.
- Enter the full address-street, PO Box, postal code, city.
- Enter the Country.
- Enter the Language key.
- Enter the currency
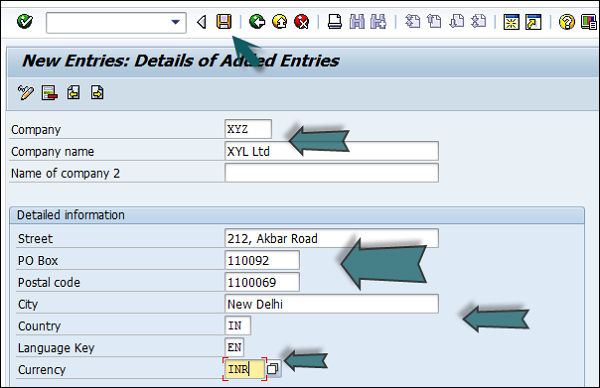
The next step is to save the company details → CTRL+S or as shown in the above screenshot.
SAP FI Create Company Code
In SAP FI, a company can comprise of multiple codes, however it acts as a single unit for which financial statements are available. Company code is the smallest unit in an organization for which financial statements (profit-loss statement, etc.) can be generated.
Create, edit, delete a company code
Let us discuss how to create, edit, and delete a company code. Take a look at the following screenshot.
Expand Enterprise Structure as mentioned in the previous topic → Definition → Financial Accounting → Edit, Copy, Delete, check company code → Execute using click on the watch image → New window will open → You can create a new company code by selecting both the options.
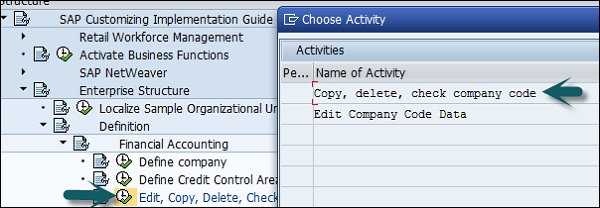
Select Edit, Copy, Delete, and Check Company Code. It allows you to copy all the configurations and tables automatically.
If you select Edit company code, you will get the following window → click on New Entries and update the code details.

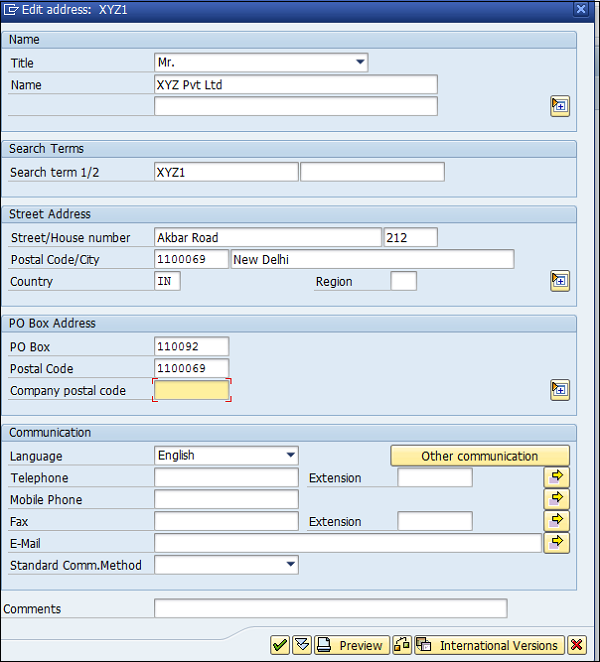
You can click on the Address button and update the following fields. Once the Address field is updated, click the Save button.
SAP FI - Define Business Area
Business Areas are used to differentiate transactions that come from different lines of business in a company.
Example
There is a big company XYZ which runs multiple businesses. Let us assume it has three different domains like manufacturing, marketing, and sales.
Now you have two options −
- First is to create different company codes.
- And the other better option is to create each of these business lines into the business areas.
The benefits of using Business Areas in this case are as follows −
You can use these business areas if other company codes require the same areas.
It is easy to configure if you use a Business Area, as you just need to attach to the company code and the other details in that business area will get attached automatically.
By using Business Areas in controlling, you can create Profit and Loss statement, Balance Sheet, etc. for business areas. Hence it is used for management accounting in a few companies.
Note − Business areas are used more in Controlling as compared to Finance Accounting.
How to create a new Business Area in SAP FI?
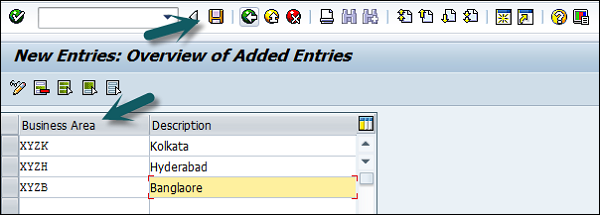
Expand Enterprise Structure as mentioned in the previous topic → Definition → Financial Accounting → Define Business Area → Execute → Go to New Entries.


Enter the 4 digit Business Area code and save the configuration.
SAP FI - Define Functional Area
Function Areas in finance accounting are used to define the expenses in a company according to individual function units. The most common Functional Areas are −
- Manufacturing
- Sales and Distribution
- Production
- Administration
How to Define a Functional area in SAP FI?
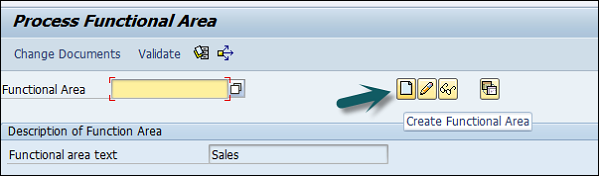
You can define a Functional Area using the T-code FM_FUNCTION (Earlier it was OKBD, but this is obsolete). It will open a new window.
Click on Create Functional Area as shown below and a new window will open.
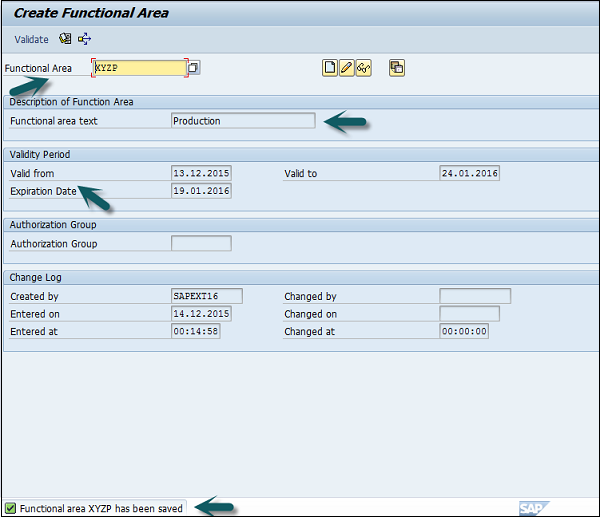
Enter the following details −
- Name of Functional Area.
- Description
- Validity to and from date
- Expiration date and Authorization.
Once all the details are provided, click the Save button at the top. Once you click Save, you will see a message at the bottom that a new functional area has been created.
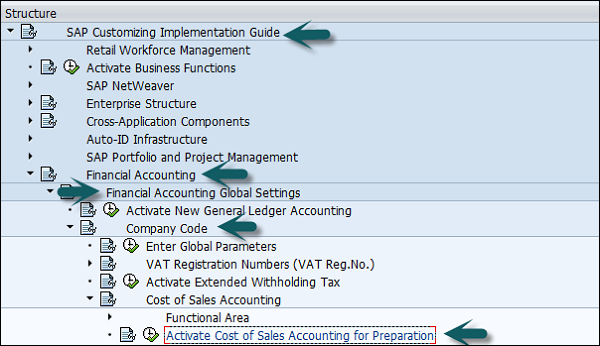
Functional Areas are used to create Profit and Loss statements using the cost of sales accounting and they are also used to analyze the cost of sales accounting. For this, you need to activate the cost of sales accounting as follows −
Go to SPRO → SAP Reference IMG → Financial Accounting → FI Global Settings → Company Code → Cost of Sales Accounting → Activate cost of sales accounting for preparation.
SAP FI - Define Credit Control
Credit Control in FI is used to check the credit limit for the customer and it can use one or more codes. It is used for credit management in Application components such as Account Receivable (AR) and Sales and Distribution.
The credit control area is determined in the following sequence −
- User exit
- Distribution channel
- Customer master
- Company code for the sales organization
How to define a Credit Control Area?
A Credit Control Area is defined in accordance with the areas of responsibility for credit monitoring. Use the T-code SPRO → click SAP Reference IMG. It will open a new window.

Expand SAP Customizing implementation guide → Enterprise Structure → Definition → Finance Accounting → Define Credit Control Area → Execute.
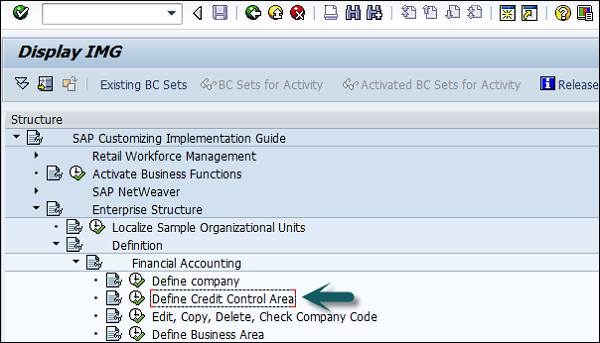
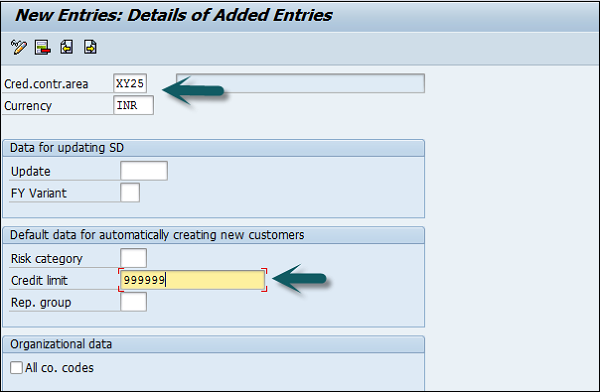
Click Execute → New entries → Enter the below details → Save. Now you have successfully configured the Credit Control Area.
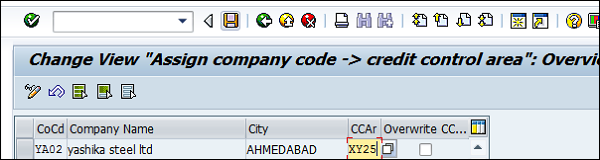
Once you create the Credit Control Area, the next step is to assign a company code to the credit control area.
Expand Enterprise structure → Assignment → Finance Accounting → Assign company code to credit control area → Execute.
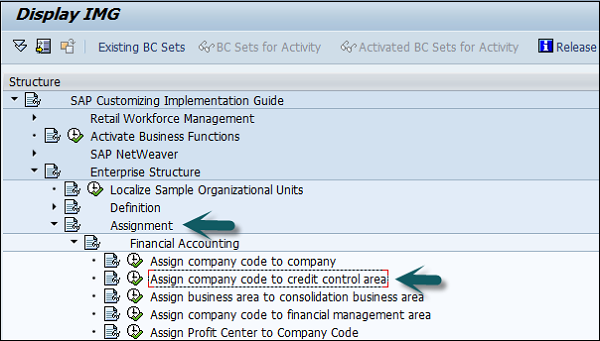
A new window will open → click Position → it will open another new window. Enter the company code and click Continue.
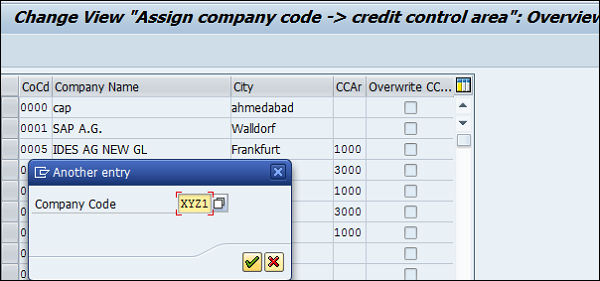
Enter the Credit Control Area in CCAR and save the details.
SAP FI - General Ledger
The General Ledger is used to record all the business transactions in a software system.
SAP FI Chart of Accounts
The FI chart of accounts represents the list of GL accounts that are used to meet the daily needs and the operating countrys legal requirement in a company. The master chart of accounts must be assigned to each company code.
Chart of accounts (COA) can be divided into the following types −
Operating Chart of Accounts − It contains all the General Ledger accounts that are used to meet the daily needs in a company. The operating chart of accounts has to be assigned to a company code.
Country Chart of Accounts − It contains a list of all General Ledger accounts that are required to meet the operating countrys legal requirements. You can also assign a company chart of account to the company code.
Chart of Accounts Group − This COA group contains a list of all the G/L accounts that are used by the entire company.
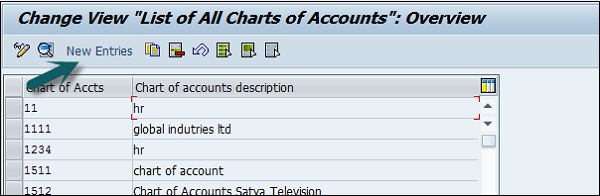
How to create a new Chart of Accounts?
You can create a new Chart of Accounts by using the T-code OB 13 or by going to Finance Accounting → G/L accounts.
Type the T-code OB13 in SAP Easy Access and it will take you to the following screen −
This window can also be opened by following the path −
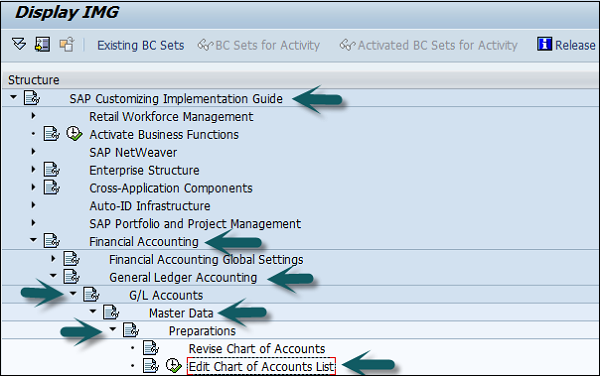
T-code SPRO → SAP Reference IMG → Financial Accounting → General Ledger Accounting → G/L accounts → master data → Preparations → Edit Chart of Account Lists → Execute → New Entries to create a new charts of account.
You can choose Controlling Integration as manual creation of cost elements or automatic creation of cost elements. (Recommended to use manual creation).
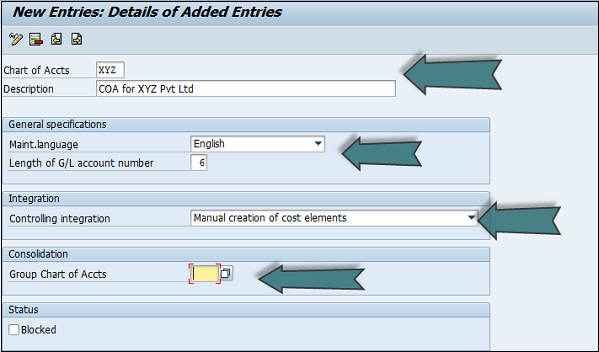
Group Chart of Accounts is used for report consolidation. Uncheck the Blocked checkbox under the status tab and click the Save option.
SAP FI - COA Group
You can create a SAP FI chart of accounts group as per your requirement. To effectively manage and control a large number of G/L accounts, you should use COA groups.
How to define Chart of Accounts Group?
There are two ways you can create a new COA group. The first method is to use the T-code OBD4.
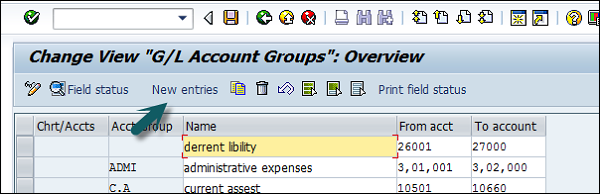
You can also reach to this screen by following the path −
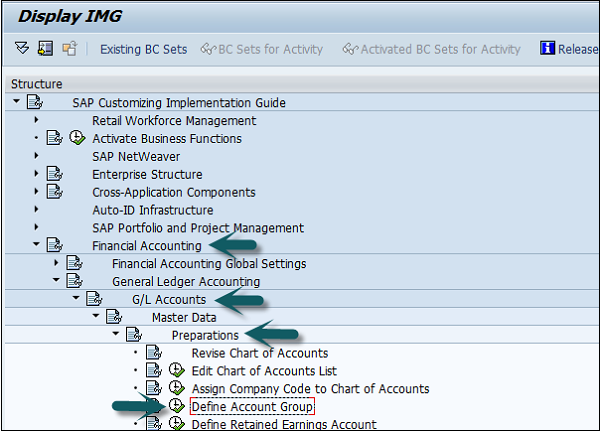
T-code SPRO → SAP Reference IMG → Financial Accounting → General Ledger Accounting → G/L Accounts → Preparations → Define Account Group → Execute → New window will open → New Entries.

Populate the following fields in the COA group: Chart of Account Key, Acct Group, Name, From Acct. and To Account details.
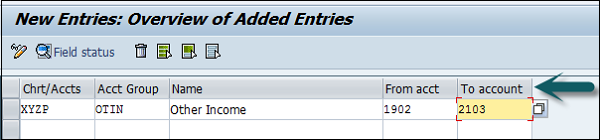
After providing the required details, click the Save Configuration option to create the COA group.
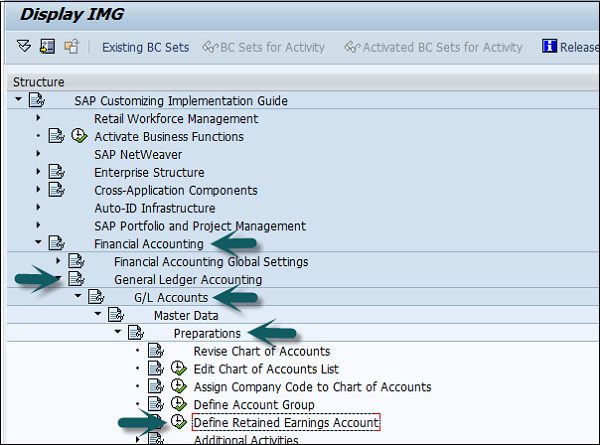
SAP FI - Retained Earnings Account
Retained Earnings Account is used to carry forward the balance from one fiscal year to the next fiscal year. You can assign a Retained Earning Account to each P&L account in the chart of accounts (COA). To automatically carry forward the balance to the next fiscal year, you can define P&L statements as per COA and assign them to the retained earning accounts.
How to define Retained Earnings Account?
There are two ways to define a Retained Earnings Account. You can either use the T-code OB53 or by T-code SPRO. Go to SAP Reference IMG → Financial Accounting → General Ledger Accounting → G/L Accounts → Preparations → Define Retained Earnings Account → Execute.
Enter the Chart of Accounts to define the Retained Earning Account for COA and press Enter.
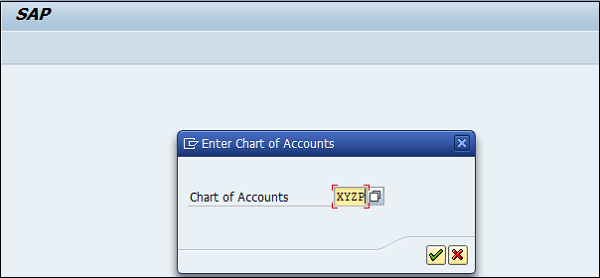
Provide the P&L Account statement account type and account → Press Enter and save the configuration.
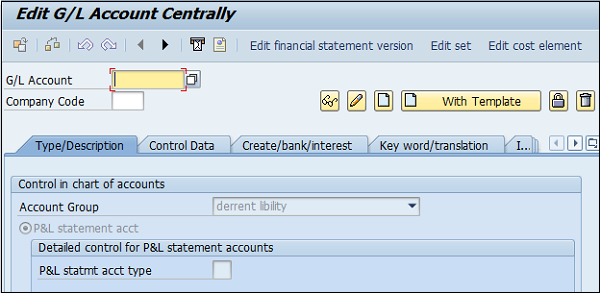
SAP FI - G/L Account
General Ledger (G/L) accounts are used to provide a picture of external accounting and accounts and to record all the business transactions in a SAP system. This software system is fully integrated with all the other operational areas of a company and ensures that the accounting data is always complete and accurate.
How to Create a New G / L Account?
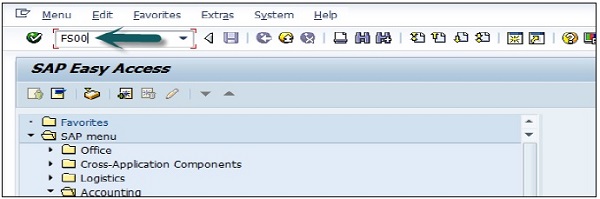
You can use the T-code FS00 to centrally define a G/L account. Refer the following screenshot.
You can also use the following path −
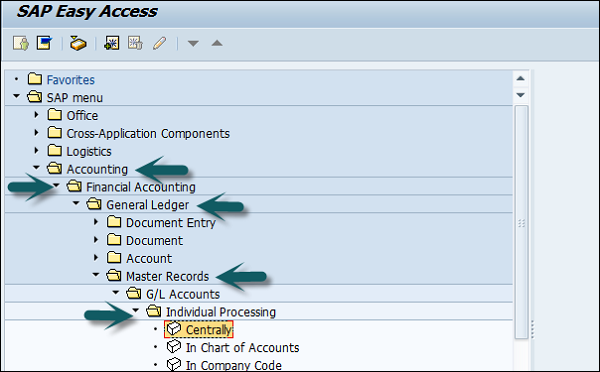
In SAP R/3, go to Accounting → Finance Accounting → General Ledger → Master Records → G/L accounts → Individual Processing → Centrally.
In the field G/L Account, enter the account number of G/L account and the company code key and click the Create icon as shown in the following screenshot −
The next step is to enter the details in the Charts of Account.
Account Group
Account Group determines the group for which the G/L account must be created, for example, Administrative Expenses, etc.
P&L Statement Acct
If the G/L account is to be used for P&L Statement Account, then select this option, otherwise use Balance Sheet Account.
Under description, provide a short text or G/L account long text.
The next step is to click the Control Data and provide data for Account Currency and other fields such as Balance in local currency, Exchange rate difference key, Tax category, posting without tax allowed, Recon account for acct type, alternative account number, Tolerance group, etc. as shown in the following screenshot.
Click Create / bank interest and provide data in the following fields −
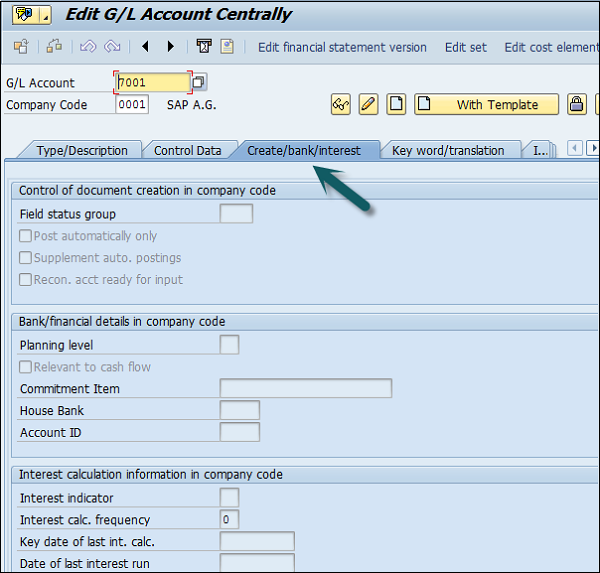
Once the details are entered, click the Save button to create a G/L account.
Posting to General Ledger
After you complete the payroll run, the next step is to post payroll run to G/L accounts. Posting to G/L account from Payroll run includes the following −
- First is to collect the G/L posting related details from the payroll run.
- Next is to create the documents summary for G/L posting.
- Once you have summarize documents, you have to make posting to relevant Cost Centers and G/L accounts.
How Posting is performed?
During each Payroll run, payroll contains different posting types for wage to relevant GL accounts. While posting to GL account following points should be considered −
In Payroll, different Wage types- Overtime wage, standard salary and other expenses should be posted to correct GL account.
Other wages like contribution to insurance, tax payment and other pay types should be posted as credit for employee Payroll.
In payroll run, you have other wage types like contribution to health insurance should be posted as double posting to accounts- includes debited as an expense, and credited as a payable in GL account.
Other Wage type in Payroll run like accruals, other insurance types, etc. should also be posted to two accounts- debited as an expense and credited as a provision in GL posting.
SAP FI - Block G/L Account
In SAP R/3, go to Accounting → Finance Accounting → General Ledger → Master Records → G/L accounts → Individual Processing → Centrally.
In G/L Account, provide the account number of G/L account and the company code key. Click the Block button as shown in the following screenshot.
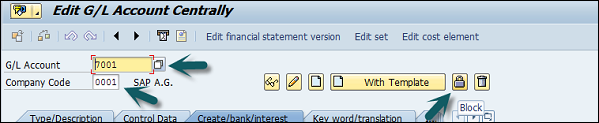
Once you click the Block button, you will get different blocking options such as −
- Block in Chart of accounts.
- Blocked for creation
- Blocked for Posting
- Blocked for Planning
- Block in Company Code
- Blocked in posting
SAP FI - Deleting G/L Accounts
In SAP R/3, go to Accounting → Finance Accounting → General Ledger → Master Records → G/L accounts → Individual Processing → Centrally.
In the G/L Account, provide the account number of G/L account and the company code key. To delete a G/L account, click the Delete button as shown below.

The next step is to select deletion options for the G/L account −
- Deletion flag COA
- Deletion flag in company code.
- Select the correct check box and click the Save configuration.
SAP FI Modify a G/L Account
To modify a G/L account, click the Change option. Refer the following screenshot.
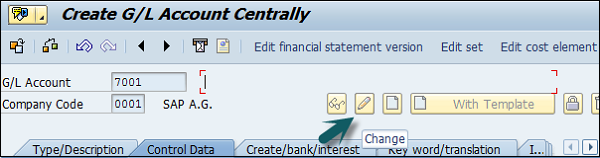
The next step is to select the changed field −

Click the Save button to effect the changes.
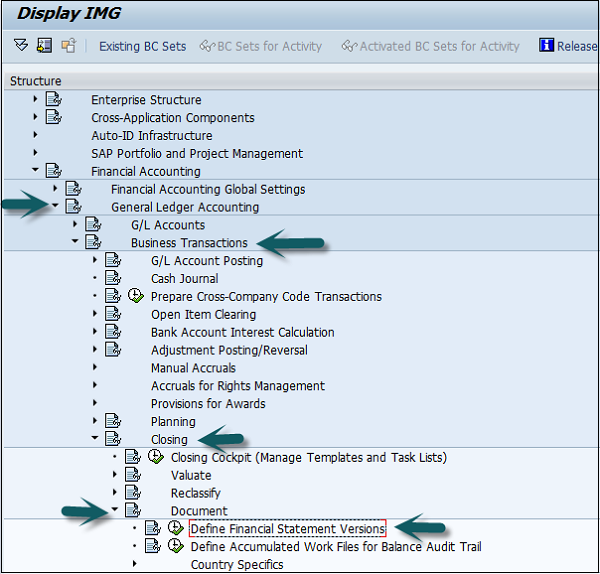
SAP FI - Financial Statement Version
General Ledger accounts can be used as per legal regulations to generate the final statements. Financial statement versions are used to create the financial statements, to run account balance reports and for General Ledger accounting planning.
You can also define multiple financial statement versions to generate financial statements in different formats. Follow the steps given below to create financial statement versions −
T-code SPRO → SAP Reference IMG → Financial Accounting → General Ledger Accounting → Business Transactions → Closing → Document → Define Financial Statement Versions → Execute.
Click the button New Entries as shown below −
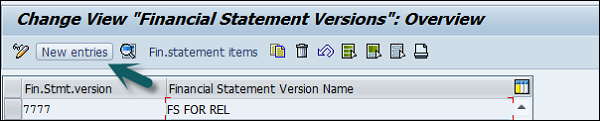
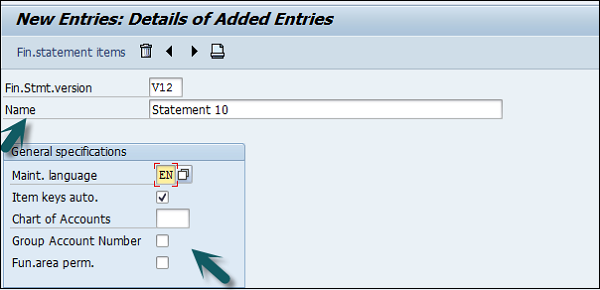
Provide the following details −
Enter the Fin. Stmt. Version.
Enter the Description of the financial statement version.
Maint. Language − Enter the language key in which you display texts, enter texts, and print statement.
Item Keys auto − It tells keys of financial statement items are assigned manually or automatically when the financial statement versions are defined.
Charts of Accounts − All accounts from this chart of accounts COA can be assigned when you define the financial statement. If you do not specify a chart of accounts, accounts from several charts of accounts can be assigned when you define the financial statement.
Group Account Number − Enter this Indicator that specifies that the group account numbers should be assigned instead of the account numbers when you define the financial statement version.
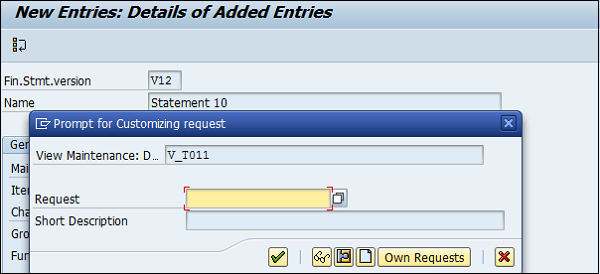
Fun. Area Parameter − This indicator is used to make it possible to assign functional areas or accounts in the financial statement version. Once the above fields are defined, you can click on the save configuration and to generate change request number. To edit this Financial Statement version, click on Fin. Statement items → you can maintain nodes in version.
SAP FI - Journal Entry Posting
The use of Journal Entry (JE) posting in SAP FI is to take a batch, validate it for consistency, and create FI documents and post those entries in various line item accounts needed for subsequent business processing.
JE Posting is a process that, with a few exceptions, runs "behind the scenes" and is the heart of Journal Entry. It receives journal entry data (representing financial transactions) from the PRA modules (Valuation, Revenue Distribution, etc.), and summarizes them in batches and posts them to the PRA JE line item tables and to SAP FI.
Journal Entry Posting is the link between the journal entries coming from PRA applications and the FI documents and JE line item table items that are created.
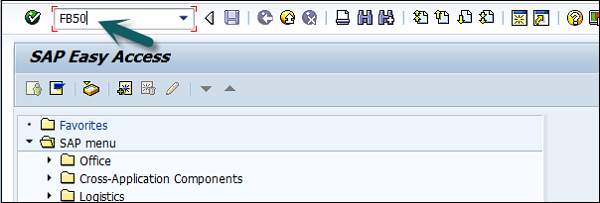
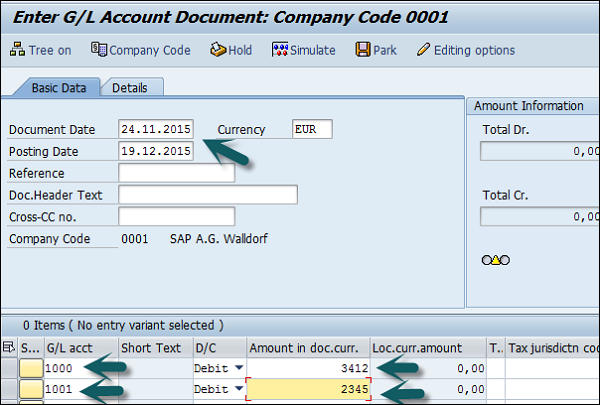
How to post a journal Entry in SAP FI?
Use T-code FB50 → Provide the Company code.
Enter the document date as shown below −
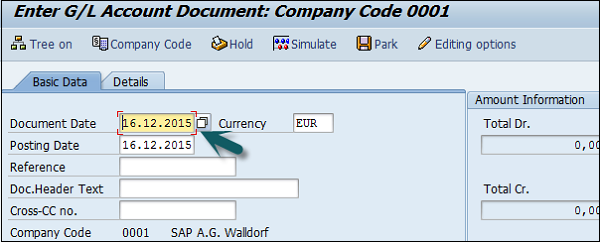
The next step is to provide the following details −
G/L Account − Enter the account to be credited.
Short Text − Description of amount.
Amount in Doc Currency − Enter the amount to be credited.
Similarly, for the Debit, provide data in the following fields −
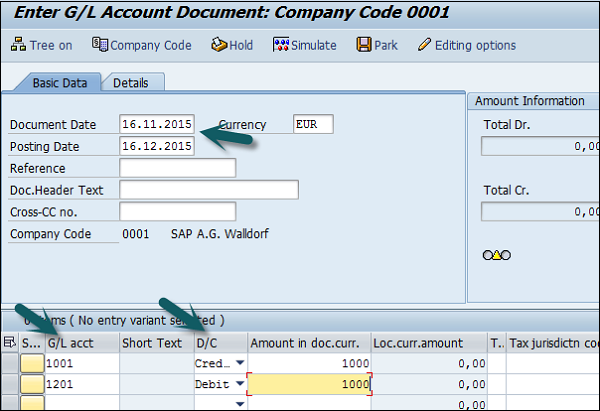
Click the Save button and you will get the document number to be posted for the company code.
SAP FI - Fiscal Year Variant
Fiscal year variant contains the number of posting periods in a fiscal year and the number of special periods. You can define up to 16 posting periods in a fiscal year in the controlling component CO.
You need to specify the fiscal year variant for each company code. When you create a controlling area, you also need to specify the fiscal year variant.
The fiscal year variants of the company code and controlling area may only differ in the number of special periods used. You need to ensure that the fiscal year variants match. In other words, they may not have a time conflict.
How to create a Fiscal year variant?
Go to SPRO → SAP Reference IMG → Financial Accounting → Financial Accounting Global Setting → Fiscal Years → Maintain Fiscal year variant → Execute.
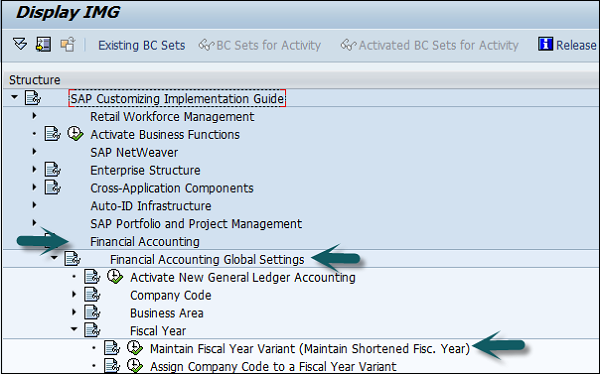
It will open the following window.

Click New Entries and it will open a new window as shown below.
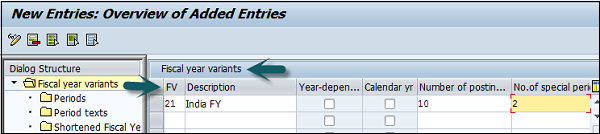
Provide the following details −
FV − Enter 2-digit Fiscal year.
Description − Enter a description of the Fiscal year variant.
Year Dependent − If the start and the end date of the fiscal year changes between year, then check this box.
Calendar Year − If the fiscal year is same as the calendar year Jan-Dec, then check this option.
Number of Postings − Enter the number of posting periods for a Fiscal year.
Number of special postings − Enter the number of special posting periods for a fiscal year.
The next step is to save the details. Enter the customizing request number that a new fiscal year variant is created.
You can maintain the posting period by using the Period option under the Fiscal year variant.
SAP FI - Posting Period Variant
SAP FI Posting period variant is used to maintain accounting periods that are open for posting and all closed period are balanced. This is used for opening and closing period in the fiscal year for posting purpose.
You can assign these posting periods to one or more company codes.
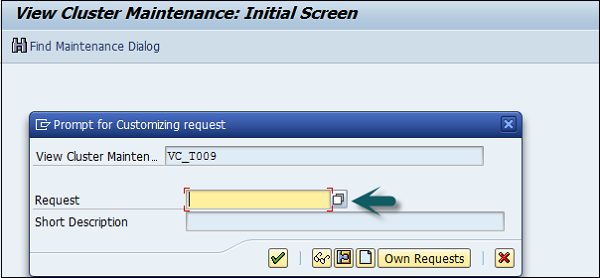
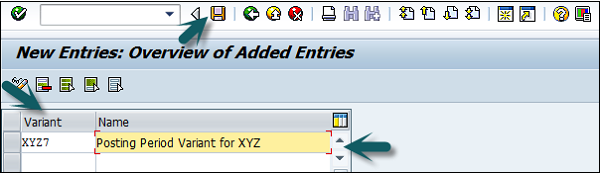
How to create posting period variants in SAP FI?
Go to SPRO → SAP Reference IMG → Financial Accounting → Financial Accounting Global Setting → Document → Posting Periods → Define Variant for open Posting Periods → Execute.
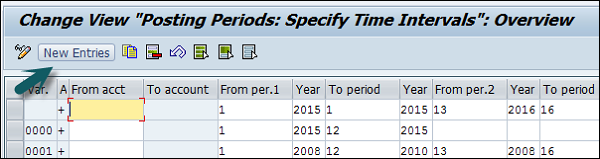
It will open a new window. Now, click New Entries.
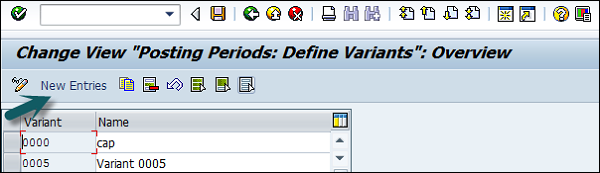
It will open another window, as shown below. Enter the 4-digit Posting Period Variant and name of the field. Click the Save icon to save this variant.
Open and Close Posting Periods
Go to SPRO → SAP Reference IMG → Financial Accounting → Financial Accounting Global Setting → Document → Posting Periods → Open and Close Posting Periods → Execute.
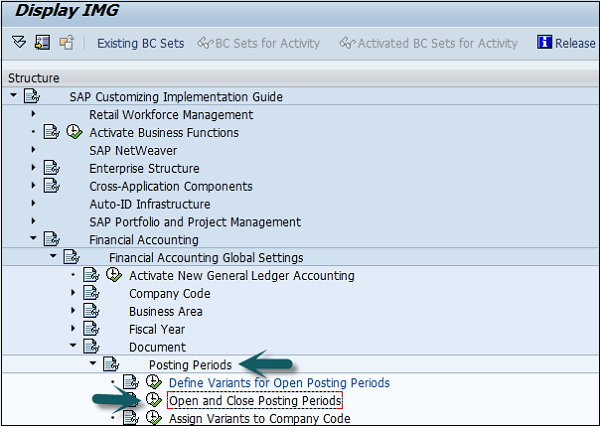
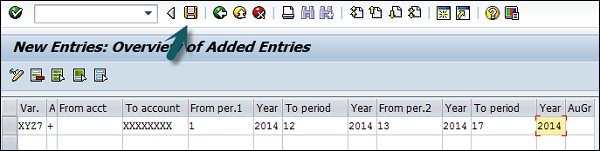
Click the button New Entries, as shown in the following screenshot.
Now, you need to provide the following details −
- Var. = Enter 4-digit Variant code.
- Select Account Type −
- +=Valid for all account type (masking)
- A = Asset
- D = Customers
- K = Vendors
- M = Materials
- S = General Ledger Account
- From Per.1 = Enter Starting Period
- Year = Enter Year
- To Period = Enter Ending Period
- Year = Enter Year
- From Period2 = Enter First Special Period
- Year = Enter Year
- To Period = Enter Period
- Year = Enter Year
- Authorization Group = It is used to open a period for particular users
Once all the details are provided, click the Save button to save the open and closing posting periods.
SAP FI - Field Status Variant
Field Status Variant is used to define the fields which are used for input like cost center, profit center, plant, etc., which are entry fields, and hidden fields. Field status Variant is a tool which is provided by SAP to assign the same set of properties to more than one object.
Example − We define fiscal year variant and it can be assigned to more than one company code. If a field status variant is assigned to more than one company code, the same set of screen field will be displayed while posting those company fields.
Difference between field status variant and field status group
Field status variant will have field status groups. Field status group is maintained in GL account and it defines the fields while posting to the GL.
How to create Field Status Variant?
Go to SPRO → SAP Reference IMG → Financial Accounting → Financial Accounting Global Setting → Document → Line Item → Controls → Define Field Status Variant → Execute.
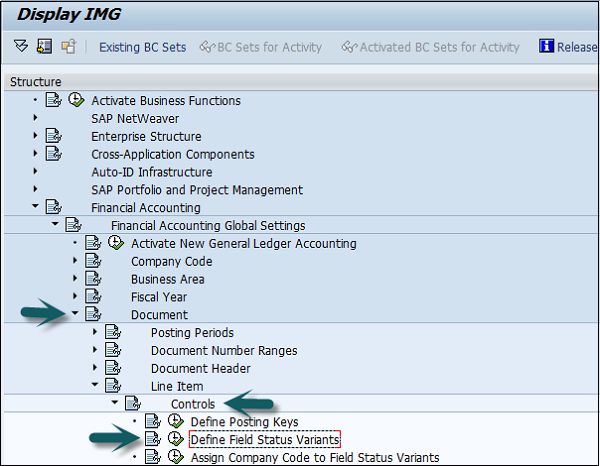
It will open a new window. Select field status variants 0001 by clicking the box before 0001→ click the Copy icon as shown below.
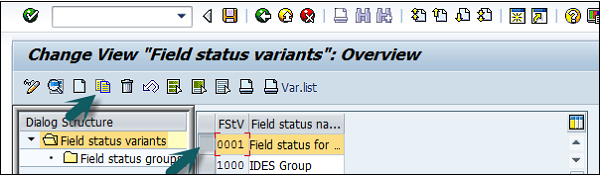
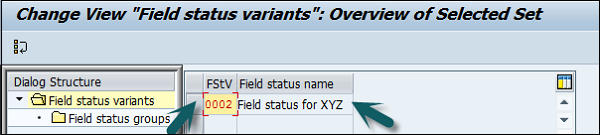
It will open another window. Enter the new Field status variant code and the name of field name variant for the company. The target key must be different from the source key. Press the Enter Key and click the Copy All option.
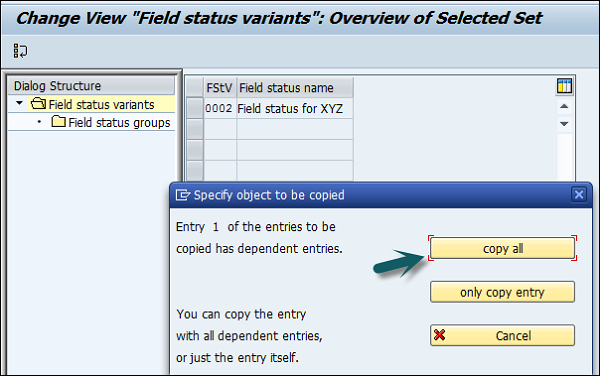
You will get a confirming message, something like: "Number of dependent entries copied: 41". Click the Save button.

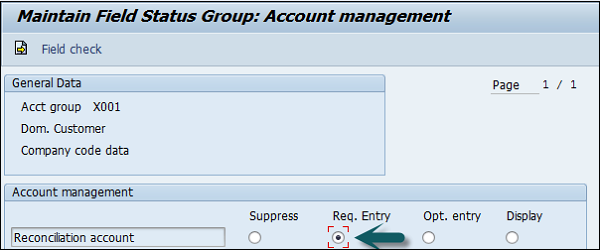
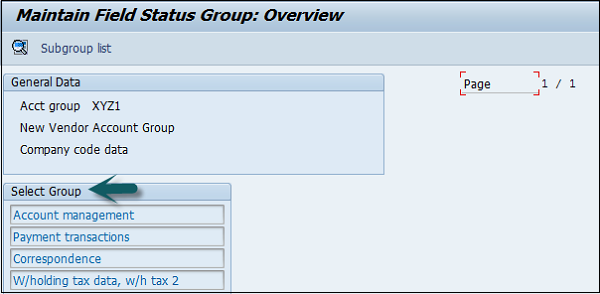
SAP FI - Field Status Group
Field status group is assigned to GL account. Through field status group, one can define a field as optional, suppressed, or mandatory. According to the field status groups, respective fields will be displayed are mandatory or suppressed when the postings are made to that GL account.
All these field status groups are clubbed to a field status variant and the Field status variant is assigned to a company code. With this, fields status groups from fields status variant can only be assigned when a General Ledger account is created for a company code.
Suppress − The field is hidden on the screen.
Optional − The field is available on the screen, you can keep it blank or fill it.
Require − The field is available on the screen, and you have to fill it.
Display − The field is available on the screen, but it's grayed out, you cannot fill anything in here.
SAP FI - Define Posting Keys
Posting Keys in SAP FI are used to determine Account types (A, D, K, M, and S) and also the type of posting. It is 2-digit numerical key.
Different Account Types in SAP FI −
- A = Assets
- D = Customers
- K = Vendors
- M = Materials
- S = General Ledger Account
Asset Posting Keys
| Posting Key | Description | Debit/Credit |
|---|---|---|
| 70 | Debit Asset | Debit |
| 75 | Credit Asset | Credit |
Material Posting Keys
| Posting Key | Description | Debit/Credit |
|---|---|---|
| 89 | Stock Inward Movement | Material Debit |
| 99 | Stock outward Movement | Material Credit |
There are various Account type posting keys available in SAP FI.
How to create a SAP FI Posting Key?
Go to SPRO → SAP Reference IMG → Financial Accounting → Financial Accounting Global Setting → Document → Line Item → Controls → Define Posting Keys → Execute.

Click the Create icon.

Enter the 2-digit numeric code (Example 02) and the name of the posting key and press the Enter key.
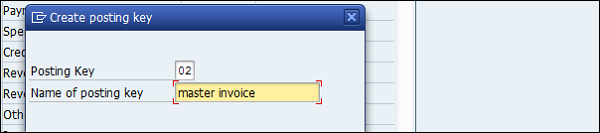
Now you need to provide the following details −
Debit/Credit Indicator − Select Debit or Credit.
Account Type − Select the Appropriate account type.
Other Attributes − Select other appropriate attributes.
Reversal Posting Key − Update the reversal posting key.
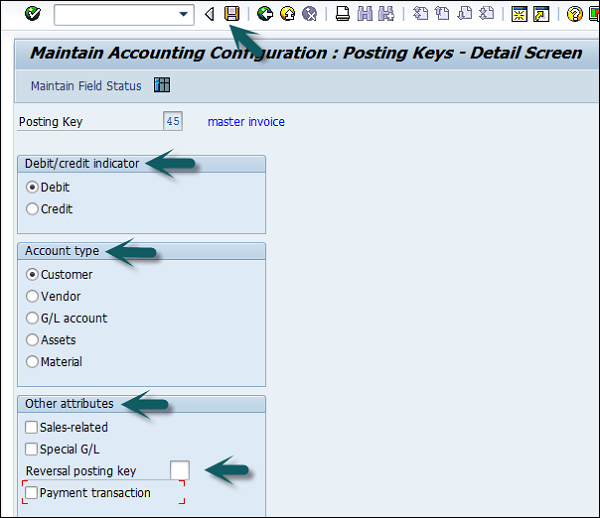
The next step is to click the Save icon to successfully configure the posting key.
SAP FI - Define Document Type
Document Type Key is used to distinguish between different business transactions and to classify the accounting documents. It is also used to determine the number range for documents and account types such as asset, material, vendor, etc. for posting.
Common Document Type Keys are as follows −
| Document Type | Document Type Description |
|---|---|
| AA | Asset Posting |
| AN | Net Asset Posting |
| DR | Customer Invoice |
| DZ | Customer Payment |
| KA | Vendor Document |
| KG | Vendor Credit Memo |
How to define Document Type in SAP FI?
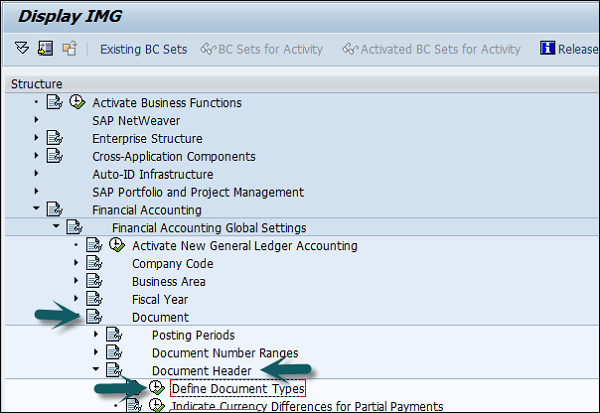
Go to SPRO → SAP Reference IMG → Financial Accounting → Financial Accounting Global Setting → Document → Document Header → Define Document Types → Execute.
It will open a new window. Click New Entries and provide the following details −
Document Type − Unique 2-digit code.
Number Range − Number Range Code.
Reverse Document Type − Reverse Document Type Key Code.
Number Range Information − Number ranges are maintained for document types.
Account Types allowed − Asset, Customer, Material, Vendor, and G/L Account.
Control Data − Control data for document type.
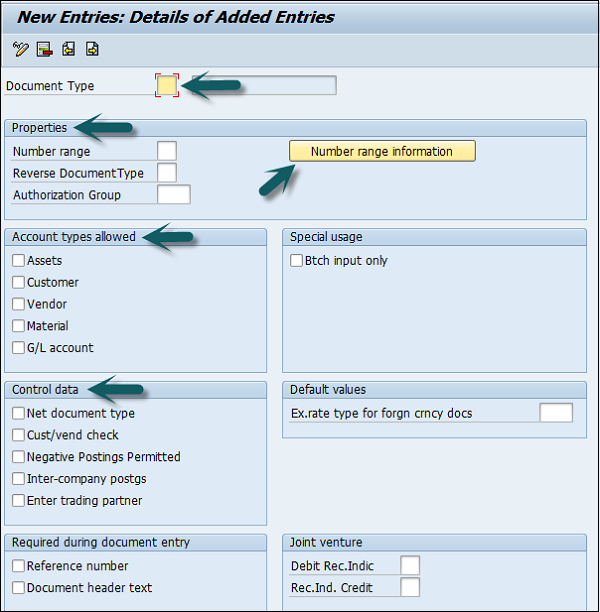
Once you enter the above data, click the Save icon. Enter the description of document and save. It will save the configuration of the document type.
SAP FI - Document Number Ranges
You can assign one or more document types to number range. The number range is applicable to document type as mentioned in the document posting and entry.
How to define Document Number Ranges in SAP FI?
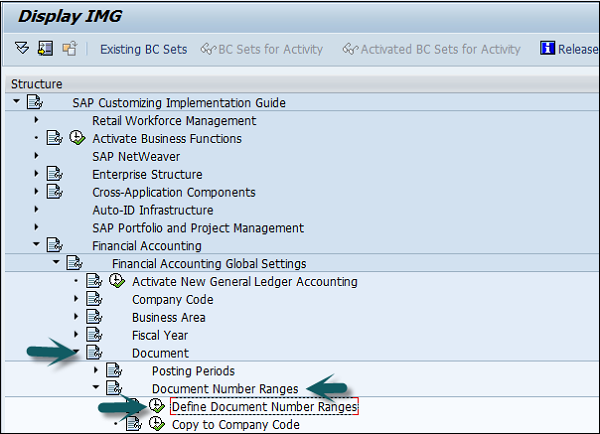
You can define document number ranges in SAP FI in two way. You can either use the T-code FBN1 or go to SPRO → SAP Reference IMG → Financial Accounting → Financial Accounting Global Setting → Document → Define Document Number Ranges → Execute.
A new window will open. Enter the company code and click Change Intervals as shown below.
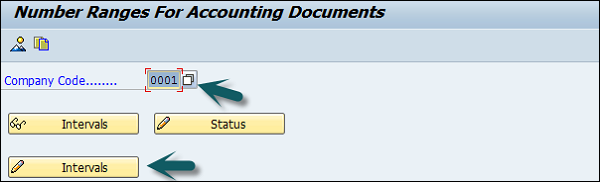
It will open another window. Click Insert Interval.
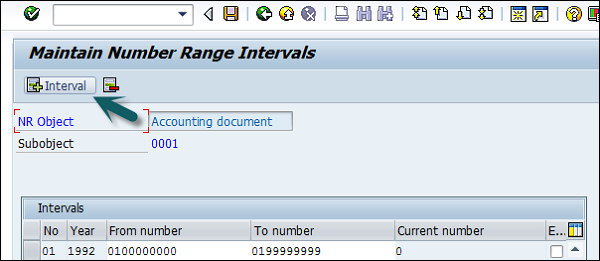
Enter the following details −
No − Number range code.
Year − Enter Year.
From Number − From number.
To Number − To Number.
Current Number − (By default it will be 0).
Ext − (Internal or External)

After providing all these details, click Save to save the changes.
SAP FI - Post with Reference
To post a document with reference in SAP FI, use the T-code FB50. Click the Goto tab and Post with reference, as shown in the following screenshot.
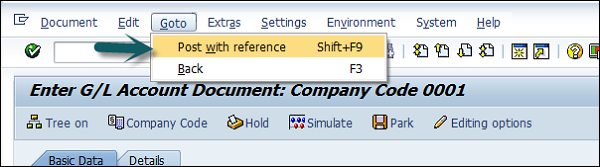
Enter the following details −
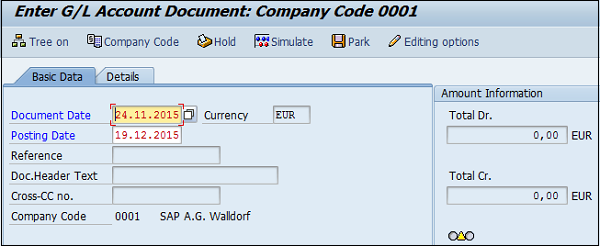
After providing the necessary details, click the Save button at the top to post a new document.
SAP FI - Hold a G/L Document Posting
You can also hold posting of a G/L document or temporarily save the document in the following conditions −
- When G/L document is not complete.
- Incomplete/Incorrect Information in the document.
- To save the document at a later stage.
To hold a G/L document posting, you can use the T-code FB50, and enter the following details &minua;
- Enter Document Date
- Enter G/L account to be credited
- Enter Credit Account
- Enter G/L account to be debited
- Enter Debit amount
The next step is to click the Hold (F5) button at the top → Enter the temporary document number and click Hold document.

SAP FI - Park a G/L Document Posting
SAP FI also provides an option with Limited Authorization Amount for Posting.
Example
An Accountant has an authority to post documents to a maximum amount $2000. Now he has to feed a document with an amount of $5000 for which he does not have the authority.
SAP FI provides a Park Facility for the document which allows the user to save the document but the amount is not posted in the G/L accounts.
This allows to review the document later reviewed by a higher authority Personnel who has appropriate posting amount authorization. Once approved, the document is posted in the G/L accounts.
How to park a G/L document posting?
To hold a G/L document posting, you can use the T-code FB50, and enter the following details −
- Enter Document Date
- Enter G/L account to be credited
- Enter Credit Account
- Enter G/L account to be debited
- Enter Debit amount
The next step is to press the Hold (F5) button at the top → Enter the temporary document number and click Park document.

SAP FI - G/L Reporting
There are various G/L reports that can be generated in SAP FI. The most common ones are −
- G/L Chart of Accounts List
- G/L Account Balances
- G/L Account List
- G/L Account Totals and Balances
G / L Chart of Accounts List
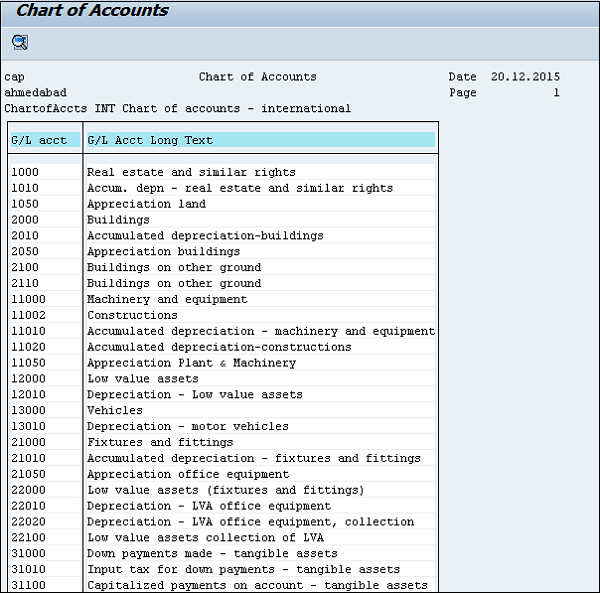
Use the T-code S_ALR_87012326 or in the SAP Easy access menu, go to Accounting → Finance Accounting → General Ledger → Information System → General Ledger Reports → Master Data → Chart of Accounts.

A new window will open. Enter the Chart of Accounts key → Execute (F8).
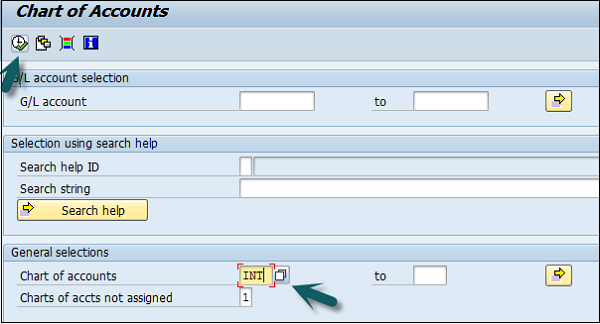
This will open a list of all G/L Chart of Accounts with respect to the key mentioned.
G / L Account Balances
Use the T-code S_ALR _87012277 or in the SAP easy access menu, go to Accounting → Finance Accounting → General Ledger → Information System → General Ledger Reports → Account Balances → General → G/L Account Balances → G/L Account Balances.
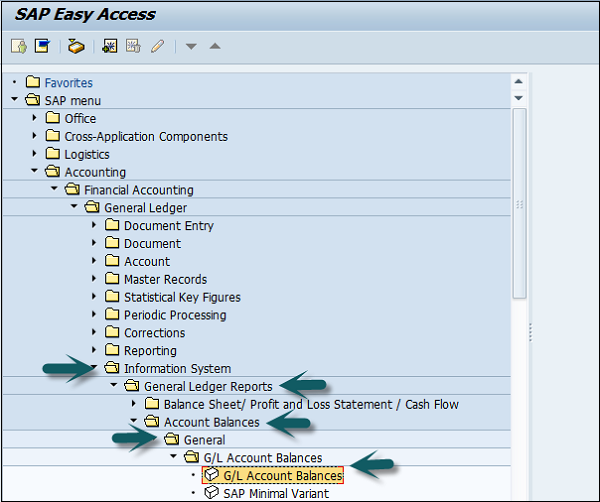
Enter the input parameters like company code to generate G/L Account Balances report → Execute.
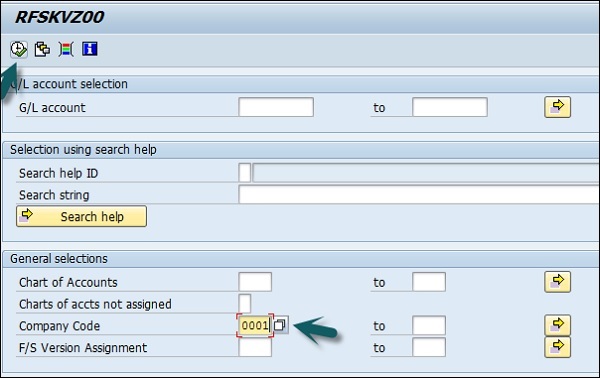
G / L Account List
Use the T-code S_ALR_87012328 or go to the path given below −
Accounting → Finance Accounting → General Ledger → Information System → General Ledger Reports → Master Data → G/L Account List → G/L Account List.
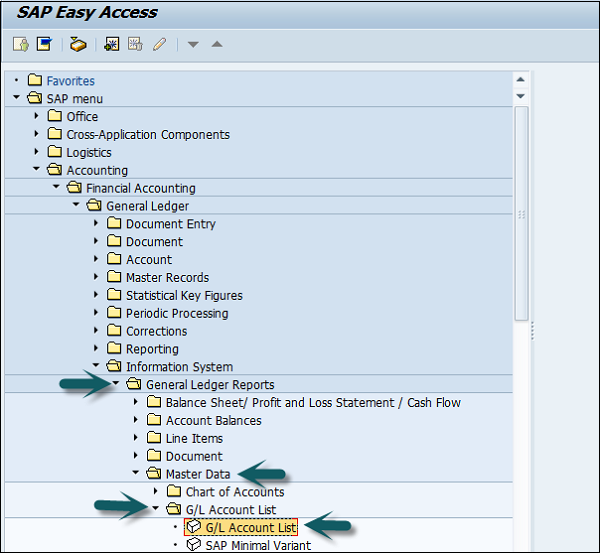
Enter Input parameters such as Company Code, Chart of Accounts, etc. to apply filter to G/L Account List → Execute.
G/L Account Totals and Balances
Use the T-code S_ALR_ 87012301 or go to the path shown in the following screenshot.
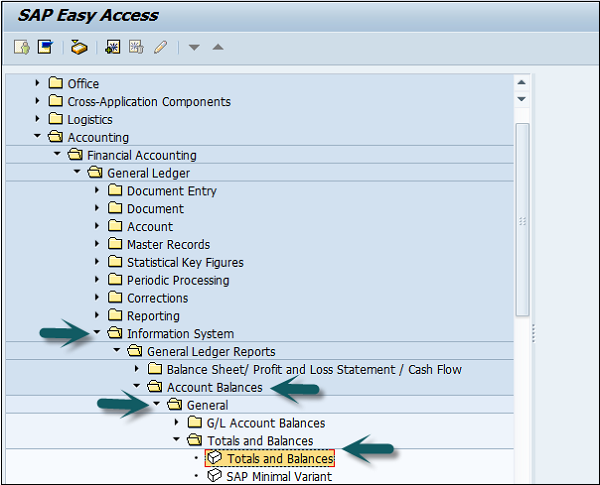
Enter the report input parameters such as company code, COA, etc. and click Execute. A report will be generated based on input parameters.
SAP FI - Accounts Receivable
SAP FI Accounts Receivable component records and manages accounting data of all customers. It is also an integral part of sales management.
All postings in Accounts Receivable are also recorded directly in the General Ledger. Different G/L accounts are updated depending on the transaction involved (for example, receivables, down payments, and bills of exchange). The system contains a range of tools that you can use to monitor open items such as account analyses, alarm reports, due date lists, and a flexible dunning program.
The correspondence linked to these tools can be individually formulated to suit your requirements. This is also the case for payment notices, balance confirmations, account statements, and interest calculations. Incoming payments can be assigned to due receivables using user-friendly screen functions or by electronic means such as EDI.
The payment program can automatically carry out direct debiting and down-payments.
We have a range of tools available for documenting the transactions that occur in Accounts Receivable, including balance lists, journals, balance audit trails, and other standard reports. When drawing up financial statements, the items in foreign currency are revalued, customers who are also vendors are listed, and the balances on the accounts are sorted by their remaining life.
Accounts Receivable is not merely one of the branches of accounting that forms the basis of adequate and orderly accounting. It also provides the data required for effective credit management (as a result of its close integration with the Sales and Distribution component) as well as important information for the optimization of liquidity planning.
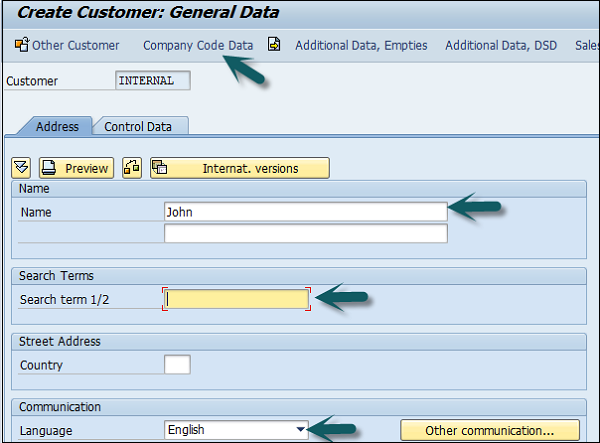
SAP FI - Customer Master Data
In SAP FI, all business transactions are posted to and managed in accounts. You must create a master record for each account that you require. The master record contains data that controls how business transactions are recorded and processed by the system. It also includes all the information about a customer that you need to be able to conduct business with him.
Customer master data is used by both the accounts and sales department in an organization. By maintaining customer master data centrally, it can be accessed throughout your organization and avoid the need to enter the same information twice. You can also avoid inconsistencies in master data by maintaining it centrally.
Example − There is a change in address of one of your customers, so you only have to enter this change once in the system, and your accounting and sales departments will always have up-to-date information.
How to create a customer master data centrally in SAP FI?
Use the T-code FD01 or go to Accounting → Finance Accounting → Accounts Receivable → Master Records → Maintain Centrally → Create.
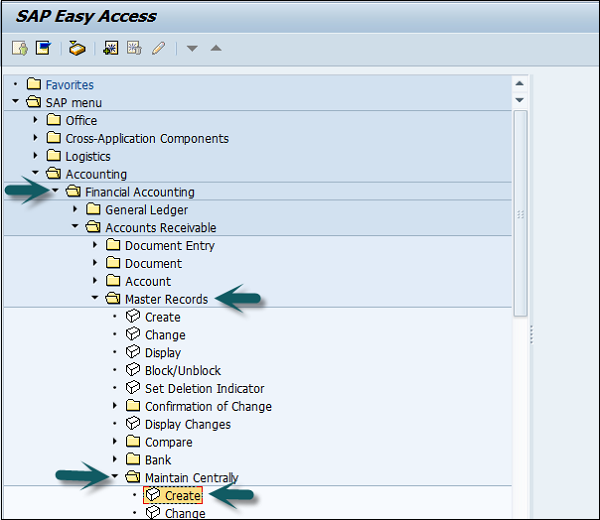
A new window will open. Enter the following details −
Select an account group.
Depending on the type of number assignment (internal or external) used for the account group, you also enter an account number.
If you wish to maintain the company code data or the sales data as well as the general data, also enter −
A company code for maintaining the FI data (accounting data).
A sales area for maintaining sales data.
To continue, choose Continue.
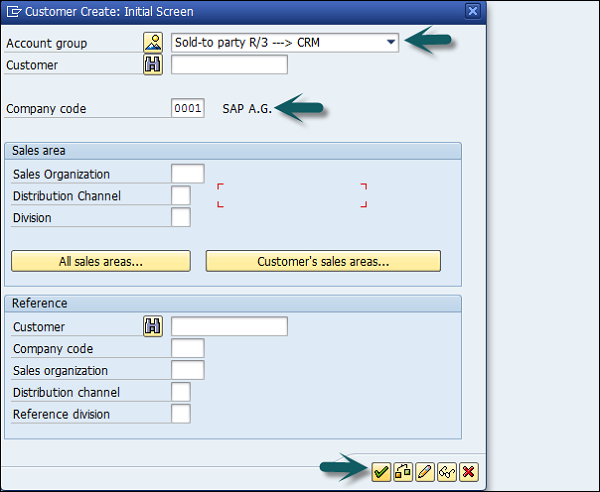
Once you click Continue, a new screen appears with customer data. Enter the following customer data and click Save.
- Enter the name of the customer.
- Enter Search Term, for searching the customer Id.
- Enter Street/House Number.
- Enter Postal code/City.
- Enter Country/Region.
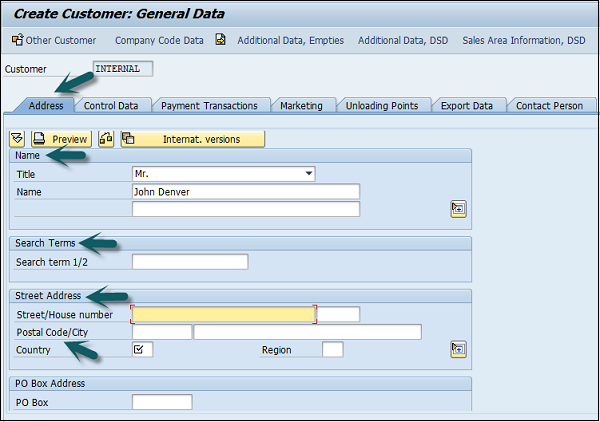
Click the Control Data tab and enter Corporate Group etc. if the customer belongs to a corporate group.
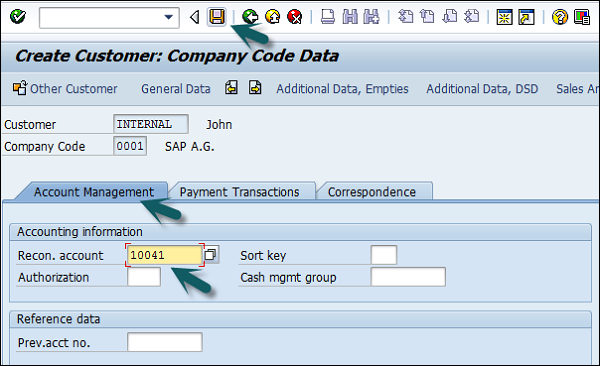
Click the second option Company Code data and go to Account Management.
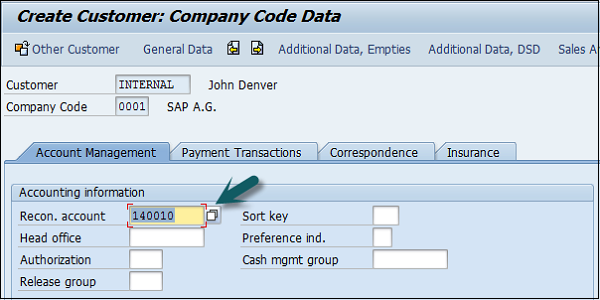
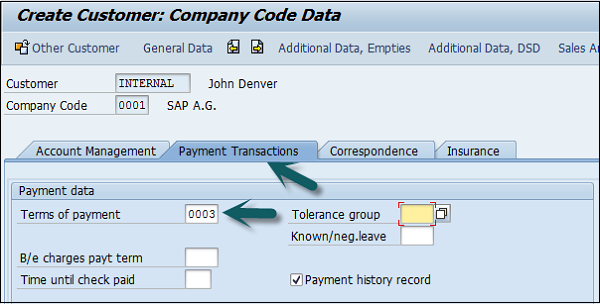
Enter Recon. Account number from the list provided. Go to Payment Transactions, enter terms of payment, tolerance group, etc.
Once you are done with all the details, click the Save icon at the top.
SAP FI - Block a Customer
You can block a customer account in AR so that postings are no longer made to that account. You have to block a customer account before marking a customer master record for deletion.
Example
You would also block a customer that you use only as an alternative dunning recipient, so that nobody can post to that customer by mistake.
In Sales and Distribution (SD) application component, you can set the following blocks for a customer −
- Posting block
- Order block
- Delivery block
- Invoicing block
How to block a customer account centrally?
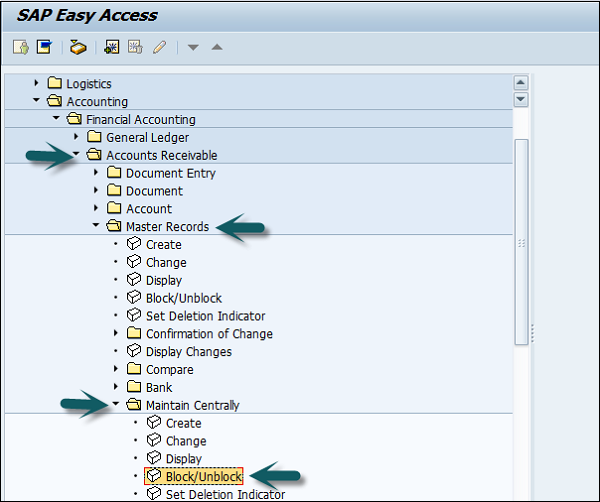
Go to Accounting → Finance Accounting → Accounts Receivable → Master Records → Maintain Centrally → Block/Unblock.
The initial screen appears. On this screen, you can specify the areas that you need to block by entering the company code, sales organization, distribution channel, and division. If you do not specify the key for an area, the corresponding block fields are not set.
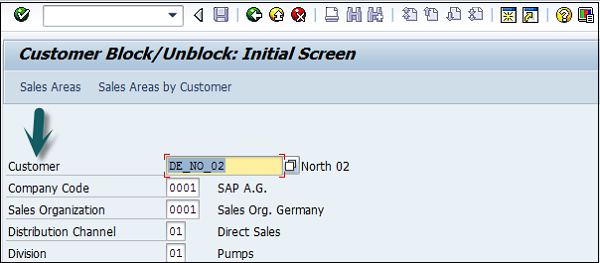
Enter the customer's account number and the company code. If you wish, you can also enter the sales organization, distribution channel, and division.
The Block/Unblock Customer: Details screen appears.
To block posting, select the company code of the displayed customer master record, or select all the company codes by selecting the corresponding field.
To block orders, deliveries, and invoices, select either the displayed sales area or all the sales areas. Save your entries.
Press Enter and a new window will open. Select the checkbox Posting Block.
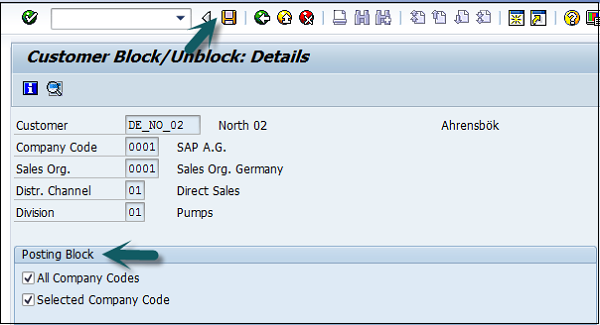
Once the selection is done, click the Save button at the top.
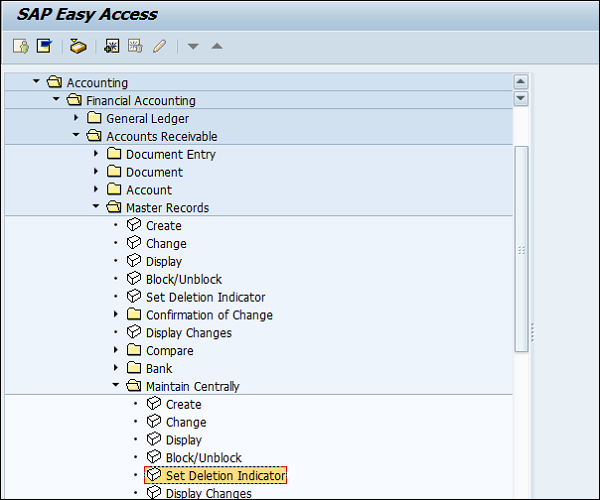
SAP FI - Delete a Customer
You can archive customer master records that you no longer need. When data is archived, it is extracted from the SAP database, deleted, and placed in a file. You can then transfer this file to an archive system.
Go to Accounting → Finance Accounting → Accounts Receivable → Master Records → Maintain Centrally → Set Deletion Indicator.
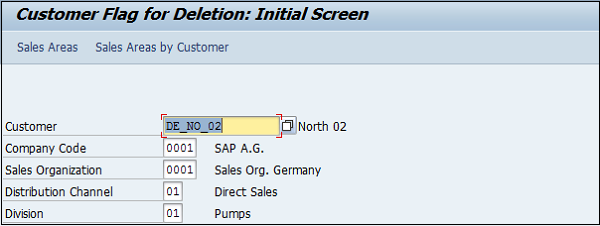
Select the customer id, company code, etc. to be deleted as shown below and press the Enter key.
A new window will open. Select the Deletion flag as shown below −
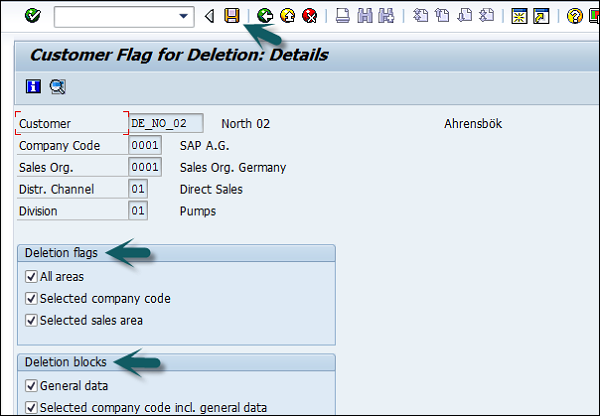
After selecting the Deletion flag, click the save icon at the top.
SAP FI - Customer Account Group
There are different types of customer account group that can be created in Account Receivable in SAP FI.
| Group | Name |
|---|---|
| X001 | Domestic Customers |
| X002 | Export Customers |
| X003 | One Time Customers |
How to create a Customer Account Group?
Go to SPRO → SAP Reference IMG → Financial Accounting → AR and AP → Customer Accounts → Master Data → Preparations for creating customer master data → Define Account Groups with screen layout (Customers) → Execute.
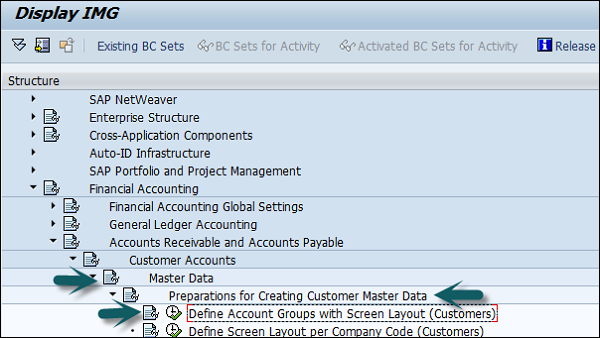
A new window will open. Click New Entries as shown in the following screenshot.
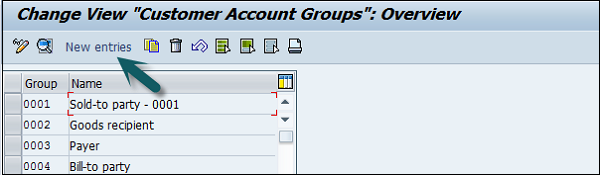
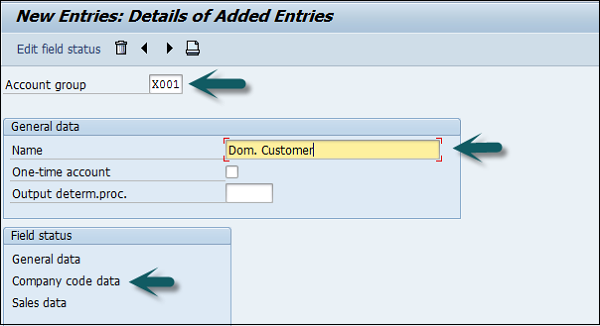
It will open another new window. Enter the following details −
Customer Account Group − Enter 4-digit account group.
Name − Enter the name under General data field.
Field Status − Click Company code data.
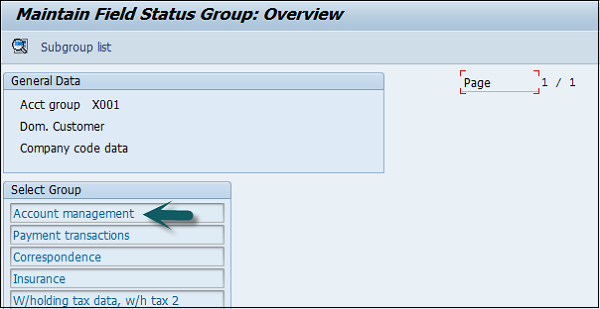
Once you select Field Status, a new window will open.
Select Account Management from the select group and click Reconciliation account Req. Entry.
Once this is done, click the save icon at the top to save the configuration. Similarly you can create X002, X003 for other customers.
SAP FI - One-Time Customer Master
In SAP FI, one-time customer master record is required for those customers who dont want to maintain their records separately or dont have frequent transactions.
To create one-time customer master, use the T-code FD01.

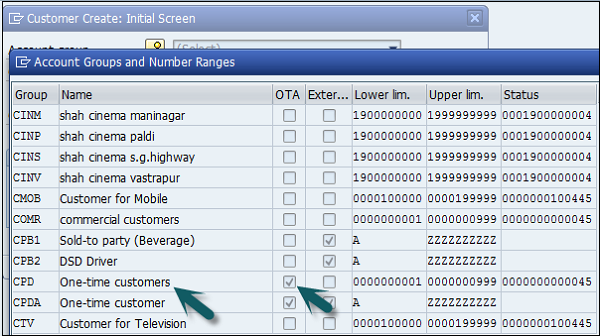
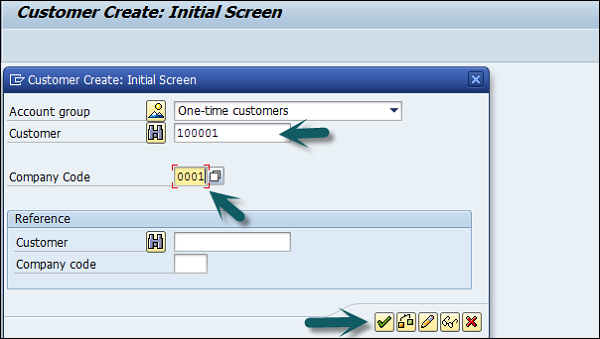
In the next screen, select account group overview button as shown below. Select the account group for which one-time customer property is checked → click the tick mark 
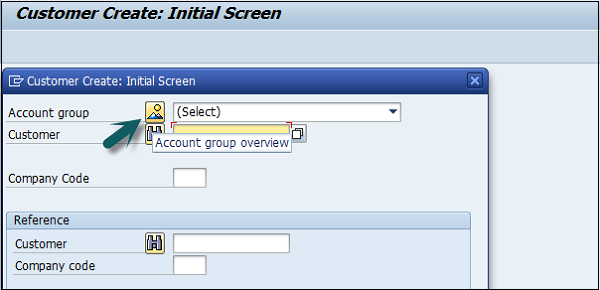
In the main window, enter the following details. Enter the Customer ID as per the number range assigned to this customer account type or if it uses internal number assignment, leave it blank and the company code in which this account has to be created.
Once you click the tick mark, a new window will open.
Enter the following details −
- Enter the name for the one-time customer.
- Enter the search term.
- Enter the communication language.
Click the Company code data once the above values are defined. Next, go to Account Management tab and enter Recon Account. Then, save the customer account details.

SAP FI - Post a Sales Invoice
In this process, you post an open item for any customer. The customer is to pay the invoice in cash. You then enter the payment in the cash journal.
T-code − FB70
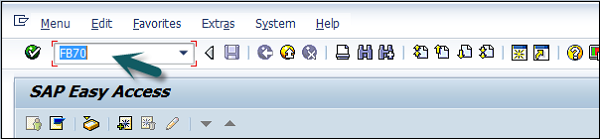
Enter the company code you want to post invoice to as shown below −
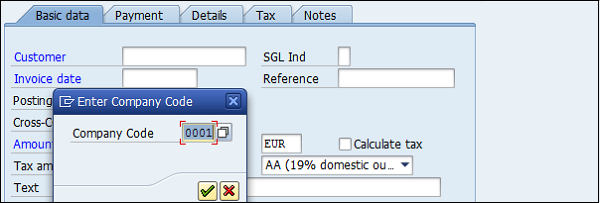
Enter the following details: Customer ID of the customer to be invoiced, invoice date, Amount for the invoice, Tax Applicable, and tax indicator.
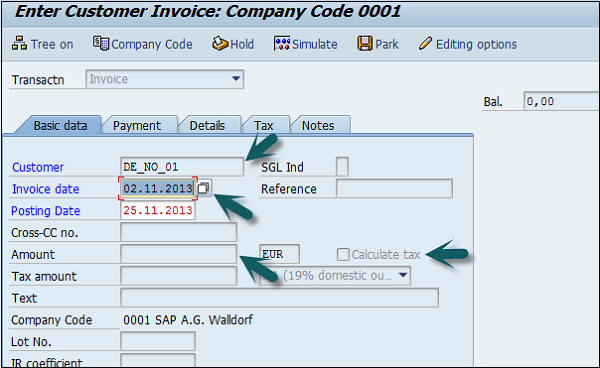
Enter the payment details like payment terms in Payment tab. Go to Details tab and enter the item details.
Once all the details are entered, click the Save button to generate the document number.
SAP FI - Document Reversal
You can also reverse an incorrect document and can also clear the open items. A document can only be reversed if −
- It contains no cleared items.
- It contains only customer, vendor, and G/L account items.
- It was posted with Financial Accounting.
- All entered values (such as business area, cost center, and tax code) are still valid.
How to reverse a document in SAP FI?
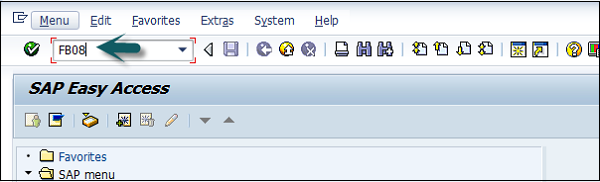
Use the T-code: FB08
Enter the following details −
- Document number to be reversed.
- Company Code.
- Fiscal year of posting.
- Reversal Reason.
- Enter posting date and period.
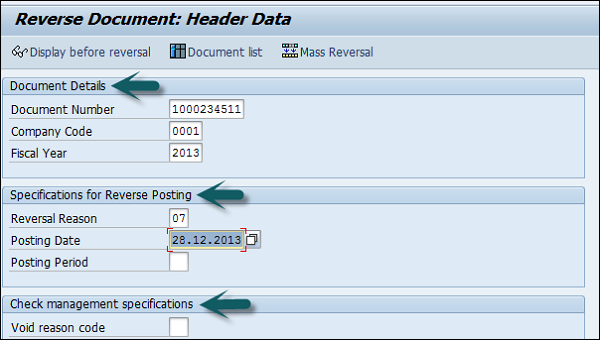
If the document includes a payment check, use void reason checkbox.
You can also click on option display before reversal at the top to see a preview of reversal document. If things are OK, go back to the previous screen and click Save.
SAP FI - Sales Returns
Sales Returns in SAP FI are used to manage full products that the customer has returned. These are used in consumer goods industry.
All returns are related to quality defects and not incorrect deliveries. The path that the returned merchandise takes often has to be tracked in detail. Returned items have to be sent for inspection.
Example − Once the analysis of the returned merchandise is complete, the vendor or manufacturer determines −
- The status of the merchandise and whether it can be reused.
- Whether the customer will be credited for the merchandise and the amount of credit.
The "Sales Returns" component gives you an overview of your physical warehouse stocks and the corresponding postings whenever you require.
How to post a Sales Return in SAP FI?
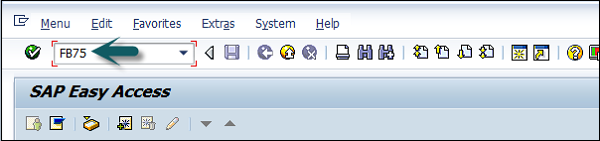
T-code FB75.
Enter Company Code, as shown in the following screenshot.

It will open a new window. Enter the following details −
- Enter the Customer ID of the customer to be issued the credit memo.
- Enter the Document Date.
- Enter the Amount to be credited.
- Enter the tax code used in the original invoice.
- Check the Calculate Tax checkbox.
Go to Item details section and enter the following data −
- Enter the Sales Revenue Account for the Original Invoice was posted.
- Enter the Amount to be debited and check the Tax code.
Once the required details are entered, click the Save button at the top. You will get a confirmation that Sales Return is posted in Company Code 0001.
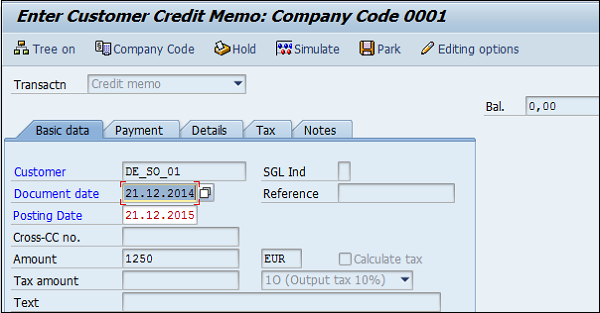
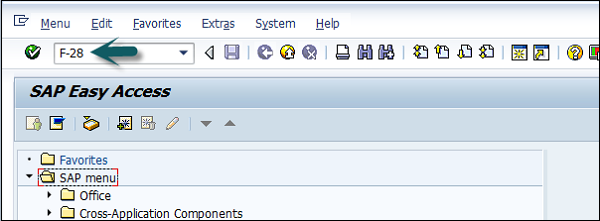
SAP FI - Post Incoming Payment
Once the customer has paid the billing document, you post the incoming payment.
T-code: F-28
A new window will open. Enter the following details −
- Document Date.
- Company Code.
- Payment Currency.
- Cash/Bank Account the Payment is to be posted.
- Payment Amount.
- Customer Id of the customer making the Payment.
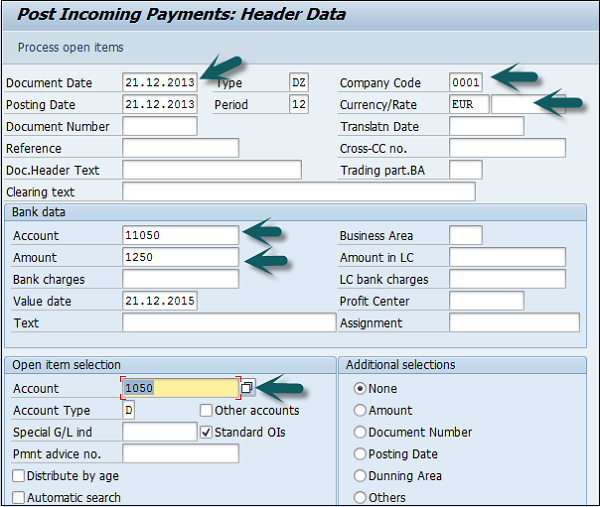
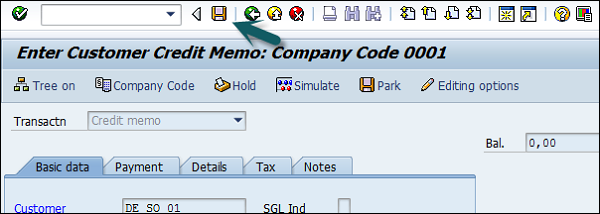
To check the list of open invoices, click Process Open Items at the top −

Enter the assigned payment amount value to balance with the invoice amount. At the end, save the details.
SAP FI - Foreign Currency Invoice
You can post a vendor invoice in a foreign currency, so that you can process a currency analysis. You should not post your invoice in MM but rather directly in FI. This makes it easier to post backdated invoices.
How to post an invoice in Foreign Currency?
T-code: F-43
A new window will open. Enter the following details −
After providing all the required details, click the Save icon.
SAP FI - Incoming Partial Payments
In SAP FI, you can also post partial payments from the customers. These partial payments are posted as separate open items.
Customers can see clearly what all invoices have been issued to customers and what payments he has made. But it keeps the multiple open items, until the invoice is fully paid/ cleared.
Example − There is a customer with an outstanding amount of 1500 and he makes a payment of 500 as partial payment, then there will be two separate open items of 1500 Debit and 500 Credit in the FI system and no clearing document will be created.
How to post a Partial payment?
T-code: F-28
- Document Date
- Company Code
- Payment Currency
- Cash/Bank Account the Payment is to be posted
- Payment Amount
- Customer Id of the customer making the Payment
- Process Open Items

Once you click on Process Open Items → Go to Partial Payment tab and select the invoice for which partial payment is done and the amount.
Click the Save button to post the document.

SAP FI - Reset AR Cleared Items
In SAP FI, this is used to reset the incorrect payment invoices. If a payment is made to incorrect invoices, then it can be reset.
How to reset AR cleared items?
T-code: FBRA
Enter the following details: Clearing Document number, Company Code, and Fiscal Year in the above window.
Click the Save icon at the top.

Once you click the Save icon, enter the reversal reason of customer payment and posting date and click . It will generate a Reversal Document Number.
SAP FI - Credit Control
In SAP FI, Credit Control is used to specify and control the customer credit limits. A credit control area can include one or more company codes. It is not possible to divide a company code into several credit control areas.
The benefits of defining a credit control area in SAP FI are as follows −
The credit control area is used for credit management in AR and SD components.
You define a credit control area according to the areas of responsibility for credit monitoring. For each credit control area, you enter a key, a name, and the currency in which the credit limit is to be managed in the credit control area. You select a four-character alphanumeric key. In the simplest case, each company code corresponds to one credit control area. In this case, we recommend that you use the same key for the credit control area as for the company code.
Credit control can include one or more company codes and to enable it to do this, you must assign the respective credit control area to the company codes.
If a customer is created in several company codes that are assigned to different credit control areas, a separate credit limit is managed for the customer in each of the different credit control areas.
How to define a Credit Control area for a customer in SAP FI?
T-code: FD32
A new window will open. Enter the following details −
- Enter Customer Id for the Customer for which you want display the Credit Limits.
- Enter the Credit Control Area.
- Check Central data section and press Enter.
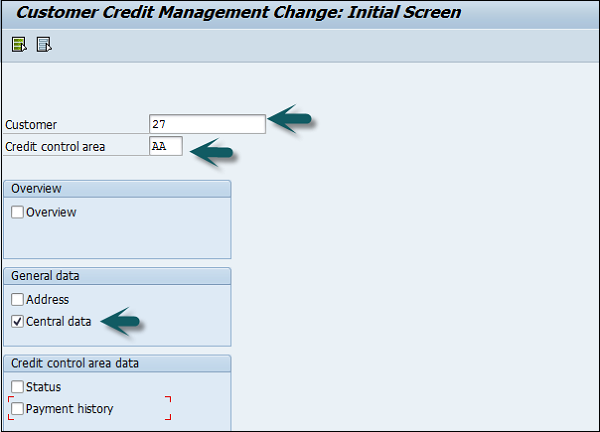
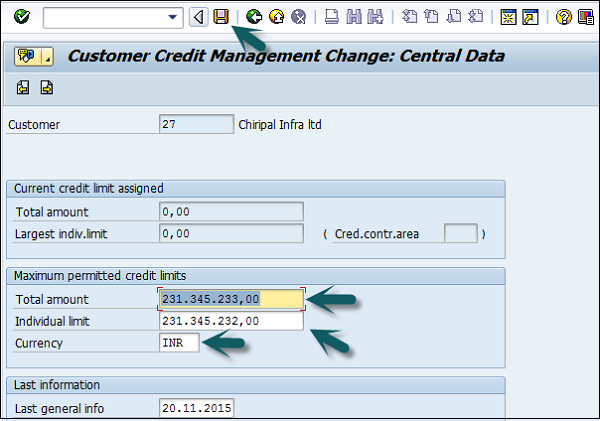
Maintain the credit limit data for customers in the above window. Individual limit shouldnt be greater than the total limit for a customer.
Once the details are updated, click the Save icon at the top.

SAP FI - Accounts Payable
SAP FI Accounts Payable is used to manage and record accounting data for all the vendors. All invoices and deliveries are managed as per vendor requests. Payables are managed as per the payment program and all the payments can be made using checks, transfer, electronic transfers, etc.
All the postings that are made in the Account Payable are also updated in the General Ledger simultaneously and the system also maintains forecasts and standard reports that can be used to keep track of all the open items.
- XK01 − Create vendor (centrally)
- XK02 − Change vendor (centrally)
- XK03 − Display vendor (centrally)
- XK04 − Vendor Changes (Centrally)
- XK05 − Block Vendor (Centrally)
- XK06 − Mark vendor for deletion (centrally)
- XK07 − Change vendor account group
- XK11 − Create Condition
- XK12 − Change Condition
- XK13 − Display Condition
- XK14 − Create with cond. ref. (cond. list)
- XK15 − Create Conditions (background job)
- XK99 − Mass maintenance, vendor master
- XKN1 − Display Number Ranges (Vendor)
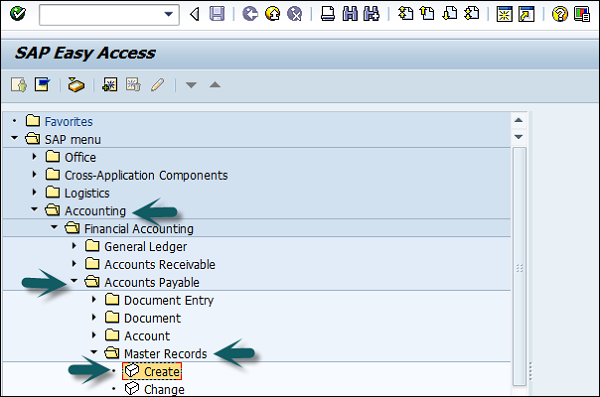
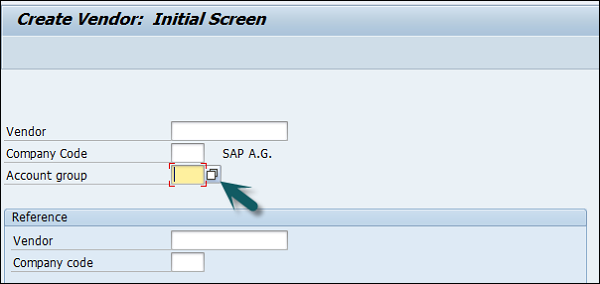
SAP FI - Create a Vendor
Vendor Master Records are used by both the Accounting component and the Purchasing component. Before you create a vendor master record in Accounting, you need to make sure that the master record is not already created in Purchasing.
How to create vendor master data in SAP FI?
You can create a vendor master record by referencing an existing one. In this case, the system copies certain data from the reference master record, however the system does not transfer all the data.
If you have SAP Material Management configured, you can create a vendor master record centrally. Here we will discuss how to create vendor master record for a company code.
Go to Accounting → Finance Accounting → Accounts Payable → Master Record → Create.
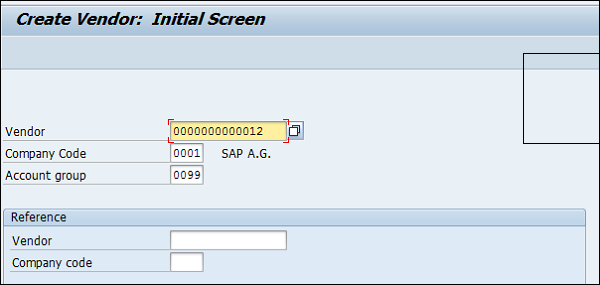
The following window will open. If you are using an external number assignment, enter the vendor account number, otherwise the system will assign once you click "Save the master record".
Press Enter after entering the Company code, Account group. It will open a new window will open where you need to enter the following details −
- Name of the Vendor.
- Term for searching the Vendor Id.
- Street/House Number and Postal code 6 digit/City.
- Country/Region and click the Next screen button at the top.
A new window will open. Enter the Vendor control group details. If the vendor is from a corporate group, enter the corporate group name.
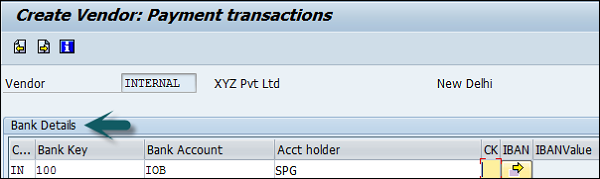
Once you press Enter or click Next Screen, enter the bank account details as shown below and click the Next Screen icon.
Next, enter the contact person details, name, telephone, description and go to the next screen.
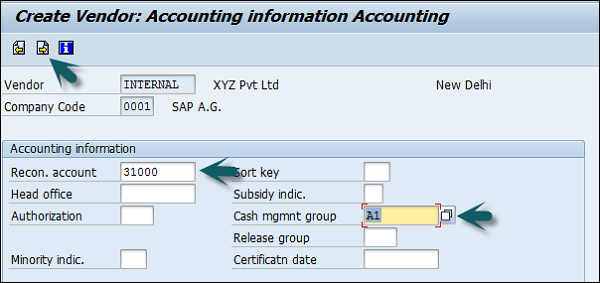
In the next screen, enter the Recon Account and cash management group (domestic/Foreign, etc.)

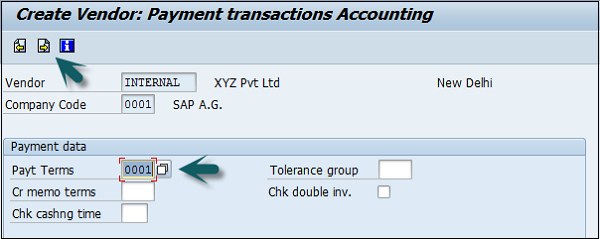
Click the Next Screen icon and enter the payment transactions accounting details.
Enter Payt terms (like pay immediately, pay after 14 days 3% cash, etc.).
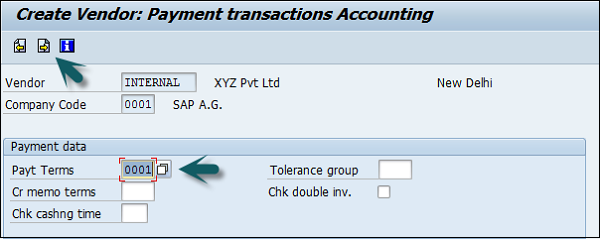
Once you are done with all the details, click the Save button at the top. You will get a message that a vendor has been created in the given company code.


SAP FI - Create Vendor Account Group
Use the T-code: OBD3 or go to the path given below −
SPRO → SAP Reference IMG → Financial Accounting → AR and AP → Vendor accounts → master data → preparation for creating vendor master data → Define Account groups with screen layout (Vendors) → Execute.
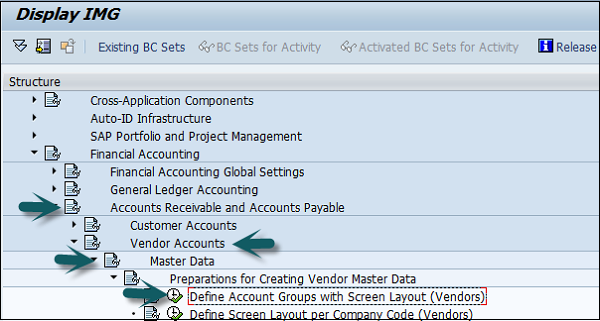
Click the New Entries button.

It will open a new window. Enter the following details −
- Unique key as Account Group key.
- Description for the Account Group.
- Select box for creating Account Group for One Time Vendors.
- Select the Field Status.
Once you provide the above details, click Edit Field Status and a new window will open. Select the fields you want to maintain in the field status.
After providing the required details, click the Save icon at the top.

Enter the customizing request number as shown below to create a new vendor account group.
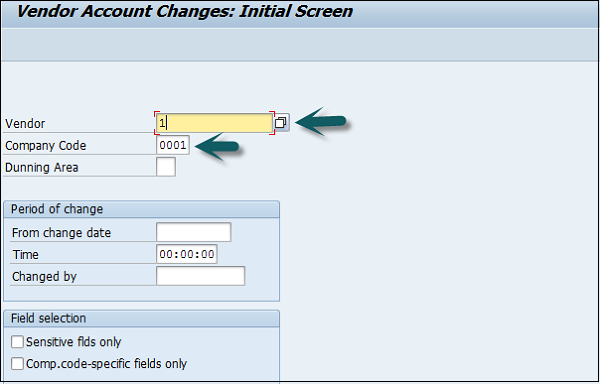
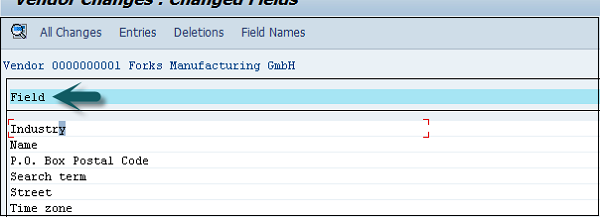
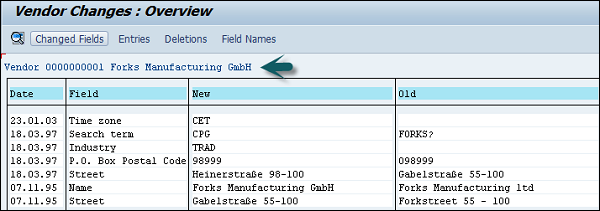
SAP FI - Display Changed Fields
When you change a master record, the system logs these changes and generates the change documents. For each field, it stores the time of change, the name of the user, and the previous field contents.
You can display all the changes for the following −
- A certain field
- A master record
For several vendor master records, the following changes are displayed separately −
- Overwritten field contents
- Any bank details and/or dunning areas entered after the master record was created
- Any bank details and/or dunning areas that have been deleted
Using the change documents, you can find all the changes that are made and when they were made.
How to display changes in Vendor master records?
Go to Accounting → Financial Accounting → Accounts Payable → Master Records → Display Changes.

Enter the Vendor Account number and the Company code and press Enter.
A new window will open. Select the changed field and click All Changes.
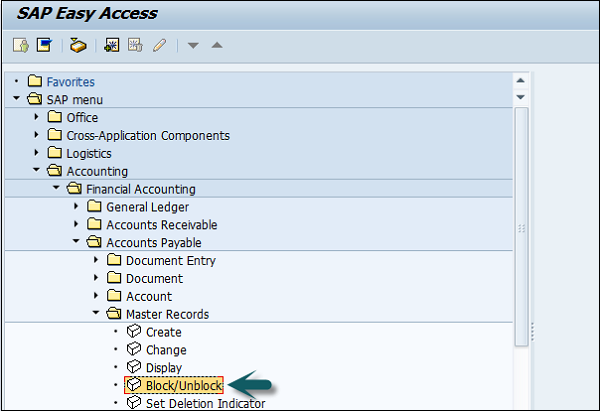
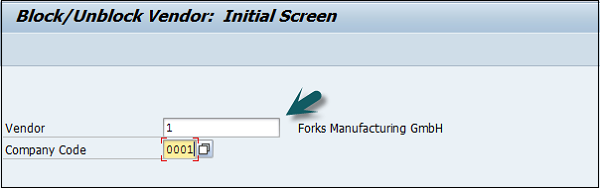
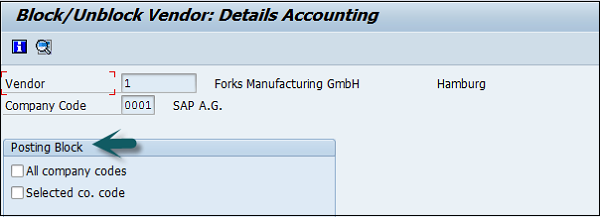
SAP FI - Block a Vendor
You can block a vendor account for posting. You have to block a vendor master record before you can mark it for deletion. You would also block a vendor that you use only as an alternative payment recipient, so that nobody can post to it by mistake.
You can apply the following blocks −
Posting a block for certain company codes or for all the company codes.
Purchasing a block for certain purchasing organizations or for all the purchasing organizations. This is of course only if you have purchased and installed the purchasing application component.
Use the T-code FK05 or go to Accounting → Financial Accounting → Accounts Payable → Master Records → Display Changes.
Enter the Company code and Vendor account as shown below and press enter.
A new window will open. Check the block indicator for data to be blocked. Once the selection is made, click the Save icon at the top.

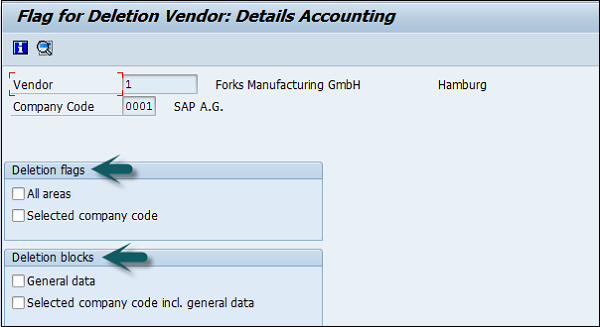
SAP FI - Delete a Vendor
Use the T-code FK06 or go to Accounting → Financial Accounting → Accounts Payable → Master Records → Display Changes.
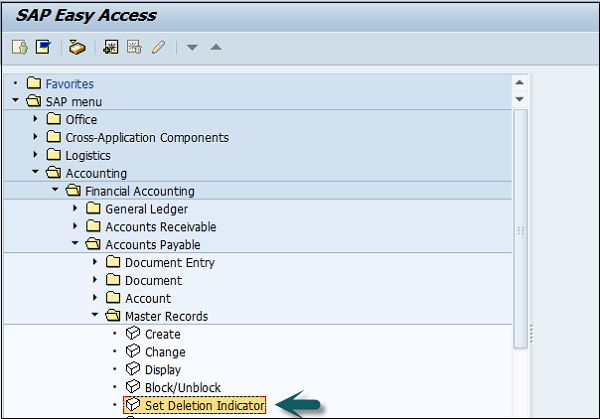
Enter the company code and the Vendor account and press Enter as shown below.

A new window will open. Select the deletion flag and the deletion blocks and click the Save button at the top.

SAP FI - One-Time Vendor
In SAP FI, you can also create One-Time Vendor Master Record for the Vendors with only a few transactions and there is no need to maintain their master records separately. In such cases, you can create One-Time Vendor with General Information such as Name, Address, Phone, etc.
Use the T-code FK01 or go to Accounting → Finance Accounting → Accounts Payable → Master Record → Create.
It will open the following window. Select the account group and search for the one-time vendor.

Enter the vendor id as per the number range assigned to the account group and the company code in which you want to create this record and press Enter.
A new window will open. Enter the following details −
- Name of the Vendor.
- Term for searching the Vendor Id.
- Street/House Number and Postal code 6 digit/City.
- Country/Region and click on Next screen button at top

In the next screen, enter the Vendor Control Group details. If a vendor is from a corporate group, enter the corporate group name.

Now, enter the bank account details as shown below and click the Next Screen button.
The next step is to enter the contact person details, name, telephone, description and go to the next screen. In the next screen, enter the Recon Account and cash management group (domestic/Foreign, etc.)
Click Next and enter the payment transactions accounting details. Enter Payt terms (like pay immediately, pay after 14 days 3% cash, etc.).
Once you are done with all the details, click the Save button at the top. You will get a message that a vendor has been created in the given company code.


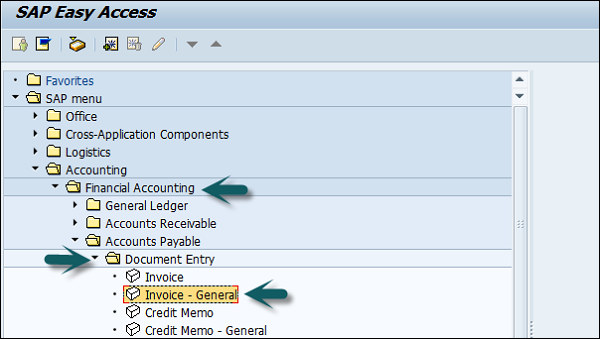
SAP FI - Post Purchase Invoice
Use the T-code FB60 for an incoming invoice or go to Accounting → Financial Accounting → Accounts Payable → Document Entry → Invoice.
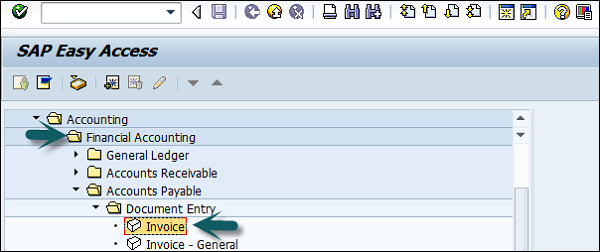
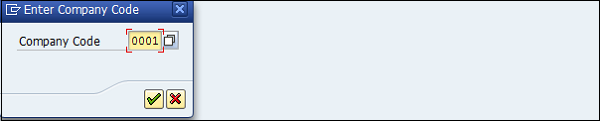
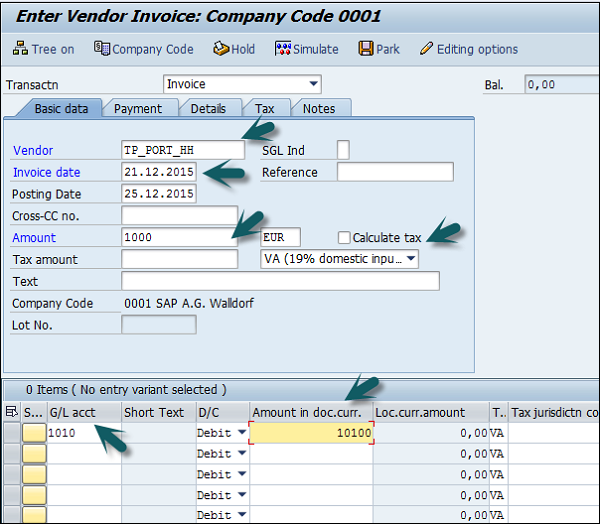
Enter the company code you want to post this invoice to and press Enter. It will open a new window. Enter the following details −
- Vendor ID of the vendor
- Invoice Date
- Amount for Invoice
- Tax Code for the Tax Applicable
- Tax Indicator "Calculate Tax"
Go to the Payment tab and enter the Payt terms like pay immediately, after 14 days, etc.

In Item details, enter the following details −
- Purchase Account
- Select Debit
- Amount for the Invoice
- Check Tax code
After entering these details, click Check the Status of the Document and thereafter, click the Save button at the top.


SAP FI - Purchases Returns
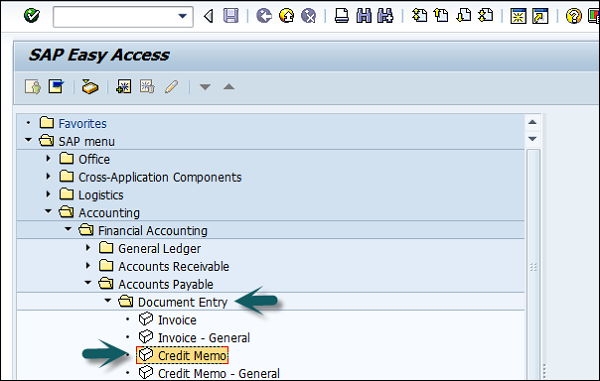
Use the T-code FB65 or go to Accounting → Financial Accounting → Accounts Payable → Document Entry → Credit memo.
Enter the company code as shown below −
In the next screen, enter the following details −
- Enter the vendor ID
- Enter the Document date
- Enter the amount to be credited
- Enter the tax code used in the original invoice
- Check the Calculate Tax check box
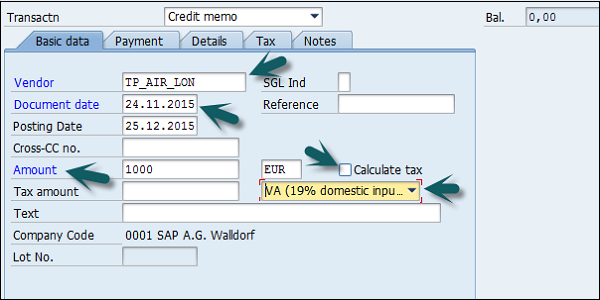
Go to Item details section and enter the following data −
- Enter the Purchase Account for the Original Invoice posted
- Enter the Amount to be debited and select credit
- Check the tax code
Once the details are entered, click the Save button at the top. You will get a confirmation that a vendor credit memo is posted in the company code 0001.
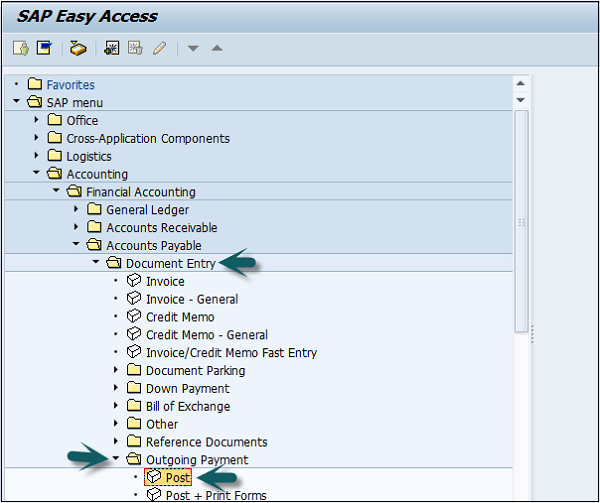
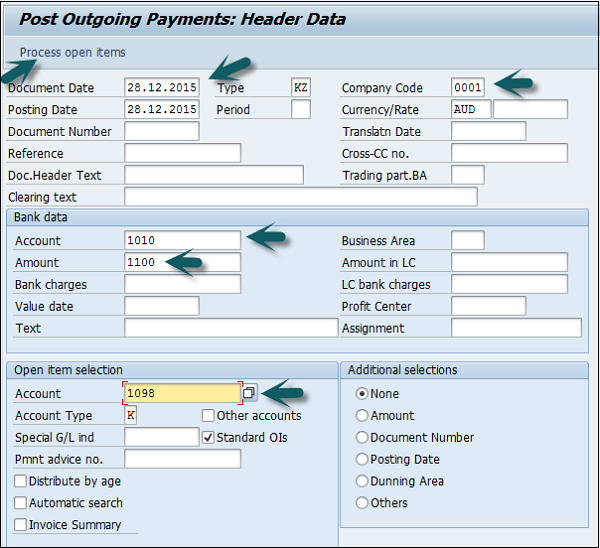
SAP FI - Post Outgoing Vendor Payment
Use the T-code F-53 or go to Accounting → Financial Accounting → Account Payable → Document Entry → Outgoing Payment → Post.
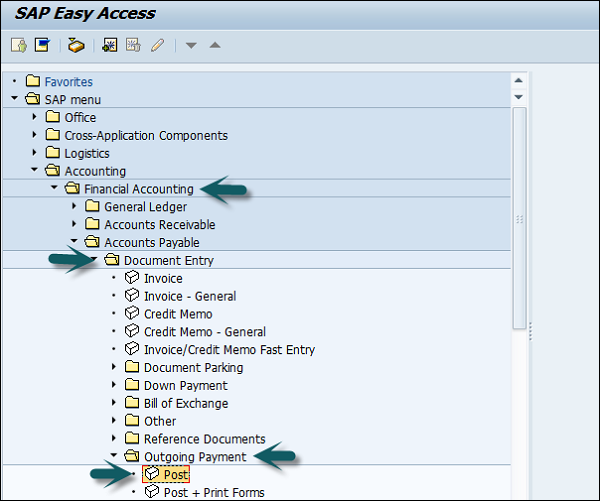
In the next screen, input the following details −
- Select the Document Date.
- Select the Company Code.
- Select the Payment Currency.
- Select the Cash/Bank Account in which Payment is to be credited and Payment Amount.
- Select the Vendor Id of the receiving vendor.

Once you provide the above details, click Process Open Items.
Assign the payment amount to the appropriate invoice so as to balance the payment with the invoice amount.

Click the Save button at the top to get the document number to be generated.
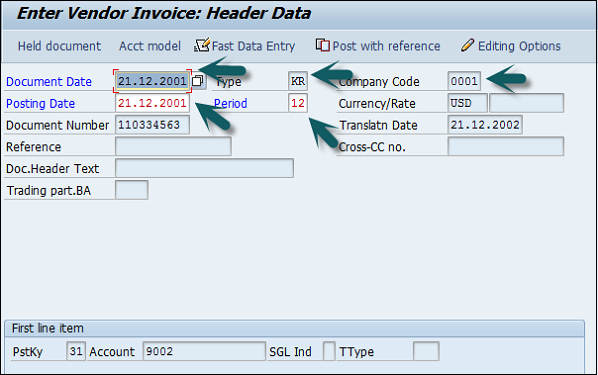
SAP FI - Foreign Currency Invoice
In SAP FI, you can post a vendor invoice in foreign currency so you can do currency analysis. If you post in FI, you can directly post backdate invoices.
How to post a foreign currency vendor invoice?
Use the T-code F-43 or go to Accounting → Financial Accounting → Accounts Payable → Document entry → Other → Invoice → General.
In the next window, enter the following details −
- Document Date
- Document Type
- Company Code
- Posting Date
- Currency
- PstKy
- Account (Vendor)

Press Enter and a new window will open. Input the amount, calculate tax, Tax code, PstKey, Account (Revenue account) and press Enter.
The amount in local currency is displayed in the field. Click the Save button at the top and note the document number.
SAP FI - Withholding Tax in vendor invoice
Use the T-code FB60 and enter the company code.
In the next screen, input the following details −
- Vendor ID of the Vendor to be Invoice and Invoice Date.
- Check Document Type as Vendor Invoice.
- Enter Amount for Invoice.
- Select Tax Code for the Tax Applicable.
- Select Tax Indicator "Calculate Tax".
- Purchase Account and Amount for the Invoice.
After completing the above fields, click Withholding tax.
- Tax Base Amount
- Tax Exempt Account
- Withholding Tax code
Click the Save icon and note down the document number to be generated.

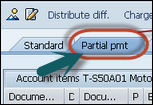
SAP FI - Outgoing Partial Payments
In SAP FI, you can also post outgoing partial payments for a vendor. Partial payment from a vendor will open as an open item and no clearing document will be generated.
How to post an outgoing partial payment?
Use the T-code F-53 or go to Accounting → Financial Accounting → Accounts Payable → Document Entry → Outgoing Payment → Post.
In the next window, input the following details −
- Document Date
- Company Code
- Cash/Bank Account for the payment to be posted
- Payment Amount
- Vendor ID of the Vendor making the payment
The next step is to click Process Open Items. It will open a new window wherein you need to take the following actions −
- Click on the Partial Payment Tab.
- Select and Activate the Invoice against which the partial payment has been made.
- Enter Partial Amount.
Once the above details are supplied, click the Save icon. Note down the document number that is generated.
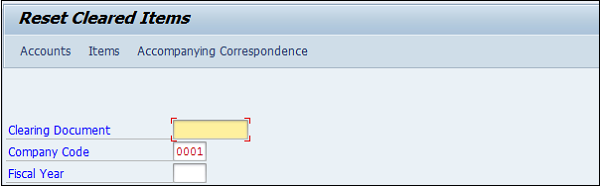
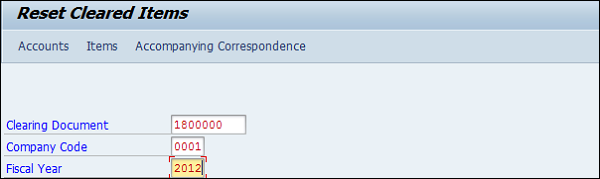
SAP FI - Reset AP Cleared Items
In SAP FI, you can clear a vendor payment if an incorrect payment is made in Account Payables.
Example
You have an invoice # 23156 and this invoice will remain open till you receive a payment for this invoice. When a payment is received, a new document is created # 50000678, when you enter the receipt and this document also becomes the clearing document.
Now, due to some error, if you have to reverse this payment document, then you need to use the T-code FBRA. When you use this, the system will first reset the documents as open items and then reverse the document number.
How to reset AP cleared items?
Use the T-code FBRA.
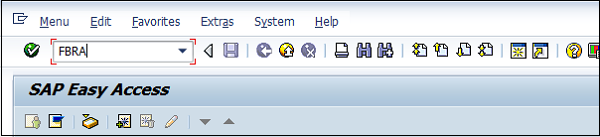
In the next screen, enter the following details −
- Clearing document number
- Company Code
- Fiscal Year
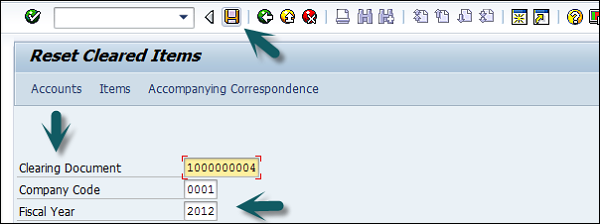
Confirm the reset of the clearing document.
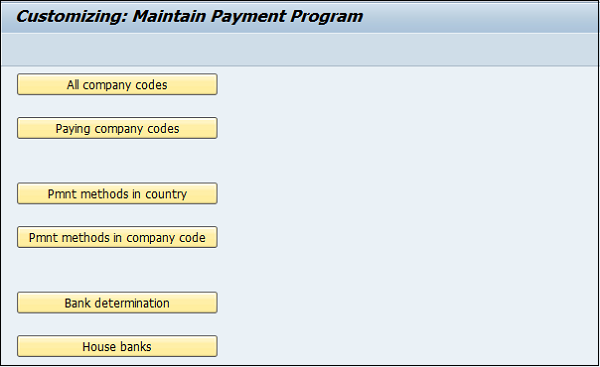
SAP FI - Automatic Payment Run
Automatic Payment Program (APP) serves the purpose of posting accounts payable like payment to a vendor based on vendor invoices automatically.
APP is used to find out due/overdue invoices and to process a list of customer and vendor invoices to make payments in one go. APP cannot be used for all company codes from different countries.
APP has the following categories −
- Setup all company codes
- Setup paying company codes
- Payment method per country
- Payment method per country code
- Bank Selection
- House Bank
Use the T-code FBZP to see all the following options.
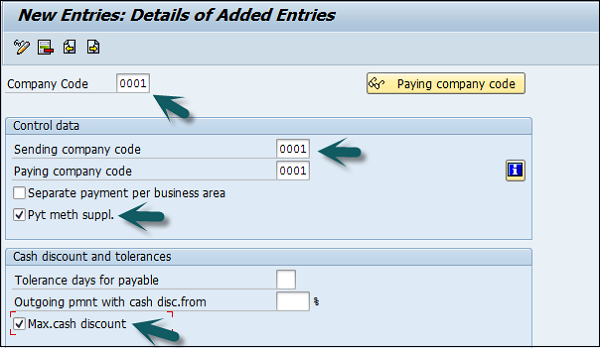
Setup all Company Codes
Click the option All Company Code in the above screen. A new window will open. Go to New Entries.

Enter the company code in the field Paying Company Code. Select the checkboxes Pyt. Meth Suppl. and Max. Cash Discount as shown below −
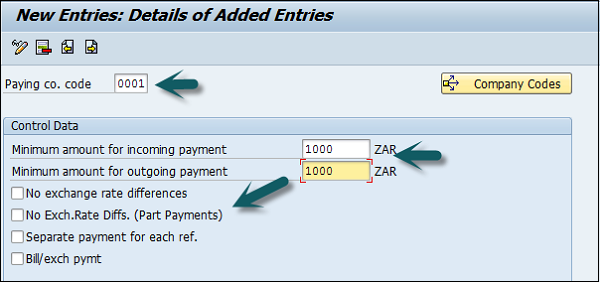
Setup Paying Company Codes
Click Paying Company Codes and go to New Entries.
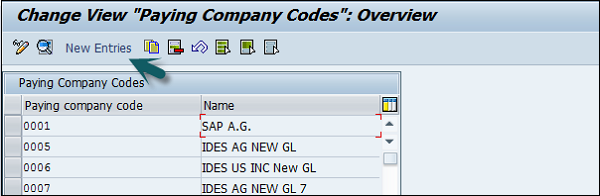
It will open a new window wherein you need to provide the following details −
- Paying company code
- Min amount for incoming payment
- Min amount for outgoing payment
- Exchange rate differences, separate payment for each Ref.,Bill / Exch pymt.
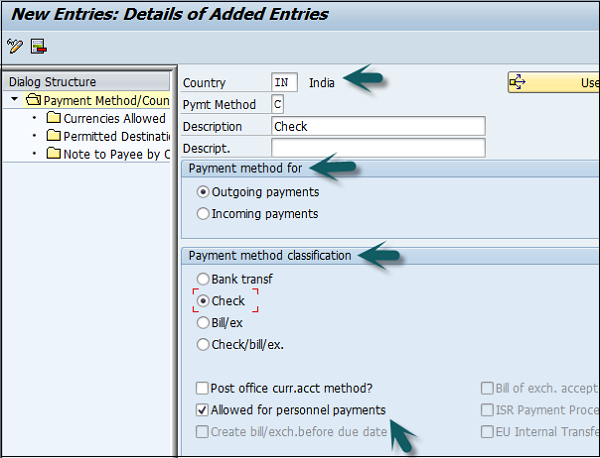
Payment Method in Country
Click the option Payment Method in Country on the main window. Go to New Entries as shown below.
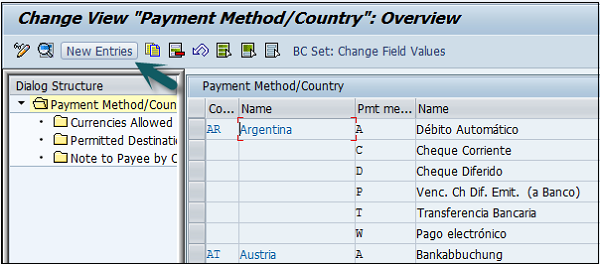
In the next screen, input the following details −
- Enter Country name, Payment method and Description.
- Select payment method: Incoming/outgoing payment.
- Select payment method classification.
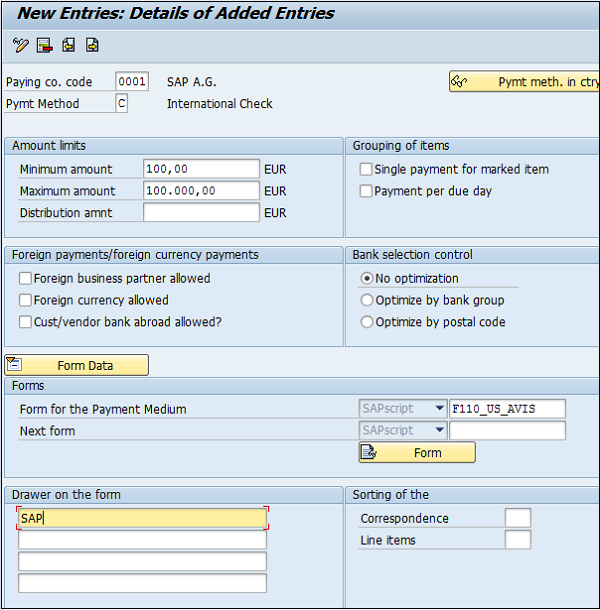
Payment Method in Company Code
Click the option Pmnt. Method in Company Code on the main window. Go to New Entries as shown below −
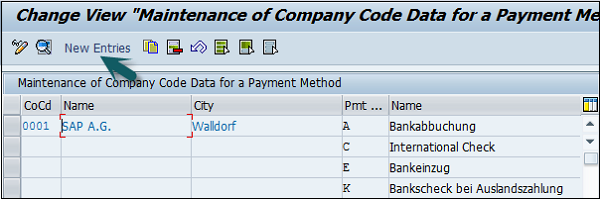
In the next screen, enter the following details −
- Enter Paying Co Code and Pymt. Method.
- Enter minimum and maximum amount limits.
- Select Bank selection control option.
- Go to form data as shown below.
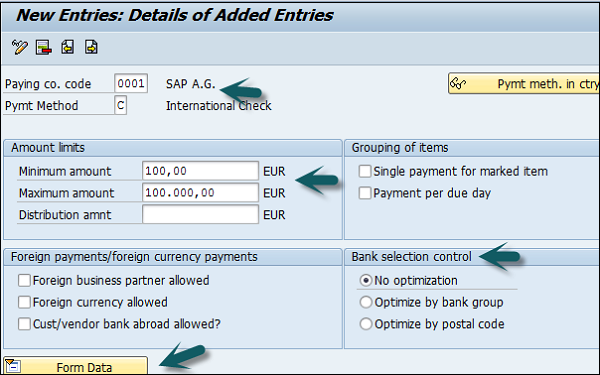
Update Form Data Type. Click the Search button and select the value.


Enter the field-drawer of the form and once all the details are supplied, click the Save button.
Bank Determination
Click the option Bank Determination in the main window. Select Paying Company Code and click the option Select Block as shown below and go to Bank Account.
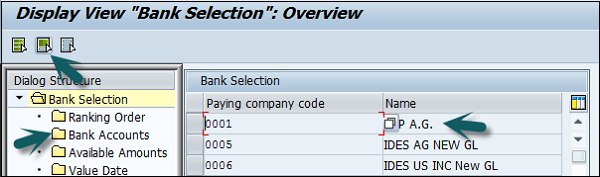
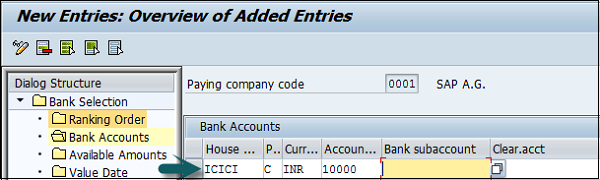
Click the button Ranking Order and go to New Entries as shown below −
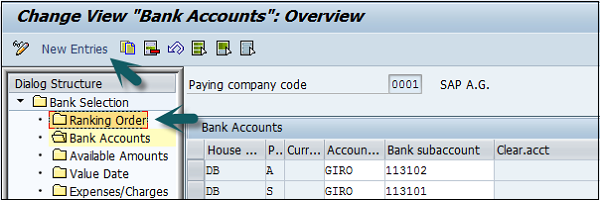
Enter the new bank account details as shown below to create a bank account.
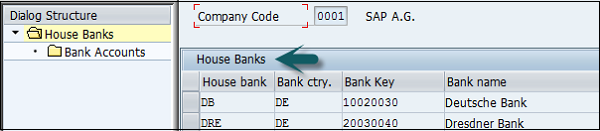
House Banks
House Banks provide the details of the bank account which is used by a company to make payments to its vendors and customers.
Click the option House Banks on the main screen and enter the company code as shown below −
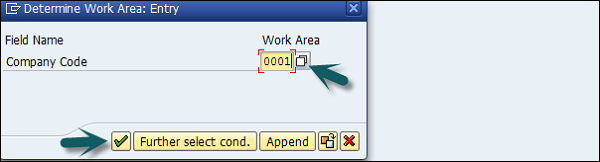
The next window will show a list of all house banks which the company is using to make payments to its vendors and customers.
SAP FI - Posting Rounding Differences
While clearing Financial Accounting documents that have been posted in a foreign currency, you can post the rounding differences that arise to a separate revenue/expense account. Earlier these differences were displayed as exchange rate differences at the time of clearing.
Rounding differences can be posted to the General Ledger account as Expense or Revenue.
How to post rounding difference in SAP FI?
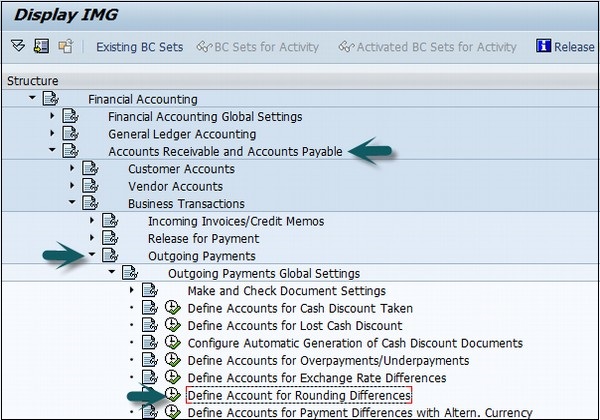
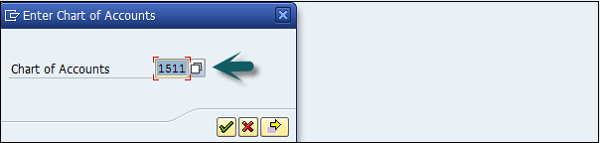
Go to SPRO → SAP Reference IMG → Financial Accounting → AR and AP → Business Transactions → Outgoing Payments → Outgoing Payment Global settings → Define account for rounding differences → Execute.
Select Chart of Accounts and click . Go to Posting Key.

In the next screen, enter the following details −
- Enter the G/L account to post rounding difference. Click Posting Key at the top
- Enter the Credit and Debit posting key and click the Save icon at the top
- Enter the request customizing number to save the configuration

SAP FI - Month End Closing
In SAP FI, month-end closing involves activities in posting a closing period. You can carry out the following activities as a part of month-end closing −
Open and close posting periods.
You close one or more posting periods in the past for posting, and permit posting to be made to one or more current or future posting periods.
Use the T-code F.05 or FAGL_FC_VAL for new G/L accounts.
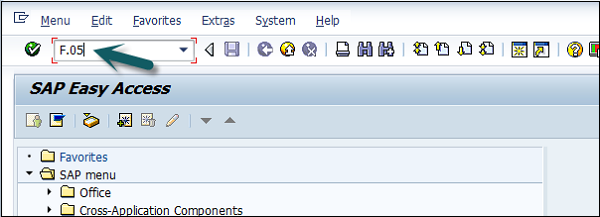
It will open a new window wherein you need to enter the following details −
- Company Code for which Foreign Currency Valuation is to be carried out.
- Evaluation Key Date.
- Valuation Method for Exchange Rate Consideration.
- Valuation in Currency Type.

You can filter out Valuation activity by entering the appropriate parameters in the Tab Screens.
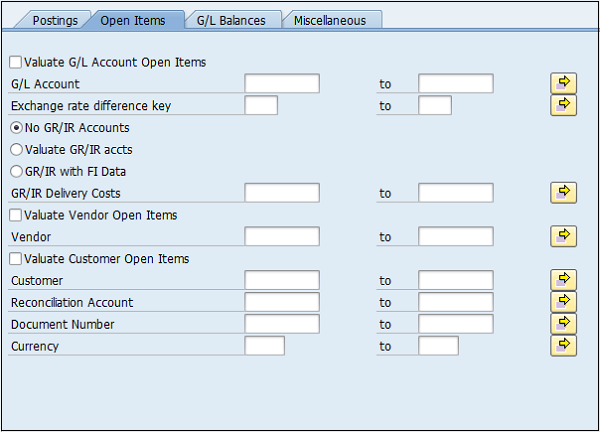
Click the Execute button  . It will open a list of all G/L accounts selected for foreign currency valuation.

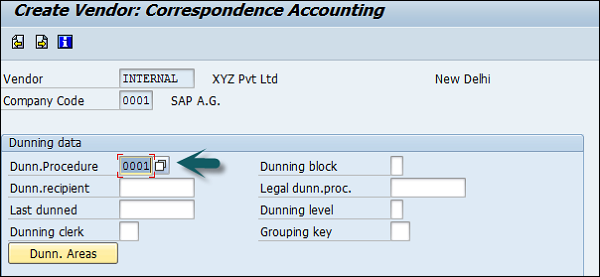
SAP FI - Dunning
In SAP FI, if a customer misses the payment for the outstanding invoice by payment due date, you can generate a dunning letter using SAP FI and send it to the customer address to remind him of the outstanding payment.
Requirement
The dunning system enables to trace liable customers who have not paid their open invoices within a given time span. It enables you to handle the process from, for example, sending a reminder to customers of their outstanding payments through referring such customers to collections agencies.
The dunning system covers the following documents.
- Open A/R invoices, including invoices that are partially credited or partially paid.
- Invoices that include installments.
- A/R credit memos.
- Incoming payments that are not based on invoices.
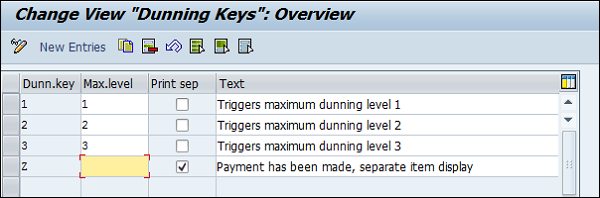
How to Create Dunning Keys?
Go to SPRO → SAP Reference IMG → Financial Accounting (New) → AR and AP → Business Transactions → Dunning → Basic Setting for Dunning → Define Dunning Keys → Execute.
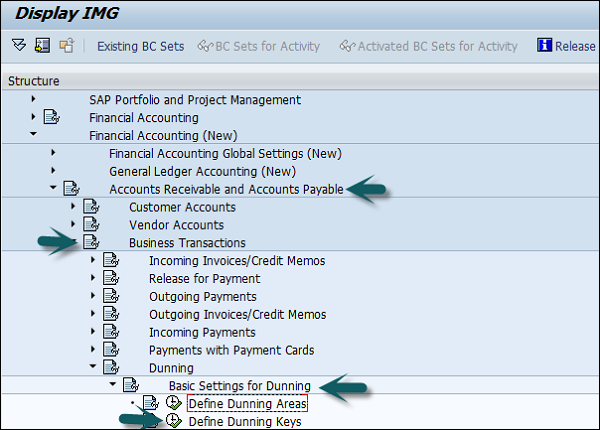
Define Block Reason for Dunning
Here you define the reason for dunning block reason under a key. It can be defined for an item or for a customer master. Blocked item or customer account are not considered for dunning reason.
SAP FI - Exchange Rates
Exchange Rates are used to define a relationship between two currencies and also to maintain exchange rates that are used to translate an amount into another currency.
You define exchange rates in the system for the following purposes −
Posting and Clearing − To translate amounts posted or cleared in foreign currency, or to check a manually entered exchange rate during posting or clearing.
Exchange Rate Differences − To determine gains or losses from exchange rate differences.
Foreign Currency Valuation − To valuate open items in foreign currency and foreign currency balance sheet accounts as part of the closing operations.
Go to SPRO → SAP Reference IMG → SAP Netweaver → General Settings → Currencies → Enter Exchange Rates → Execute.
Exchange rates can be entered as direct or indirect quotations. In direct quotation, we give multiple of base currency to foreign currency.
Example − 1 USD = 65 × 1 INR
For indirect quotation, it will be 1/65 USD = 1 INR.
How to create direct/indirect quotation in SAP FI?
In the next window, enter the following details −
- Exchange Rate Type.
- Valid From date that is the start date from which the rates are applicable.
- First Currency.
- Quotation Rate.
- Second Currency.
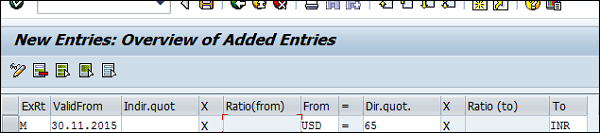
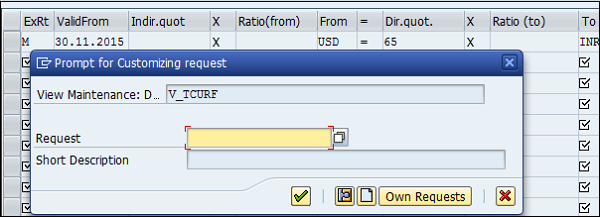
After entering the details, click the Save button. Enter the request number and click the tick mark.
SAP - Tables in FI Module
| FBAS | Financial Accounting Basis | |
| BKPF | Accounting Document Header | MANDT / BUKRS / BELNR / GJAHR |
| BSEG | Accounting Document Segment | MANDT / BUKRS / BELNR / GJAHR / BUZEI |
| BSIP | Index for Vendor Validation of Double Documents | MANDT / BUKRS / LIFNR / WAERS / BLDAT / XBLNR / WRBTR / BELNR / GJAHR / BUZEI |
| BVOR | Inter Company Posting Procedure | MANDT / BVORG / BUKRS / GJAHR / BELNR |
| EBKPF | Accounting Document Header (docs from External Systems) | MANDT / GLSBK / BELNR / GJHAR / GLEBK |
| FRUN | Run Date of a Program | MANDT / PRGID |
| KLPA | Customer / Vendor Linking | MANDT / NKULI / NBUKR / NKOAR / PNTYP / VKULI / VBUKR / VKOAR |
| KNB4 | Customer Payment History | MANDT / KUNNR / BUKRS |
| KNB5 | Customer Master Dunning Data | MANDT / KUNNR / BUKRS / MABER |
| KNBK | Customer Master Bank Details | MANDT / KUNNR / BANKS / BANKL / BANKN |
| KNC1 | Customer Master Transaction Figures | MANDT / KUNNR / BUKRS / GJHAR |
| KNC3 | Customer Master Special GL Transactions Figures | MANDT / KUNNR / BUKRS / GJAHR / SHBKZ |
| LFB5 | Vendor Master Dunning Data | MANDT / LIFNR / BUKRS / MABER |
| LFBK | Vendor Master Bank Details | MANDT / LIFNR / BANKS / BANKL / BANKN |
| LFC1 | Vendor Master Transaction Figures | MANDT / LIFNR / BUKRS / GJHAR |
| LFC3 | Vendor Master Special GL Transactions Figures | MANDT / LIFNR / BUKRS / GJHAR / SHBKZ |
| VBKPF | Document Header for Document Parking | MANDT / AUSBK / BUKRS / BELNR / GJHAR |
| FBASCORE | Financial Accounting General Services Basis | |
| KNB1 | Customer Master (Company Code) | MANDT / KUNNR / BUKRS |
| LFA1 | Vendor Master (General Section) | MANDT / LIFNR |
| LFB1 | Vendor Master (company Code Section) | MANDT / LIFNR / BUKRS |
| SKA1 | G/L Account Master (Chart of Accounts) | MANDT / KTOPL / SAKNR |
| SKAT | G/L Account Master (Chart of Accounts Description) | MANDT / SPRAS / KTOPL / SAKNR |
| MAHNS | Accounts Blocked by Dunning Selection | MANDT / KOART / BUKRS / KONKO / MABER |
| MHNK | Dunning Data (Account Entries) | MANDT / LAUFD / LAUFI / KOART / BUKRS / KUNNR / LIFNR / CPDKY / SKNRZE / SMABER / SMAHSK / BUSAB |
| FI-GL-GL (FBS) | General Ledger Accounting: Basic Functions- G/L Accounts | |
| SKAS | G/L Account Master (Chart of Accounts Key Word list) | MANDT / SPRAS / KTOPL / SAKNR / SCHLW |
| SKB1 | G/L Account Master (Company Code) | MANDT / BUKRS / SAKNR |
| FI-GL-GL (FBSC) | General Ledger Accounting: Basic Functions - R/3 Customizing for G/L Accounts | |
| FIGLREP | Settings for G/L Posting Reports | MANDT |
| TSAKR | Create G/L account with reference | MANDT / BUKRS / SAKNR |
| FI-GL-GL (FFE) | General Ledger Accounting: Basic Functions - Fast Data Entry | |
| KOMU | Account Assignment Templates for G/L Account items | MANDT / KMNAM / KMZEI |
| FI-AR-AR (FBD) | Accounts Receivable: Basic Functions - Customers | |
| KNKA | Customer Master Credit Management : Central Data | MANDT / KUNNR |
| KNKK | Customer Master Credit Management : Control Area Data | MANDT / KUNNR / KKBER |
| KNKKF1 | Credit Management : FI Status data | MANDT / LOGSYS / KUNNR / KKBER / REGUL |
| RFRR | Accounting Data A/R and A/P Information System | MANDT / RELID / SRTFD / SRTF2 |
| FI-BL-PT (BFIBL_CHECK_D) | Bank Accounting: Payment Transactions General Sections | |
| PAYR | Payment Medium File | MANDT / ZBUKR / HBKID / HKTID / RZAWE / CHECT |
| PCEC | Pre-numbered Check | MANDT / ZBUKR / HBKID / HKTID / STAPL |
| FI-BL-PT-AP(FMZA) | Bank Accounting: Payment Transactions Automatic Payments | |
| F111G | Global Settings for Payment Program for Payment Requests | MANDT |
| FDZA | Cash Management Line Items in Payment Requests | MANDT / KEYNO |
| PAYRQ | Payment Requests | MANDT / KEYNO |
| FI-AA-AA (AA) | Asset Accounting: Basic Functions Master Data | |
| ANKA | Asset Classes: General Data | MANDT / ANLKL |
| ANKP | Asset Classes: Fld Cont Dpndnt on Chart of Depreciation | MANDT / ANLKL / AFAPL |
| ANKT | Asset Classes: Description | MANDT / SPRAS / ANLKL |
| ANKV | Asset Classes: Insurance Types | MANDT / ANLKL / VRSLFD |
| ANLA | Asset Master Record Segment | MANDT / BUKRS / ANLN1 / ANLN2 |
| ANLB | Depreciation Terms | MANDT / BUKRS / ANLN1 / ANLN2 / AFABE / BDATU |
| ANLT | Asset Texts | MANDT / SPRAS / BUKRS / ANLN1 / ANLN2 |
| ANLU | Asset Master Record User Fields | .INCLUDE / MANDT / BUKRS / ANLN1 / ANLN2 |
| ANLW | Insurable Values (Year Dependent) | MANDT / BUKRS / ANLN1 / ANLN2 / VRSLFD / GJAHR |
| ANLX | Asset Master Record Segment | MANDT / BUKRS / ANLN1 / ANLN2 |
| ANLZ | Time Dependent Asset Allocations | MANDT / BUKRS / ANLN1 / ANLN2 / BDATU |
| FI-AA-AA (AA2) | Asset Accounting: Basic Functions Master Data 2.0 | |
| ANAR | Asset Types | MANDT / ANLAR |
| ANAT | Asset Type Text | MANDT / SPRAS / ANLAR |
| FI-AA-AA (AB) | Asset Accounting: Basic Functions Asset Accounting | |
| ANEK | Document Header Asset Posting | MANDT / BUKRS / ANLN1 / ANLN2 / GJAHR / LNRAN |
| ANEP | Asset Line Items | MANDT / BUKRS / ANLN1 / ANLN2 / GJAHR / LNRAN / AFABE |
| ANEV | Asset Downpymt Settlement | MANDT / BUKRS / ANLN1 / ANLN2 / GJAHR / LNRANS |
| ANKB | Asset Class: Depreciation Area | MANDT / ANLKL / AFAPL / AFABE / BDATU |
| ANLC | Asset value Fields | MANDT / BUKRS / ANLN1 / ANLN2 / GJAHR / AFABE |
| ANLH | Main Asset Number | MANDT / BUKRS / ANLN1 |
| ANLP | Asset Periodic Values | MANDT / BUKRS / GJAHR / PERAF / AFBNR / ANLN1 / ANLN2 / AFABER |
| FI-SL-VSR (GVAL) | Special Purpose Ledger: Validation, Substitution and Rules | |
| GB03 | Validation / Substitution User | VALUSER |
| GB92 | Substitutions | MANDT / SUBSTID |
| GB93 | Validation | MANDT / VALID |
SAP FI - AR Invoice Processes
In addition to invoicing processes delivered by SAP, you can define your own invoicing processes. For each process, you can adjust the behavior of the SAP invoicing program to your own requirements such that only the required invoicing functions are run and under the consideration of your individual settings for these functions. This flexibility is in addition to non-modification enhancement which includes BAdIs, and events.
Invoicing processes are used as selection parameters for mass activities for "Invoicing in Contract Accounts Receivable and Payable".
Number ranges for invoicing documents are defined dependent on the invoicing processes.
Invoicing processes are a differentiation characteristic for the activation of optional invoicing functions.
The individual process steps of "Invoicing in Contract Accounts Receivable and Payable" are explained below.
Process Steps: Invoice Processes
Invoice processes involve the following steps −
Data Selection − In data selection, the invoicing orders are selected for the invoicing process. You define the selection criteria for the data selection for the invoicing process.
Creation of Invoicing Units − The invoicing orders selected are grouped into invoicing units for each contract account. You can create several invoicing units for each contract account. For each invoicing unit, "Invoicing in Contract Accounts Receivable and Payable" creates one invoicing document. You define the criteria for creating the invoicing units for the invoicing process.
Processing of Billing Documents − The billing documents selected for an invoicing unit are included in the invoicing document. The billing document items are linked with the items of the invoicing document, and the derivations required for the posting in "Contract Accounts Receivable and Payable" (FI-CA) are performed.
Performance of Additional Functions − In addition to processing billing documents, in "Invoicing in Contract Accounts Receivable and Payable" , you can integrate further functions of FI-CA. For example, interest calculation, creation of dunning proposals, or the calculation of charges and discounts. You define which additional functions are performed for each invoicing process.
Account Maintenance − Using the account maintenance integrated in "Invoicing in Contract Accounts Receivable and Payable", you can perform clearing between the posting documents entered in Invoicing and the open items of the contract account posted before invoicing. You define the criteria for clearing in the clearing control.
Update − The invoicing document created for the invoicing unit and the posting documents are written to the database. The invoicing orders processed are deleted. As well as the invoicing unit, a correspondence container for invoice printing and an extraction order for the update to BW are created.
SAP FI - AR Account Analysis
There are many types of reports that can be used for account analysis (A/R) −
- Customer Line Item Analysis
- Balance Analysis
- Customer Evaluation Report
Customer Line item Analysis
T-code: FBL5N
Customer line item report will be generated based on the open items, cleared items, and all items. It has options available to see transactions based on type: i.e., special G/L, Noted items, Parked items and vendor items.
Customer Balance
T-code: FD10N
This report will be generated as customer-wise / period-wise balances, including debit and credit amount separately. It will also display the balances related to special G/L under different form and gives the total.
Balances of open Sales Invoice, Debit note and Credit note is available under separate columns in the same report. Users have the facility to incorporate required fields by changing the report layout.
Customer Evaluations
T-code: F.30
This report helps in analyzing customer open transactions company-wise, group-wise, Credit control, etc. Users can define open transactions criteria based on due date, payment history, currency analysis, overdue items etc.
SAP T-codes to be used for Account Analysis in SAP FI −
- Customer line item display : FBL5N
- Customer Balance Display : FD10N
- Accounts Receivable info system : F.30
SAP FI - AR Reporting
There are various reports that you can generate in Account Receivable. Following are the common reports in SAP FI AR along with their T-codes used to generate the report −
Bill Holdings (Bill of Exchange Receivable List with ALV facility): S-ALR_87009987
Customer Balances in Local Currency: S_ALR_87012172
Customer Line Items: S_ALR_87012197
Due Dates Analysis for Open Items: S_ALR_87012168
List of Customer Open Items: S_ALR_87012173
Customer Evaluation with Open Item Sorted List: S_ALR_87012176
Customer Payment History: S_ALR_87012177
Customer Open Item Analysis (Overdue Items Balance): S_ALR_87012178
List of Customer Cleared Line Items: S_ALR_87012198
List of Down Payments open at key date: S_ALR_87012199
Debit & Credit Notes Register u2013 Monthly: S_ALR_87012287
Customer-wise Sales: S_ALR_87012186
SAP FI - AA Overview
The FI-Asset Accounting (FI-AA) component is used for managing the fixed assets in FI system. In Financial Accounting, it serves as a subsidiary ledger to the General Ledger, providing detailed information on transactions involving fixed assets.
Integration with other components − As a result of the integration in the SAP system, Asset Accounting (FI-AA) transfers data directly to and from other SAP components.
Example
It is possible to post from the Materials Management (MM) component directly to FI-AA. When an asset is purchased or produced in-house, you can directly post the invoice receipt or goods receipt, or the withdrawal from the warehouse, to assets in the "Asset Accounting" component.
At the same time, you can pass on depreciation and interest directly to the "Financial Accounting" (FI) and "Controlling" (CO) components. From the "Plant Maintenance" (PM) component, you can settle maintenance activities that require capitalization to assets.
Components of Asset Accounting
The "Asset Accounting" component consists of the following parts −
- Traditional asset accounting
- Processing leased assets
- Preparation for consolidation
- Information System
Traditional asset accounting encompasses the entire lifetime of the asset from purchase order or the initial acquisition through its retirement. The system calculates, to a large extent automatically, the values for depreciation, interest, insurance and other purposes between these two points in time, and places this information at your disposal in varied from using the Information System. There is a report for depreciation forecasting and simulation of the development of asset values.
The system also offers special functions for leased assets, and assets under construction. The system enables you to manage values in parallel currencies using different types of valuation. These features simplify the process of preparing for the consolidation of multinational group concerns.
The "Plant Maintenance" (PM) component offers functions for the technical management of assets in the form of functional locations and as equipment. The "Treasury" (TR) component offers special functions for managing financial assets.
Create New Asset Classes
Use the T-code OAOA or go to SPRO → SAP Reference IMG → Financial Accounting → Asset Accounting → Organizational Structure → Asset Classes → Define Asset Classes → Execute.
Click New Entries as shown in the following screenshot.

In the next screen, enter the following details −
- Asset class and Short Text
- Asset Type details
- Number Range from number assignment
- Select include asset under inventory
You can also select Asset under construction (AuC).
Click the Save icon to configure the asset class.
SAP FI - AA Asset Explorer
This function shows all the values of a fixed asset, including APC values and depreciation, in various forms and summarization levels. Planned values are displayed as well as the values already posted. You use this function to display and analyze asset values.
Components of Asset Explorer
Asset Explorer consists of the following components −
Header − This is the field where you enter the company code and asset number.
Overview tree − Using overview tree, you can navigate between different depreciation areas. Overview tree displays objects related to the asset.
Tab − This is where you analyze plan values and posted values using different parameters, and compare fiscal years and depreciation areas.
Note − The Asset Explorer uses ALV Grid Control for its table display. You can use it to specify the contents of the columns.
Header
With the company code and main asset number, you can also enter the asset sub-number. If you enter an asterisk (*) in the sub number field, the Asset Explorer shows all transactions and depreciation of all sub numbers of the asset main number. Use This graphic is explained in the accompanying text and This graphic is explained in the accompanying text icons to navigate to different fiscal years.
Overview Tree for Depreciation Areas
Choose the pushbutton above the overview tree, or this graphic is explained in the accompanying text Display master data function, to reach the display transaction for asset master data.
To navigate between depreciation areas in the overview tree, select the depreciation area you want. Icons indicate the type of depreciation area. This graphic is explained in the accompanying text icon indicates a real depreciation area, and the This graphic is explained in the accompanying text icon indicates a derived depreciation area.
Overview Tree for Related Objects
The system automatically searches for objects related to the asset, such as cost center, equipment, G/L account, WBS element, and displays them in an overview tree. From this overview tree, you can jump directly to the display transaction of the given master data.
There are additional options if the asset was created or posted from a purchase order. In that case, you can double click on the Purchase Orders folder to go to a report that displays all Materials Management documents that are linked to the asset.
When you enter an asterisk (*) for the sub-number in the Asset Explorer, the search for related objects is deactivated. On the Planned Values, Posted Values, and Comparisons tab pages, the system shows the total of all sub-numbers for all fields. On the Parameters tab page, the individual parameters are displayed only if they are the same for the main number and all sub-numbers. If they are not all the same (for example, the main asset and sub-numbers have different useful lives), then the field is shown with an asterisk (*).
The Transactions subscreen shows all transactions for all the sub-numbers. The display of planned/posted depreciation per period shows the total of all sub-numbers for each period. When you jump to other Asset Accounting reports, these are started without being limited to a sub-number. The report then displays all sub-numbers.
Limitations of using an asterisk (*) for the sub-number
Display of the depreciation trace (RATRACE0N) − The trace always relates to a specific asset and it is not possible to add assets together. The report is started for the asset that has the lowest sub-number.
Display of asset master record (AS03) − It is started for the first existing asset.
SAP FI - Cash Management
The Cash Management field in SAP FI is used to manage cash flows and to ensure that you have sufficient liquidity to cover your payment obligations.
Integration with other SAP components
SAP FI Cash Management is a sub-component of Financial Supply Chain Management. It can be integrated with a range of other SAP components.
Example − The liquidity forecast in a medium- to long-term liquidity trend integrates expected incoming and outgoing payments in financial accounting, purchase, and sales.
Features of Cash Management
SAP FI Cash Management Incomings area covers the following topics −
- Electronic and manual bank statements
- Electronic and manual check deposits
- Bill of exchange presentation
- Memo record
- Polling
- Payments
- Lockbox
Compare payment advices, "Interest calculation "and "Returned vendor checks" are dealt with the Checks topic.
Cash concentration can be found in the Planning topic. Planning also deals with the "payment program", "payment requests", "bill of exchange presentation", "memo record "and "telephone list".
The tools topic covers the "distribution" to cash management systems.
The Information System topic deals among other things with the "Liquidity forecast."
Further topics include: Payment advice journal, Compare and check "and "Reconciliation with cash management.
In the Environment area, you will find functions for transferring market data to the SAP system. Market data can be transferred using the file interface, real-time data feed, or via a spreadsheet.
SAP CO - Overview
SAP Controlling (CO) is another important SAP module offered to an organization. It supports coordination, monitoring, and optimization of all the processes in an organization. SAP CO involves recording both the consumption of production factors and the services provided by an organization.
SAP CO includes managing and configuring master data that covers cost and profit centers, internal orders, and other cost elements and functional areas.
The main purpose of SAP controlling module is planning. It enables you to determine variances by comparing actual data with plan data and thus enables you to control business flows in your organization.
SAP CO Integration with Financial Accounting
Both SAP CO and SAP FI modules are independent components in a SAP system. The data flow between these components takes place on a regular basis.
Data flows relevant to cost flows to Controlling from Financial Accounting. At the same time, the system assigns the costs and revenues to different CO account assignment objects, such as cost centers, business processes, projects or orders.
SAP CO - Submodules
The key submodules of SAP controlling system are listed below −
Cost Element Accounting − Cost and Revenue Element Accounting provides you with an overview of the costs and revenues that occur in an organization. Most of the values are moved automatically from Financial Accounting to Controlling. Cost and Revenue Element Accounting only calculates costs which either do not have another expense or only one expense in Financial Accounting.
Cost Center Accounting − Cost Center Accounting is used for controlling purposes within your organization.
Activity-Based-Accounting − It is used to analyze cross-departmental business processes.
Internal Orders − Internal orders in SAP CO are used to collect and control according to the job that incurred them. You can assign budgets for these jobs that is system monitored to ensure that they are not exceeded from the set budgets.
Product Cost Controlling − It calculates the cost for manufacture a product, or to provide a service. It allows you to calculate the price at which you can profitably marketed it.
Profitability Analysis − It is used to analyze the profit or loss of an organization by individual market segments. Profitability Analysis provides a basis for decisionmaking. For example, it is used to determine price, conditioning, customer, distribution channel, and market segment.
Profit Center Accounting − It is used to evaluate profit or loss of individual, independent areas within an organization. These areas are responsible for their costs and revenues.
SAP CO - Cost Center
A Cost Center is defined as a component in an organization that adds to the cost and indirectly adds to the profit of the organization. Examples include Marketing and Customer Service.
A company can classify a business unit in three ways −
- Profit center,
- Cost center, or
- Investment center.
The simple and straightforward division in an organization can be classified as cost center because cost is easy to measure.
Cost Center Hierarchy
The hierarchy of a cost center looks as follows −
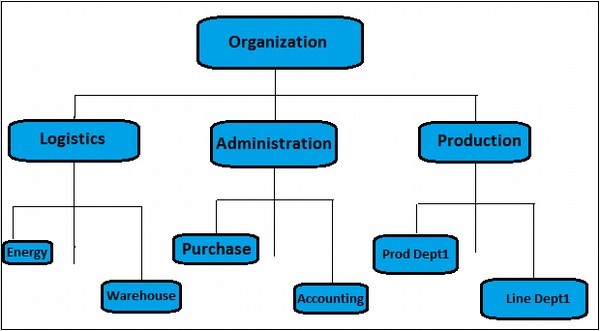
SAP CO - Create Cost Center
To create a cost center, use the T-code KS01. It will open the following window.
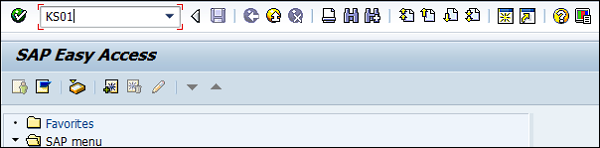
Enter the Controlling Area in the next screen and click the tick mark.
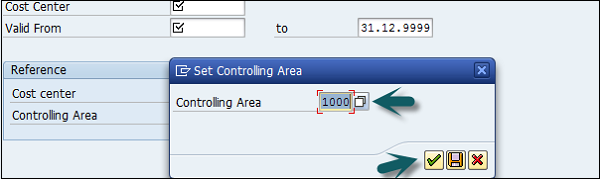
In the next window, enter the following details and click the Master Data.
- New cost center number.
- Validity dates of the new cost center.
You can also create a new cost center with a reference.
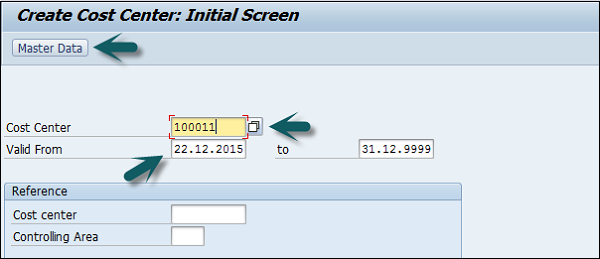
Once you click Master Data, a new window will open. Enter the following details in the basic data tab −
- Enter the name of the new cost center.
- Enter a description for the new cost center.
- Enter the User and Person Responsible.
- Cost Center Category.
- Hierarchy area.
- Company Code.
- Profit Center.
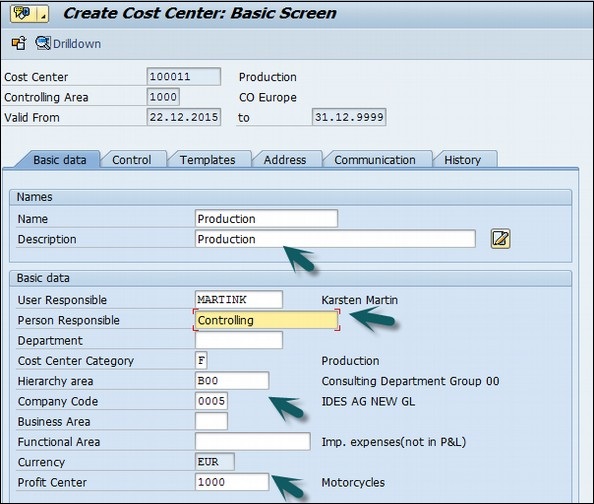
Next, click the Control tab and select the correct indicator.

At the end, click the save icon at the top.
SAP CO - Post to a Cost Center
To post to a cost center, use the T-code FB50. It will take you to the following window.
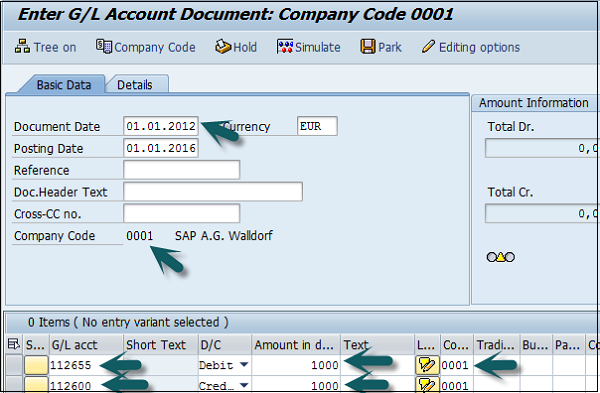
In this window, you need to enter the following details −
- Document date
- Company code
- G/L Account for the Debit Entry which is to be posted to the Cost Center
- Debit Amount
- Cost Center in which the Amount is to be posted
- G/L Account for Credit Entry
- Credit Amount
Click the Save button at the top to post to this cost center.
SAP CO - Internal Orders
SAP CO internal order monitors the parts of the costs and in a few cases, it also monitors the revenues of the organization.
You can create an internal order to monitor the costs of a time-restricted job or the costs for the production of activities. Internal orders can also be used for the long-term monitoring of costs.
Investment cost related to fixed assets are monitored using Investment orders.
Period-related accrual calculation between expenses in FI and the costing-based costs debited in Cost Accounting are monitored using Accrual orders.
Costs and revenues incurred for activities for external partners or for internal activities that do not form a part of the core business for your organization are monitored using order with revenues.
How to create an Internal Order in SAP CO?
Use the T-code KO04 or go to Accounting → Controlling → Internal Orders → Master Data → Order Manager.

In the next screen, input the controlling area as shown below −

Click the Create button at the top to create a new internal order and enter the order type.
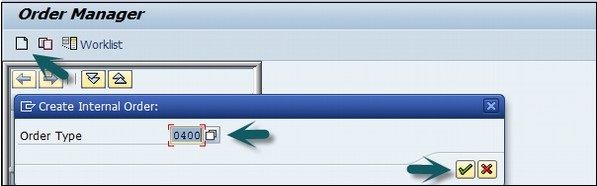
In the next window, enter the following details −
- Company Code
- Business area
- Object Class of the Order
- Profit Center
- Cost Center responsible for the internal order
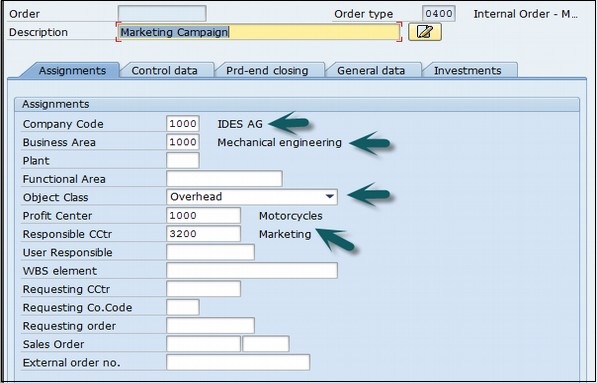
After entering the above details, click the Save button at the top to create the internal order.

SAP CO - Settlement of IO
An internal order is used as an interim collector of costs and is used for planning, monitoring, and controlling the processes. When the job has been completed, you settle the costs to one or more receivers like cost centers, fixed assets, etc.
How to perform settlement of IO to Cost Centers?
Use the T-code: KO02 or Go to Accounting → Controlling → Internal Orders → Master Data → Special Functions → Change.
A new window will open. Enter the Order number for which settlement is to be done.
Click the Settlement rule button at the top −

Enter the following details −
- In Category column, enter 'CTR' for the cost center.
- In Settlement receiver Column, enter the Cost Center in which the Order is to be settled.
- Enter the percentage amount which is to be settled.
- In Settlement type, enter 'PER' for periodic settlement.
Click the save button at the top to save the settlement rule and come back to the main screen.
Enter the T-code KO88 and input the following details −
- Order for which the settlement rule is maintained.
- Period for settlement.
- Fiscal Year.
- Uncheck the Test Run.
- Click on the Execute Button to run the settlement.
A new window will open with a Settlement display message. Click the Continue button to complete the processing.
SAP CO - Profit Center
SAP CO Profit Center is used for managing internal controlling. When you divide your company into profit centers, it allows you to delegate responsibility to decentralized units and treat them as separate companies in a company. It also allows you to calculate key figures in cost accounting like ROI, Cash flow, etc.
Profit Center is a part of Enterprise Controlling module and is integrated with a new General Ledger Accounting.
Key Features of SAP CO Profit Center
Profit Center Accounting is used to determine profit for internal areas of responsibility. It lets you determine profits and losses using either period accounting or the cost-of-sales approach.
It allows you to analyze fixed assets by profit center, thus using them as investment centers. It allows to expand profit centers to investment centers.
Why Do We Create Profit Center?
The main aim of creating a Profit Center in SAP CO is to analyze the cost of a product line or a business unit.
You can also generate P&L accounts according to a Profit Center and also generate balance sheets, however a Profit Center should only be used for internal reporting purpose.
The key components of a profit center include name of the profit center, the controlling area under which it is assigned, time period, person responsible for the profit center, standard hierarchy, etc.
How to Create a Profit Center?
Use the T-code KE51 or go to Accounting → Controlling → Profit Center Accounting → Master Data → Profit Center → Individual Processing → Create.
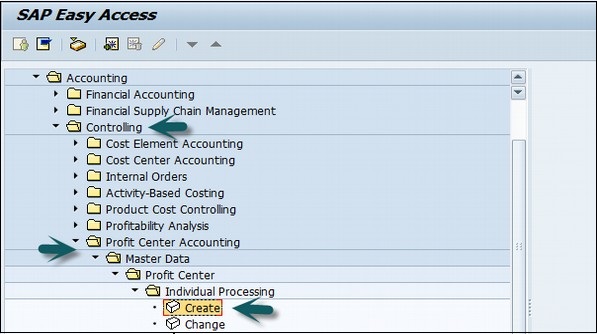
In the next screen, enter the controlling area in which the profit center is to be created and click the tick mark.
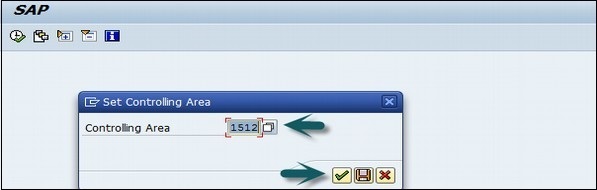
In the next screen, enter the unique profit center ID and click Master Data.
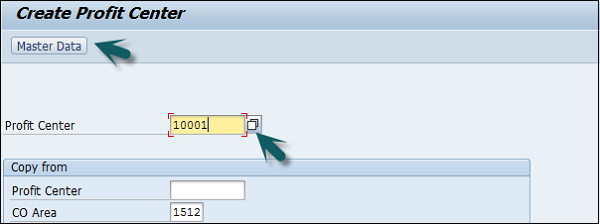
A new window will open where you need to input the following details −
- Profit center name and a short description of the profit center.
- Person responsible for the profit center.
- Profit center group for which the profit center belongs to.
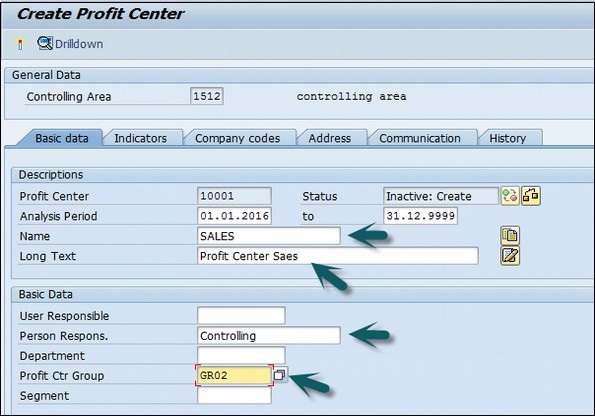
Click the Save icon at the top to create the profit center in inactive mode. To activate the profit center, click the icon as shown in the following screenshot.
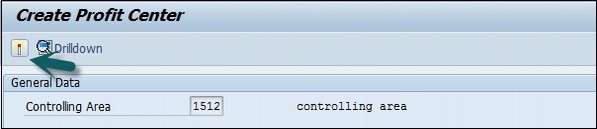
How to Create a Profit Center Group?
Use the T-code KCH1 or go to Accounting → Controlling → Profit Center Accounting → Master Data → Profit Center Group → Create.
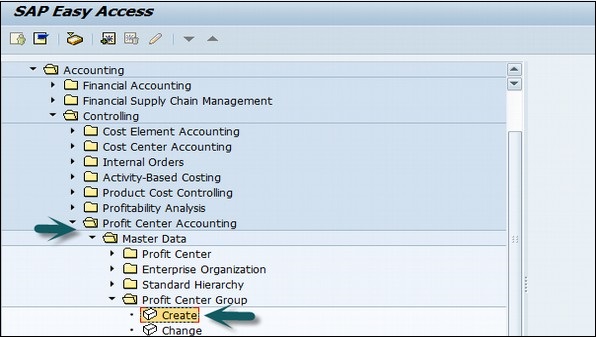
Enter the Controlling Area in which the Profit Center is to be created.
Enter the Unique Profit Center Group Id as shown below and press Enter.
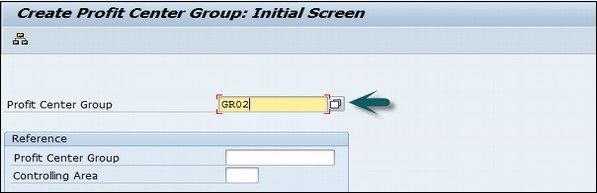
Enter the short description for the profit center group and click the Save icon at the top.

SAP CO - Postings to Profit Center
To post to a Profit Center, use the T-code FB50. It will take you to the following window.
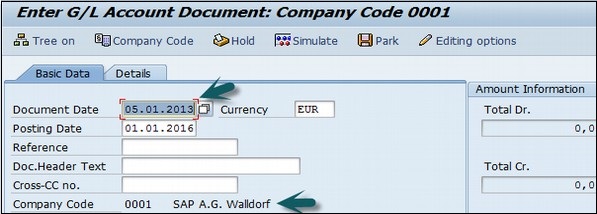
Enter the Document date and the Company code. Thereafter, provide input data in the fields as shown in the following screenshot.

After entering the line items, select the debit line item and click the button Detail Item button. Refer the following screenshot.

A new window will open. Enter the Profit Center and click the Save icon at the top.
SAP CO - Profit Center Standard Hierarchy
SAP CO Profit Center standard hierarchy, known as tree structure, that contains all the profit centers in a controlling area.
If you want to create/change the structure of a standard hierarchy, it can be done at two places −
- In the Profit Center Accounting
- In Customizing for Profit Center Accounting
How to Create Profit Center Standard Hierarchy?
Use the T-code KCH1 or go to Accounting → Controlling → Profit Center Accounting → Master Data → Standard Hierarchy → Create.
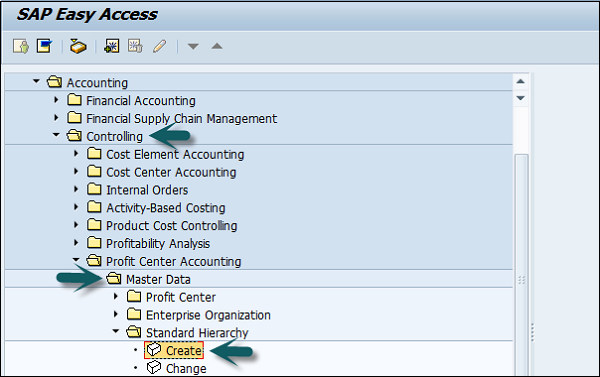
In the next screen, enter the Controlling Area for which you want to create a Standard hierarchy.
Enter the Profit Center Group and click Hierarchy at the top and enter the sub-nodes of the Profit Center Standard Hierarchy.
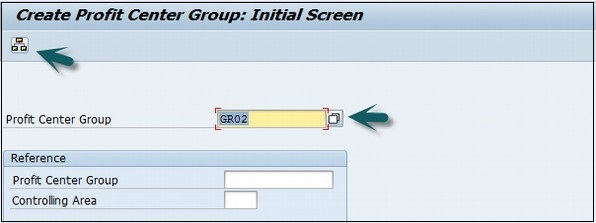
Click the Lower level button to create a hierarchy. Click the Profit center to assign a Profit Center group.
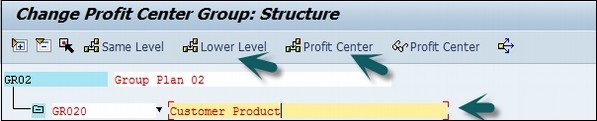
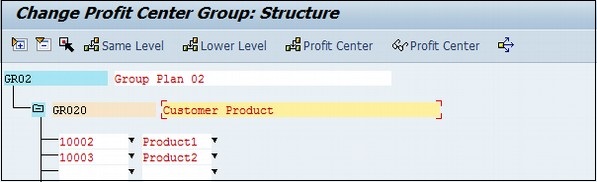
Click the Save button at the top and you will get a confirmation message.
SAP CO - Assigning Cost to Profit Centers
Go to SPRO → SAP Reference IMG → Controlling → Profit Center Accounting → Assignments of Account Assignment objects to Profit Center → Assign Cost Centers → Execute.
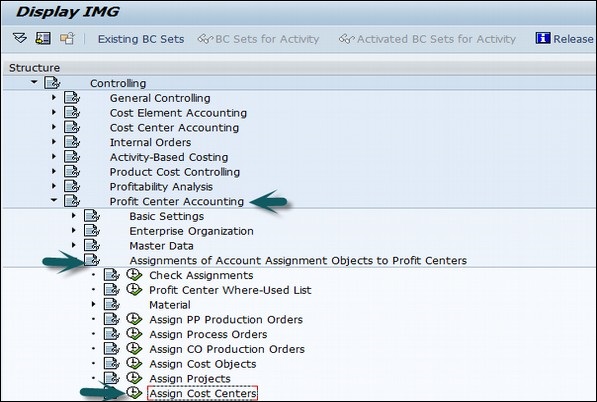
Enter the Cost center to be assigned to the Profit center.
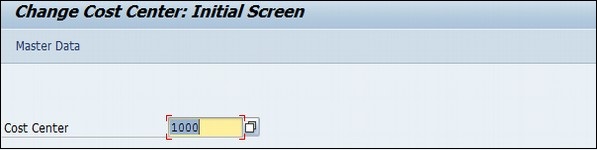
In the next screen, enter the profit center to which the cost center is assigned and click the Save icon at the top.
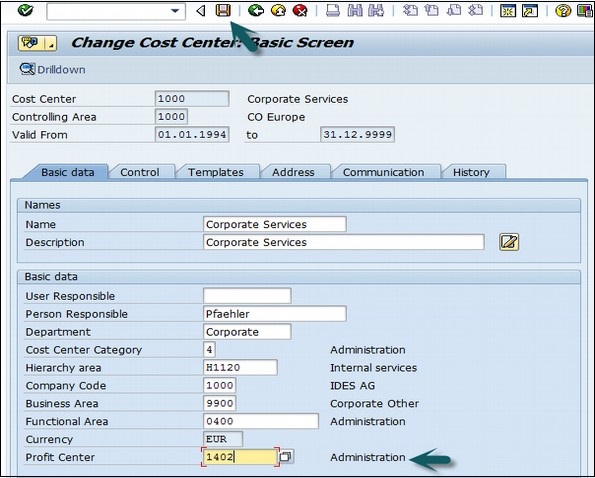
SAP CO - Assigning Materials to Profit Center
Go to SPRO → SAP Reference IMG → Controlling → Profit Center Accounting → Assignments of Account Assignment objects to Profit Center → Material → Assign Material Masters → Execute.
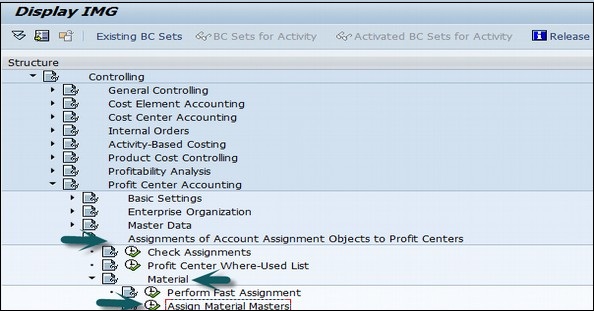
A new window will open. Enter the material Id for which the profit center is to be assigned and press Enter.
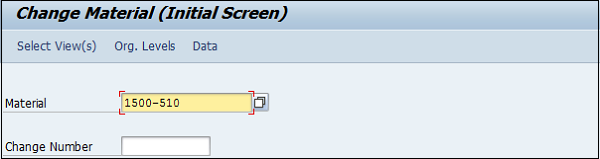
Select the view of the material master.
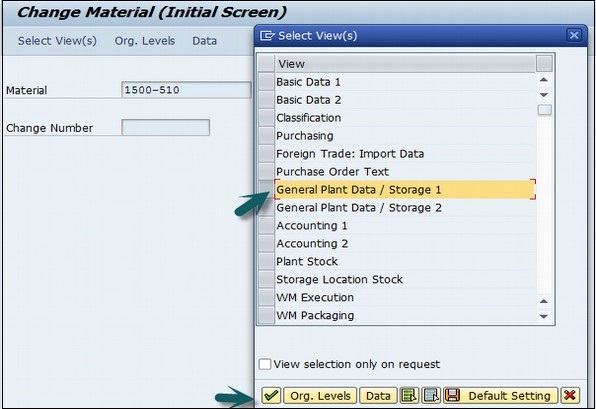
In the next window, enter the following details −
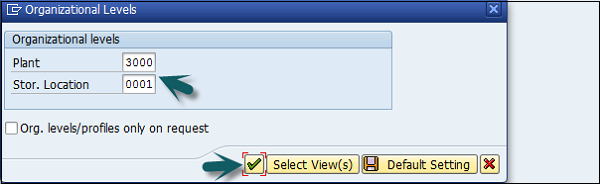
In the next window, enter the Profit Center and click the Save icon at the top.
SAP CO - Tables in Module
| Important Tables in SAP CO | ||
|---|---|---|
| AUSP | Characteristic Values | MANDT / OBJEK / ATINN / ATZHL / MAFID / KLART / ADZHL |
| CO-KBAS | Overhead Cost Controlling | |
| A132 | Price per Cost Center | MANDT / KAPPL / KSCHL / KOKRS / VERSN / RESRC / KOSTL / DATBI |
| A136 | Price per Controlling Area | MANDT / KAPPL / KSCHL / KOKRS / VERSN / RESRC / DATBI |
| A137 | Price per Country / Region | MANDT / KAPPL / KSCHL / KOKRS / VERSN / RESRC / LAND1 / REGIO / DATBI |
| COSC | CO Objects: Assignment of Original Costing Sheets | MANDT / OBJNR / SCTYP / VERSN / GJAHR |
| CSSK | Cost Center / Cost Element | MANDT / VERSN / KOKRS / GJAHR / KOSTL / KSTAR |
| CSSL | Cost Center / Activity Type | MANDT / KOKRS / KOSTL / LSTAR / GJAHR |
| KAPS | CO Period Locks | MANDT / KOKRS / GJAHR / VERSN / VRGNG / PERBL |
| COKBASCORE | Overhead Cost Controlling: General Services | |
| CSKA | Cost Elements (Data Dependent on Chart of Accounts) | MANDT / KTOPL / KSTAR |
| CSKB | Cost Elements (Data Dependent on Controlling Area) | MANDT / KOKRS / KSTAR / DATBI |
| CSKS | Cost Center Master Data | MANDT / KOKRS / KOSTL / DATBI |
| CSLA | Activity Master | MANDT / KOKRS / LSTAR / DATBI |
| CO-OM (KACC) | Overhead Cost Controlling | |
| COBK | CO Object: Document Header | MANDT / KOKRS / BELNR |
| COEJ | CO Object: Line Items (by Fiscal Year) | MANDT / KOKRS / BELNR / BUZEI / PERBL |
| COEJL | CO Object: Line Items for Activity Types (by Fiscal Yr) | MANDT / KOKRS / BELNR / BUZEI / PERBL |
| COEJR | CO Object: Line Items for SKF (by Fiscal Year) | MANDT / KOKRS / BELNR / BUZEI / PERBL |
| COEJT | CO Object: Line Items for Prices (by Fiscal Year) | MANDT / KOKRS / BELNR / BUZEI / PERBL |
| COEP | CO Object: Line Items (by Period) | MANDT / KOKRS / BELNR / BUZEI |
| COEPL | CO Object: Line Items for Activity Types (by Period) | MANDT / KOKRS / BELNR / BUZEI |
| COEPR | CO Object: Line Items for SKF (by Period) | MANDT / KOKRS / BELNR / BUZEI |
| COEPT | CO Object: Line Items for Prices (by Period) | MANDT / KOKRS / BELNR / BUZEI |
| COKA | CO Object: Control Data for Cost Elements | MANDT / OBJNR / GJAHR / KSTAR / HRKFT |
| COKL | CO Object: Control Data for Activity Types | MANDT / LEDNR / OBJNR / GJAHR / VERSN |
| COKP | CO Object: Control Data for Primary Planning | MANDT / LEDNR / OBJNR / GJAHR / WRTTP / VERSN / KSTAR / HRKFT / VRGNG / VBUND / PARGB / BEKNZ / TWAER |
| COKR | CO Object: Control Data for Statistical Key Figures | MANDT / LEDNR / OBJNR / GJAHR / WRTTP / VERSN / STAGR / HRKFT / VRGNG |
| COKS | CO Object: Control Data for Secondary Planning | MANDT / LEDNR / OBJNR / GJAHR / WRTTP / VERSN / KSTAR / HRKFT / VRGNG / PAROB / USPOB / BEKNZ / TWAER |
| CO-OM-CEL (KKAL) | Cost Element Accounting (Reconciliation Ledger) | |
| COFI01 | Object Table for Reconciliation Ledger COFIT | MANDT / OBJNR |
| COFI02 | Transaction Dependent Fields for Reconciliation Ledger | MANDT / OBJNR |
| COFIP | Single Plan Items for Reconciliation Ledger | RCLNT / GL_SIRID |
| COFIS | Actual Line Items for Reconciliation Ledger | RCLNT / GL_SIRID |
| CO-OM-CCA | Cost Center Accounting (Cost Accounting Planning) | |
| A138 | Price per Company Code | MANDT / KAPPL / KSCHL / KOKRS / VERSN / RESRC / BUKRS / GSBER / DATBI |
| A139 | Price per Profit Center | MANDT / KAPPL / KSCHL / KOKRS / VERSN / RESRC / PRCTR / DATBI |
| CO-OMOPA(KABR) | Overhead Orders: Application Development R/3 Cost Accounting Settlement | |
| AUAA | Settlement Document: Receiver Segment | MANDT / BELNR / LFDNR |
| AUAB | Settlement Document: Distribution Rules | MANDT / BELNR / BUREG / LFDNR |
| AUAI | Settlement Rules per Depreciation Area | MANDT / BELNR / LFDNR / AFABE |
| AUAK | Document Header for Settlement | MANDT / BELNR |
| AUAO | Document Segment: CO Objects to be Settled | MANDT / BELNR / LFDNR |
| AUAV | Document Segment: Transactions | MANDT / BELNR / LFDNR |
| COBRA | Settlement Rule for Order Settlement | MANDT / OBJNR |
| COBRB | Distribution Rules Settlement Rule Order Settlement | MANDT / OBJNR / BUREG / LFDNR |
| CO-OM-OPA (KAUF) | Overhead Orders: Cost Accounting Orders | |
| AUFK | Order Master Data | MANDT / AUFNR |
| AUFLAY0 | Entity Table: Order Layouts | MANDT / LAYOUT |
| EC-PCA (KE1) | Profit Center Accounting | |
| CEPC | Profit Center Master Data Table | MANDT / PRCTR / DATBI / KOKRS |
| CEPCT | Texts for Profit Center Master Data | MANDT / SPRAS / PRCTR / DATBI / KOKRS |
| CEPC_BUKRS | Assignment of Profit Center to a Company Code | MANDT / KOKRS / PRCTR / BUKRS |
| GLPCA | EC-PCA: Actual Line Items | RCLNT / GL_SIRID |
| GLPCC | EC-PCA: Transaction Attributes | MANDT / OBJNR |
| GLPCO | EC-PCA: Object Table for Account Assignment Element | MANDT / OBJNR |
| GLPCP | EC-PCA: Plan Line Items | RCLNT / GL_SIRID |
| EC-PCA BS (KE1C) | PCA Basic Settings: Customizing for Profit Center Accounting | |
| A141 | Dependent on Material and Receiver Profit Center | MANDT / KAPPL / KSCHL / KOKRS / WERKS / MATNR / PPRCTR / DATBI |
| A142 | Dependent on Material | MANDT / KAPPL / KSCHL / WERKS / MATNR / DATBI |
| A143 | Dependent on Material Group | MANDT / KAPPL / KSCHL / WERKS / MATKL / DATBI |
SAP CO - Product Costing
SAP CO Product Costing module is used to find the value of internal cost of products. It is also used for profitability and management accounting for production.
While configuring Product Costing, it involves two areas for setting −
- Product Cost Planning
- Cost Object Controlling
The basics of Product Costing is Cost Center Planning. The goal of cost center planning is to plan total dollars and quantities in each Cost Center in a Plant.
Product Costing - Overview
Use the T-code KP06 and enter the controlling area.
Cost Center dollars are planned by activity Type and cost element. You can also enter the variable and fixed dollar amounts.
You can plan all costs in production cost centers where they will end up through allocations, or you can plan costs where they are incurred and use plan assessments and distributions to allocate.
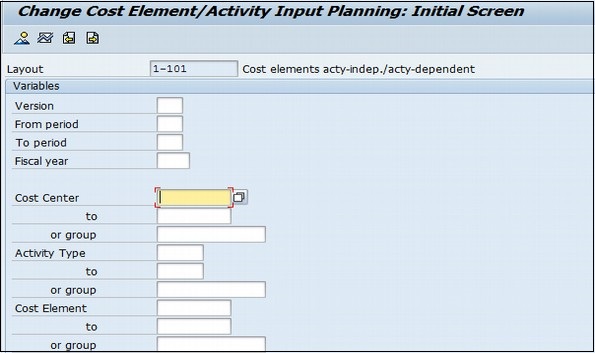
To define cost center activity quantities, use the T-code KP26. You can also manually enter an activity rate based on last year's actual values. Note that if you enter an activity rate instead of using the system to calculate a rate, you lose the opportunity to review actual vs. plan and see dollar and unit variances. It is a best practice to plan activity quantities based on practical installed capacity which accounts for downtime. If you plan at full capacity, plan activity rates will be underestimated.
Example
Let's say we are using Product Costing to value our inventory in a cookie baking shop. This will help us value our cookies (finished good), frosting (semi-finished good), and baking items like eggs, milk, and sugar (raw materials). In order to calculate costs, we need to come up with rates for each activity, such as mixing baking items, oven baking, and cookie cooling. Since a rate is a dollar per unit, we can either come up with a rate based on previous year's actual rates, or enter our total costs and total units.
SAP CO - Profitability Analysis
SAP CO Profitability Analysis is used to analyze the market segments classified as products, customers, sales area, business area, etc.
SAP CO Profitability Analysis (CO-PA) is used for the evaluation of Market segments which is classified according to products, customers, and orders −
- or any combination of these.
- or Strategic business units such as sales organizations.
- or business areas, with reference to company's profit.
- or contribution margin.
There are two types of Profitability Analysis are supported −
Costing-based Profitability Analysis − It is used to group the costs and revenues as per the value fields. It is used to ensure that you access at all times to a complete, short-term profitability report.
Account-based Profitability Analysis − It is used to provide you with a profitability report that is permanently reconciled with financial accounting. It is mainly used for getting information related to sales, marketing, product management and corporate planning departments to support internal accounting and decision-making.
Key Components in SAP CO-PA
The key components in SAP CO-PA are as follows −
Actual Posting − It allows you to transfer sales orders and billing documents from the Sales and Distribution application component to CO-PA in real time. You can also transfer costs from cost centers, orders and projects, as well as costs and revenues from direct postings or settle costs from CO to profitability segment.
Information System − It allows you to analyze existing data from a profitability standpoint using drilldown function in the reporting tool. It allows you to navigate through a multidimensional data cube using different functions like drilldown or switching hierarchies. The system displays data in either value fields or accounts, depending on the currently active type of Profitability Analysis and the type to which the report structure is assigned.
Planning − This allows you to create a sales and profit plan. Whereas both types of Profitability Analysis can receive actual data in parallel, there is no common source of planning data. Consequently, you always plan either in accounts (account-based CO-PA) or in value fields (costing-based CO-PA). The manual planning function allows you to define planning screens for your organization. With this you can display reference data in planning, calculate formulas, create forecasts, and more. You can perform planning at any level of detail.
Example
You can plan at a higher level, and have this data distributed top-down automatically. In automatic planning, you can copy and revaluate actual or planning data for a large number of profitability segments at once.
SAP CO - Planning Methods
SAP CO Planning Method allows you to plan the profitability segments as mentioned in the Planning packages.
To execute a planning method, you need to define it in a parameter set. Each planning method is executed via parameter set. To create a parameter set, you need to first define the Planning level. For parameter set to execute, there should be at least one planning package exists at that level.
There are two different types of planning methods and they differ in the way they allow you to enter and edit planning data for the profitability segments.
Manual Type
Manual planning methods allows you to enter planning data and display planning data in the profitability segments specified in the planning package are listed individually for editing or display.
In parameter set, you mention how the profitability segments are to be listed. When planning method is executed, processing of parameter set occurs and you can directly check the results of your processing.
Automatic Type
With automatic planning methods like copy, top-down distribution and delete, all profitability segments that are specified in the planning package are processed.
You need to mention in the parameter set like- how these segments are to be processed, when you execute the method, the system automatically processes the segments without any need of manual action.
Results of the processing can be checked using a report in the information system or by manual planning method display planning data.
SAP FI - Integration
SAP FI is commonly integrated with MM and SD component. SAP FI Integration with other modules means how the system maps with different modules and how the effect of those is passed into FI Module.
FI Integration with SD and MM
For SAP FI-MM, use the T-code OBYC
Whenever there is a delivery created with reference to a sales order, goods movement takes place in the system.
Example
In case of standard sales order, you create an outbound goods delivery to the customer. Here movement 601 takes place. This movement is configured in MM and movement of goods hit some G/L account in FI.
Every such movement of goods hits General Ledger account in FI.
The accounts posting in FI is done with reference to the billing documents like credit and debit note, invoice etc. created in SD and hence this is link between SD and FI.
Tax determination: In case of a tax determination, there is a direct link between SD and MM.
Movement Types
Material movements in MM is done with respect to a Movement Type.
- Goods receipt movement type 101
- Goods issue to production order movement type 261
- Scrapping of goods movement type 551
- Goods delivered to the customer movement type 601
- Initial upload of stock movement type 561
SAP allows us to use different G/L accounts for the various movements for the same material by linking this movement type to a transaction key and hence we can set G/L accounts as per movement type.
