- SAP FICO - Home
- SAP FI - Overview
- SAP FI - Submodules
- SAP FI - Company Basics
- SAP FI - Define Business Area
- SAP FI - Define Functional Area
- SAP FI - Define Credit Control
- SAP FI - General Ledger
- SAP FI - COA Group
- SAP FI - Retained Earnings Account
- SAP FI - G/L Account
- SAP FI - Block G/L Account
- SAP FI - Deleting G/L Accounts
- SAP FI - Financial Statement Version
- SAP FI - Journal Entry Posting
- SAP FI - Fiscal Year Variant
- SAP FI - Posting Period Variant
- SAP FI - Field Status Variant
- SAP FI - Field Status Group
- SAP FI - Define Posting Keys
- SAP FI - Define Document Type
- SAP FI - Document Number Ranges
- SAP FI - Post with Reference
- SAP FI - Hold a G/L Document Posting
- SAP FI - Park a G/L Document Posting
- SAP FI - G/L Reporting
- SAP FI - Accounts Receivable
- SAP FI - Customer Master Data
- SAP FI - Block a Customer
- SAP FI - Delete a Customer
- SAP FI - Customer Account Group
- SAP FI - One-Time Customer Master
- SAP FI - Post a Sales Invoice
- SAP FI - Document Reversal
- SAP FI - Sales Returns
- SAP FI - Post Incoming Payment
- SAP FI - Foreign Currency Invoice
- SAP FI - Incoming Partial Payments
- SAP FI - Reset AR Cleared Items
- SAP FI - Credit Control
- SAP FI - Accounts Payable
- SAP FI - Create a Vendor
- SAP FI - Create Vendor Acct Group
- SAP FI - Display Changed Fields
- SAP FI - Block a Vendor
- SAP FI - Delete a Vendor
- SAP FI - One-Time Vendor
- SAP FI - Post Purchase Invoice
- SAP FI - Purchases Returns
- Post Outgoing Vendor Payment
- SAP FI - Foreign Currency Invoice
- Withholding Tax in vendor invoice
- SAP FI - Outgoing Partial Payments
- SAP FI - Reset AP Cleared Items
- SAP FI - Automatic Payment Run
- SAP FI - Posting Rounding Differences
- SAP FI - Month End Closing
- SAP FI - Dunning
- SAP FI - Exchange Rates
- SAP FI - Tables in Module
- SAP FI - AR Invoice Processes
- SAP FI - AR Account Analysis
- SAP FI - AR Reporting
- SAP FI - AA Overview
- SAP FI - AA Asset Explorer
- SAP FI - Cash Management
- SAP CO - Overview
- SAP CO - Submodules
- SAP CO - Cost Center
- SAP CO - Create Cost Center
- SAP CO – Post to a Cost Center
- SAP CO - Internal Orders
- SAP CO - Settlement of IO
- SAP CO - Profit Center
- SAP CO - Postings to Profit Center
- Profit Center Standard Hierarchy
- Assigning Cost to Profit Centers
- Assigning Materials to Profit Center
- SAP CO - Tables in Module
- SAP CO - Product Costing
- SAP CO - Profitability Analysis
- SAP CO - Planning Methods
- SAP FI - Integration
- SAP FICO - Questions Answers
- SAP FICO - Quick Guide
- SAP FICO - Useful Resources
- SAP FICO - Discussion
SAP FI - Create a Vendor
Vendor Master Records are used by both the Accounting component and the Purchasing component. Before you create a vendor master record in Accounting, you need to make sure that the master record is not already created in Purchasing.
How to create vendor master data in SAP FI?
You can create a vendor master record by referencing an existing one. In this case, the system copies certain data from the reference master record, however the system does not transfer all the data.
If you have SAP Material Management configured, you can create a vendor master record centrally. Here we will discuss how to create vendor master record for a company code.
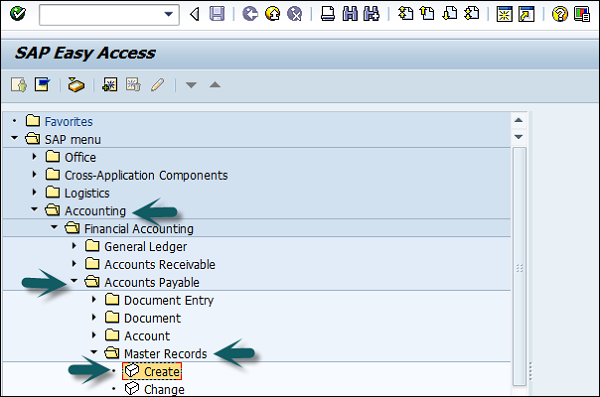
Go to Accounting → Finance Accounting → Accounts Payable → Master Record → Create.
The following window will open. If you are using an external number assignment, enter the vendor account number, otherwise the system will assign once you click "Save the master record".
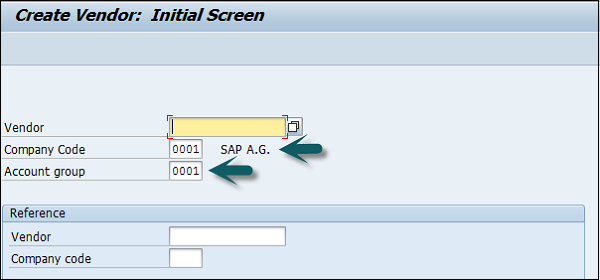
Press Enter after entering the Company code, Account group. It will open a new window will open where you need to enter the following details −
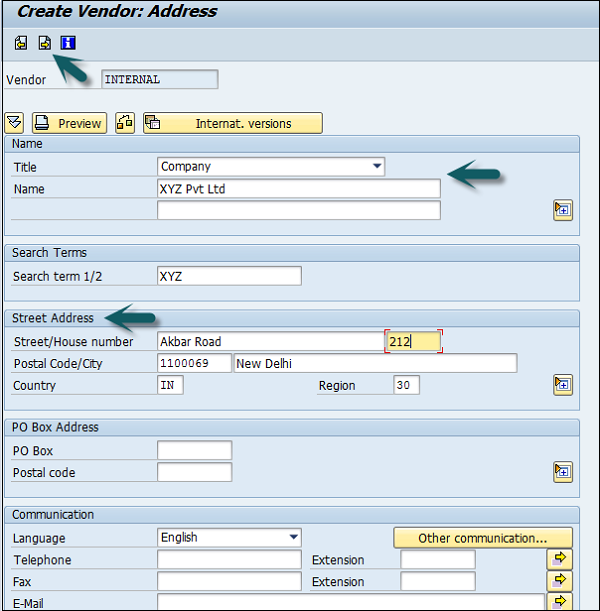
- Name of the Vendor.
- Term for searching the Vendor Id.
- Street/House Number and Postal code 6 digit/City.
- Country/Region and click the Next screen button at the top.
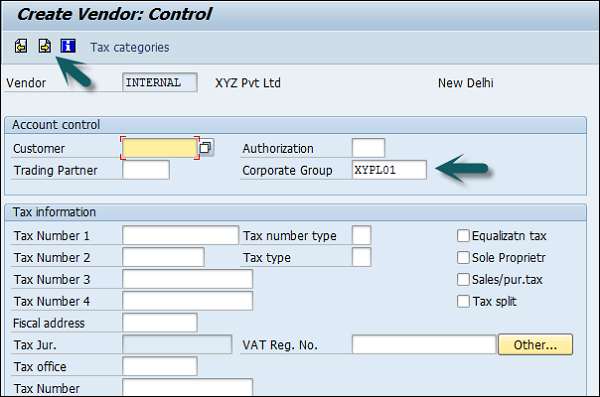
A new window will open. Enter the Vendor control group details. If the vendor is from a corporate group, enter the corporate group name.
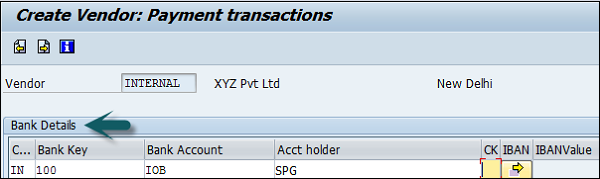
Once you press Enter or click Next Screen, enter the bank account details as shown below and click the Next Screen icon.
Next, enter the contact person details, name, telephone, description and go to the next screen.
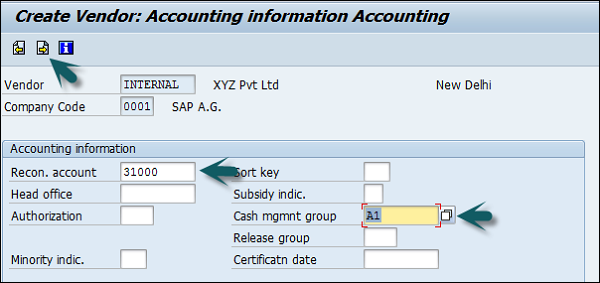
In the next screen, enter the Recon Account and cash management group (domestic/Foreign, etc.)
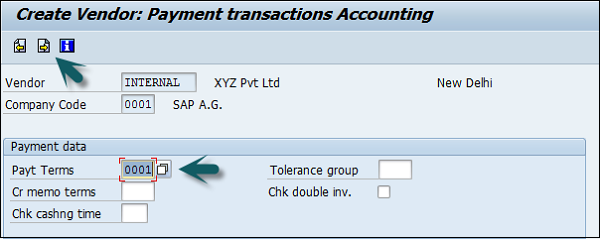
Click the Next Screen icon and enter the payment transactions accounting details.
Enter Payt terms (like pay immediately, pay after 14 days 3% cash, etc.).
Once you are done with all the details, click the Save button at the top. You will get a message that a vendor has been created in the given company code.


