- Adobe RoboHelp Tutorial
- Adobe RoboHelp Resources
- Adobe RoboHelp - Quick Guide
- Adobe RoboHelp - Resources
- Adobe RoboHelp - Discussion
Importing and Linking MS Word Docs
Just like PDF files, you can import and link Microsoft Word Documents in RoboHelp. You can create new help files by importing Word documents or import Word documents into existing help files. Before importing Word documents, it is important that they be optimized for online output. You have the option of either importing or linking Word documents. It is important to choose the one that suits your needs.
Importing allows you to integrate the Word document in the help file and customize filenames from the Project Manager. Linking allows you to dynamically-update the source document including ToC, index and glossary.
You can also regenerate deleted topics and preserve changes in generated topics. You cannot however, change the filenames and topic titles from the Project Manager.
Optimizing Word Documents for Online Output
To optimize word documents for online output, we should consider the following points.
Heading hierarchies − Apply hierarchical headings before conversion to achieve automatic pagination. For example, you can apply Heading 1 style in your Word document, map this style to a similar RoboHelp style, and define pagination to create an HTML topic for each Heading 1 style.
Inline styles and style overrides − You can convert inline styles to CSS styles in RoboHelp.
Header and footer information − RoboHelp can convert headers and footers. To ensure consistency across your topics, you can define a master page that contains the required header and footer information.
Chapter versus topic − In online Help, the organizational unit is the topic, and users see topics one at a time. Provide comprehensive information without adding redundancy by grouping related topics.
ToCs − You can also import the Word ToC into the RoboHelp ToC by defining the topic hierarchy and representing it in RoboHelp TOC.
Context sensitivity − You can assign context-sensitive Help markers in Word documents using custom footnote entries. RoboHelp reads these footnote entries and assigns the map IDs to the generated topics.
Importing a Word Document into RoboHelp
Unlike PDFs, which do not require you to have Acrobat or Acrobat Reader installed, you need to have Microsoft Word installed to be able to import Word documents into RoboHelp.
To import a Word document, in the Starter pod, go to the Import tab and select the icon representing Word documents (*.docx, *.doc) and select the Word document you want to import. Enter the details of the project and click on Finish.

Linking a Word Document to a RoboHelp Project
To Link a Word document to a RoboHelp project, we should follow the steps given below.
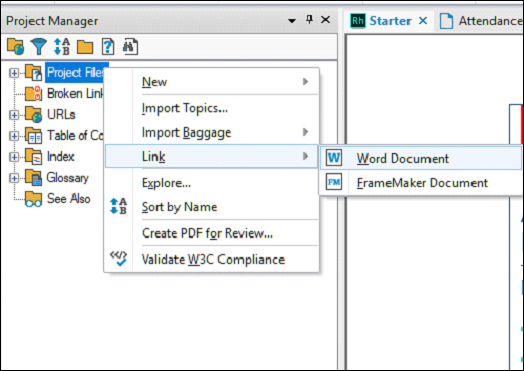
Step 1 − In the Project Manager Pod, right-click on the Project Files folder and select Word Document from the Link submenu. Select one or more Word documents and click Open.
Step 2 − Right-click on the linked Word document in the Project Files folder and click on Properties.
Step 3 − In the Word Document Settings dialog box, specify settings for the ToC, index and glossary.
Step 4 − To generate a ToC from the Word document, click on the Convert Table of Contents checkbox and choose to either append to an existing ToC or create a new associated ToC.
Step 5 − To generate an index from the Word document, click on the Convert Index checkbox and choose to either append to an existing index or create a new associated index.
Step 6 − To generate a glossary from the Word document, click on the Convert Glossary checkbox and choose to either append to an existing glossary or create a new associated glossary.
