- JIRA - Home
- JIRA - Overview
- JIRA - Project
- JIRA - Issues
- JIRA - Workflow
- JIRA - Installation
- JIRA - Free Trials Setup
- JIRA - Login
- JIRA - Dashboard
- JIRA - Issue Types
- JIRA - Screens
- JIRA - Issue Creation
- JIRA - Clone an Issue
- JIRA - Create a Subtask
- JIRA - Convert Issue To Subtask
- JIRA - Convert Subtask to Issue
- JIRA - Create Issue using CSV
- JIRA - Edit an Issue
- JIRA - Email an Issue
- JIRA - Label an Issue
- JIRA - Linking Issues
- JIRA - Move an Issue
- JIRA - View/Change History
- JIRA - Watch and Vote on Issue
- JIRA - Search
- JIRA - Advanced Search
- JIRA - Reports
- JIRA - Workload Pie Chart
- JIRA - Created vs Resolved Issues
- JIRA - Burndown Chart
JIRA - Quick Guide
JIRA - Overview
JIRA is an Incident Management Tool used for Project Management, Bug Tracking, Issue Tracking and Workflow. JIRA is based on the following three concepts Project, Issue and Workflow.
Important Points to Note
The following points explain some interesting details of JIRA.
JIRA is an incident management tool.
JIRA is developed by Atlassian Inc., an Australian Company.
JIRA is a platform independent tool; it can be used with any OS.
JIRA is multi-lingual tool − English, French, German, Japanese, Spanish, etc.
JIRA supports MySQL, Oracle, PostgreSQL and SQL server in the backend.
JIRA can be integrated with many other tools − Subversion, GIT, Clearcase, Team Foundation Software, Mercury, Concurrent Version System and many more.
License and Free Trial
The following points describes the legalities of the JIRA Tool.
JIRA is a commercial tool and available as a Trial version for a limited time.
To utilize JIRA services, a license is required.
JIRA provides free license for academic projects.
A 15-day trial version is available for an individual person to use.
Use of JIRA
Following are some of the most significant uses of JIRA.
JIRA is used in Bugs, Issues and Change Request Tracking.
JIRA can be used in Help desk, Support and Customer Services to create tickets and track the resolution and status of the created tickets.
JIRA is useful in Project Management, Task Tracking and Requirement Management.
JIRA is very useful in Workflow and Process management.
JIRA - Core Features
The following table explains some of the most important and commonly used features in detail for better understanding.
| Sr.No | Core Features & Description |
|---|---|
| 1 |
Boards JIRA supports Scrum and Kanban boards. These boards provide an immediate snapshot of the project to the team. Helps to quickly review the progress of the project and see the status of the individual tasks. Board workflow can be customized to fulfil the way a team wants to proceed. |
| 2 |
Business Project Template JIRA supports n number of business templates to manage simple tasks and complex tasks like workflow. Template can be customized based on the team and their approach. Ex: Workflow can be customized based on each team's approach. Every step is accounted and team can move to achieve their goals. |
| 3 |
Task Details Tasks can be defined at the individual level to track the progress. Status of every task, comment, attachment and due dates are stored in one place. |
| 4 |
Notifications An email can be sent for a particular task to the users. Voting and watching features to keep an eye on the progress for the stakeholders. Use @mention to get the attention of a specific team member at Comments/Description. User will instantly notify if something is assigned or if any feedback is required. |
| 5 |
Power Search JIRA supports a powerful search functionality with Basic, Quick and Advanced features. Use the search tool to find answers like due date, when a task was last updated, what items a team member still needs to finish. Project information at one place, search within a project. |
| 6 |
Reports JIRA supports more than a dozen reports to track progress over a specific timeframe, deadlines, individuals contribution, etc. Easy to understand and generate different reports those help to analyze how the team is going on. Easy to configure these reports and display the matrices to the stakeholders. |
| 7 |
Scale with Team Growth JIRA supports any business team and any project irrespective of size and complexity. |
| 8 |
Add -Ins JIRA supports more than 100 add-ins to connect with different software to make work easy. Wide range of add-ins makes it as universal across the globe. |
| 9 |
Multilingual JIRA supports more than 10 languages those are widely used as English (US, UK, India), French, German, Portuguese, Spanish, Korean, Japanese and Russian. |
| 10 |
Mobile App JIRA is available as a Mobile Application as well. It is available on Google Play Store and App Store (iTunes) of Apple. Easy to stay connected with the team while moving anywhere with notification, comments and project activity. |
JIRA - Project
A Project contains issues; a JIRA project can be called as a collection of issues. A JIRA Project can be of several types. For example −
- Software Development Project
- Marketing Project
- Migration to other platform project
- Help Desk Tracking Project
- Leave Request Management System
- Employee Performance System
- Website Enhancement
Create a New Project
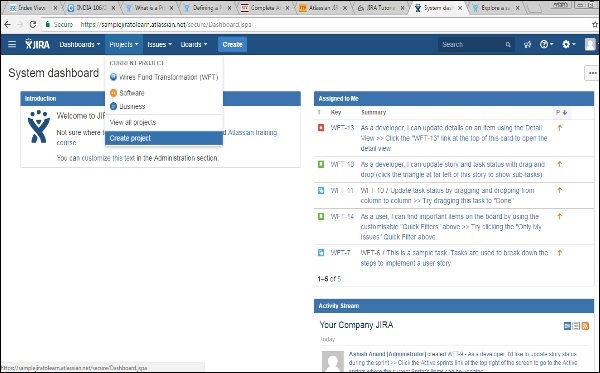
To create a project, the user should login as a JIRA Service Desk Admin and then Click on Project → Create Project.
The following screenshot shows how to reach to the Create Project button from the Dashboard.
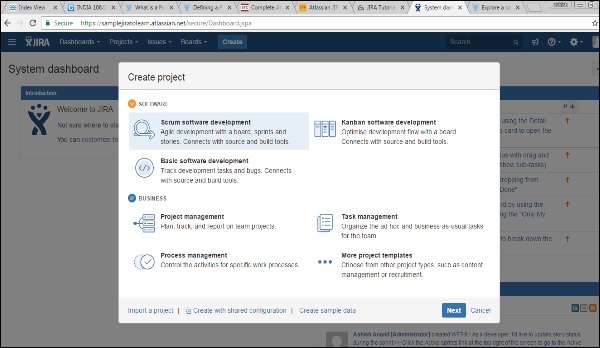
Choose the type of Project that suits your requirement and the process it should follow.
The following screenshot displays the type of projects available in JIRA.
Once the type of project is selected, click on Next. The user will see the flow of the project based on the selection. Here, we have selected Basic Software development.
The following screenshot displays the available issue types and the workflow for the chosen project in the step mentioned above −

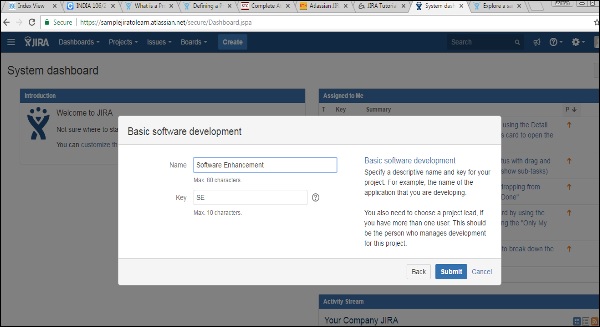
Click on the Select button, enter the name of the project and confirm the Key that the user wants to display as a reference in all the issues. Once this is done, click on the Submit button.
The following screenshot displays the fields to provide details before the creation of a project.
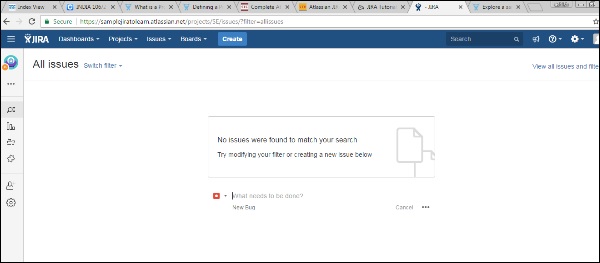
The page having issues will display. The following screenshot displays whether any issues are linked with a new created project.
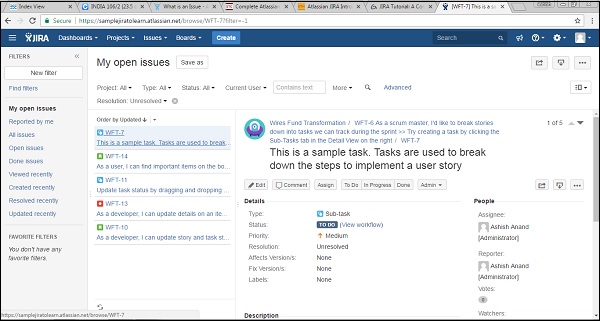
JIRA - Issues
JIRA is a project management tool and uses issues to track all the tasks. An issue helps to track all works that underlie in a project. In real time, every work or task either technical, non-technical, support or any other type of a project in JIRA are logged as an issue.
An issue can be dependent on the organization and requirements −
- Story of a project
- Task of a story
- Sub-task of a story
- A defect or bug can be an issue
- Helpdesk Ticket can be logged as issue
- Leave Request
The following screen shot shows the basic page and information of an open issue −
JIRA - Workflow
In JIRA, workflow is used to track the lifecycle of an Issue. Workflow is a record of statuses and transitions of an issue during its lifecycle. A status represents the stage of an issue at a particular point. An issue can be in only one status at a given point of time like Opened, To Do, Done, Closed, Assigned, etc.
A transition is a link between two statuses when an issue moves from one status to another. For an issue to move between two statuses, a transition must exist. In a simple way, a transition is some kind of work done on the issue, while status is the impact of work on that issue.
Example
As of now, an issue is created and opened. When the assignee starts working on the issue, the issue moves to the In Progress status. Here, the transition is starting the work, while the status of the issue is now progressive.
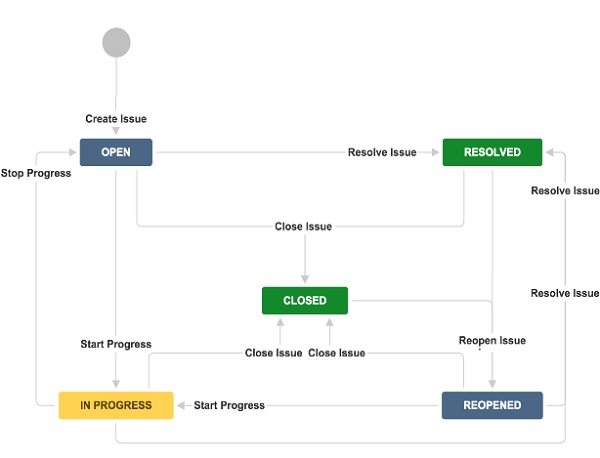
JIRA workflow has the following stages to track as soon as an issue is created −
Open Issue − After creation, the issue is open and can be assigned to the assignee to start working on it.
In Progress Issue − The assignee has actively started to work on the issue.
Resolved Issue − All sub-tasks and works of that Issue are completed. Now, the issue is waiting to be verified by the reporter. If verification is successful, it will be closed or re-opened, if any further changes are required.
Reopened Issue − This issue was resolved previously, but the resolution was either incorrect or missed a few things or some modifications are required. From Reopened stage, issues are marked either as assigned or resolved.
Close Issue − The issue is considered as finished, resolution is correct as of now. Closed issues can be re-opened later based on the requirement.
JIRA Workflow can be referred as a Defect Lifecycle. It follows the same concepts; the only difference is that it is generic for all issues rather than limited to Defects only.
The following diagram shows a standard workflow −
A transition is a one-way link, if an issue moves back and forth between two statuses; two transitions should be created.
Example − There are two-way transitions between closed and re-opened statuses. A closed issue can be reopened if any modifications are required at any time until the project completes, while a re-opened issue can be closed directly if additional work is taken care in another issue and no specific work has been done on the re-opened issue.
JIRA - Installation
In this chapter, we will learn how to install JIRA on your system.
Important Points to Note
JIRA is a web application that provides a private website to an individual or a set of requested users belonging to the same company/project.
JIRA can be run as a Windows Service at the server side.
JIRA is a pure Java based application and supports all OS platforms like Windows, Linux of different versions or MAC, etc., those satisfy JDK/JRE requirements.
JIRA supports all famous browsers like Chrome, IE, Mozilla and Safari.
It supports Mobile browsers as well in mobile views.
System Requirements
Since JIRA is a web-application, it follows the concept of client/server. It means that JIRA can be installed centrally on a server and users can interact with it through web-browsers using a website from any computer.
Browser − JavaScript should be enabled, the user is recommended not to use any script-blocking tool like NoScript to access full functionality of JIRA.
JDK/JRE − It is recommended to update JRE/JDK with the latest version. JIRA 6.4 recommends using JRE/JDK version 8.
Since our scope is to consume the JIRA application as end users, we can ignore the server side requirements.
Installation at the Server Side
JIRA follows the Client/Server concept. At the server side, JIRA must be installed before using it as end user.
At the server side, JIRA must connect with relation database to store issues/application data.
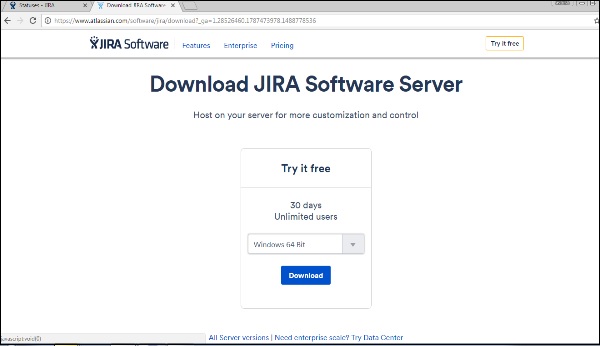
Download the JIRA Windows Installer.exe file from the following link − https://www.atlassian.com/software/jira/download?_ga=1.28526460.1787473978.1 488778536.
Select the OS type and click on Download.
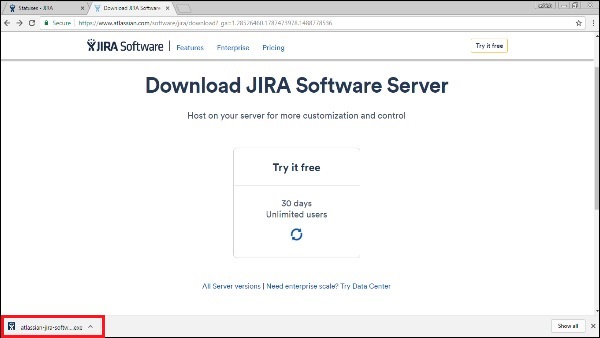
The following screenshot shows how to download the .exe file for a specific OS.
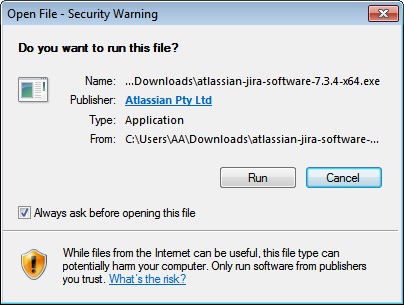
Run the .exe file to run the installation wizard. The following screenshot shows the downloaded .exe file.
After clicking the .exe file, the Run confirmation pop-up displays, click on RUN. The following screenshot shows the RUN confirmation pop-up.
The following JIRA installation wizard displays, click on Next.

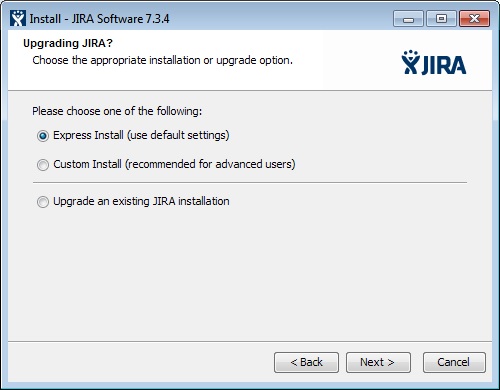
Choose the appropriate installation option as shown in following screenshot and then click on Next.
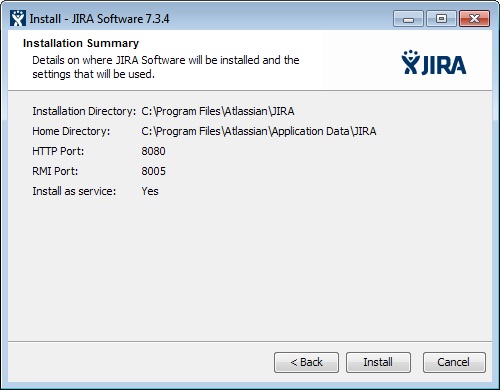
The installation summary is displayed with the Destination Directory, Home Directory, TCP Ports, etc., as shown in the following screenshot.
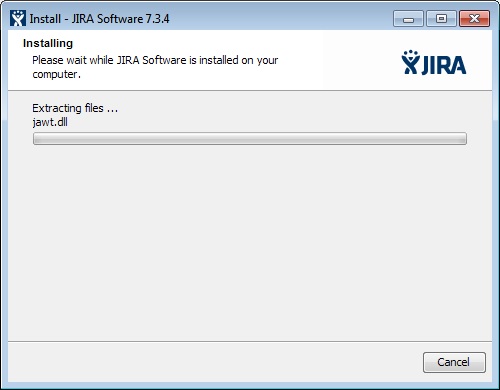
Click on Install. JIRA will start installing as displayed in following screenshot. It takes a couple of minutes to finish the installation.
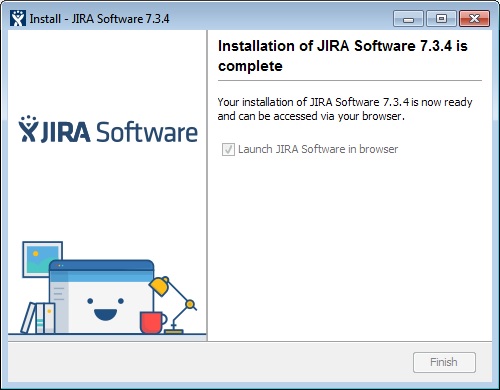
After installation, JIRA will be started automatically if the check box to Start JIRA Software 7.3.4 now is checked. Then click on Next, if not, it can be accessed using the appropriate Windows Start Menu shortcut.

Click the Finish button.
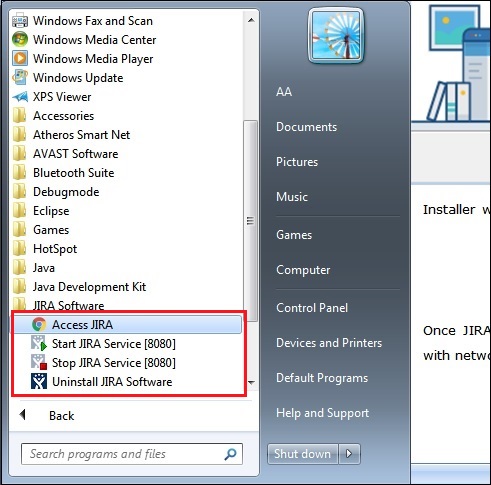
The installer will create the following shortcuts on the start menu −
- Access JIRA
- Start JIRA Server
- Stop JIRA server
- Uninstall JIRA
The following screenshot shows the above-mentioned shortcuts −
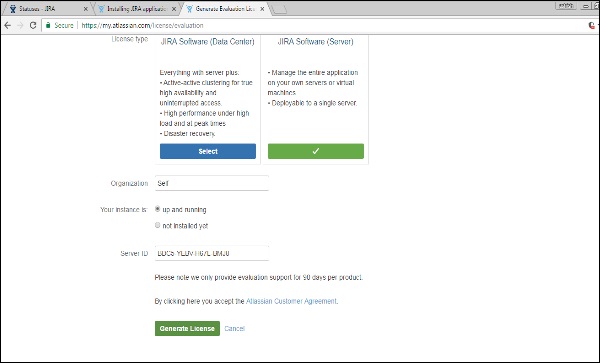
Select the license type and enter organization name as shown in following screenshot −

Click on Generate License
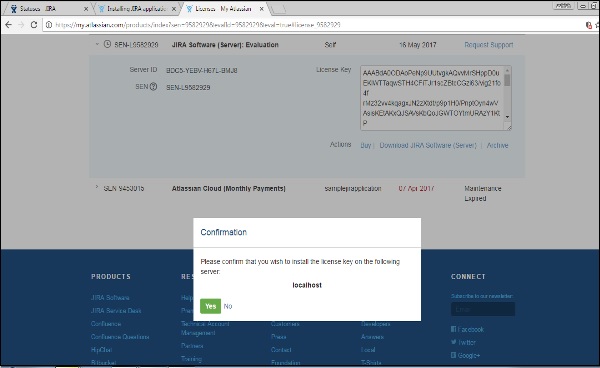
A confirmation pop-up will display as shown in the following screenshot. Click on Yes.
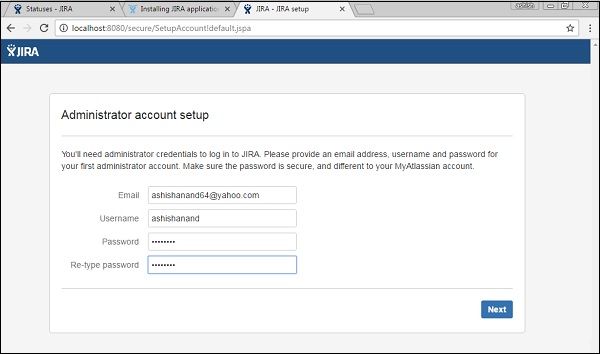
Set up the administration account as displayed in the following screenshot.
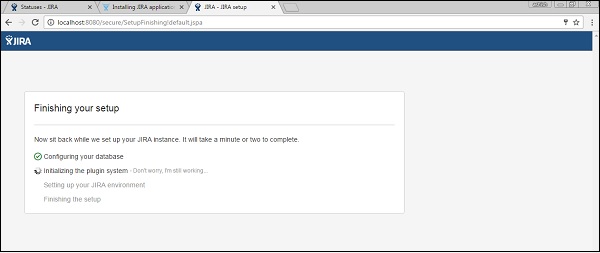
JIRA will automatically finish the setting-up as shown below −
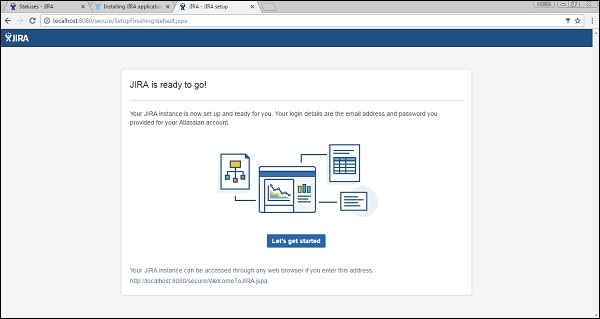
Once JIRA finishes the setup and starts running in the server, the user can access it from a browser on any computer with network access to the JIRA server.
JIRA - Free Trials Setup
JIRA provides 15 days to 1-month free trials of basic features. JIRA has other plans as well with different advanced features and add-ins. The cost depends on the number of users.
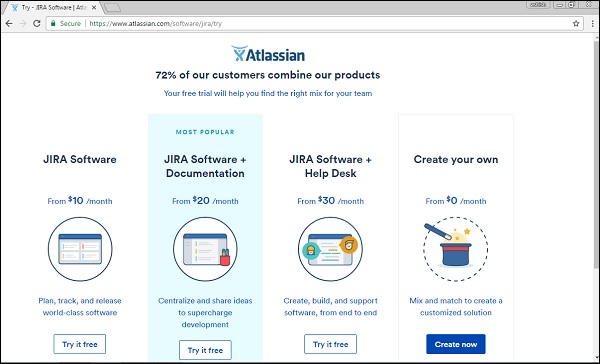
By visiting https://www.atlassian.com/software/jira/try, a user can see different available plans for trying purposes.
Setup for Free Trials
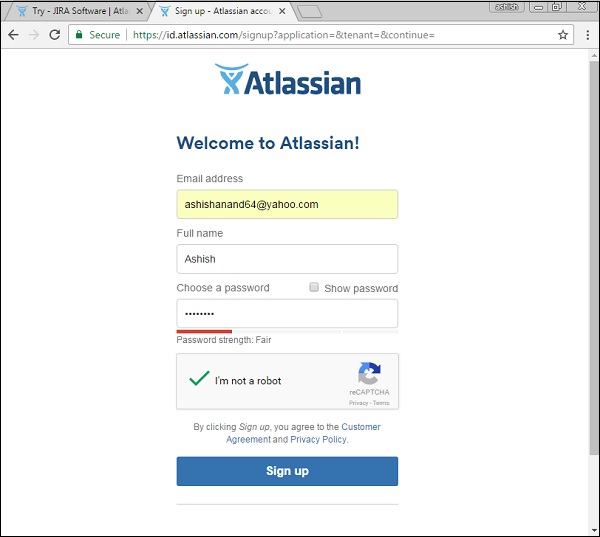
To setup a free trial, the user has to Sign up on the following link − https://id.atlassian.com/signup?application=&tenant=&continue or login if he already has an account.
The following screenshot shows required fields to sign up in Atlassian account.
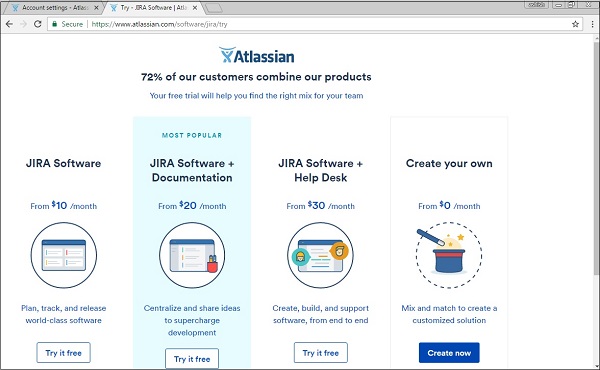
The user has to log into the email account and verifies the account by clicking on the link sent by JIRA-Atlassian. The next step is to go to https://www.atlassian.com/software/jira/try and click on Create now button, which is at the bottom right hand of the webpage.
The following screenshot shows different plans available for trial of JIRA.
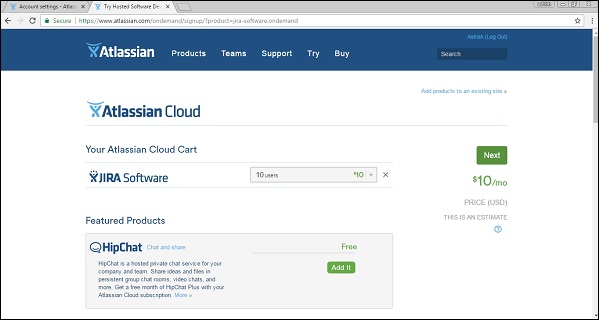
The following screenshot shows the details of the chosen plan for a free trial.
Once the user fills in all the details along with the sample website name, user has to click on the Start now button. The following screenshot shows how to claim your site and provide your credentials to start it.
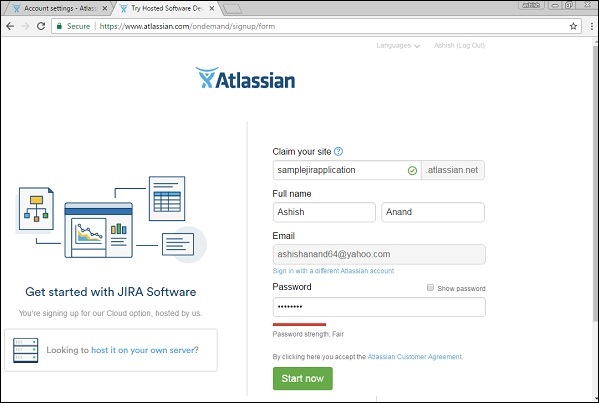
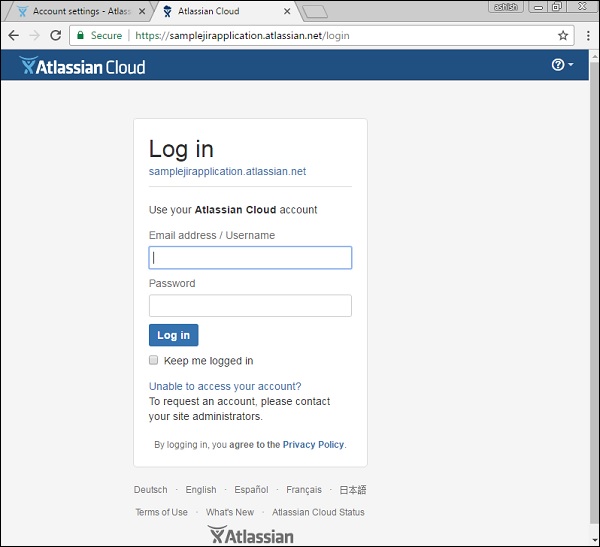
It will take a few minutes to start the requested sample JIRA website. Once it is done, the JIRA login page will display and the user can see the given sample website name in the browsers address bar. The user can now directly access this link to navigate to JIRA. The following screenshot shows the login page of JIRA.
JIRA - Login
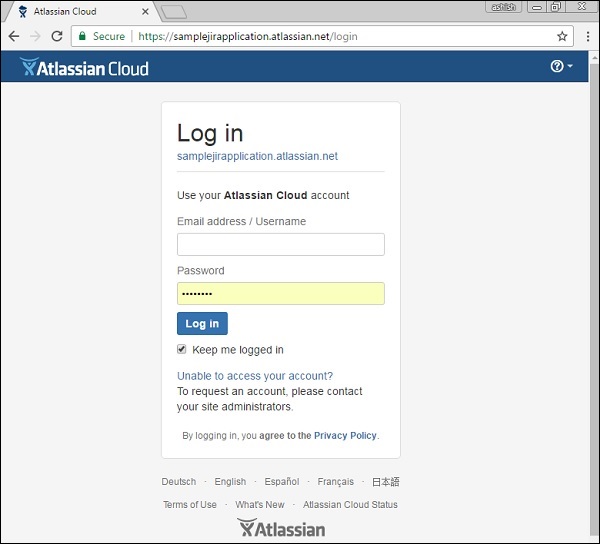
To login to JIRA, go to your sample website. It will open a login page. Fill in your registered email address/username and Password. Click on the Login button. The following screenshot shows how to login into JIRA using your credentials.
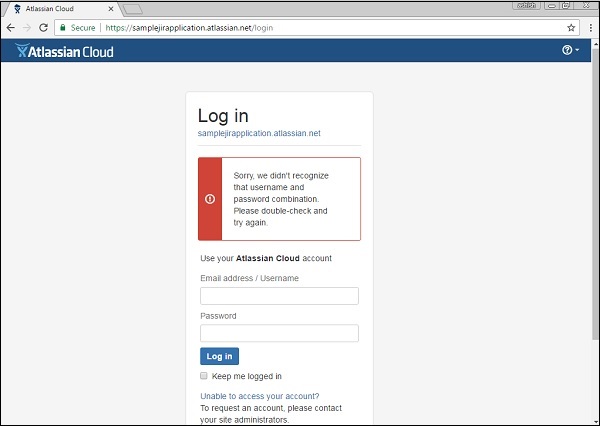
Common Login Errors
In case of any unsuccessful login, an error message displays. The following screenshot shows the error message a user receives, if the credentials are not matching or incorrect.
To rectify this scenario, click on Unable to access your account, then select the appropriate option and fill in the details. Click on email. The following screenshot shows how to recover the username, in case the user has forgotten it.
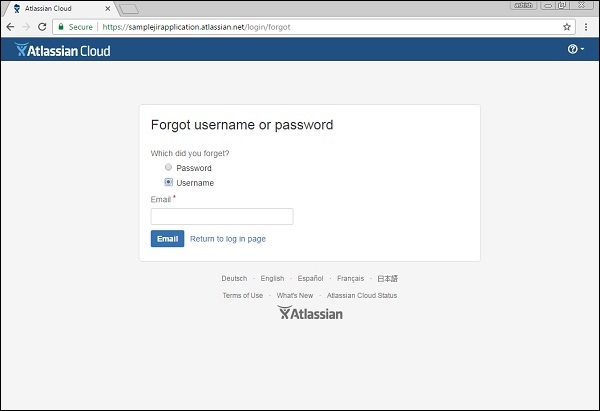
The user will get an email with the details of his username or a link to reset the password.
Successful Login
On a successful login, the system dashboard will display if the account is associated with any project by the admin, or if a user can create a sample project as explained in the earlier chapters.
The following screenshot displays the welcome page/dashboard of JIRA on a successful login.
JIRA - Dashboard
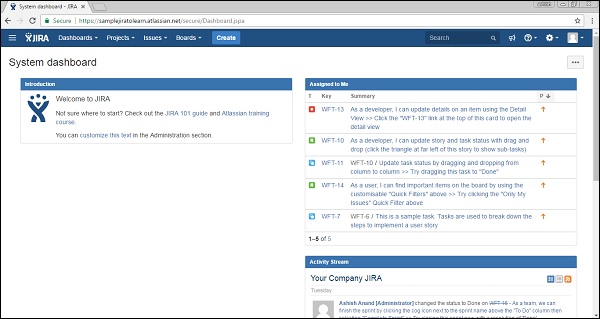
After logging into JIRA, the Dashboard is the first page that shows up. The Dashboard is customized by the Admin. Based on the roles, the admin can set the access of JIRA. Even the admin has the right to change colors and the logo of JIRA.
Important Points of the Dashboard
Following are some of the most significant points the users should understand before using the JIRA Dashboard −
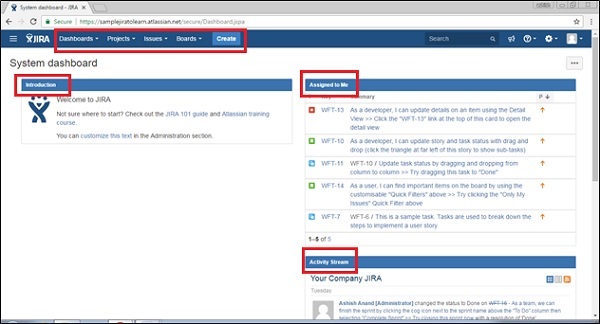
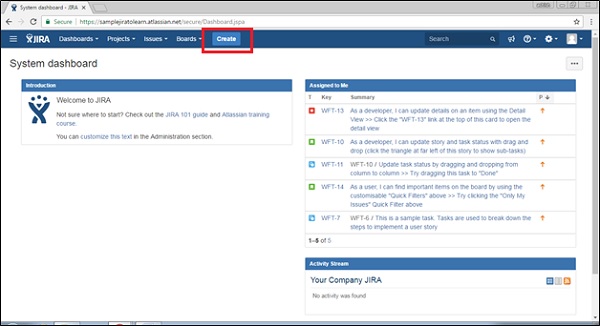
The navigation bar, present at the top of the JIRA page, will be the same across all the pages/screens of JIRA. Dashboard, Projects, Issues, Boards and Create are the main links. These links have many sub-links to navigate other functionalities.
Navigation bar contains links that provides a quick access to the most useful functions of JIRA.
Just under navigation bar, there is a System Dashboard.
The information provided in the system dashboard area can be customized by the Admin.
By default, it has three main sections Introduction, Assigned to Me (displays Issues list assigned to users) and Activity Stream (Activities done by the users).
The following screenshot shows the overview of the Dashboard page of JIRA −
Types of Projects
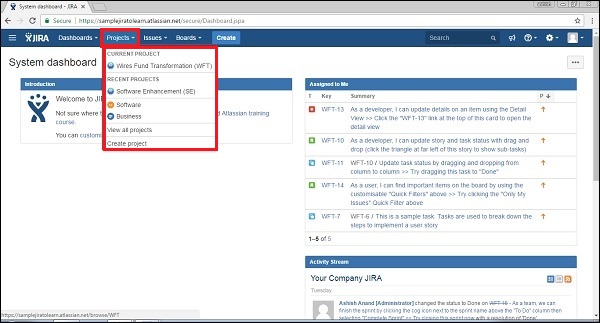
The Projects link has several sub-links, which are explained in detail for better understanding −
Current Project − It displays the name of the Project where the user is currently in or is viewing the dashboard of the project. By clicking at Project name, it will display the list of issues associated with the project.
Recent Project − It displays the name of the recent project that the user has accessed, if exists, where the user can navigate by clicking on the project listed under this header.
Software − It is the sub-link to navigate the list of projects, which are listed in the Project Type as Software.
Business − It is also a project-type. By clicking here, it will display the list of business project types.
View all Projects − It displays all the projects, which are associated with the logged in user.
Create Project − This link is usually accessed by the Admin or it depends on various roles. If this link is visible, a user can create a new project by following the instructions given there.
The following screenshot shows the different sub-links under the Project category.
Types of Issues
It has many sub links to access other functionalities. The following screenshot shows different available sub-links under Issue navigation.
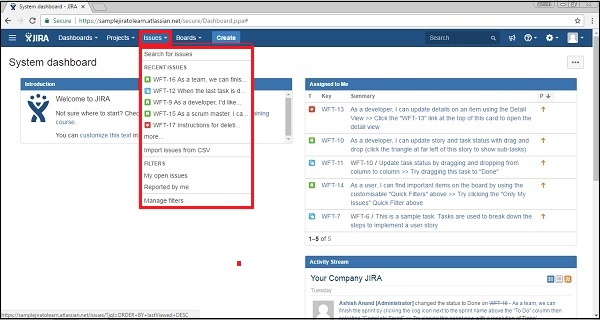
Search for Issues − It navigates to the search page, where the user can provide search criteria to narrow down the results.
Recent Issues − It displays the list of issues that are recently viewed by the user.
Import issue from CSV − This feature allows the user to import the details of issues by uploading a CSV file and mapping the fields.
My open issues − It is the filter section, which displays issues those are open and assigned to the logged-in user.
Reported by me − This filter section displays the issues, which are already created by the logged-in user.
Manage filters − It helps to customize the filter and narrow down the results. It displays any saved filters/ favorites filters.
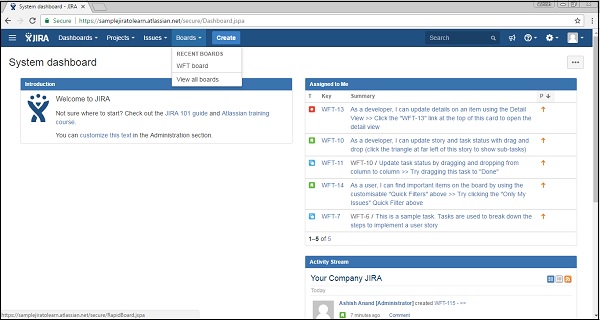
Types of Boards
Boards are showcase of process that is followed by Project. It could be the most famous Agile Board if the project is following the agile methodology or it might be the Kanban board as well.
Recent Board − It displays the recent project board accessed by the user.
View all boards − It displays all available project boards.
The following screenshot shows the different sub-links available under the board section.
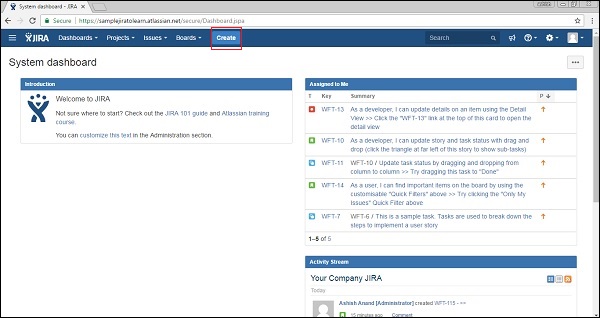
The Create Button
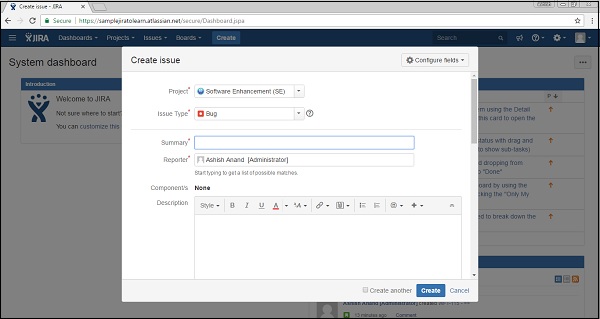
By clicking on the Create button, it displays the create form to log an issue.
The following screenshot shows required fields and other fields to create an issue −
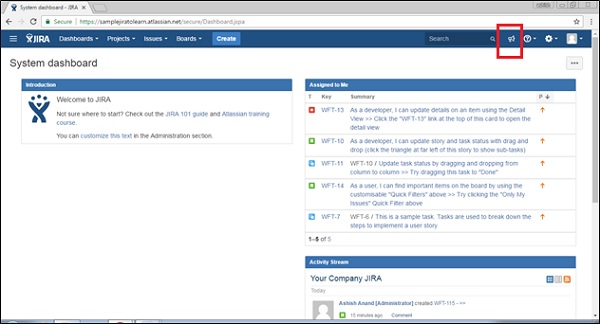
The Feedback Link
There is a feedback link at the right side of the navigation bar (as highlighted in the following screenshot). By clicking on link, user gets a form where he can provide feedback by entering Summary, Description, Name and email.
The following screenshot shows the location of the Feedback link present in the Dashboard.
The following screenshot shows the required and optional fields to provide feedback.
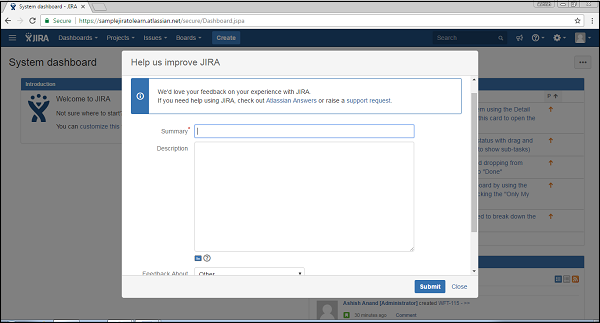
Once all the fields are filled, click on Submit, it successfully posts the feedback.
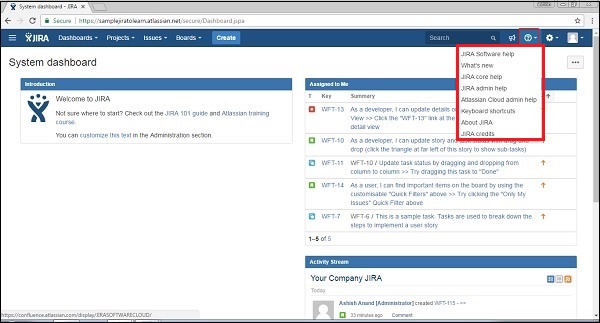
The Help Link
The Help link provides different useful documentation about JIRA. It provides the details of JIRA as well by clicking on About JIRA. Similarly, this link also provides new release features by clicking on Whats new. Keyboard shortcuts have much useful keyboard navigation for users that saves time. The following screenshot shows the Help link and different sub-links available in it.
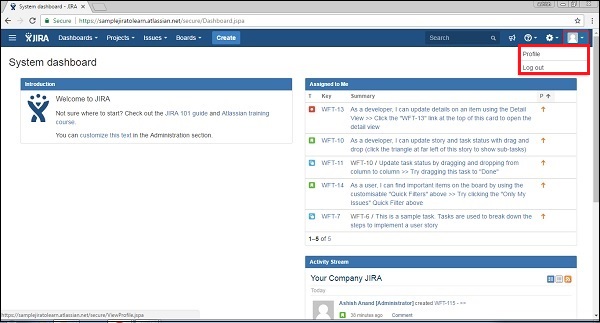
User Profile Button
By clicking on the profile link, the user can view his profile details and manage this section. By clicking on Logout, the user will get back to the login page and will not be able to access the project details without logging in again.
The following screenshot shows available functionality under User-Profile section −
By clicking on the edit symbol, the user will be able to edit profile details like Summary Details, Preferences, etc. The following screenshot shows how to edit the profile by clicking on the Edit (highlighted in red outline) icon at each section.
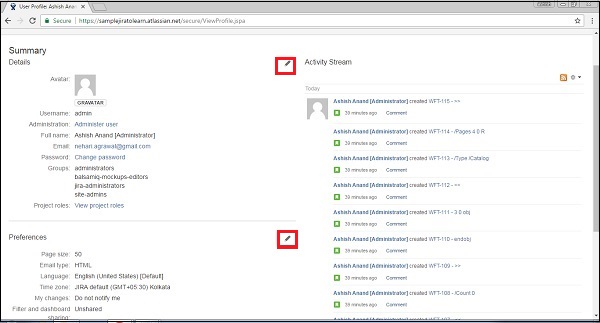
On the right side, the user can see the activity stream performed by the logged in user.
JIRA - Issue Types
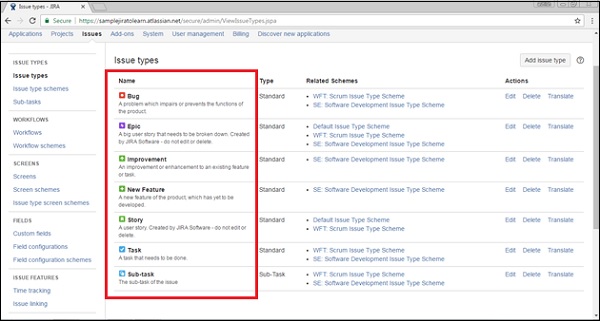
Since JIRA tracks all the tasks, the sub-tasks or even a work as an Issue, there are several types of Issues to identify the work and categorize the similar issues.
An Issue is classified as follows −
Sub-Task − This is the sub-task of an issue. In a logged issue, there can be different tasks to resolve it, which are called as sub-tasks.
Bug − A problem that impairs or prevents the functions of the product.
Epic − A big user story that needs to be broken down. Created by JIRA Software - do not edit or delete.
Improvement − An improvement or enhancement to an existing feature or task.
New Feature − A new feature of the product, which is yet to be developed.
Story − A user story. Created by JIRA Software - do not edit or delete.
Task − A task that needs to be done to achieve teams goal.
If a user logs in as Admin and navigate to Settings → JIRA Administrator → Issues, all the listed issue types will display. The following screenshot shows all the available issue types in JIRA.
Issue Type Schemes
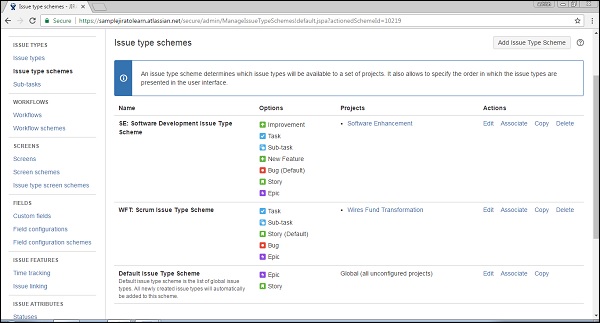
An issue type scheme determines which issue types will be available to a project or set of projects. It also manages specifying the order in which the issue types will present in the user interface of JIRA, while creating an Issue. An issue type scheme generates as soon as the project is added in the JIRA.
Here, one scheme is by default named as the Default Issue Type Scheme and others are project schemes. The default issue type scheme is the list of global issue types. All newly created issue types will automatically be added to this scheme. The following screenshot shows Issue type schemes of different projects.
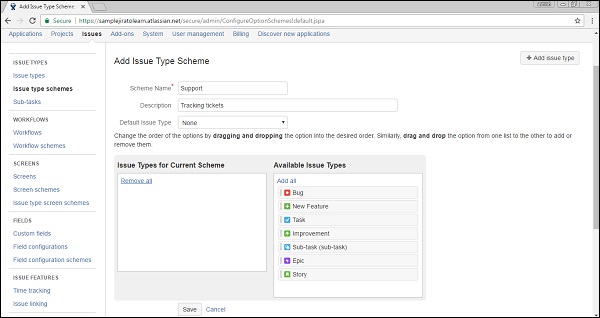
By clicking on the Add Issue Type Scheme button at the top right hand corner, the user can add a user defined scheme.
Enter the Name, Description and Select the Issue Type for the Current scheme from the Available issue type list. The following screenshot shows how to add a new type schema by providing the required and optional fields.
Click on Save. The new schema will appear in the list. The Following screenshot shows how the page display after adding a new Issue Type schema −
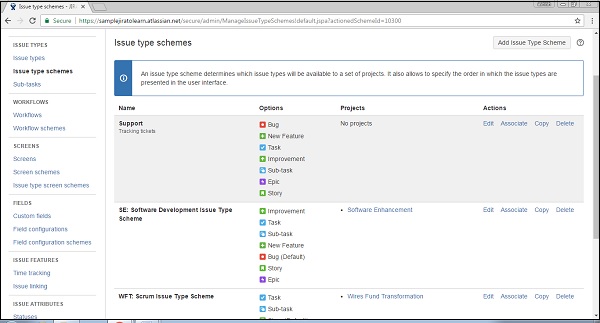
By clicking on Edit, the user can edit the details. By clicking on Associate, the user can associate this scheme to a project. Copy and Delete is used for copying and deletion of the same scheme.
JIRA - Screens
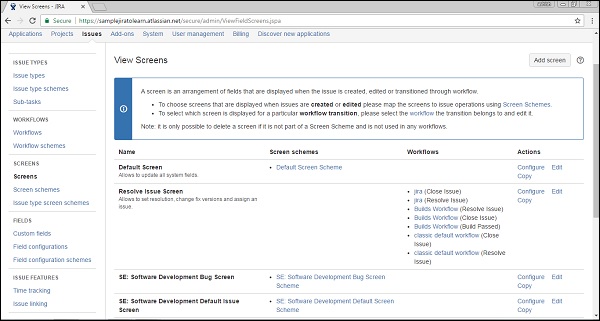
View Screen
It is the arrangement and representation of fields to display in UI whenever a new issue is created or existing issues are modified and issue transitioned through one status to another. If a user logs in as Admin and navigate to Settings → Issues → Screens, he will be able to see all the available screens. The following screenshot shows the available screen for different projects.
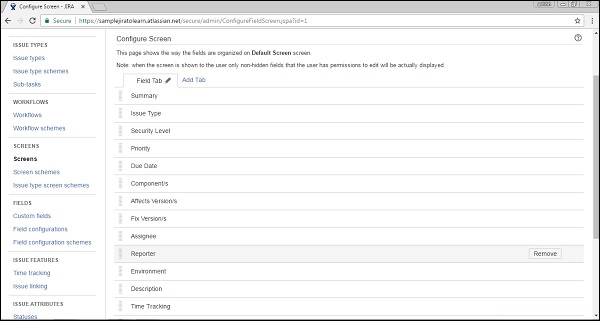
By clicking on configure, the user will be able to see all the available fields with this screen. Whereas, in the organized/arranged way of order, it will display at the UI. The following screenshot shows how to configure the screen fields.
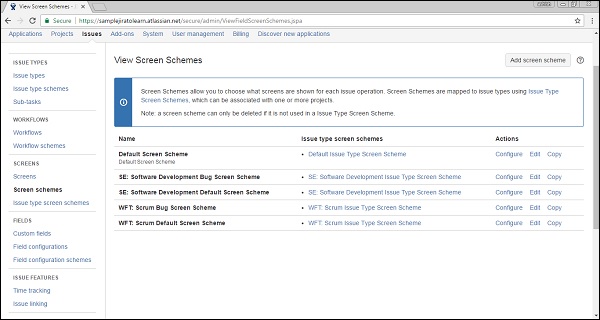
Screen Schemes
Screen schemes provides an option to choose fields, which should display when a particular issue type is selected. A screen scheme is mapped with issue type using the Issue Type Screen Scheme. It can be associated with one or more project. A screen scheme can be deleted only when it is not used by any Issue Type screen scheme. The user can add a new screen scheme by clicking on the Add Screen Scheme button. The following screenshot shows the different screen schemes available for the listed projects.
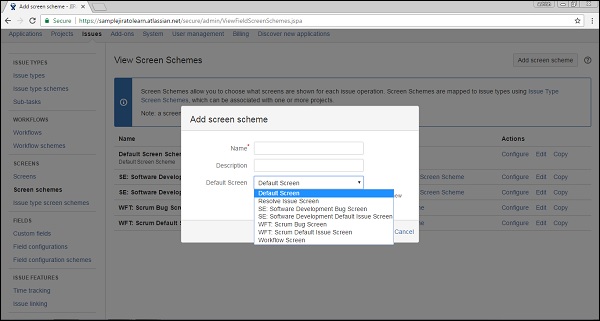
Provide all details and the click on the ADD button. The following screenshot shows how to add a new screen scheme.
JIRA - Issue Creation
To create an issue in JIRA, the user should have Create Issue permission in the project. Admin can add/remove the permission.
Steps to Follow
Click on the Create button in the navigation bar to open the create issue dialogue box.
To complete the process of creating an issue, we should follow the pointers given below.
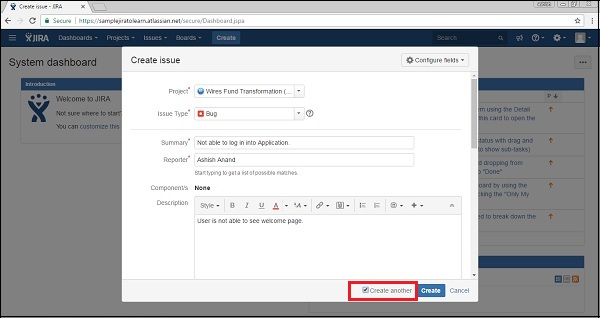
Select the Project where the issue is.
Select the type of issue, whether it is a bug/new feature/story, etc.
Write a one-line summary to provide the overall idea about the issue.
Write the details of the issue in the Description field. Explain the issue, so that stockholders can understand every detail of the issue.
To create a similar type of issue in the same project and issue type, check the checkbox of Create another otherwise keep it as unchecked.
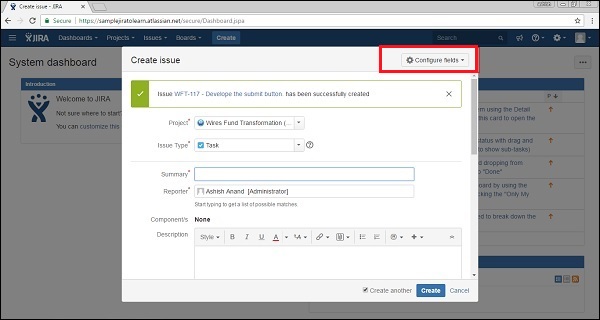
After entering all the details, click on the Create button.
The following screenshot shows how to create an issue by providing the required and optional details.
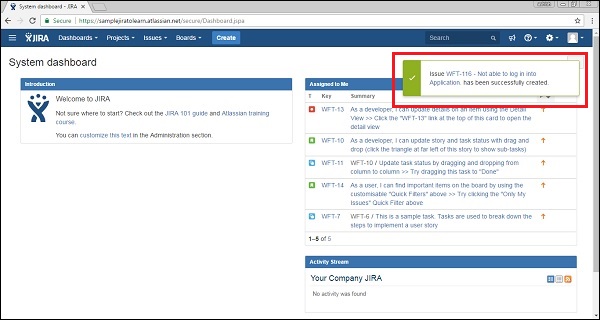
If the Create another checkbox is not checked, after clicking on the Create button, the user will have to navigate to the Dashboard and a pop-up will display on the right side with an issue id and summary.
The following screenshot shows how to know whether the issue is successfully created or not.
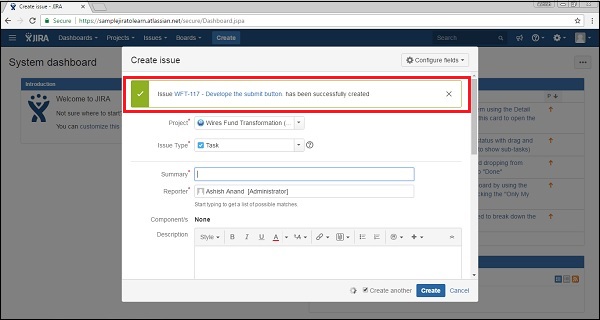
If the Create another checkbox is checked while clicking on the Create button, the user will get a new create issue page along with the issue id.
The following screenshot shows the page, if the user has checked the Create another box.
Configure Fields
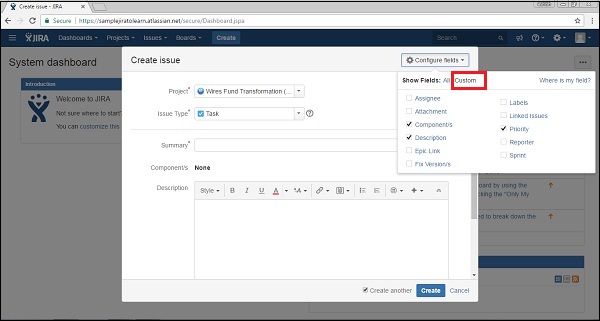
To add other fields in the Create Issue form, click on Configure fields at the top right hand side of the page. The following screenshot shows how to configure the fields in the Create Issue page.
After clicking on the Configure fields button, a drop down box will be displayed, click on Custom. The following screenshot shows the available fields under the Custom tab.
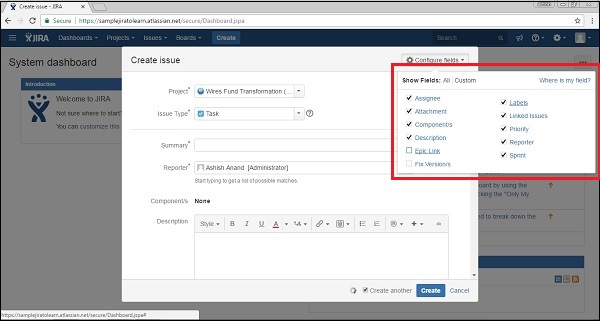
By checking and unchecking the checkboxes to show and hide, fields will be added or cleared from the form. The following screenshot shows the available fields under the All tab.
Now navigate to Create Issue, all fields based on choices will be displayed in the form that shows up. The following screenshot shows the configured fields in the Create Issue page.
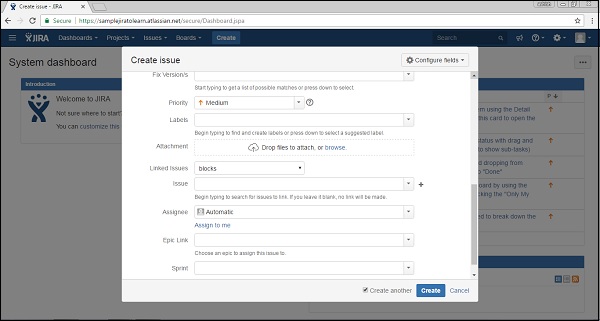
The fields in the Create Issue form are explained below.
Priority − Issue creator can set the priority to resolve the issue as High, Medium, Low, and Lowest.
Labels − It is similar to Tag; it helps in filtering out specific types of issues.
Linked Issue − It links other issues that are either dependent on this issue or this issue is dependent on them. Options in dropdowns are block, is blocked by, duplicate, clone, etc.
Issue − User can link the issue by the Typing ID or summary of those that are related to the linked issue field.
Assignee − The person who is responsible to fix this issue. Assignee name can be entered by the issue creator.
Epic Link − An Issue creator can provide an epic link, if the issue belongs to any of those.
Sprint − The user can define in which sprint, this issue belongs to, when this issue should be addressed.
In the next chapter, we will learn how to clone an issue.
JIRA - Clone an Issue
Cloning means to copy. To clone an issue means to create a duplicate issue within the same project. A cloned issue can be treated as a new issue and edited like other issues.
We should consider the following points while cloning an issue.
A cloned issue is completely a separate issue from the original issue.
Any action or operation taken on the original issue does not have any impact on the clone issue and vice-versa.
The only connection between the original and clone is the link that is created.
Information that is carried from the original issue to clone issue is as follows −
Summary
Description
Assignee
Environment
Priority
Issue Type
Security
Component
Reporter
Affects Version
Fix Version
Attachment
Projects
Content of custom fields are also cloned
Information that is not cloned −
Time Tracking
Comments
Issue History
Links to confluence pages
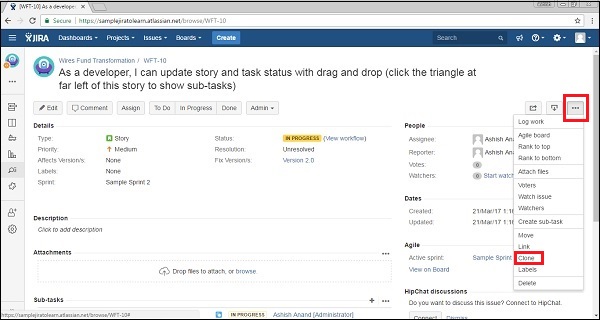
Steps to Follow for Cloning
Open a JIRA issue that is supposed to be cloned. Select More → Clone when the screen appears. The following screenshot shows how to access the Clone functionality.
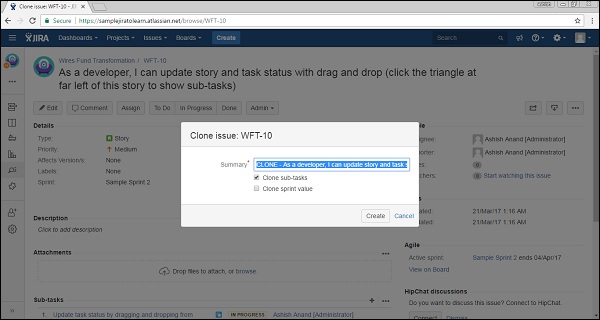
In the clone screen, there are a few options given to the users, which are as follows −
A user can change the summary while cloning it.
If the issue contains links to other issues, a user can check the checkbox to contain the clone issue or uncheck if the user does not want to be a part of the clone issue.
If the issue has sub-tasks, the user can select/deselect the checkbox to contain the sub-tasks in clone or not.
The same is applicable for attachment as well.
It also gives an option, whether to carry or not the sprint value to the new clone issue.
The following screenshot shows how to clone an issue by providing the necessary details.
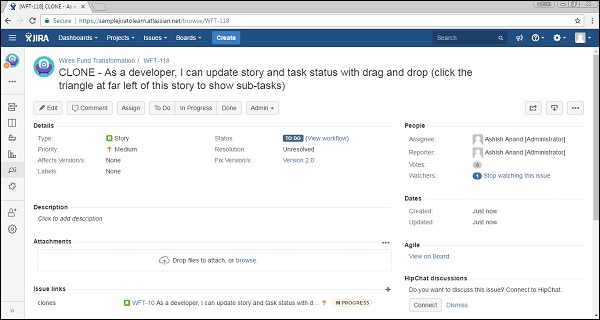
The next step is to click on Create. It will display the clone issue details. If the user does not change the clone words while creating, it can be visible in the summary, links and sub-tasks. The following screenshot shows how a cloned issue is displayed.
JIRA - Create a Subtask
An issue can be completed by performing many tasks with different persons like Dev, QA, UAT, Business, Support, etc. To track the progress in each department, sub-tasks are created in an issue and assigned to the concern person. Once all the sub-tasks are resolved, the issue can be marked as completed.
Points to Note for Creating a Subtask
The following points are to be considered when creating a subtask.
All subtasks are an essential part of their parent issue.
All subtasks are visible on the main screen of the parent issue.
Subtasks always belong to the same project as their parent issue.
Subtask has all fields that are present in the standard issue.
Subtasks cannot have a subtask of their own.
Steps to Follow for Creating a Subtask
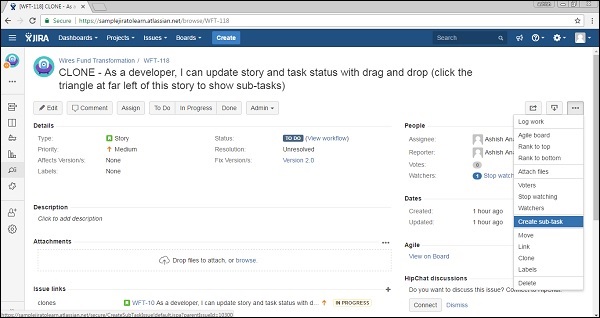
We should consider the following steps when creating a subtask.
Open an issue where subtasks should be created.
Select More → Create Subtask. Create subtask page will display.
The following screenshot shows how to access the Create Subtask functionality.
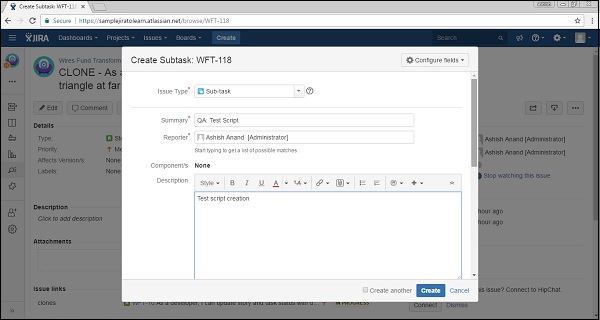
Enter the details in all the required fields and then click on Create. The following screenshot shows the Create Subtask Form with the required and optional fields.
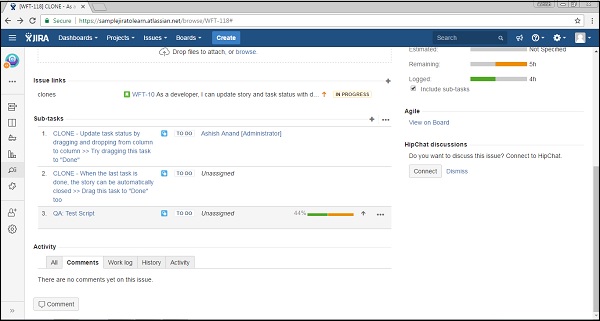
Once a subtask is created, it will be available on the Main Issue page → Subtask section. The following screenshot shows how to view a subtask in an issue.
JIRA - Convert Issue To Subtask
In this chapter, we will understand how to convert an issue to a subtask. For doing this, we should follow the procedure given below.
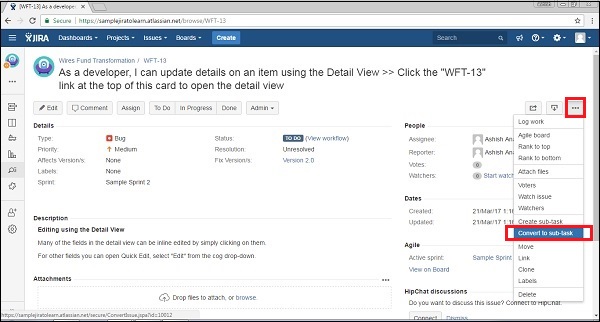
To begin with, navigate and click to the issue, which needs to be converted into a subtask. Select More → Convert to subtask. The following screenshot shows how to navigate to convert to sub-task.
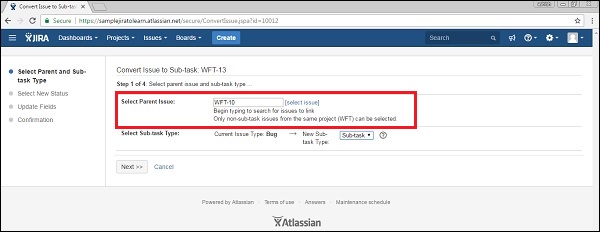
Choose the parent issue in which this subtask will be tagged. The following screenshot shows how to convert the issue into a sub-task.
Click on Next. If the status of the issue is not an allowed status for the new issue type. Select New Status will be displayed. Select a new status and click on the Next button.
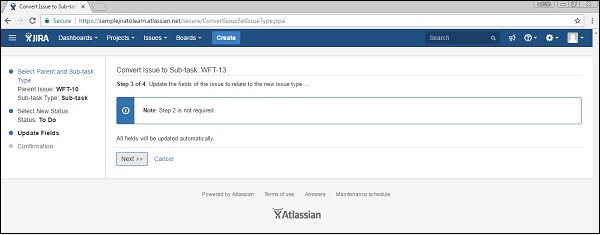
Update Fields screen will be prompted to enter any additional fields, if they are required. Otherwise, a message will be prompted as 'All fields will be updated automatically'. Click on Next.
The following screenshot shows how to convert the issue in sub-tasks.
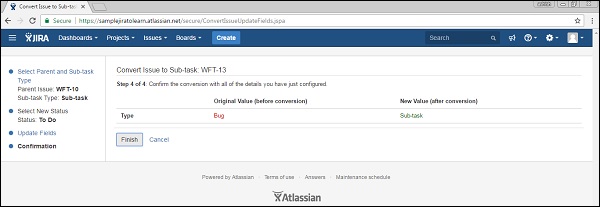
The Confirmation screen is displayed. It will display the original values and the new values. Click on Finish.
The following screenshot shows how to convert the issue in sub-tasks.
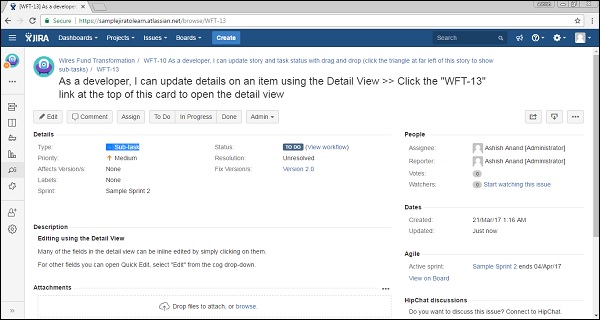
The original issue will be displayed. Now it is a sub-task. The parent's issue number is now displayed at the top of the screen. The following screenshot shows how the sub-task displays after successful conversion from an issue.
Convert an Issue to a Subtask
We should consider the following points while converting an issue to a subtask.
An issue cannot be converted into a subtask if it has its own subtask.
To convert such an issue into a subtask, we should first convert all the subtasks of issues into a standard issue and after that convert the issue into a subtask.
Subtasks cannot be moved from one issue to another directly.
To move a subtask from one issue to another, first convert all sub-tasks into issues and then again, convert issues to subtasks by giving the parent issue name while converting.
In the next chapter, we will learn how to covert a subtask to an issue.
JIRA - Convert Subtask to Issue
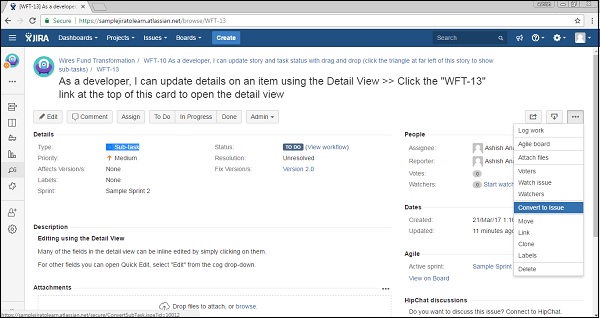
To convert a subtask to an issue, we should first navigate to the subtask that needs to be converted into an issue. Then, Select More → Convert to issue. The following screenshot shows how to navigate at Convert to Issue.
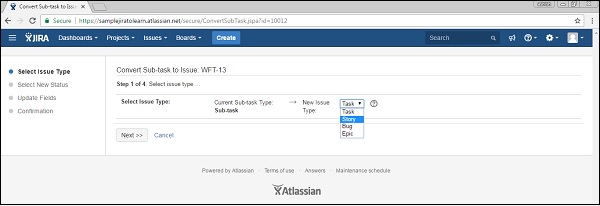
To begin with, click on the drop down box of the Select Issue Type option, choose the type of the issue (i.e., a standard issue type) and click on the Next button.
The following screenshot shows how to convert a sub-task to an issue.
If the status of the subtask is not an allowed status for the new issue type, then the Select New Status screen is displayed. Select a new status and click on the Next button.
In the next step, the Update Fields screen will be prompted to enter any additional fields if they are required. Otherwise, a message will display stating 'All fields will be updated automatically'. Click on Next.
The following screenshot shows how to convert a subtask in to an issue.

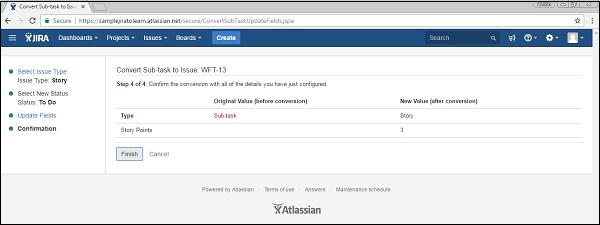
The Confirmation screen is displayed. It will display the original values and the new values. Click on Finish.
The following screenshot shows how to convert a subtask to an issue.
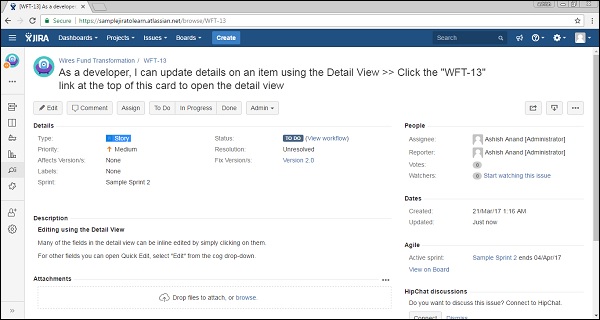
The issue will be displayed. It is no longer a subtask. There is no longer a parent issue number displayed at the top of the screen.
The following screenshot shows how the issue will display after conversion from a subtask.
JIRA - Create Issue using CSV
A User can create multiple issues at a time using Comma separated file known as CSV. The CSV files are text files those represent tabulated data and separate different sections by commas.
They have two-step process that requires importing the data from a CSV, while a third optional step is also present, which are listed below.
- Prepare a CSV file.
- Import the CSV file into the system.
- Save the configuration for future use.
Prepare the CSV File
While creating a CSV file the following points must be considered.
Each CSV file should have a heading row with a summary column. The first row is the heading row and represents the fields of the create issue page. Example − Summary, Assignee, Reporter, Priority, Description, sprint, Test Suite, Ashish, Ashish, 1, etc.
Use double quote marks () in the CSV file to capture data that appears in multip.le lines. For Example − upon import, JIRA will treat the following CSV as a single record: Summary, Description, Status, "Login issue", "This is on a new line", Open
While importing issues from a CSV file, the Project Name and Project Key are important columns in CSV. In addition, the name of these fields should match exactly as they are present in JIRA.
Import the CSV File
To import the CSV file, we should follow the steps given below.
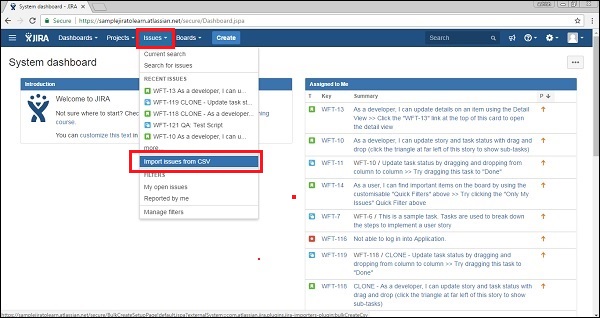
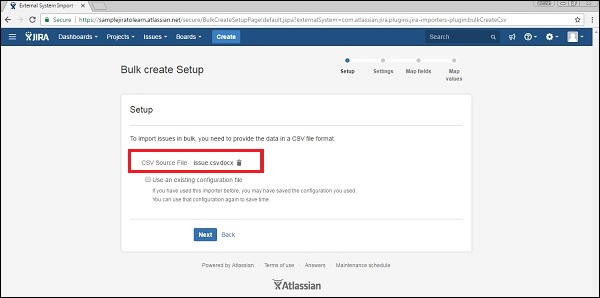
Step 1 − Select Issues → Import Issues from CSV to open the Bulk Create Setup page.
The following screenshot shows how to access the Import issues from the CSV functionality.
Step 2 − On the Setup page, select CSV Source File. Do not check the Use an existing configuration file check box, if you do not have a configuration file or if you want to create a new configuration file.
Configuration files specify a mapping between column names in the CSV file's header row and fields in the JIRA application.
The following screenshot shows the Bulk create setup page, where the user browses and uploads the CSV file.
Step 3 − If the user checks the checkbox of Use an existing configuration file, JIRA will ask to specify an Existing Configuration File.
The following screenshot shows how to use an existing configuration file.
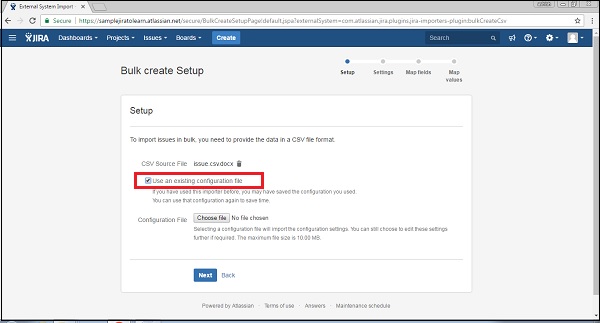
Step 4 − If the user does not select this option, then at the end of the CSV file import wizard, JIRA will ask to create a configuration file, which can be used for subsequent CSV imports.
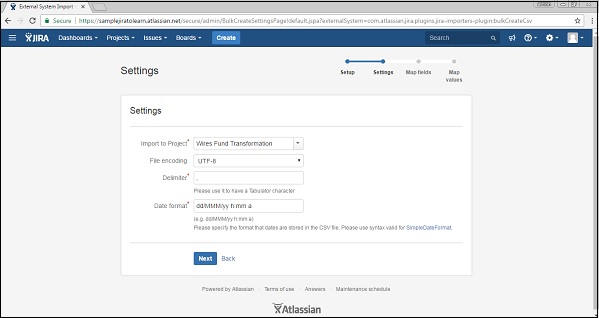
Click on the Next button → the Settings step of the CSV file import wizard will display. Complete the required fields. If the CSV file uses a different separator character other than a comma, specify that character in the CSV Delimiter field. If the separator is a 'Tab', this can be entered using the format '/t'.
The following screenshot shows how to provide settings of csv file −
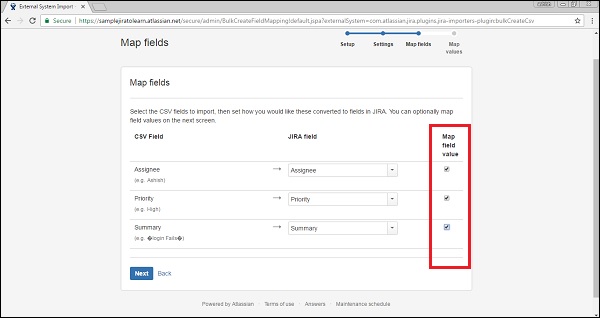
Step 5 − Click on the Next button to proceed to the Map fields step of the CSV file import wizard. Here, the user has to map the column headers of the CSV file to the fields in the selected JIRA project. After selection, tick the check box for Map field value.
A CSV field should map to the JIRA summary field. This ensures the issues created have a summary.
The following screenshot shows how to map CSV fields with JIRA fields −
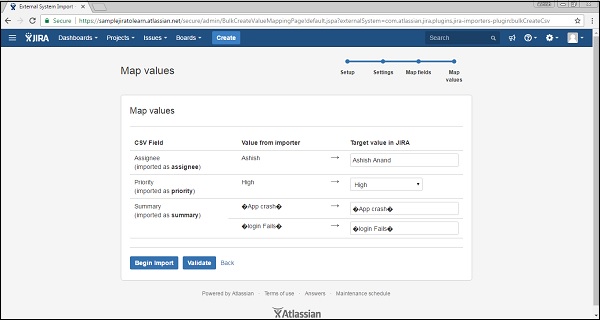
Step 6 − Click on the Next button, the Map values step of the CSV file import wizard will display. On this step of the import wizard, the user can select which specific CSV field values to map to which specific JIRA field value.
Fields whose Map Field Value check boxes were selected in the previous step will be presented on this page.
If the CSV field has a username (e.g. Reporter or Assignee) and does not select the Map Field Value check box for this field in the previous step of the CSV file import wizard, then the importer will map imported usernames from the CSV file to (lowercase) JIRA usernames.
The following screenshot shows how to map values.
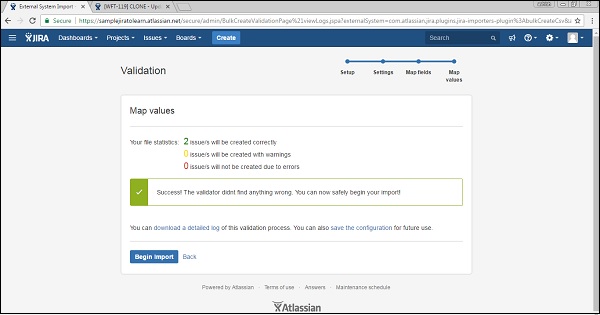
Step 7 − Click on the Validate button, it will validate the imported data and display if any errors or warnings are required, otherwise it will display how many successful imports are possible with the file.
The following screenshot shows the successful validation of CSV file.
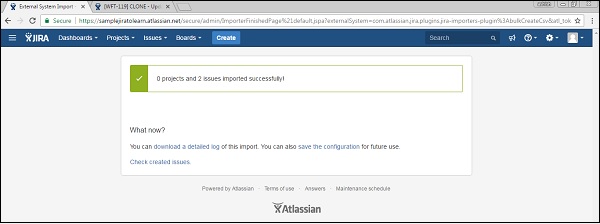
Step 8 − Now, Click the Begin Import button. The importer will display updates like import is in progress, then a success message when the import is completed.
Following screenshot shows how many issues are created using CSV file −
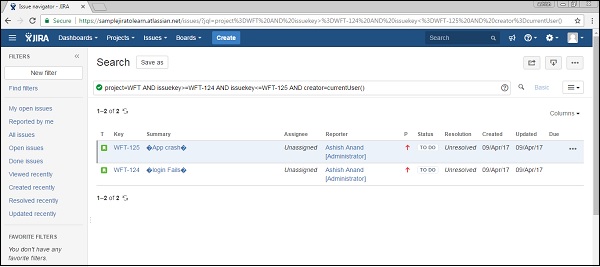
Step 9 − Click on the Check Created issues, it will display the list of issues those are created using the CSV.
The following screenshot shows the list of newly created issues using the CSV file.
JIRA - Edit an Issue
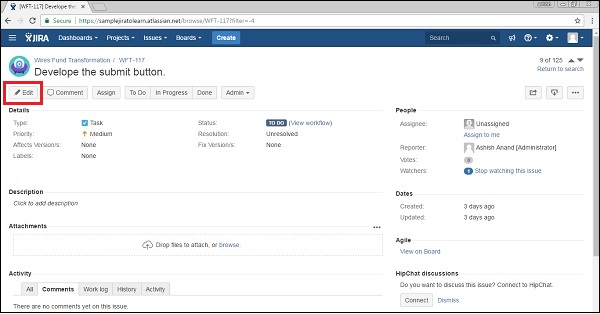
To edit an issue in JIRA, the user has to navigate to the issue, which is required to edit and the click on the issue to open the page. The next step is to click on the Edit button, which is present at the top left hand side of the view issue page. It will open the edit issue page that is similar to the create page.
The following screenshot shows how to access the Edit functionality.
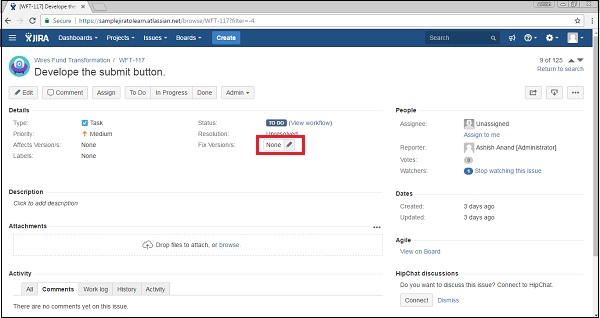
Or, hover the mouse over the field and click on the Pencil Icon to edit the specific field inline.
The following screenshot shows how to edit a specific field without clicking on main edit button −
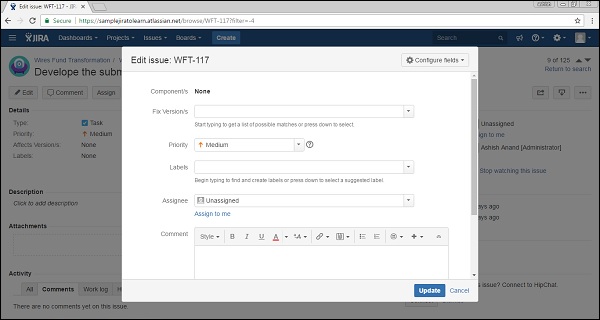
Modify the issue details in the corresponding field of the edit Issue page. The Following screenshot shows the edit page to update details of an issue.
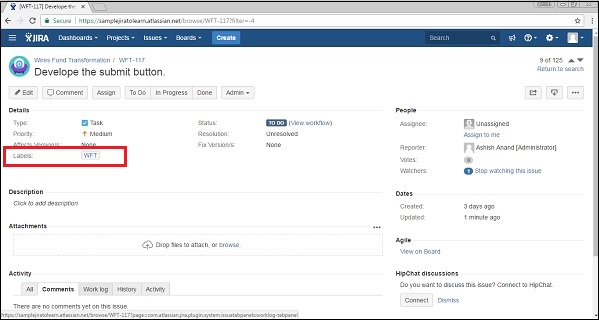
Once the update is completed, click on the Update button. The user will be able to see the edited text/fields in the View Issue Page.
The Following screenshot shows the updated details −
JIRA - Email an Issue
In this chapter, we will learn how to email an issue in JIRA. A user can email an issue to other JIRA users. There are two ways to do it −
- By share an issue and
- By mention these users in issues Description or Comment field.
Let us now discuss each of these in detail.
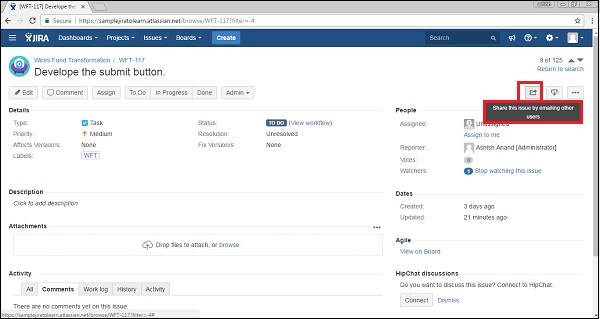
Sharing an Issue
To begin with, the user should navigate to the issue that is required to share and click to view the issue. Click on the Share Symbol on the top right hand side of the page. The following screenshot shows where the sharing option present at issue page −
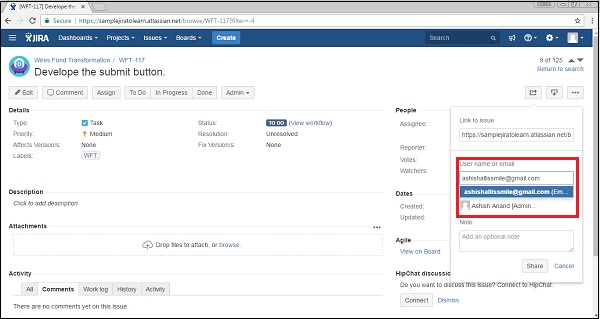
You can write the JIRA users name by typing their usernames or partially/all of their full names as registered with JIRA or type the email addresses of the individuals with whom you would like to share the issues.
When the user starts typing a JIRA user's username or name, or a previously specified email address, an auto-complete dropdown list of users appears.
The Following screenshot shows how to provide email addresses or select from the auto-completion suggestions.
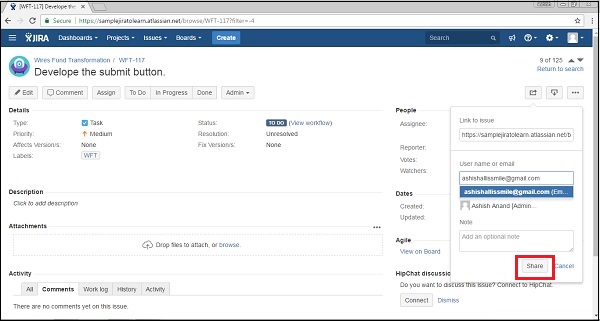
Add optional note. Click on the Share button present in the Share wizard section. The following screenshot shows how to share/email an issue to a user.
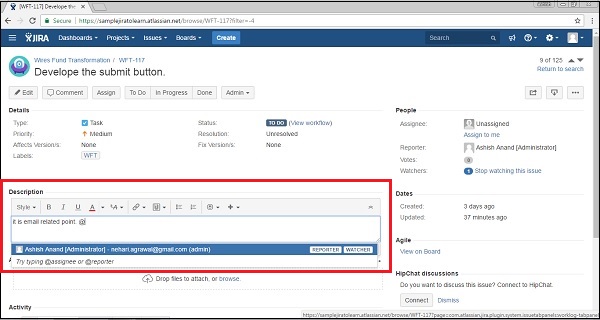
Mention Users in Description / Comment
In the issue's Description or the Comment field, type '@' and then the first few characters of the JIRA user's username or partially/all of their full name as registered with JIRA.
As the user starts typing, a list of suggested users will appear in a dropdown list below the field. The user should select based on the referenced users by completely typing the JIRA user's username or choose from the list of suggested users in the dropdown list.
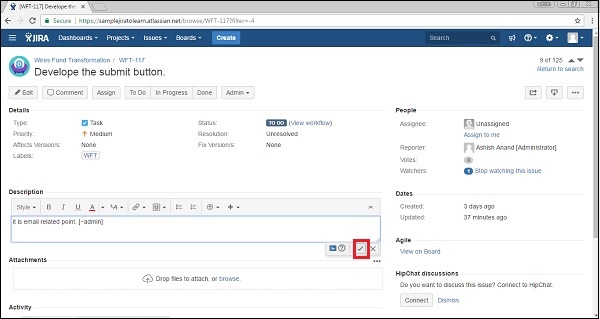
The following screenshot shows how to mention the users name/email in the description.
Click on submit the field. JIRA will send that user an email message indicating that you mentioned them on that issue.
The following screenshot shows how to submit mentioning the users email in the description.
JIRA - Label an Issue
A Label is used to categorize an issue. It is similar to the hashtag (#) used in twitter, Facebook or other social sites. It also helps while searching an issue. While viewing an issue, the label appears in the detail section of the issue.
The following screenshot shows where the labels are present in the issue detail page.
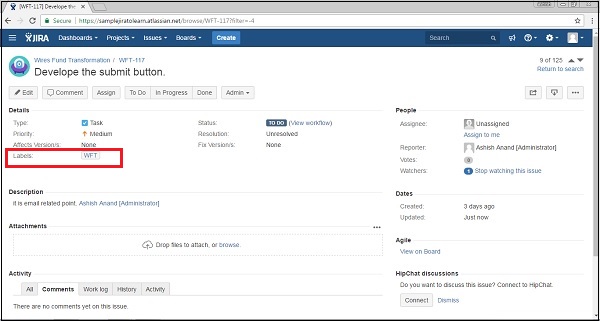
Once the user clicks on the label i.e. WFT, it will display the list of issues having the same label.
The following screenshot shows how to search issues using label names −

Add and Remove Labels
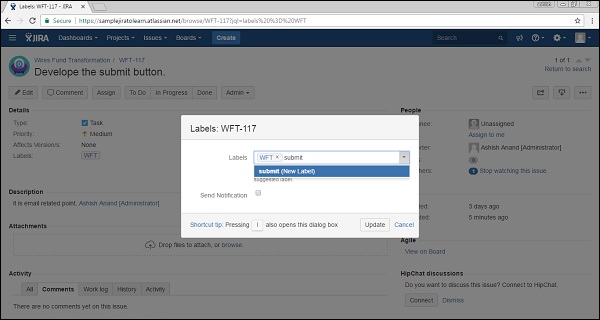
To add or remove labels, a user has to go to the View Issue page and select the issue that needs to add labels. Click on More → Labels. A dialogue box will appear.
The following screenshot shows how to access the Label features.

Start typing the label and select from the suggestions. The following screenshot shows how to add labels.
To Delete a label, click on the close (x) sign, which appears beside the label name. The following screenshot shows how to delete an existing label −
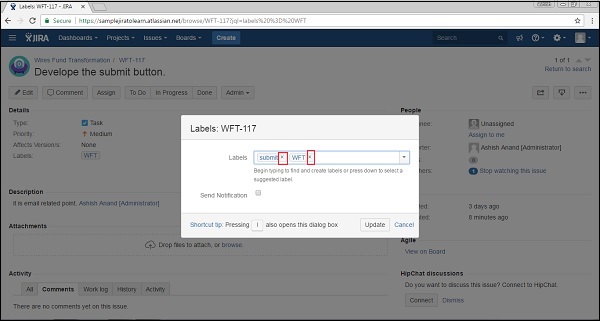
Click on the Update button. Labels are added / removed from an issue and can be verified in the Detail Section of the View Issue Page.
The following screenshot shows where to verify the updated labels.

JIRA - Linking Issues
This feature is very useful when two issues have some type of a dependency on each other as if they are duplicates or relate to each other, upstream downstream dependency or blocking issues.
Create a Link to Another Issue
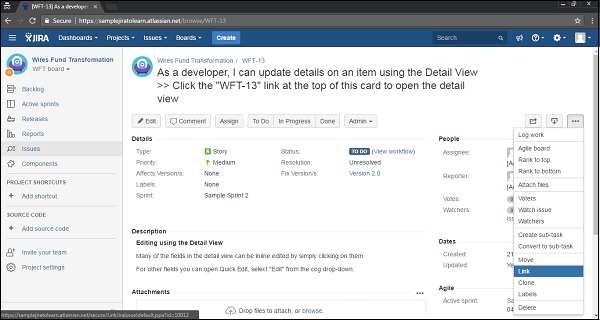
For creating a link to another issue, the user has to navigate to the issue and click on the View Issue Page. After that, click More → Link to display link dialogue page.
The following screenshot shows how to access Link feature −
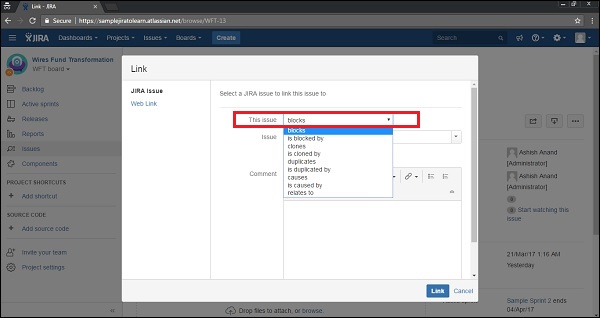
Select JIRA Issue item in the left side of the dialogue and select This issue field from the dropdown list. The following screenshot shows how to link an issue by providing the details.
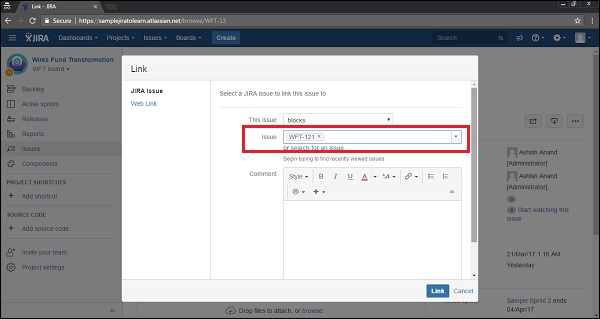
The next step is to select/search issue. The following screenshot shows how to add an issue as a link in another issue.
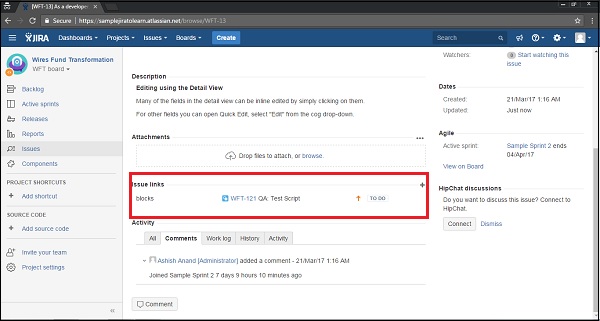
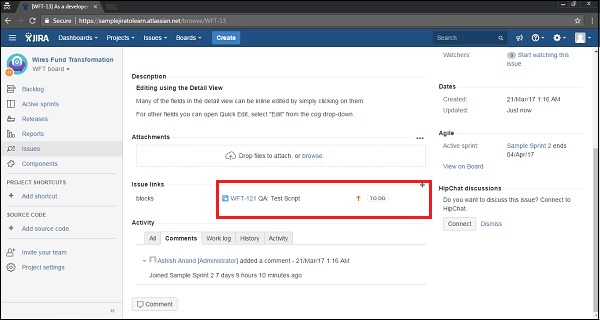
Add the comment; it is optional and then Click on Link. The View Issue page shows up and the user can go down and verify whether the linked issue is displayed or not under the Section Issue links.
The following screenshot shows how to view linked issue in parent issue −
Deleting a Link
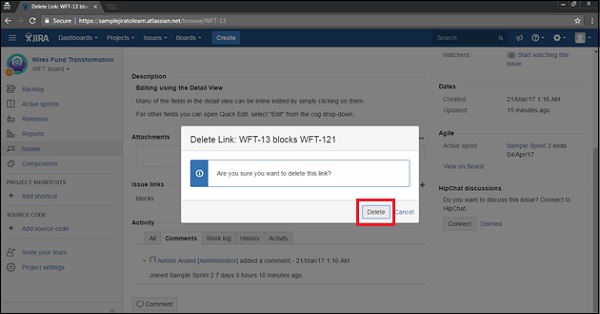
To delete a link, a user should go to the View Issue page and to that issue which contains the links. Scroll down and go to Issue Links section. Hover the mouse over the link that should be deleted and then click on the Delete icon.
The following screenshot shows how to delete a link −
A confirmation pop-up will display; click on the Delete button. The following screenshot shows the confirmation pop-up for deletion.
JIRA - Move an Issue
JIRA has a feature to move an issue from one project to another project. Let us understand with the following steps, how a user can do it.
Steps to Follow
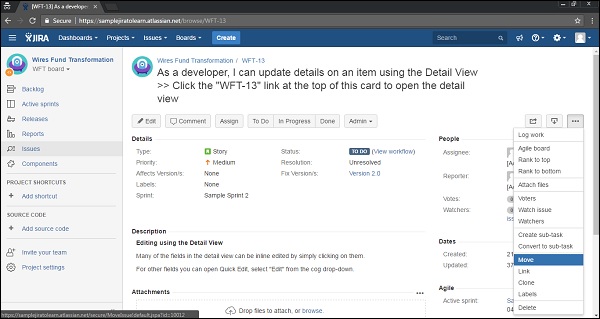
Go to the View Issue page that needs to move into another project. Select More → Move. The following screenshot shows how to access Move feature −
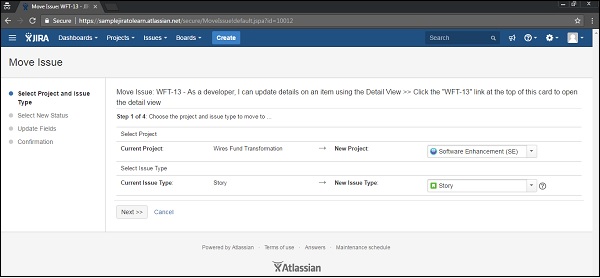
In the first step of the Move Issue wizard, select the new project where the issue will move, and if required/desired, change the issue type. Click on Next to continue.
The following screenshot shows Select Project and Issues step to move −
If there is a need to change the status of the issue, the user can go to Select Status page. Select the new status for the issue and click on the Next button to continue.
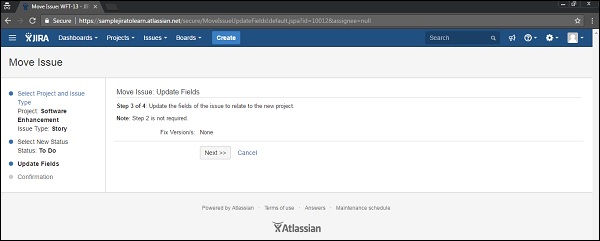
If required to specify the values for any required custom fields, the Update Fields page is displayed. Specify the desired values for each field, and click on Next to continue.
The following screenshot shows the Update Fields step, if required before moving an issue.
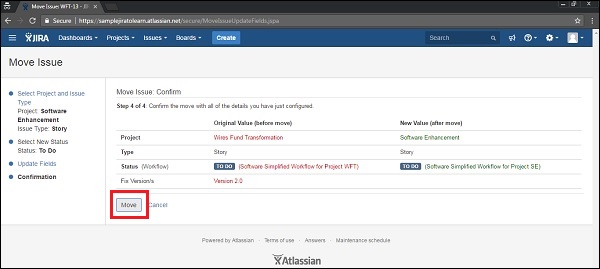
The confirmation page will display with all the changes. If a user wants to revise any of the changes, click the appropriate step in the left hand side menu to return to that page of the wizard. After that, click on the Move button to move the issue to the target project.
The following screenshot shows confirmation step to confirm details before moving −
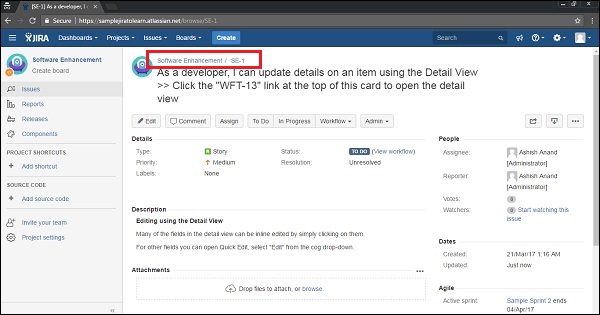
The Issue will be moved to the target project and displayed on screen. This Issue can be further edited to make additional changes. The following screenshot shows a new project and an issue type after the successful moving an issue.
JIRA - View/Change History
In this chapter, we will learn how to view and change history in JIRAN. History is the record of all the activities performed on issues. Some of the most common instances are −
- Creator of the issue
- Changes to an issue field
- Attachment of a file
- Deletion of comment/Work log
- Addition/deletion of links
In a history record, a user can view the following information.
- User name who made the changes
- Time while the changes was made
- If an issue field is changed, new and old values of that field
Steps to View History
To view history in JIRA, the user should follow the steps given below.
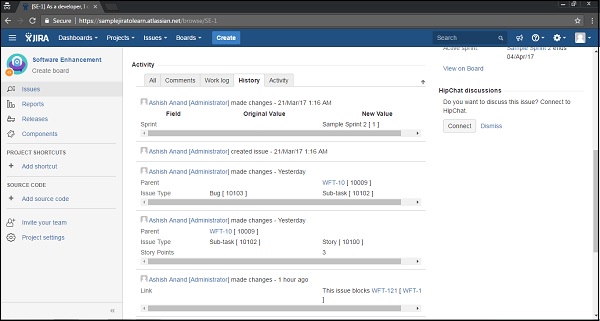
- Go to View Issue Page to see change history
- Scroll down to Activity section
- Click on History tab
The following screenshot shows how to view History.
JIRA - Watch and Vote on Issue
In this chapter, we will understand how Voting and Watching is done on an issue in JIRA.
Voting on an Issue
JIRA has a feature called as Vote to provide the opinion on the preference for that issue, whether it is resolved or completed.
- Admin needs to add permission for users to use this feature.
- Go to the View Issue page where voting is required.
- Click Vote for this issue to instantly vote for that issue.
The following screenshot shows where Votes field is present at issue detail page −
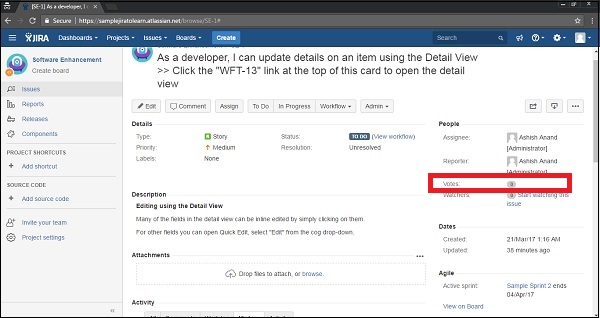
Note − Since the user does not have permission here to vote, the user is not able to view the link beside Votes field.
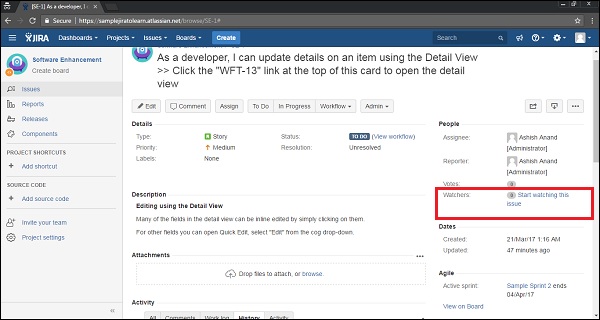
Watching an Issue
JIRA has a feature that allows users/stakeholders to keep an eye on the issue, whenever there is any update or changes in that issue. If there is any the issue, it sends notification/emails to those who are listed as watchers for that specific issue.
- Admin needs to add permission for users to use this feature.
- Go to the view issue page that the user wants to watch.
- Click on the Start Watching this issue link to be listed as watchers.
The following screenshot shows where the Watchers field is present in the Issue Detail page.
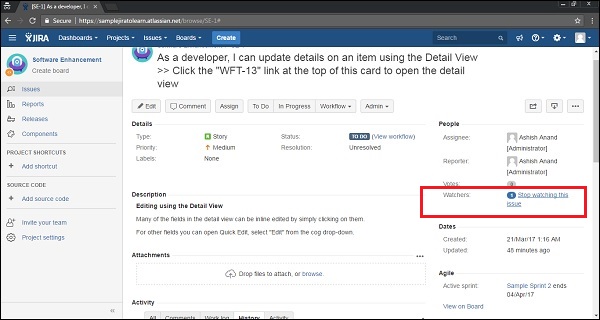
Now instead of zero watchers, there will be 1 (watcher) displayed along with the link Stop watching this issue to delist as watchers. The following screenshot shows the updated number of watchers −
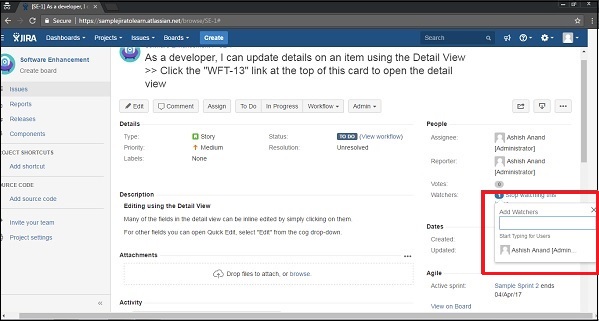
The user can click on 1, it allows to add other users as well to the list as watchers. Start typing the user name in the Add watchers box and select from the autocomplete box. The user will be listed as watchers.
The following screenshot shows how to add a new watcher by providing the users detail.
JIRA - Search
JIRA has powerful and very efficient search functionalities. A user can search issues across Projects, Versions and Components using various search types. JIRA allows saving the search criteria to utilize next time as filters; even these filters can be shared by others as well.
Types of Searching Options
JIRA has a couple of fundamental ways to search issues. The most important ones are as follows.
- Basic Search
- Quick Search
Let us now understand both of these search types in detail.
Basic Search
Basic Search in JIRA is a user-friendly interface that can be used easily to find out the issues. It uses the JQL queries in the backend. To do a basic search in JIRA, the user has to follow the steps given below.
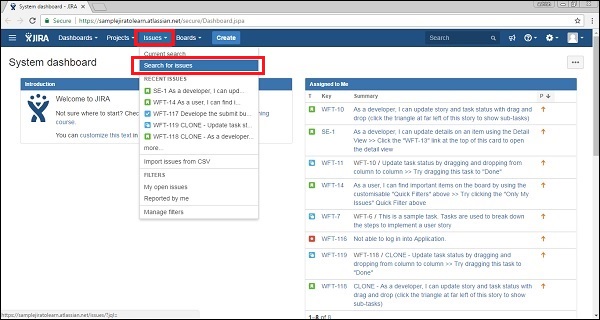
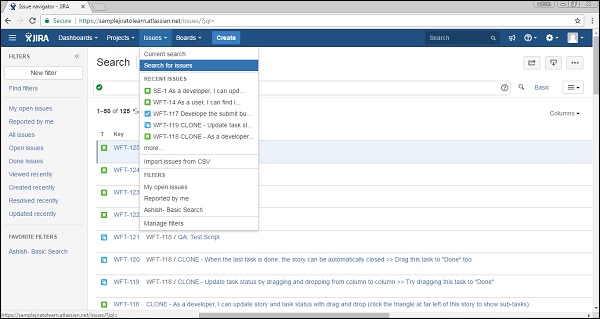
Step 1 − Navigate to issues → Search Issues. The following screenshot shows how to access the Search for Issues feature −
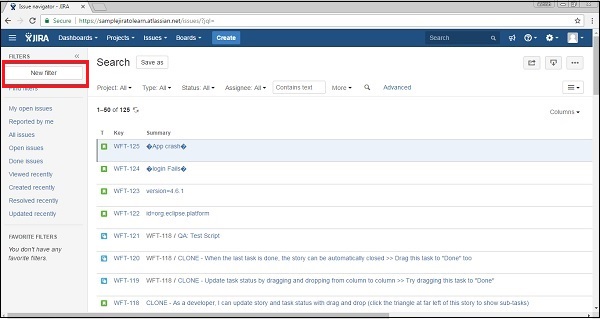
Step 2 − A search page displays. If it has any existing Search criteria, then click on the New Filter to reset it. The following screenshot shows how to define a new search criteria.
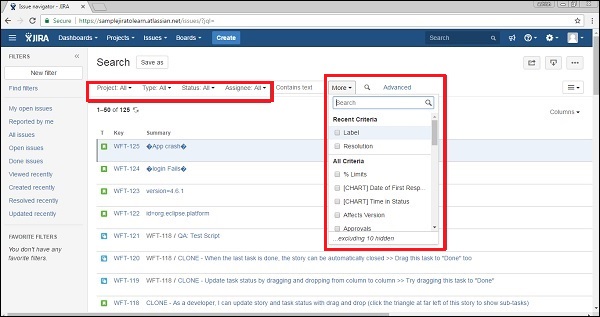
Step 3 − Set the search criteria against different fields like Project, Type, Status and Assigned. Then click on More and select any field to search with additional fields. The following screenshot shows what all criterias can be set to search issues.
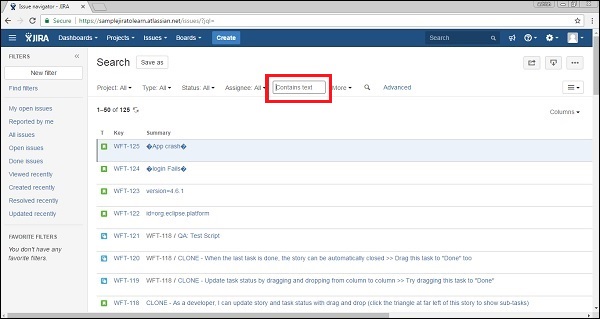
Step 4 − If the user wants to search against any specific text, keywords, start typing in the Contains text box. The following screenshot shows how to search specific text in issues.
Step 5 − A user can use wildcards or operators in all text based fields to search specific strings. For example −
- Single character wildcard - te?t
- Multiple characters wildcard win*
- Boolean operators - "atlassian jira" || confluence
Based on different search criteria, the following result is displayed. The following screenshot shows the list of searched issues.

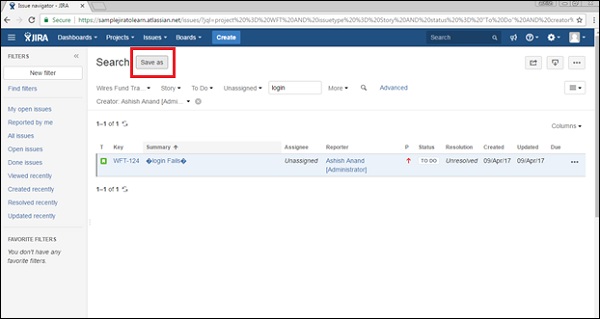
How to Save a Search
To save the searched criteria, the user should follow the steps given below.
Step 1 − Click on Save As at the top of the page. The following screenshot shows how to save the search criteria for future use.
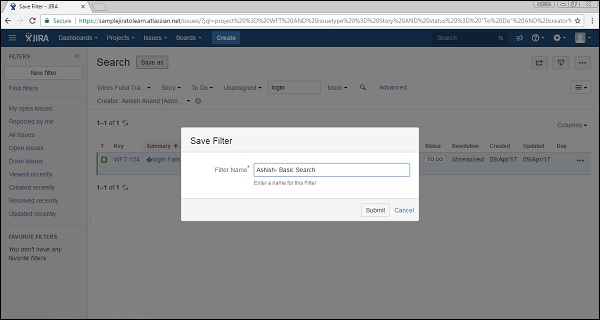
Step 2 − Type the filter name and click on Submit. The following screenshot shows how to provide a name of new search criteria before saving.
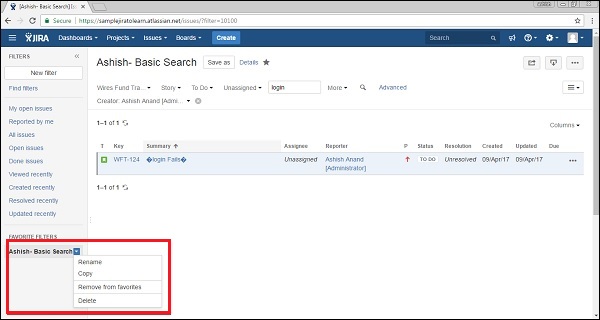
Step 3 − A Filter will appear on the left side of the Search Page under the Favourite filters and it will have a few options like Rename, Delete, Copy and Remove from Favourites. The following screenshot shows the saved search criteria and the available actions to perform.
Quick Search
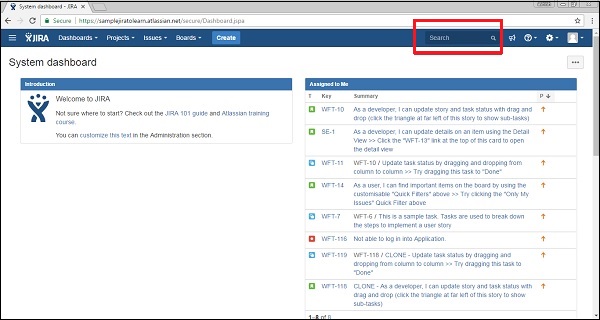
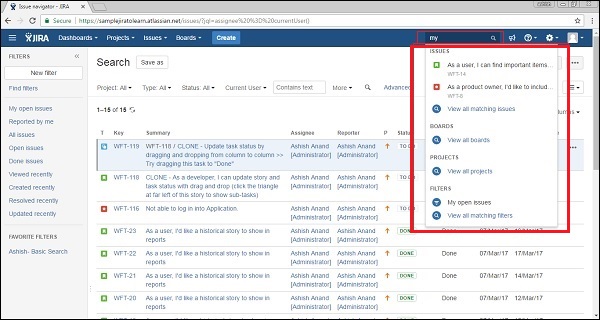
The quick search is the fastest way to define search criteria. It is a text box where the user enters the key, text or anything and it starts searching for the exact matches in the current project and provides the result.
The Quick Search box is available on the top right hand corner of the navigator. The following screenshot shows how to access the Quick Search feature.
Smart Querying
The quick search option performs smart searches with minimal typing. It recognizes the following word and gives out several options to the user to choose.
my − This word searches issues assigned to the logged-in user.
The following screenshot shows different smart querying in a quick search.
Some of the most commonly used smart querying options are as follows −
r:me − Finds issues reported by the logged-in user.
r:abc − Finds issues reported by user abc.
r:none − Finds issues with no reporter.
<project name> or <project key> − Finds issues within the given project name or finds issues having the same project key.
Overdue − Finds issues those are overdue before today.
Created:, updated:, due: − These smart searches finds issues with Created, Updated, or Due Date using the prefixes created:, updated:, or due:, respectively. For the date range, use today, tomorrow, yesterday, a single date range (e.g. '-1w'), or two date ranges (e.g. '-1w,1w'). Date ranges cannot have spaces between them. Valid date/time abbreviations are: 'w' (week), 'd' (day), 'h' (hour), 'm' (minute).
C: − Finds issues with a particular component.
V: − Finds issues with a particular version.
Ff: − Finds issues with a Fixed For version.
* − Wildcard can be utilized with any of the above queries to find issues.
JIRA - Advanced Search
Apart from the type of searches explained in the previous chapter, JIRA also has a few advanced search options, which can be performed using the following three ways.
- Using Field Reference
- Using Keyword Reference
- Using Operators Reference
These above-mentioned three ways have been explained in detail below.
The user should consider the following points while performing any advanced search.
Advanced search uses structured queries to search for JIRA issues.
Search results displays in the Issue Navigator.
Search results can be exported to MS Excel and many other available formats.
Save and Subscribe features are available to advanced searches.
An advanced search uses the JIRA Query Language known as JQL.
A simple query in JQL consists of a field, operator, followed by one or more values or functions. For example, the following simple query will find all issues in the "WFT" project −
Project = "WFT"
JQL supports SQL like syntax such as ORDER BY, GROUP BY, ISNULL() functions, but JQL is not a Database Query Language.
Using Field Reference
A field reference means a word that represents the field name in the JIRA issue including the custom fields. The syntax is −
<field name> <operators like =,>, <> values or functions
The operator compares the value of the field with value presents at right side such that only true results are retrieved by query.
- Go to Issues → Search for Issues in the navigator bar.
The following screenshot shows how to navigate the Search section.
If there is an existing search criterion, click on the New Filter button to reset the criteria. The following screenshot shows how to start with a new criteria −
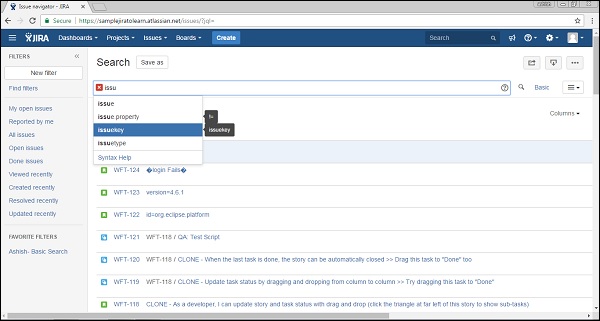
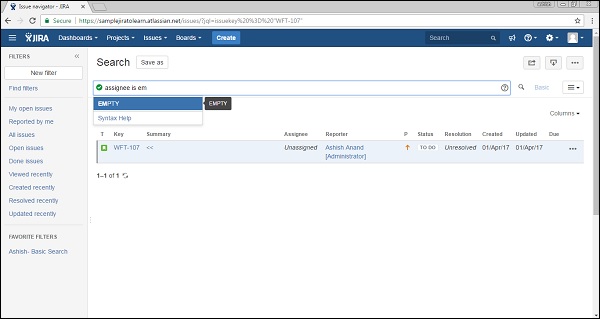
Type the query using the Field, Operator and Values like issueKey = WFT-107.
There are other fields as well Affected Version, Assignee, Attachments, Category, Comment, Component, Created, Creator, Description, Due, Environment, etc. As soon as the user starts typing, the auto-complete functionality helps to write in the defined format.
The following screenshot shows how to add Field Name criteria using advanced features.
Operator selection − The following screenshot shows how to select operators.

The next step is to enter the value and then click on the Search symbol. The following screenshot shows how to add values and search.
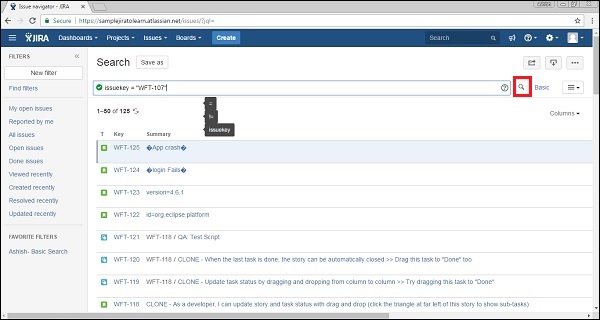
The following screenshot shows the search result based on criteria set.

Using Keyword Reference
Here, we will understand how to use a keyword reference and what its advantages are
A keyword in JQL −
- joins two or more queries together to form a complex JQL query.
- alters the logic of one or more queries.
- alters the logic of operators.
- has an explicit definition in a JQL query.
- performs a specific function that defines the results of a JQL query.
List of Keywords −
- AND − ex - status = open AND priority = urgent And assignee = Ashish.
- OR − ex duedate < now() or duedate is empty.
- NOT − ex not assignee = Ashish .
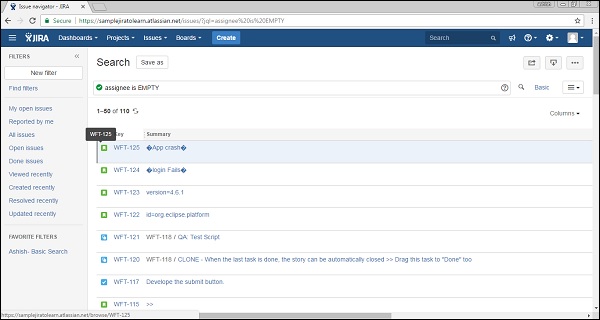
- EMPTY − ex - affectedVersion is empty / affectedVersion = empty.
- NULL − ex assignee is null.
- ORDER BY − ex duedate = empty order by created, priority desc.
Similar to field reference, as soon as the user starts typing, the auto-complete functionality helps to get the correct syntax. The following screenshot shows how to add keywords.
Click on the Search symbol and it will provide the search results. The following screenshot shows the result based on a criteria set.
Using Operators Reference
Operators are used to compare values of the left side with the right side, such that only true results display as the search result.
List of Operators
- Equals: =
- Not Equals: !=
- Greater Than: >
- Less Than: <
- Greater Than Equals: =>
- Less than equals: =<
- IN
- NOT IN
- CONTAINS: ~
- Does Not contain: ! ~
- IS
- IS NOT
- WAS
- WAS IN
- WAS NOT IN
- WAS NOT
- CHANGED
Similar to the Field and the Keyword Reference, these operators can also be used to enhance the search results.
JIRA - Reports
JIRA provides different types of reports within a project. It helps to analyze the Progress, Issues, Showstoppers and Timeliness of any Project. It also helps to analyze the resource utilization as well.
How to Access Reports
To access reports in JIRA, the user should go to Project → choose Specific project. The following screenshot shows how to navigate to a specific project.
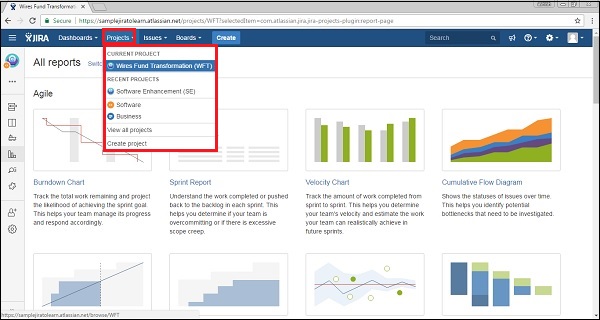
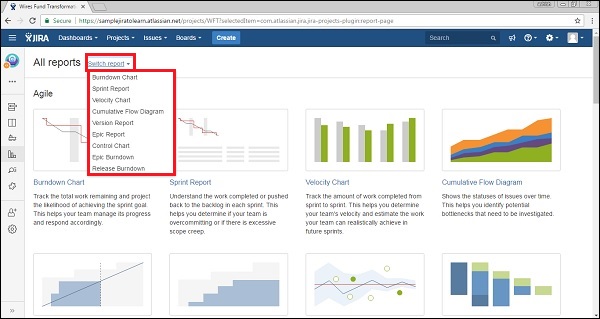
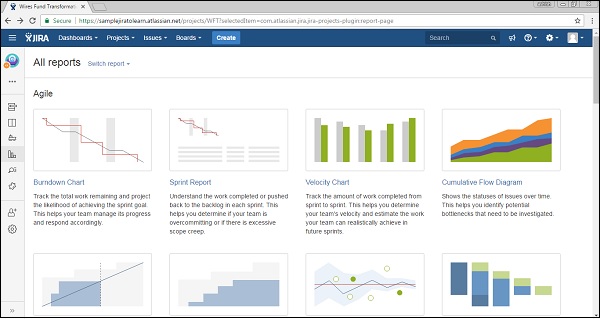
Click on the Reports icon on the left side of the page. It will display all the reports supported by JIRA. The following screenshot shows how to access the Report section.
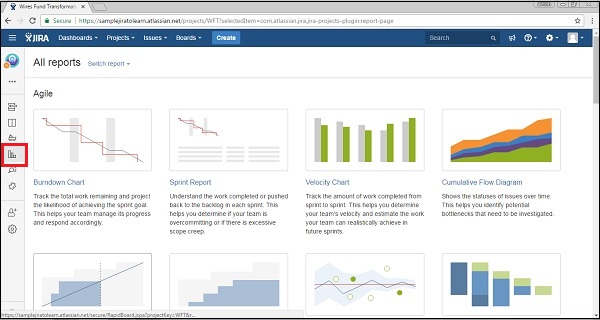
When the user clicks on Switch report, it will display the list of reports. The following screenshot shows list of reports available for quick switch.
Type of Reports
JIRA has categorized reports in four levels, which are −
- Agile
- Issue Analysis
- Forecast & Management
- Others
Let us now discuss the features of the above-mentioned report categories in detail.
Agile
Following are the list of features of Agile Reports.
Burn down Chart − Track the total work remaining, also whether sprint is achieving the project goal or not.
Sprint Chart − Track the work completed or pushed back to the backlog in each sprint.
Velocity Chart − Track the amount of work completed from sprint to sprint.
Cumulative Flow Diagram − Shows the statuses of issues over time. It helps to identify high-risk issues or unresolved important issues.
Version Report − Track the projected release date for a version.
Epic Report − Shows the progress towards completing an epic over a given time.
Control Chart − Shows the cycle time for the product, its version or the sprint. It helps to identify whether data from the current process can be used to determine future performance.
Epic Burn Down − Track the projected number of sprints required to complete the epic.
Release Burn Down − Track the projected release date for a version. It helps to monitor whether the version will release on time, so mandatory action can be taken if work is falling behind.
Issue Analysis
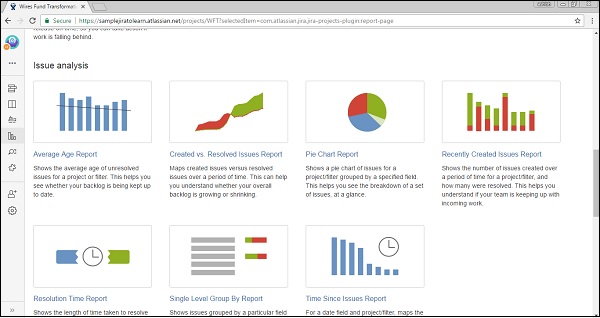
Following are the list of features of Issue Analysis.
Average Age Report − Displays the average age in days of unresolved issues.
Created Vs Resolved Issue Report − Display the number of issues created vs the number of issues resolved in given period.
Pie chart Report − Shows a pie chart of issues for a project grouped by a specified field.
Recently Created Issue Report − Shows the number of issues created over a time-period for a project and how many of those were resolved.
Resolution Time Report − Displays the average time taken to resolve issues.
Single Level Group by Report − .It helps to group the search results by a field and see the overall status of each group.
Time since Issues Report − It helps to track how many issues were created, updated, resolved, etc., over a time-period.
Forecast & Management
Following are the list of features of Forecast and Management type of reports.
Time Tracking Report − Shows the original and current time estimates for issues in the current project. It can help to determine whether work is on track for those issues.
User Workload Report − Shows the time estimates for all unresolved issues assigned to a user across projects. It helps to understand how much a user is occupied, whether overburdened or has less work.
Version Workload Report − Displays how much outstanding work is remaining per user and per issue. It helps to understand the remaining work of a version.
In addition to these, there are other types of reports that generally have a pie chart in them, which we will discuss in detail in the subsequent chapters.
JIRA - Workload Pie Chart
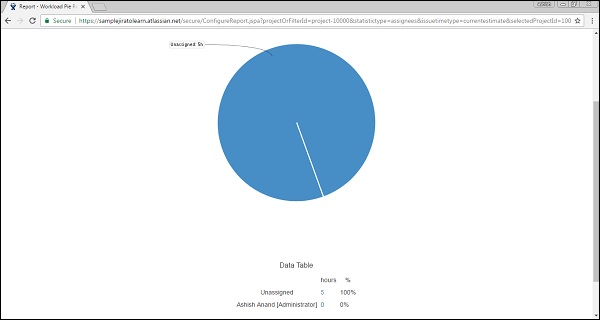
A workload pie chart displays a pie chart showing all the issues for a specific project. Let us understand how to use it in JIRA.
Generate a Report
To generate a report, the user should follow the steps given below.
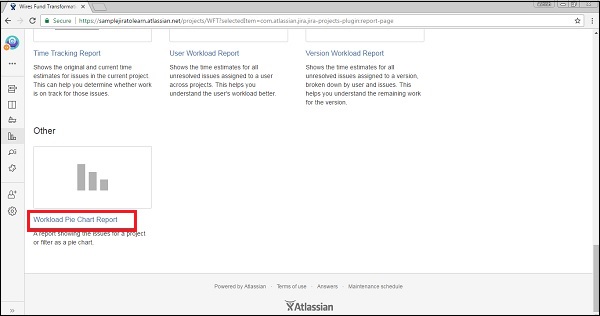
Step 1 − Go to Project → choose the Specific project. Click on the Report icon on the left side of the menu. Go to Others section and click on Workload Pie Chart Report as shown in the following screenshot.
Step 2 − Select Project or issue filter for which to generate the report. In the Statistic Type, select the field name on which the pie chart will be formed. Select the Time Field to report on as Current Estimate, Original Estimate or Time Spent.
The following screenshot shows how to generate a report by providing details.

Step 3 − Click on Next to generate the report. The following screenshot shows how the generated report looks like.
JIRA - Created vs Resolved Issues
It displays the number of created issues versus resolved issues over a given time-period. It helps to understand whether the overall backlog is moving towards resolution or not.
Generate a Report
To generate a report, the user should follow the steps given below.
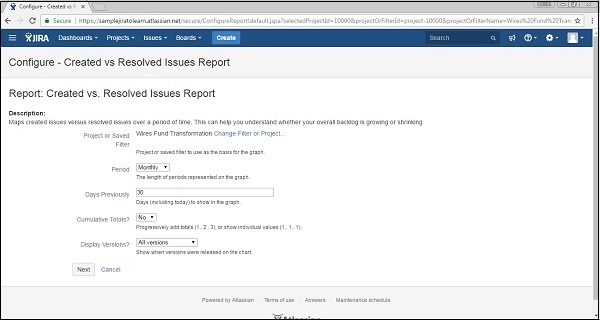
Step 1 − Go to Project → choose a specific project. Click on the Report icon on the left side of the menu. Go to Issue Analysis and click on Created Vs Resolved Issues Report. The following screenshot shows how to access the Created Vs Resolved issues report −
Step 2 − Select the Project or the issue filter for which the report has to be generated. Select the time-period to see reports like Daily, Weekly, Monthly, Quarterly, Annually, etc., available in the dropdown box. Enter the number of days in the Days Previously field to show in the graph. Select Yes or No for Cumulative totals. Select Display Versions as All Versions from the dropdown list.
The following screenshot shows how to generate report by selecting different available fields.
Step 3 − Click on Next to generate the reports. The following screenshot shows how the generated report looks like.
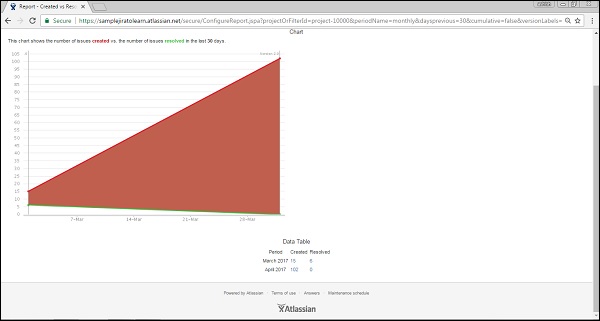
The created issues are displayed in red, while the resolved issues are in green color.
JIRA - Burndown Chart
It displays the total work remaining to achieve the sprint goal for a given time to sprint. It helps the team to manage the progress and respond accordingly. This chart is an important feature of Agile Scrum methodology.
Generate a Report
To generate a report, the user should follow the steps given below.
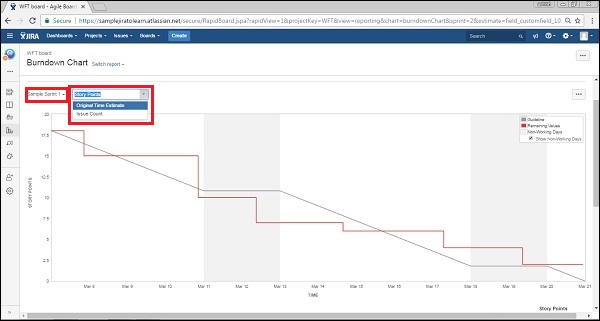
Step 1 − Go to Project → choose a Specific project. Click on the Report icon on the left side of the menu. Go to Agile and click on Burndown chart. The following screenshot shows how to access a Burndown Chart.
Step 2 − It displays the Burndown chart of the sprint like how the team is progressing towards a committed task. The red line displays how much work is remaining, while the grey line shows the committed tasks. The team can see where they stand in terms of the progress of sprint as compared to the commitment at the starting of that sprint. The user can change the Sprint and Y-axis by selection from a dropdown.
The following screenshot shows how the Burndown chart looks like sprint wise.
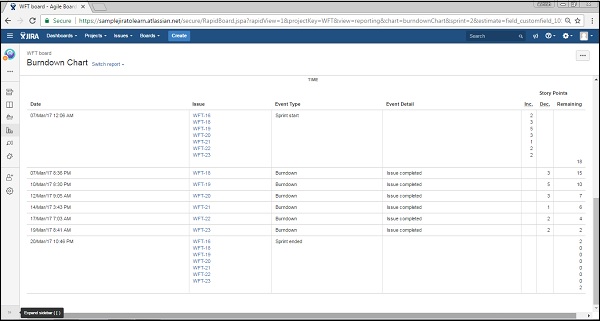
Step 3 − In the second part of the report, it displays data like what is the sprint start date, what all issues were added, day by day how many issues resolved, what story points of the issues are, and day-by-day how many story points are remaining. This data is utilized to create the chart. The following screenshot shows the data that is used to generate the chart.
Note − Quite similar to these reports, other reports can also be generated.
