- React - Home
- React - Introduction
- React - Roadmap
- React - Installation
- React - Features
- React - Advantages & Disadvantages
- React - Architecture
- React - Creating a React Application
- React - JSX
- React - Components
- React - Nested Components
- React - Using Newly Created Components
- React - Component Collection
- React - Styling
- React - Properties (props)
- React - Creating Components using Properties
- React - props Validation
- React - Constructor
- React - Component Life Cycle
- React - Event management
- React - Creating an Event−Aware Component
- React - Introduce Events in Expense Manager APP
- React - State Management
- React - State Management API
- React - Stateless Component
- React - State Management Using React Hooks
- React - Component Life Cycle Using React Hooks
- React - Layout Component
- React - Pagination
- React - Material UI
- React - Http Server
- React - Http client programming
- React - Form Programming
- React - Forms
- React - Controlled Component
- React - Uncontrolled Component
- React - Formik
- React - Conditional Rendering
- React - Lists
- React - Keys
- React - Routing
- React - Redux
- React - Animation
- React - Bootstrap
- React - Map
- React - Table
- React - Managing State Using Flux
- React - Testing
- React - CLI Commands
- React - Building and Deployment
- React - Example
- Hooks
- React - Introduction to Hooks
- React - Using useState
- React - Using useEffect
- React - Using useContext
- React - Using useRef
- React - Using useReducer
- React - Using useCallback
- React - Using useMemo
- React - Custom Hooks
- React Advanced
- React - Accessibility
- React - Code Splitting
- React - Context
- React - Error Boundaries
- React - Forwarding Refs
- React - Fragments
- React - Higher Order Components
- React - Integrating With Other Libraries
- React - Optimizing Performance
- React - Profiler API
- React - Portals
- React - React Without ES6 ECMAScript
- React - React Without JSX
- React - Reconciliation
- React - Refs and the DOM
- React - Render Props
- React - Static Type Checking
- React - Strict Mode
- React - Web Components
- Additional Concepts
- React - Date Picker
- React - Helmet
- React - Inline Style
- React - PropTypes
- React - BrowserRouter
- React - DOM
- React - Carousel
- React - Icons
- React - Form Components
- React - Reference API
- React Useful Resources
- React - Quick Guide
- React - Cheatsheet
- React - Axios CheatSheet
- React - Useful Resources
- React - Discussion
React - Using Create React App tool
Let us learn to create an expense management application using Create React App tool.
Open a terminal and go to your workspace.
> cd /go/to/your/workspace
Next, create a new React application using Create React App tool.
> create-react-app expense-manager
It will a create new folder expense-manager with startup template code.
Next, go to expense-manager folder and install the necessary library.
cd expense-manager
npm install
The npm install will install the necessary library under node_modules folder.
Next, start the application.
npm start
Compiled successfully!
You can now view react-cra-web-app in the browser.

   Local:            http://localhost:3000
   On Your Network:  http://192.168.56.1:3000

Note that the development build is not optimized.
To create a production build, use npm run build.
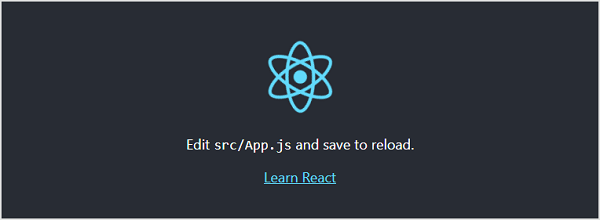
Next, open the browser and enter http://localhost:3000 in the address bar and press enter. The development web server will serve our webpage as shown below.
Let us analyse the structure of our React application.
Files and folders
The content of the React application is as follows −
|-- README.md
|-- node_modules
|-- package-lock.json
|-- package.json
|-- public
|  |-- favicon.ico
|  |-- index.html
|  |-- logo192.png
|  |-- logo512.png
|  |-- manifest.json
|  `-- robots.txt
`-- src
   |-- App.css
   |-- App.js
   |-- App.test.js
   |-- index.css
   |-- index.js
   |-- logo.svg
   |-- reportWebVitals.js
   `-- setupTests.js
Here,
The package.json is the core file representing the project. It configures the entire project and consists of project name, project dependencies, and commands to build and run the application.
{
  "name": "expense-manager",
  "version": "0.1.0",
  "private": true,
  "dependencies": {
    "@testing-library/dom": "^10.4.1",
    "@testing-library/jest-dom": "^6.9.1",
    "@testing-library/react": "^16.3.0",
    "@testing-library/user-event": "^13.5.0",
    "react": "^19.2.0",
    "react-dom": "^19.2.0",
    "react-scripts": "5.0.1",
    "web-vitals": "^2.1.4"
  },
  "scripts": {
    "start": "react-scripts start",
    "build": "react-scripts build",
    "test": "react-scripts test",
    "eject": "react-scripts eject"
  },
  "eslintConfig": {
    "extends": [
      "react-app",
      "react-app/jest"
    ]
  },
  "browserslist": {
    "production": [
      ">0.2%",
      "not dead",
      "not op_mini all"
    ],
    "development": [
      "last 1 chrome version",
      "last 1 firefox version",
      "last 1 safari version"
    ]
  }
}
The package.json refers the below React library in its dependency section.
react and react-dom are core react libraries used to develop web application.
web-vitals are general library to support application in different browser.
react-scripts are core react scripts used to build and run application.
@testing-library/jest-dom, @testing-library/react and @testing-library/user-event are testing libary used to test the application after development.
The public folder − Contains the core file, index.html and other web resources like images, logos, robots, etc., index.html loads our react application and render it in user's browser.
The src folder − Contains the actual code of the application. We will check it next section.
Source code of the application
Let us check the each and every source code document of the application in this chapter.
The index.js − Entry point of our application. It uses ReactDOM.render method to kick-start and start the application. The code is as follows −
import React from 'react';
import ReactDOM from 'react-dom';
import './index.css';
import App from './App';
import reportWebVitals from './reportWebVitals';

ReactDOM.render(
   <React.StrictMode>
      <App />
   </React.StrictMode>,
   document.getElementById('root')
);

// If you want to start measuring performance in your app, pass a function
// to log results (for example: reportWebVitals(console.log))
// or send to an analytics endpoint. Learn more: https://bit.ly/CRA-vitals
reportWebVitals();
Here,
React.StrictMode is a build-in component used to prevent unexpected bugs by analysing the component for unsafe lifecycle, unsafe API usage, depreciated API usage, etc., and throwing the relevant warning.
App is our first custom and root component of the application. All other components will be rendered inside the App component.
The index.css − Used to styles of the entire application. Let us remove all styles and start with fresh code.
App.js − Root component of our application. Let us replace the existing JSX and show simple hello react message as shown below −
import './App.css';
function App() {
   return (
      <h1>Hello React!</h1>
   );
}
export default App;
App.css − Used to style the App component. Let us remove all styles and start with fresh code.
App.test.js − Used to write unit test function for our component.
setupTests.js − Used to setup the testing framework for our application.
reportWebVitals.js − Generic web application startup code to support all browsers.
logo.svg − Logo in SVG format and can be loaded into our application using import keyword. Let us remove it from the project.
