- React - Home
- React - Introduction
- React - Roadmap
- React - Installation
- React - Features
- React - Advantages & Disadvantages
- React - Architecture
- React - Creating a React Application
- React - JSX
- React - Components
- React - Nested Components
- React - Using Newly Created Components
- React - Component Collection
- React - Styling
- React - Properties (props)
- React - Creating Components using Properties
- React - props Validation
- React - Constructor
- React - Component Life Cycle
- React - Event management
- React - Creating an Event−Aware Component
- React - Introduce Events in Expense Manager APP
- React - State Management
- React - State Management API
- React - Stateless Component
- React - State Management Using React Hooks
- React - Component Life Cycle Using React Hooks
- React - Layout Component
- React - Pagination
- React - Material UI
- React - Http Server
- React - Http client programming
- React - Form Programming
- React - Forms
- React - Controlled Component
- React - Uncontrolled Component
- React - Formik
- React - Conditional Rendering
- React - Lists
- React - Keys
- React - Routing
- React - Redux
- React - Animation
- React - Bootstrap
- React - Map
- React - Table
- React - Managing State Using Flux
- React - Testing
- React - CLI Commands
- React - Building and Deployment
- React - Example
- Hooks
- React - Introduction to Hooks
- React - Using useState
- React - Using useEffect
- React - Using useContext
- React - Using useRef
- React - Using useReducer
- React - Using useCallback
- React - Using useMemo
- React - Custom Hooks
- React Advanced
- React - Accessibility
- React - Code Splitting
- React - Context
- React - Error Boundaries
- React - Forwarding Refs
- React - Fragments
- React - Higher Order Components
- React - Integrating With Other Libraries
- React - Optimizing Performance
- React - Profiler API
- React - Portals
- React - React Without ES6 ECMAScript
- React - React Without JSX
- React - Reconciliation
- React - Refs and the DOM
- React - Render Props
- React - Static Type Checking
- React - Strict Mode
- React - Web Components
- Additional Concepts
- React - Date Picker
- React - Helmet
- React - Inline Style
- React - PropTypes
- React - BrowserRouter
- React - DOM
- React - Carousel
- React - Icons
- React - Form Components
- React - Reference API
- React Useful Resources
- React - Quick Guide
- React - Cheatsheet
- React - Axios CheatSheet
- React - Useful Resources
- React - Discussion
React - Create an Event-Aware Component
Event management is one of the important features in a web application. It enables the user to interact with the application. React supports all events available in a web application. React event handling is very similar to DOM events with little changes. For example, clicking on a component is one of the common events one can observe in React-based websites.
An event-aware component in React is nothing but a component that contains an event handler method within it. The component can either be a class component or functional component. In this chapter, we will learn how to create such event-aware components with React.
How to create an Event-Aware Component?
Following are the steps to create a new Event-Aware Component −
Let us create a new component, MessageWithEvent and handle events in the component to better understand event management in React application.
Step 1 − Open expense-manager application in your favorite editor.
Next, create a file, MessageWithEvent.js in src/components folder to create MessageWithEvent component.
Import React library.
import React from 'react';
Step 2 − Create a class, MessageWithEvent and call constructor with props.
class MessageWithEvent extends React.Component {
   constructor(props) {
      super(props);
   }
}
Step 3 − Create an event handler method, logEventToConsole, which will log event details to the console.
logEventToConsole(e) {
   console.log(e.target.innerHTML);
}
Step 4 − Create a render function.
render() {
}
In render() function, create a greeting message and return it.
render() {
   return (
      <div>
         <p>Hello {this.props.name}!</p>
      </div>
   );
}
Step 5 − Then, set logEventToConsole method as the event handler for click event of the root container(div).
render() {
   return (
      <div onClick={this.logEventToConsole}>
         <p>Hello {this.props.name}!</p>
      </div>
   );
}
Step 6 − Update the constructor by binding the event handler.
class MessageWithEvent extends React.Component {
   constructor(props) {
      super(props);
      this.logEventToConsole = this.logEventToConsole.bind();
   }
}
Finally, export the component.
export default MessageWithEvent;
The complete code of the MessageWithEvent component is given below −
import React from 'react';

class MessageWithEvent extends React.Component {
   constructor(props) {
      super(props);
   }
   logEventToConsole(e) {
      console.log(e.target.innerHTML);
   }
   render() {
      return (
         <div onClick={this.logEventToConsole}>
            <p>Hello {this.props.name}!</p>
         </div>
      );
   }
}
export default MessageWithEvent;
index.js
Next, open index.js and import MessageWithEvent.
import MessageWithEvent from './components/MessageWithEvent'
Build the user interface of the application by using MessageWithEvent component.
import React from 'react';
import { createRoot } from 'react-dom/client';
import MessageWithEvent  from './components/MessageWithEvent'

const container = document.getElementById('root');
const root = createRoot(container);
root.render(<MessageWithEvent name="John"/>);
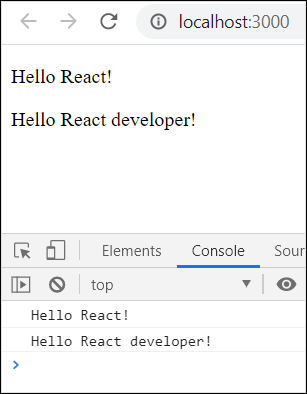
Serve the application using npm command.
npm start
Open the browser and enter http://localhost:3000 in the address bar and press enter.
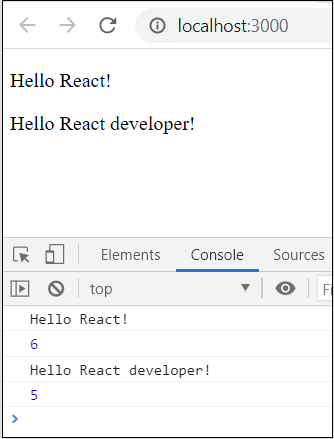
Now, click both MessageWithEvent component and the application will emit messages in the console as shown below.
Passing Extra Information to Event Handler
Let us try to pass and an extra information (for example, msgid) to event handler.
Step 1 − First, update the logEventToConsole to accept an extra argument, msgid.
logEventToConsole(msgid, e) {
   console.log(e.target.innerHTML);
   console.log(msgid);
}
Step 2 − Next, pass message id to the event handler by binding the message id in the render method.
render() {
   return (
      <div onClick={this.logEventToConsole.bind(this, Math.floor(Math.random() * 10))}>
         <p>Hello {this.props.name}!</p>
      </div>
   );
}
Step 3 − The complete and updated code is as follows −
import React from 'react';

class MessageWithEvent extends React.Component {
   constructor(props) {
      super(props);

      this.logEventToConsole = this.logEventToConsole.bind();
   }
   logEventToConsole(msgid, e) {
      console.log(e.target.innerHTML);
      console.log(msgid);
   }
   render() {
      return (
         >div onClick={this.logEventToConsole.bind(this, Math.floor(Math.random() * 10))}>
            >p>Hello {this.props.name}!>/p>
         >/div>
      );
   }
}
export default MessageWithEvent;
Run the application and you will find that the event emits message id in the console.