- React - Home
- React - Introduction
- React - Roadmap
- React - Installation
- React - Features
- React - Advantages & Disadvantages
- React - Architecture
- React - Creating a React Application
- React - JSX
- React - Components
- React - Nested Components
- React - Using Newly Created Components
- React - Component Collection
- React - Styling
- React - Properties (props)
- React - Creating Components using Properties
- React - props Validation
- React - Constructor
- React - Component Life Cycle
- React - Event management
- React - Creating an Event−Aware Component
- React - Introduce Events in Expense Manager APP
- React - State Management
- React - State Management API
- React - Stateless Component
- React - State Management Using React Hooks
- React - Component Life Cycle Using React Hooks
- React - Layout Component
- React - Pagination
- React - Material UI
- React - Http Server
- React - Http client programming
- React - Form Programming
- React - Forms
- React - Controlled Component
- React - Uncontrolled Component
- React - Formik
- React - Conditional Rendering
- React - Lists
- React - Keys
- React - Routing
- React - Redux
- React - Animation
- React - Bootstrap
- React - Map
- React - Table
- React - Managing State Using Flux
- React - Testing
- React - CLI Commands
- React - Building and Deployment
- React - Example
- Hooks
- React - Introduction to Hooks
- React - Using useState
- React - Using useEffect
- React - Using useContext
- React - Using useRef
- React - Using useReducer
- React - Using useCallback
- React - Using useMemo
- React - Custom Hooks
- React Advanced
- React - Accessibility
- React - Code Splitting
- React - Context
- React - Error Boundaries
- React - Forwarding Refs
- React - Fragments
- React - Higher Order Components
- React - Integrating With Other Libraries
- React - Optimizing Performance
- React - Profiler API
- React - Portals
- React - React Without ES6 ECMAScript
- React - React Without JSX
- React - Reconciliation
- React - Refs and the DOM
- React - Render Props
- React - Static Type Checking
- React - Strict Mode
- React - Web Components
- Additional Concepts
- React - Date Picker
- React - Helmet
- React - Inline Style
- React - PropTypes
- React - BrowserRouter
- React - DOM
- React - Carousel
- React - Icons
- React - Form Components
- React - Reference API
- React Useful Resources
- React - Quick Guide
- React - Cheatsheet
- React - Axios CheatSheet
- React - Useful Resources
- React - Discussion
React - Integrating with Other Libraries
Even though react provides all necessary feature to create a complete web application, integration with other libraries are a must due to legacy system coded in another library, migration from another framework, etc., React can co-exists with other libraries and provides necessary infrastructure to use along with other systems.
Let us see how to use react component with other libraries like jQuery, backbone, etc., in this chapter.
CreateRoot based integration
React use createRoot() method from ReactDOMClient module to attach itself to the main HTML document. createRoot() does not disturbs the HTML document except attached element. This behaviour can be exploited by the developer to intermix multiple libraries in the same document.
Let us see how to integrate jQuery and React component in a single document by attaching the react application in a separate element.
First of all, create a new react application and start it using below command.
create-react-app myapp
cd myapp
npm start
Next, create a react component, Hello under component folder (src/components/Hello.js)
import React from "react";
class Hello extends React.Component {
   constructor(props) {
      super(props)
   }
   render() {
      return (
         <div>Hello, {this.props.name}</div>
      );
   }
}
export default Hello;
Next, open index.html (public/index.html) and add a new container (jquery-root) as shown below −
<!DOCTYPE html>
<html lang="en">
   <head>
      <meta charset="utf-8" />
      <link rel="icon" href="%PUBLIC_URL%/favicon.ico" />
      <meta name="viewport" content="width=device-width, initial-scale=1" />
      <meta name="theme-color" content="#000000" />
      <meta name="description" content="Web site created using create-react-app" />
      <link rel="apple-touch-icon" href="%PUBLIC_URL%/logo192.png" />
      <link rel="manifest" href="%PUBLIC_URL%/manifest.json" />

      <script src="https://code.jquery.com/jquery-3.6.1.slim.min.js"></script>
      <title>React App</title>
   </head>
   <body>
      <noscript>You need to enable JavaScript to run this app.</noscript>
      <div style="padding: 10px;">
         <div id="root"></div>
         <div id="jquery-root"></div>
      </div>
      <script>
         $(document).ready(function() {
            $("#jquery-root").text("Hello, from jQuery")
         })
      </script>
   </body>
</html>
Here,
jQuery library in linked through CDN
It is initialized as done traditionally through $(document).ready method
And is used to append the message using jQuery selector (#jquery-root) and text method
Next, open index.js (src/index.js) and attach our hello component into the root container as shown below −
import React from 'react';
import ReactDOM from 'react-dom/client';
import './index.css';
import Hello from './Components/Hello';
import reportWebVitals from './reportWebVitals';
const root = ReactDOM.createRoot(document.getElementById('root'));
root.render(
   <React.StrictMode>
      <Hello name="from React" />
   </React.StrictMode>
);
reportWebVitals();
Here,
React application is attached using createRoot() method.
Rendered a Hello component into the root element in the HTML document.
Finally, open the application in the browser and check the result. Both react and jQuery libraries emit the hello messages as shown below −

Ref based integration
In general, React does not know any DOM manipulation done by other libraries. So, to use React with other libraries, React should not do any DOM manipulation and should forward all changes to other libraries.
As we know, React provides an escape hatch called Ref to manipulate DOM elements without affecting / affected by the state changes. Developer can exploit these feature to create a wrapper react component of some other library and use it in a react application. The standard steps to use other libraries in React component is as follow,
Create a react component and renders an empty div
render() {
   return <div />
}
Attach a ref to the rendered div as shown below −
render() {
   return <div ref={el => this.el = el} />
}
Manipulate the dom element using attached ref in componentDidMount() life cycle event as shown below −
componentDidMount() {
   this.$el = $(this.el);
   this.$el.somePlugin(); // create dom
   // call this.$el.pluginAPI() as necessary
}
Destroy the dom element using attached ref in componentWillUnmount() life cycle event as shown below −
componentWillUnmount() {
   this.$el.somePlugin('destroy'); // destroy dom
   // this.$el.destroyAPI() to remove the element from the dom
}
Let us apply these technics to integrate a jQuery plugin into the application in the next section.
JQuery slick plugin integration
Let us try to integrate slick jquery plugin (https://github.com/kenwheeler/slick) into a react component
First of all, create a new react application and start it using below command.
create-react-app myapp
cd myapp
npm start
Next, install the slick jQuery plugin
npm install jquery slick-carousel --save
Next, copy the slick folder from slick plugin package (css and assets) into the app's public folder. The content of the slider folder is as shown below −
.
 ajax-loader.gif
 config.rb
 fonts
    slick.eot
    slick.svg
    slick.ttf
    slick.woff
 slick-theme.css
 slick-theme.less
 slick-theme.scss
 slick.css
 slick.js
 slick.less
 slick.min.js
 slick.scss
Next, create a simple component, ReactSlick (src/Components/ReactSlick.js) as shown below −
import React from "react";
import $ from 'jquery';
import slick from 'slick-carousel';
class ReactSlick extends React.Component {
   componentDidMount() {
      this.$el = $(this.el);
      this.$el.slick();
   }
   componentWillUnmount() {
      this.$el.slick('destroy');
   }
   render() {
      return (
         <div>
            <div ref={el => this.el = el}>
               {this.props.children}
            </div>
         </div>
      );
   }
}
export default ReactSlick;
Here,
Rendered a div with children from props
Attached a ref to the div element
Attached the plugin to the element using ref in componentDidMount() life cycle event
Destroyed the plugin to the element using ref in componentWillUnmount life cycle event
Next, open App component (src/App.js) and update the content with ReactSlick component as shown below −
import ReactSlick from './Components/ReactSlick';
function App() {
   return (
      <ReactSlick>
         <div className="box"><h1>1</h1></div>
         <div className="box"><h1>2</h1></div>
         <div className="box"><h1>3</h1></div>
         <div className="box"><h1>4</h1></div>
      </ReactSlick>
   );
}
export default App;
Here,
Rendered the ReactSlick component
Used four div with numbers (1,2,3 and 4) as sliders
Next, open App.css (src/App.css) and remove all the CSS classes. Then, open index.html (public/index.html) and add a necessary styles as shown below −
<!DOCTYPE html>
<html lang="en">
   <head>
      <meta charset="utf-8" />
      <link rel="icon" href="%PUBLIC_URL%/favicon.ico" />
      <meta name="viewport" content="width=device-width, initial-scale=1" />
      <meta name="theme-color" content="#000000" />
      <meta
      name="description"
      content="Web site created using create-react-app"
      />
      <link rel="apple-touch-icon" href="%PUBLIC_URL%/logo192.png" />
      <link rel="manifest" href="%PUBLIC_URL%/manifest.json" />
      <link rel="stylesheet" type="text/css" href="slick/slick.css"/>
      <link rel="stylesheet" type="text/css" href="slick/slick-theme.css"/>
      <style>
         #root {
            margin: auto;
            padding-left: 25px;
            padding-top: 25px;
            width: 300px;
            color: gray;
            font-family:Cambria, Cochin, Georgia, Times, 'Times New Roman', serif;
            padding-left : 25px;
            text-align: center;
         }
         .box {
            background-color: skyblue;
            text-align: center;
            color: white
         }
      </style>
      <title>React App</title>
   </head>
   <body>
      <noscript>You need to enable JavaScript to run this app.</noscript>
      <div style="background-color: white; margin: 2px;">
         <div id="root"></div>
      </div>
   </body>
</html>
Here we have,
Updated the style for root component
Updated the style for sliders (.box)
Included the slick plugin specific styles (slick/slick.css and slick/slick-theme.css)
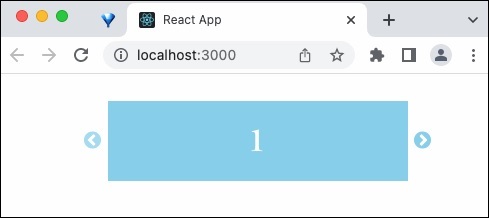
Finally, open the application in the browser. jQuery slick slider will be rendered through React component as shown below −
Summary
React provides multiple ways to use react and other libraries in the same project. Every integration method is simple and effective. Developer should use refrain from using other libraries except in unavoidable situation such as legacy application, migration application, etc.,
