- React - Home
- React - Introduction
- React - Roadmap
- React - Installation
- React - Features
- React - Advantages & Disadvantages
- React - Architecture
- React - Creating a React Application
- React - JSX
- React - Components
- React - Nested Components
- React - Using Newly Created Components
- React - Component Collection
- React - Styling
- React - Properties (props)
- React - Creating Components using Properties
- React - props Validation
- React - Constructor
- React - Component Life Cycle
- React - Event management
- React - Creating an Event−Aware Component
- React - Introduce Events in Expense Manager APP
- React - State Management
- React - State Management API
- React - Stateless Component
- React - State Management Using React Hooks
- React - Component Life Cycle Using React Hooks
- React - Layout Component
- React - Pagination
- React - Material UI
- React - Http Server
- React - Http client programming
- React - Form Programming
- React - Forms
- React - Controlled Component
- React - Uncontrolled Component
- React - Formik
- React - Conditional Rendering
- React - Lists
- React - Keys
- React - Routing
- React - Redux
- React - Animation
- React - Bootstrap
- React - Map
- React - Table
- React - Managing State Using Flux
- React - Testing
- React - CLI Commands
- React - Building and Deployment
- React - Example
- Hooks
- React - Introduction to Hooks
- React - Using useState
- React - Using useEffect
- React - Using useContext
- React - Using useRef
- React - Using useReducer
- React - Using useCallback
- React - Using useMemo
- React - Custom Hooks
- React Advanced
- React - Accessibility
- React - Code Splitting
- React - Context
- React - Error Boundaries
- React - Forwarding Refs
- React - Fragments
- React - Higher Order Components
- React - Integrating With Other Libraries
- React - Optimizing Performance
- React - Profiler API
- React - Portals
- React - React Without ES6 ECMAScript
- React - React Without JSX
- React - Reconciliation
- React - Refs and the DOM
- React - Render Props
- React - Static Type Checking
- React - Strict Mode
- React - Web Components
- Additional Concepts
- React - Date Picker
- React - Helmet
- React - Inline Style
- React - PropTypes
- React - BrowserRouter
- React - DOM
- React - Carousel
- React - Icons
- React - Form Components
- React - Reference API
- React Useful Resources
- React - Quick Guide
- React - Cheatsheet
- React - Axios CheatSheet
- React - Useful Resources
- React - Discussion
React - Render Props
Since react components are interconnected by composition (having one component inside another) rather than by inheritance, logic used in a react component will not be shared to an another component directly. React provides multiple option to share the logic between components and one such option is Render props. Render props is basically passing a function with necessary rendering logic to a component having core functionality through its props. Hence, it is termed as render props.
Let us learn how to use render props in this chapter.
How to use render props
Let us see how to use render props and share logic between two component in the step by step manner. Let us consider the scenario of fetching and rendering the data from an external URL.
Create a component, FetcherComponent to fetch data from external url and FetcherConsumerComponent to consume the data and rendering it.
Create a component, FetcherComponent with data fetching logic for the given url (props.url).
componentDidMount() {
   fetch(this.props.url)
   .then((response) => response.json())
   .then((data) => {
      this.setState({
         data: data
      });
   });
}
Now, Update the FetcherComponent in such a way that the core rendering logic will be delegated to props (this.props.render).
render() {
   return (
      <div>
         <h2>Fetch react component</h2>
         {this.state.data && this.props.render(this.state.data)}
      </div>
   )
}
Here,
this.props.render is the function with rendering logic and will be passed into the FetcherComponent through it's props by any other component.
Create a component, FetcherConsumerComponent and render the FetcherComponent by passing the rendering logic of the fetched data.
render() {
   return (<FetcherComponent url="users.json" render={(items) => (
      <ul>
         {items && items.length && items.map((item) =>
            <li key={item.id}>{item.name}</li>
         )}
      </ul>
   )} />)
}
Here,
items is the data fetched by FetcherComponent's component.
And they are looped over and emit HTML unordered list.
We can follow the step defined in the section and create a working example in the following section.
Applying render props
First of all, create a new react application and start it using below command.
create-react-app myapp
cd myapp
npm start
Next, open App.css (src/App.css) and remove all CSS classes.
FetchRenderProps.js
Then, create a component, FetchRenderProps (src/components/FetchRenderProps.js) with data fetching logic as shown below −
import React from "react";
class FetchRenderProps extends React.Component {
   constructor(props) {
      super(props);
      this.state = {
         data: []
      }
   }
   componentDidMount() {
      fetch(this.props.url)
      .then((response) => response.json())
      .then((data) => {
         console.log(data)
         this.setState({
            data: data
         });
      });
   }
   render() {
      return (
         <div>
            <h2>Fetch react component</h2>
            {this.state.data && this.props.render(this.state.data)}
         </div>
      )
   }
}
export default FetchRenderProps;
Here we have,
Used fetch javascript method to fetch data from external url in the componentDidMount event.
Rendered the fetched data using render method passed through props.
users.json
Next, create a file, users.json (public/users.json) in the public folder to store user information. We will try to fetch it using FetchRenderProps component and show it in our application.
[{"id":1,"name":"Fowler","age":18},
{"id":2,"name":"Donnell","age":24},
{"id":3,"name":"Pall","age":26}]
todo_list.json
Next, create a file, todo_list.json (public/todo_list.json) in the public folder to store todo list information. We will try to fetch it using FetchRenderProps component and show it in our application.
[{"id":1,"title":"Learn JavaScript","is_done":true},
{"id":2,"title":"Learn React","is_done":true},
{"id":3,"title":"Learn Typescript","is_done":false
SimpleRenderProps.js
Next, create a component, SimpleRenderProps (src/components/SimpleRenderProps.js) to consume the FetchRenderProps component as shown below −
import React from "react";
import FetchRenderProps from "./FetchRenderProps";
class SimpleRenderProps extends React.Component {
   render() {
      return (
         <>
            <FetchRenderProps url="users.json" render={(items) => (
               <ul>
                  {items && items.length && items.map((item) =>
                     <li key={item.id}>{item.name}</li>
                  )}
               </ul>
            )} />
            <FetchRenderProps url="todo_list.json" render={(items) => (
               <ul>
                  {items && items.length && items.map((item) =>
                     <li key={item.id}>{item.title} {item.is_done && <strong>Done</strong>}</li>
                  )}
               </ul>
            )} />
         </>
      )
   }
}
export default SimpleRenderProps;
Here we have,
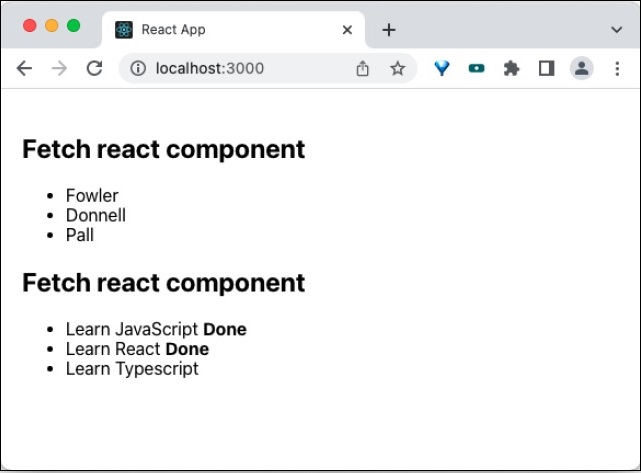
Used FetchRenderProps with users.json to fetch and render user list
Used FetchRenderProps with todo_list.json to fetch and render todo list
Fetching both user and todo list uses the same FetchRenderProps component.
App.js
Next, open App.js file and render a SimpleRenderProps component as shown below −
import './App.css'
import React from 'react';
import SimpleRenderProps from './components/SimpleRenderProps'
function App() {
   return (
      <div className="container">
         <div style={{ padding: "10px" }}>
            <div>
               <SimpleRenderProps />
            </div>
         </div>
      </div>
   );
}
export default App;
Finally, open the application in the browser and check the final result. The application will render as shown below −
Summary
Render props is an efficient method to share logic between components. It is extensively used in many third party component with good success rate and it is time-tested method to share logic in the react domain.
