- React - Home
- React - Introduction
- React - Roadmap
- React - Installation
- React - Features
- React - Advantages & Disadvantages
- React - Architecture
- React - Creating a React Application
- React - JSX
- React - Components
- React - Nested Components
- React - Using Newly Created Components
- React - Component Collection
- React - Styling
- React - Properties (props)
- React - Creating Components using Properties
- React - props Validation
- React - Constructor
- React - Component Life Cycle
- React - Event management
- React - Creating an Event−Aware Component
- React - Introduce Events in Expense Manager APP
- React - State Management
- React - State Management API
- React - Stateless Component
- React - State Management Using React Hooks
- React - Component Life Cycle Using React Hooks
- React - Layout Component
- React - Pagination
- React - Material UI
- React - Http Server
- React - Http client programming
- React - Form Programming
- React - Forms
- React - Controlled Component
- React - Uncontrolled Component
- React - Formik
- React - Conditional Rendering
- React - Lists
- React - Keys
- React - Routing
- React - Redux
- React - Animation
- React - Bootstrap
- React - Map
- React - Table
- React - Managing State Using Flux
- React - Testing
- React - CLI Commands
- React - Building and Deployment
- React - Example
- Hooks
- React - Introduction to Hooks
- React - Using useState
- React - Using useEffect
- React - Using useContext
- React - Using useRef
- React - Using useReducer
- React - Using useCallback
- React - Using useMemo
- React - Custom Hooks
- React Advanced
- React - Accessibility
- React - Code Splitting
- React - Context
- React - Error Boundaries
- React - Forwarding Refs
- React - Fragments
- React - Higher Order Components
- React - Integrating With Other Libraries
- React - Optimizing Performance
- React - Profiler API
- React - Portals
- React - React Without ES6 ECMAScript
- React - React Without JSX
- React - Reconciliation
- React - Refs and the DOM
- React - Render Props
- React - Static Type Checking
- React - Strict Mode
- React - Web Components
- Additional Concepts
- React - Date Picker
- React - Helmet
- React - Inline Style
- React - PropTypes
- React - BrowserRouter
- React - DOM
- React - Carousel
- React - Icons
- React - Form Components
- React - Reference API
- React Useful Resources
- React - Quick Guide
- React - Cheatsheet
- React - Axios CheatSheet
- React - Useful Resources
- React - Discussion
React - BrowserRouter
Routing is one of the important concept in a front end application. React community provides an excellent router library called React Router. Let us learn the concept of React router and how to use it in a react application in this chapter.
Router concepts
The primary purpose of the router is to match the given url to a react component and render the matched component. In addition to matching and rendering, the router should manage the history of the browser as well for an efficient forward and backward navigation in the browser.
Before understanding the how the router works, let us know some of the useful components of react router library.
BrowserRouter − BrowserRouter is top level component. It creates a history (navigation history), put the initial location (router object representing "where the user is at") into the react state and finally subscribes to the location URL.
<BrowserRouter>
   <!-- children -->
</BrowserRouter>
Routes − Routes will recurses it's child node and build a router configuration. It matches the configured routes against the location and render the first matched route element.
<BrowserRouter>
   <Routes>
      <Route path="/" element={<App />}>
         <Route index element={<Home />} />
            <Route path="admin" element={<Admin />}>
            <Route path="product" element={<ProductListing />} />
            <Route path="category" element={<CategoryListing />} />
            <Route index element={<Dashboard />} />
         </Route>
      </Route>
      <Route path="/login" element={<Login />}>
         <!-- more nested routes -->
      </Route>
      <!-- more routes -->
   </Routes>
</BrowserRouter>
Here,
/ path is mapped to App component.
/ path's index component is mapped to Home component.
/admin path is mapped to Admin component.
/admin path's index component is mapped to Dashboard component.
/admin/product path is matched to ProductListing component.
/admin/category path is matched to CategoryListing component.
/admin/dashboard path is matched to Dashboard component.
Route − Route is the actual router configuration. It can be nested to any level similar to folders.
Outlet − Outlet component renders the next match in a set of matches.
function Hello() {
   return (
      <div>Hello</div>
      <Outlet />
   )
}
Here,
Placed the Outlet component at the bottom of the hello component.
Router will render the next match inside the Outlet component.
Link − Link component is similar to anchor tag and used for navigation purpose. Once the user click on it, it changes the location based on it's to props
<Link to="/admin" />
navigate() − navigate() is an API used for navigation purpose similar to Link component.
navigate("/admin")
Router workflow
Let us consider a react application has two five pages / components as shown below −
Home (/)
Contact (/contact)
Register (/register)
Admin (/admin)
AdminDashboard (/admin/dashboard)
A sample router configuration is as follows −
<BrowserRouter>
   <Routes>
      <Route path="/" element={<App />}>
         <Route index element={<Home />} />
         <Route path="contact" element={<Contact />} />
         <Route path="register" element={<Register />} />
         <Route path="admin" element={<Admin />}>
         <Route path="dashboard" element={<AdminDashboard />} />
         <Route path="category" element={<CategoryListing />} />
         <Route index element={<AdminDashboard />} />
      </Route>
   </Routes>
</BrowserRouter>
Let us see how admin dashboard url (/admin/dashboard) will get matched and rendered by the react router.
At First of all, react library will render our application. Since our application will have BrowserRouter at the top of the render tree, it gets called and rendered
BrowserRouter component creates a history, put the initial location in the state and subscribe to the url
Routes component will checks all its children, build the router configuration and finally render the first match (/admin => )
Admin component will be rendered. It will have an Outlet component as shown below -
function Admin() {
   return (
      <div>
         <!-- Admin content -->
      </div>
   <Outlet />
   )
}
Outlet component renders the next match within itself (/admin/dashboard => )
User may click a link (Link component) in the dashboard, say "/admin/category"
Link component calls the navigate("/admin/category") method
The history (object) changes the url and notifies the BrowserRouter
As BrowserRouter component is already subscribed to the url, BrowserRouter component will be rerendered and the whole process will be repeated (from 2)
How to apply routers
First of all, create a new react application and start it using below command.
create-react-app myapp
cd myapp
npm start
Next, install the react router library using below command,
npm install --save react-router-dom
Next, open App.css (src/App.css) and remove all CSS classes.
// remove all css classes
Home.js
Next, create a folder, Pages under src and create a new home page component, Home (src/Pages/Home.js) and render simple home page content as shown below −
function Home() {
   return <h3>Home</h3>
}
export default Home
Greeting.js
Next, create a new greeting page component, Greeting (src/Pages/Greeting.js) and render simple greeting message as shown below −
function Greeting() {
   return <h3>Hello World!</h3>
}
export default Greeting;
App.js
Next, open App.js file and render a BrowserRoutes component as shown below −
import './App.css'
import React from 'react';

import { BrowserRouter, Route, Routes } from 'react-router-dom';
import Layout from './Pages/Layout';
import Home from './Pages/Home';
import Greeting from './Pages/Greeting';

function App() {
   return (
      <BrowserRouter>
         <Routes>
            <Route path="/" element={<Layout />}>
               <Route index element={<Home />} />
               <Route path="greet" element={<Greeting />} />
            </Route>
         </Routes>
      </BrowserRouter>
   );
}
export default App;
Here,
BrowserRouter is the main component. It will have router setting as its children and render the entire application based on the router setting.
Routes is the main router component. It holds a list of individual router setting.
Route is the actual router component having the mapping between web path (/home) and the component (Home).
Route can be nested to support nested paths.
The mapping defined in the routes are as follows −
/ is mapped to Layout component. Layout component will be created in the next step.
/home is mapped to Home component and it is nested under / path.
/greet is mapped to Greet component and it is nested under / path.
Layout.js
Next, create a Layout component, Layout (src/Pages/Layout.js). The purpose of the layout component is to show the entire application with navigation link. It is the main component of the application and points to / route. The source code of the Layout component is as follows −
import { Outlet, Link } from "react-router-dom";
function Layout() {
   return (
      <>
         <nav>
            <ul>
               <li>
                  <Link to="/">Home</Link>
               </li>
               <li>
                  <Link to="/greet">Greeting</Link>
               </li>
            </ul>
         </nav>
         <Outlet />
      </>
   )
}
export default Layout;
Here,
Imported Link and Outlet components.
Link component is used to create web navigation links.
to props of the Link component is set with one of the routes defined in the parent BrowserRouter component.
Used / and /greet routes available in the router setting.
Outlet component is used at the bottom to load the selected component. During the initial rendering, it will load the default component (home).
Once the user click the web link, it will get router path from the to props and get the mapped component through router setting. Finally, it will render the component inside the Outlet component.
PageNotAvailable.js
Next, create a new component, PageNotAvailable (src/Pages/PageNotAvailable.js) to show when the link does not match with any of the router setting.
import { Link } from "react-router-dom"
function PageNotAvailable() {
   return (
      <p>The page is not available. Please <Link to=
      "/">click here</Link> to go to home page.</p>
   )
}
export default PageNotAvailable
Here, the Link component is used to navigate back to home page.
App.js
Next, update the App component and include PageNotAvailable component in the router setting.
import './App.css'
import React from 'react';
import { BrowserRouter, Route, Routes } from 'react-router-dom';
import Layout from './Pages/Layout';
import Home from './Pages/Home';
import Greeting from './Pages/Greeting';
import PageNotAvailable from './Pages/PageNotAvailable'
function App() {
   return (
      <BrowserRouter>
         <Routes>
            <Route path="/" element={<Layout />}>
               <Route index element={<Home />} />
               <Route path="greet" element={<Greeting />} />
               <Route path="*" element={<PageNotAvailable />} />
            </Route>
         </Routes>
      </BrowserRouter>
   );
}
export default App;
Here,
When user click a link, react router will try to match the clicked link and the router setting one by one in the given order. if a link is matched, then the react router will stop and render the matched component.
* pattern will match all links. Since it is placed as last entry, it will match all undefined / unknown links.
Layout.js
Next, update the Layout component and add an unavailable link to check PageNotAvailable component is properly configured.
import { Outlet, Link } from "react-router-dom";
function Layout() {
   return (
      <>
         <nav>
            <ul>
               <li>
                  <Link to="/">Home</Link>
               </li>
               <li>
                  <Link to="/greet">Greeting</Link>
               </li>
               <li>
                  <Link to="/unknown">Unavailable page</Link>
               </li>
            </ul>
         </nav>
         <Outlet />
      </>
   )
}
export default Layout;
Finally, open the application in the browser and check the final result. The application will render as shown below −
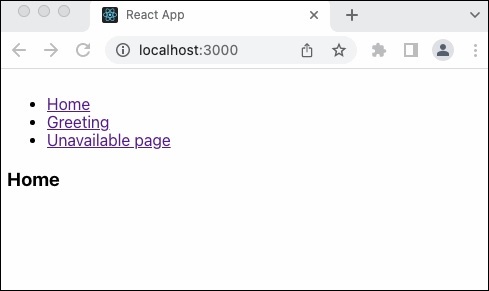
User can navigate to any page using the navigation link as shown in the above output.
Summary
React router is easy to configure and use. It does not have so many fancy feature but has necessary features like link, outlet, routes and route to create a complete web application with navigation links.
