- React - Home
- React - Introduction
- React - Roadmap
- React - Installation
- React - Features
- React - Advantages & Disadvantages
- React - Architecture
- React - Creating a React Application
- React - JSX
- React - Components
- React - Nested Components
- React - Using Newly Created Components
- React - Component Collection
- React - Styling
- React - Properties (props)
- React - Creating Components using Properties
- React - props Validation
- React - Constructor
- React - Component Life Cycle
- React - Event management
- React - Creating an Event−Aware Component
- React - Introduce Events in Expense Manager APP
- React - State Management
- React - State Management API
- React - Stateless Component
- React - State Management Using React Hooks
- React - Component Life Cycle Using React Hooks
- React - Layout Component
- React - Pagination
- React - Material UI
- React - Http Server
- React - Http client programming
- React - Form Programming
- React - Forms
- React - Controlled Component
- React - Uncontrolled Component
- React - Formik
- React - Conditional Rendering
- React - Lists
- React - Keys
- React - Routing
- React - Redux
- React - Animation
- React - Bootstrap
- React - Map
- React - Table
- React - Managing State Using Flux
- React - Testing
- React - CLI Commands
- React - Building and Deployment
- React - Example
- Hooks
- React - Introduction to Hooks
- React - Using useState
- React - Using useEffect
- React - Using useContext
- React - Using useRef
- React - Using useReducer
- React - Using useCallback
- React - Using useMemo
- React - Custom Hooks
- React Advanced
- React - Accessibility
- React - Code Splitting
- React - Context
- React - Error Boundaries
- React - Forwarding Refs
- React - Fragments
- React - Higher Order Components
- React - Integrating With Other Libraries
- React - Optimizing Performance
- React - Profiler API
- React - Portals
- React - React Without ES6 ECMAScript
- React - React Without JSX
- React - Reconciliation
- React - Refs and the DOM
- React - Render Props
- React - Static Type Checking
- React - Strict Mode
- React - Web Components
- Additional Concepts
- React - Date Picker
- React - Helmet
- React - Inline Style
- React - PropTypes
- React - BrowserRouter
- React - DOM
- React - Carousel
- React - Icons
- React - Form Components
- React - Reference API
- React Useful Resources
- React - Quick Guide
- React - Cheatsheet
- React - Axios CheatSheet
- React - Useful Resources
- React - Discussion
React - Material UI
React community provides a huge collection of advanced UI component framework. Material UI is one of the popular React UI frameworks. Let us learn how to use material UI library in this chapter.
Installation
Material UI can be installed using npm package.
npm install @material-ui/core
Material UI recommends roboto fonts for UI. To use Roboto font, include it using Gooogleapi links.
<link rel="stylesheet" href="https://fonts.googleapis.com/css?family=Roboto:300,400,500,700&display=swap" />
To use font icons, use icon link from googleapis −
<link rel="stylesheet" href="https://fonts.googleapis.com/icon?family=Material+Icons" />
To use SVG icons, install @material-ui/icons package −
npm install @material-ui/icons
Working example
Let us recreate the expense list application and use material ui components instead of html tables.
Step 1 − First, create a new react application, react-materialui-app using Create React App or Rollup bundler by following instruction in Creating a React application chapter.
Step 2 − Install React Transition Group library −
cd /go/to/project npm install @material-ui/core @material-ui/icons --save
Open the application in your favorite editor.
Create src folder under the root directory of the application.
Create components folder under src folder.
Create a file, ExpenseEntryItemList.js in src/components folder to create ExpenseEntryItemList component
Import React library and the stylesheet.
import React from 'react';
Step 2 − Next, import Material-UI library.
import { withStyles } from '@material-ui/core/styles';
import Table from '@material-ui/core/Table';
import TableBody from '@material-ui/core/TableBody';
import TableCell from '@material-ui/core/TableCell';
import TableContainer from '@material-ui/core/TableContainer';
import TableHead from '@material-ui/core/TableHead';
import TableRow from '@material-ui/core/TableRow';
import Paper from '@material-ui/core/Paper';
Create ExpenseEntryItemList class and call constructor function.
class ExpenseEntryItemList extends React.Component {
   constructor(props) {
      super(props);
   }
}
<link rel="stylesheet" href="https://fonts.googleapis.com/css?family=Roboto:300,400,500,700&display=swap" />
Create a render() function.
render() {
}
Apply styles for table rows and table cells in the render method.
const StyledTableCell = withStyles((theme) => ({
   head: {
      backgroundColor: theme.palette.common.black,
      color: theme.palette.common.white,
   },
   body: {
      fontSize: 14,
   },
}))(TableCell);
const StyledTableRow = withStyles((theme) => ({
   root: {
      '&:nth-of-type(odd)': {
         backgroundColor: theme.palette.action.hover,
      },
   },
}))(TableRow);
Use map method to generate a collection of Material UI StyledTableRow each representing a single expense entry item in the list.
const lists = this.props.items.map((item) =>
   <StyledTableRow key={item.id}>
      <StyledTableCell component="th" scope="row">
         {item.name}
      </StyledTableCell>
      <StyledTableCell align="right">{item.amount}</StyledTableCell>
      <StyledTableCell align="right">
         {new Date(item.spendDate).toDateString()}
      </StyledTableCell>
      <StyledTableCell align="right">{item.category}</StyledTableCell>
   </StyledTableRow>
);
Here, key identifies each row and it has to be unique among the list.
Step 3 − In the render() method, create a Material UI table and include the lists expression in the rows section and return it.
return (
<TableContainer component={Paper}>
   <Table aria-label="customized table">
      <TableHead>
         <TableRow>
            <StyledTableCell>Title</StyledTableCell>
            <StyledTableCell align="right">Amount</StyledTableCell>
            <StyledTableCell align="right">Spend date</StyledTableCell>
            <StyledTableCell align="right">Category</StyledTableCell>
         </TableRow>
      </TableHead>
      <TableBody>
         {lists}
      </TableBody>
   </Table>
</TableContainer> );
Finally, export the component.
export default ExpenseEntryItemList;
Now, we have successfully created the component to render the expense items using material ui components.
The complete source code of the component is as given below −
import React from 'react';

import { withStyles } from '@material-ui/core/styles';
import Table from '@material-ui/core/Table';
import TableBody from '@material-ui/core/TableBody';
import TableCell from '@material-ui/core/TableCell';
import TableContainer from '@material-ui/core/TableContainer';
import TableHead from '@material-ui/core/TableHead';
import TableRow from '@material-ui/core/TableRow';
import Paper from '@material-ui/core/Paper';

class ExpenseEntryItemList extends React.Component {
   constructor(props) {
      super(props);
   }
   render() {
      const StyledTableCell = withStyles((theme) => ({
         head: {
            backgroundColor: theme.palette.common.black,
            color: theme.palette.common.white,
         },
         body: {
            fontSize: 14,
         },
      }))(TableCell);
      const StyledTableRow = withStyles((theme) => ({
         root: {
            '&:nth-of-type(odd)': {
               backgroundColor: theme.palette.action.hover,
            },
         },
      }))(TableRow);
      const lists = this.props.items.map((item) =>
         <StyledTableRow key={item.id}>
            <StyledTableCell component="th" scope="row">
               {item.name}
            </StyledTableCell>
            <StyledTableCell align="right">{item.amount}</StyledTableCell>
            <StyledTableCell align="right">{new Date(item.spendDate).toDateString()}</StyledTableCell>
            <StyledTableCell align="right">{item.category}</StyledTableCell>
         </StyledTableRow>
      );
      return (
      <TableContainer component={Paper}>
         <Table aria-label="customized table">
            <TableHead>
               <TableRow>
                  <StyledTableCell>Title</StyledTableCell>
                  <StyledTableCell align="right">Amount</StyledTableCell>
                  <StyledTableCell align="right">Spend date</StyledTableCell>
                  <StyledTableCell align="right">Category</StyledTableCell>
               </TableRow>
            </TableHead>
            <TableBody>
               {lists}
            </TableBody>
         </Table>
      </TableContainer> );
   }
}
export default ExpenseEntryItemList;
index.js:
Open index.js and import react library and our newly created ExpenseEntryItemList component.
import React from 'react';
import ReactDOM from 'react-dom';
import ExpenseEntryItemList from './components/ExpenseEntryItemList';
Declare a list (of expense entry item) and populate it with some random values in index.js file.
const items = [
   { id: 1, name: "Pizza", amount: 80, spendDate: "2020-10-10", category: "Food" },
   { id: 1, name: "Grape Juice", amount: 30, spendDate: "2020-10-12", category: "Food" },
   { id: 1, name: "Cinema", amount: 210, spendDate: "2020-10-16", category: "Entertainment" },
   { id: 1, name: "Java Programming book", amount: 242, spendDate: "2020-10-15", category: "Academic" },
   { id: 1, name: "Mango Juice", amount: 35, spendDate: "2020-10-16", category: "Food" },
   { id: 1, name: "Dress", amount: 2000, spendDate: "2020-10-25", category: "Cloth" },
   { id: 1, name: "Tour", amount: 2555, spendDate: "2020-10-29", category: "Entertainment" },
   { id: 1, name: "Meals", amount: 300, spendDate: "2020-10-30", category: "Food" },
   { id: 1, name: "Mobile", amount: 3500, spendDate: "2020-11-02", category: "Gadgets" },
   { id: 1, name: "Exam Fees", amount: 1245, spendDate: "2020-11-04", category: "Academic" }
]
Use ExpenseEntryItemList component by passing the items through items attributes.
ReactDOM.render(
   <React.StrictMode>
      <ExpenseEntryItemList items={items} />
   </React.StrictMode>,
   document.getElementById('root')
);
The complete code of index.js is as follows −
import React from 'react';
import ReactDOM from 'react-dom';
import ExpenseEntryItemList from './components/ExpenseEntryItemList';

const items = [
   { id: 1, name: "Pizza", amount: 80, spendDate: "2020-10-10", category: "Food" },
   { id: 1, name: "Grape Juice", amount: 30, spendDate: "2020-10-12", category: "Food" },
   { id: 1, name: "Cinema", amount: 210, spendDate: "2020-10-16", category: "Entertainment" },
   { id: 1, name: "Java Programming book", amount: 242, spendDate: "2020-10-15", category: "Academic" },
   { id: 1, name: "Mango Juice", amount: 35, spendDate: "2020-10-16", category: "Food" },
   { id: 1, name: "Dress", amount: 2000, spendDate: "2020-10-25", category: "Cloth" },
   { id: 1, name: "Tour", amount: 2555, spendDate: "2020-10-29", category: "Entertainment" },
   { id: 1, name: "Meals", amount: 300, spendDate: "2020-10-30", category: "Food" },
   { id: 1, name: "Mobile", amount: 3500, spendDate: "2020-11-02", category: "Gadgets" },
   { id: 1, name: "Exam Fees", amount: 1245, spendDate: "2020-11-04", category: "Academic" }
]
ReactDOM.render(
   <React.StrictMode>
      <ExpenseEntryItemList items={items} />
   </React.StrictMode>,
   document.getElementById('root')
);
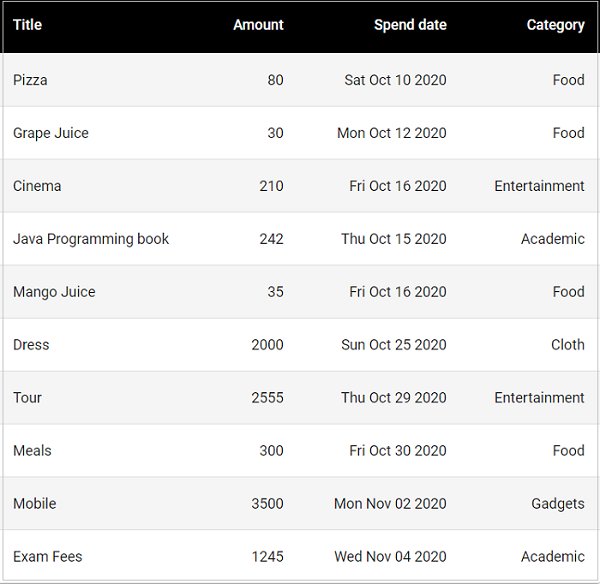
Serve the application using npm command.
npm start
index.html
Open index.html file in the public folder and include the material UI font and icons.
<!DOCTYPE html>
<html lang="en">
   <head>
      <meta charset="utf-8">
      <title>Material UI App</title>
      <link rel="stylesheet" href="https://fonts.googleapis.com/css?family=Roboto:300,400,500,700&display=swap" />
      <link rel="stylesheet" href="https://fonts.googleapis.com/icon?family=Material+Icons" />
   </head>
   <body>
      <div id="root"></div>
      <script type="text/JavaScript" src="./index.js"></script>
   </body>
</html>
Open the browser and enter http://localhost:3000 in the address bar and press enter.