- React - Home
- React - Introduction
- React - Roadmap
- React - Installation
- React - Features
- React - Advantages & Disadvantages
- React - Architecture
- React - Creating a React Application
- React - JSX
- React - Components
- React - Nested Components
- React - Using Newly Created Components
- React - Component Collection
- React - Styling
- React - Properties (props)
- React - Creating Components using Properties
- React - props Validation
- React - Constructor
- React - Component Life Cycle
- React - Event management
- React - Creating an Event−Aware Component
- React - Introduce Events in Expense Manager APP
- React - State Management
- React - State Management API
- React - Stateless Component
- React - State Management Using React Hooks
- React - Component Life Cycle Using React Hooks
- React - Layout Component
- React - Pagination
- React - Material UI
- React - Http Server
- React - Http client programming
- React - Form Programming
- React - Forms
- React - Controlled Component
- React - Uncontrolled Component
- React - Formik
- React - Conditional Rendering
- React - Lists
- React - Keys
- React - Routing
- React - Redux
- React - Animation
- React - Bootstrap
- React - Map
- React - Table
- React - Managing State Using Flux
- React - Testing
- React - CLI Commands
- React - Building and Deployment
- React - Example
- Hooks
- React - Introduction to Hooks
- React - Using useState
- React - Using useEffect
- React - Using useContext
- React - Using useRef
- React - Using useReducer
- React - Using useCallback
- React - Using useMemo
- React - Custom Hooks
- React Advanced
- React - Accessibility
- React - Code Splitting
- React - Context
- React - Error Boundaries
- React - Forwarding Refs
- React - Fragments
- React - Higher Order Components
- React - Integrating With Other Libraries
- React - Optimizing Performance
- React - Profiler API
- React - Portals
- React - React Without ES6 ECMAScript
- React - React Without JSX
- React - Reconciliation
- React - Refs and the DOM
- React - Render Props
- React - Static Type Checking
- React - Strict Mode
- React - Web Components
- Additional Concepts
- React - Date Picker
- React - Helmet
- React - Inline Style
- React - PropTypes
- React - BrowserRouter
- React - DOM
- React - Carousel
- React - Icons
- React - Form Components
- React - Reference API
- React Useful Resources
- React - Quick Guide
- React - Cheatsheet
- React - Axios CheatSheet
- React - Useful Resources
- React - Discussion
React - Redux
React redux is an advanced state management library for React. As we learned earlier, React only supports component level state management. In a big and complex application, large number of components are used. React recommends to move the state to the top level component and pass the state to the nested component using properties. It helps to some extent but it becomes complex when the components increases.
React redux chips in and helps to maintain state at the application level. React redux allows any component to access the state at any time. Also, it allows any component to change the state of the application at any time.
Let us learn about the how to write a React application using React redux in this chapter.
Concepts
React redux maintains the state of the application in a single place called Redux store. React component can get the latest state from the store as well as change the state at any time. Redux provides a simple process to get and set the current state of the application and involves below concepts.
Store − The central place to store the state of the application.
Actions − Action is an plain object with the type of the action to be done and the input (called payload) necessary to do the action. For example, action for adding an item in the store contains ADD_ITEM as type and an object with item's details as payload. The action can be represented as −
{
   type: 'ADD_ITEM',
   payload: { name: '..', ... }
}
Reducers − Reducers are pure functions used to create a new state based on the existing state and the current action. It returns the newly created state. For example, in add item scenario, it creates a new item list and merges the item from the state and new item and returns the newly created list.
Action creators − Action creator creates an action with proper action type and data necessary for the action and returns the action. For example, addItem action creator returns below object −
{
   type: 'ADD_ITEM',
   payload: { name: '..', ... }
}
Component − Component can connect to the store to get the current state and dispatch action to the store so that the store executes the action and updates it's current state.
The workflow of a typical redux store can be represented as shown below.
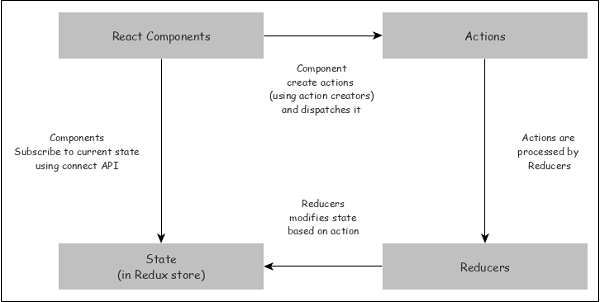
- React component subscribes to the store and get the latest state during initialization of the application.
- To change the state, React component creates necessary action and dispatches the action.
- Reducer creates a new state based on the action and returns it. Store updates itself with the new state.
- Once the state changes, store sends the updated state to all its subscribed component.
Redux API
Redux provides a single api, connect which will connect a components to the store and allows the component to get and set the state of the store.
The signature of the connect API is −
function connect(mapStateToProps?, mapDispatchToProps?, mergeProps?, options?)
All parameters are optional and it returns a HOC (higher order component). A higher order component is a function which wraps a component and returns a new component.
let hoc = connect(mapStateToProps, mapDispatchToProps)
let connectedComponent = hoc(component)
Let us see the first two parameters which will be enough for most cases.
mapStateToProps − Accepts a function with below signature.
(state, ownProps?) => Object
Here, state refers current state of the store and Object refers the new props of the component. It gets called whenever the state of the store is updated.
(state) => { prop1: this.state.anyvalue }
mapDispatchToProps − Accepts a function with below signature.
Object | (dispatch, ownProps?) => Object
Here, dispatch refers the dispatch object used to dispatch action in the redux store and Object refers one or more dispatch functions as props of the component.
(dispatch) => {
   addDispatcher: (dispatch) => dispatch({ type: 'ADD_ITEM', payload: { } }),
   removeispatcher: (dispatch) => dispatch({ type: 'REMOVE_ITEM', payload: { } }),
}
Provider component
React Redux provides a Provider component and its sole purpose to make the Redux store available to its all nested components connected to store using connect API. The sample code is given below −
import React from 'react'
import ReactDOM from 'react-dom'
import { Provider } from 'react-redux'
import { App } from './App'
import createStore from './createReduxStore'

const store = createStore()

ReactDOM.render(
   <Provider store={store}>
      <App />
   </Provider>,
   document.getElementById('root')
)
Now, all the component inside the App component can get access to the Redux store by using connect API.
Working example
Let us recreate our expense manager application and uses the React redux concept to maintain the state of the application.
First, create a new react application, react-message-app using Create React App or Rollup bundler by following instruction in Creating a React application chapter.
Next, install Redux and React redux library.
npm install redux react-redux --save
Next, install uuid library to generate unique identifier for new expenses.
npm install uuid --save
Next, open the application in your favorite editor.
Next, create src folder under the root directory of the application.
Next, create actions folder under src folder.
Next, create a file, types.js under src/actions folder and start editing.
Next, add two action type, one for add expense and one for remove expense.
export const ADD_EXPENSE = 'ADD_EXPENSE';
export const DELETE_EXPENSE = 'DELETE_EXPENSE';
Next, create a file, index.js under src/actions folder to add action and start editing.
Next, import uuid to create unique identifier.
import { v4 as uuidv4 } from 'uuid';
Next, import action types.
import { ADD_EXPENSE, DELETE_EXPENSE } from './types';
Next, add a new function to return action type for adding an expense and export it.
export const addExpense = ({ name, amount, spendDate, category }) => ({
   type: ADD_EXPENSE,
   payload: {
      id: uuidv4(),
      name,
      amount,
      spendDate,
      category
   }
});
Here, the function expects expense object and return action type of ADD_EXPENSE along with a payload of expense information.
Next, add a new function to return action type for deleting an expense and export it.
export const deleteExpense = id => ({
   type: DELETE_EXPENSE,
   payload: {
      id
   }
});
Here, the function expects id of the expense item to be deleted and return action type of 'DELETE_EXPENSE' along with a payload of expense id.
index.js
The complete source code of the action is given below −
import { v4 as uuidv4 } from 'uuid';
import { ADD_EXPENSE, DELETE_EXPENSE } from './types';

export const addExpense = ({ name, amount, spendDate, category }) => ({
   type: ADD_EXPENSE,
   payload: {
      id: uuidv4(),
      name,
      amount,
      spendDate,
      category
   }
});
export const deleteExpense = id => ({
   type: DELETE_EXPENSE,
   payload: {
      id
   }
});
Next, create a new folder, reducers under src folder.
Next, create a file, index.js under src/reducers to write reducer function and start editing.
Next, import the action types.
import { ADD_EXPENSE, DELETE_EXPENSE } from '../actions/types';
Next, add a function, expensesReducer to do the actual feature of adding and updating expenses in the redux store.
export default function expensesReducer(state = [], action) {
   switch (action.type) {
      case ADD_EXPENSE:
         return [...state, action.payload];
      case DELETE_EXPENSE:
         return state.filter(expense => expense.id !== action.payload.id);
      default:
         return state;
   }
}
index.js
The complete source code of the reducer is given below −
import { ADD_EXPENSE, DELETE_EXPENSE } from '../actions/types';

export default function expensesReducer(state = [], action) {
   switch (action.type) {
      case ADD_EXPENSE:
         return [...state, action.payload];
      case DELETE_EXPENSE:
         return state.filter(expense => expense.id !== action.payload.id);
      default:
         return state;
   }
}
Here, the reducer checks the action type and execute the relevant code.
Next, create components folder under src folder.
Next, create a file, ExpenseEntryItemList.css under src/components folder and add generic style for the html tables.
ExpenseEntryItemList.css
html {
   font-family: sans-serif;
}
table {
   border-collapse: collapse;
   border: 2px solid rgb(200,200,200);
   letter-spacing: 1px;
   font-size: 0.8rem;
}
td, th {
   border: 1px solid rgb(190,190,190);
   padding: 10px 20px;
}
th {
   background-color: rgb(235,235,235);
}
td, th {
   text-align: left;
}
tr:nth-child(even) td {
   background-color: rgb(250,250,250);
}
tr:nth-child(odd) td {
   background-color: rgb(245,245,245);
}
caption {
   padding: 10px;
}
tr.highlight td {
   background-color: #a6a8bd;
}
Next, create a file, ExpenseEntryItemList.js under src/components folder and start editing.
Next, import React and React redux library.
import React from 'react';
import { connect } from 'react-redux';
Next, import ExpenseEntryItemList.css file.
import './ExpenseEntryItemList.css';
Next, import action creators.
import { deleteExpense } from '../actions';
import { addExpense } from '../actions';
Next, create a class, ExpenseEntryItemList and call constructor with props.
class ExpenseEntryItemList extends React.Component {
   constructor(props) {
      super(props);
   }
}
Next, create mapStateToProps function.
const mapStateToProps = state => {
   return {
      expenses: state
   };
};
Here, we copied the input state to expenses props of the component.
Next, create mapDispatchToProps function.
const mapDispatchToProps = dispatch => {
   return {
      onAddExpense: expense => {
         dispatch(addExpense(expense));
      },
      onDelete: id => {
         dispatch(deleteExpense(id));
      }
   };
};
Here, we created two function, one to dispatch add expense (addExpense) function and another to dispatch delete expense (deleteExpense) function and mapped those function to props of the component.
Next, export the component using connect api.
export default connect(
   mapStateToProps,
   mapDispatchToProps
)(ExpenseEntryItemList);
Now, the component gets three new properties given below −
expenses − list of expense
onAddExpense − function to dispatch addExpense function
onDelete − function to dispatch deleteExpense function
Next, add few expense into the redux store in the constructor using onAddExpense property.
if (this.props.expenses.length == 0)
{
const items = [
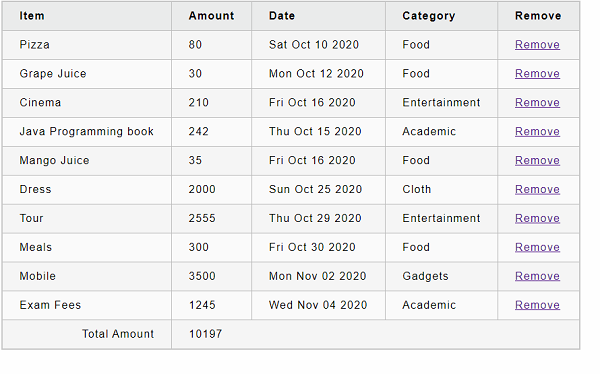
{ id: 1, name: "Pizza", amount: 80, spendDate: "2020-10-10", category: "Food" },
{ id: 2, name: "Grape Juice", amount: 30, spendDate: "2020-10-12", category: "Food" },
{ id: 3, name: "Cinema", amount: 210, spendDate: "2020-10-16", category: "Entertainment" },
{ id: 4, name: "Java Programming book", amount: 242, spendDate: "2020-10-15", category: "Academic" },
{ id: 5, name: "Mango Juice", amount: 35, spendDate: "2020-10-16", category: "Food" },
{ id: 6, name: "Dress", amount: 2000, spendDate: "2020-10-25", category: "Cloth" },
{ id: 7, name: "Tour", amount: 2555, spendDate: "2020-10-29", category: "Entertainment" },
{ id: 8, name: "Meals", amount: 300, spendDate: "2020-10-30", category: "Food" },
{ id: 9, name: "Mobile", amount: 3500, spendDate: "2020-11-02", category: "Gadgets" },
{ id: 10, name: "Exam Fees", amount: 1245, spendDate: "2020-11-04", category: "Academic" }
]
items.forEach((item) => {
this.props.onAddExpense(
{
name: item.name,
amount: item.amount,
spendDate: item.spendDate,
category: item.category
}
);
})
}
Next, add an event handler to delete the expense item using expense id.
handleDelete = (id,e) => {
   e.preventDefault();
   this.props.onDelete(id);
}
Here, the event handler calls the onDelete dispatcher, which call deleteExpense along with the expense id.
Next, add a method to calculate the total amount of all expenses.
getTotal() {
   let total = 0;
   for (var i = 0; i < this.props.expenses.length; i++) {
      total += this.props.expenses[i].amount
   }
   return total;
}
Next, add render() method and list the expense item in the tabular format.
render() {
   const lists = this.props.expenses.map(
      (item) =>
      <tr key={item.id}>
         <td>{item.name}</td>
         <td>{item.amount}</td>
         <td>{new Date(item.spendDate).toDateString()}</td>
         <td>{item.category}</td>
         <td><a href="#"
            onClick={(e) => this.handleDelete(item.id, e)}>Remove</a></td>
      </tr>
   );
   return (
      <div>
         <table>
            <thead>
               <tr>
                  <th>Item</th>
                  <th>Amount</th>
                  <th>Date</th>
                  <th>Category</th>
                  <th>Remove</th>
               </tr>
            </thead>
            <tbody>
               {lists}
               <tr>
                  <td colSpan="1" style={{ textAlign: "right" }}>Total Amount</td>
                  <td colSpan="4" style={{ textAlign: "left" }}>
                     {this.getTotal()}
                  </td>
               </tr>
            </tbody>
         </table>
      </div>
   );
}
Here, we set the event handler handleDelete to remove the expense from the store.
ExpenseEntryItemList.js
The complete source code of the ExpenseEntryItemList component is given below −
import React from 'react';
import { connect } from 'react-redux';
import './ExpenseEntryItemList.css';
import { deleteExpense } from '../actions';
import { addExpense } from '../actions';

class ExpenseEntryItemList extends React.Component {
   constructor(props) {
      super(props);

      if (this.props.expenses.length == 0){
         const items = [
            { id: 1, name: "Pizza", amount: 80, spendDate: "2020-10-10", category: "Food" },
            { id: 2, name: "Grape Juice", amount: 30, spendDate: "2020-10-12", category: "Food" },
            { id: 3, name: "Cinema", amount: 210, spendDate: "2020-10-16", category: "Entertainment" },
            { id: 4, name: "Java Programming book", amount: 242, spendDate: "2020-10-15", category: "Academic" },
            { id: 5, name: "Mango Juice", amount: 35, spendDate: "2020-10-16", category: "Food" },
            { id: 6, name: "Dress", amount: 2000, spendDate: "2020-10-25", category: "Cloth" },
            { id: 7, name: "Tour", amount: 2555, spendDate: "2020-10-29", category: "Entertainment" },
            { id: 8, name: "Meals", amount: 300, spendDate: "2020-10-30", category: "Food" },
            { id: 9, name: "Mobile", amount: 3500, spendDate: "2020-11-02", category: "Gadgets" },
            { id: 10, name: "Exam Fees", amount: 1245, spendDate: "2020-11-04", category: "Academic" }
         ]
         items.forEach((item) => {
            this.props.onAddExpense(
               {
                  name: item.name,
                  amount: item.amount,
                  spendDate: item.spendDate,
                  category: item.category
               }
            );
         })
      }
   }
   handleDelete = (id,e) => {
      e.preventDefault();
      this.props.onDelete(id);
   }
   getTotal() {
      let total = 0;
      for (var i = 0; i < this.props.expenses.length; i++) {
         total += this.props.expenses[i].amount
      }
      return total;
   }
   render() {
      const lists = this.props.expenses.map((item) =>
         <tr key={item.id}>
            <td>{item.name}</td>
            <td>{item.amount}</td>
            <td>{new Date(item.spendDate).toDateString()}</td>
            <td>{item.category}</td>
            <td><a href="#"
               onClick={(e) => this.handleDelete(item.id, e)}>Remove</a></td>
         </tr>
      );
      return (
         <div>
            <table>
               <thead>
                  <tr>
                     <th>Item</th>
                     <th>Amount</th>
                     <th>Date</th>
                     <th>Category</th>
                     <th>Remove</th>
                  </tr>
               </thead>
               <tbody>
                  {lists}
                  <tr>
                     <td colSpan="1" style={{ textAlign: "right" }}>Total Amount</td>
                     <td colSpan="4" style={{ textAlign: "left" }}>
                        {this.getTotal()}
                     </td>
                  </tr>
               </tbody>
            </table>
         </div>
      );
   }
}
const mapStateToProps = state => {
   return {
      expenses: state
   };
};
const mapDispatchToProps = dispatch => {
   return {
      onAddExpense: expense => {
         dispatch(addExpense(expense));
      },
      onDelete: id => {
         dispatch(deleteExpense(id));
      }
   };
};
export default connect(
   mapStateToProps,
   mapDispatchToProps
)(ExpenseEntryItemList);
App.js
Next, create a file, App.js under the src/components folder and use ExpenseEntryItemList component.
import React, { Component } from 'react';
import ExpenseEntryItemList from './ExpenseEntryItemList';

class App extends Component {
   render() {
      return (
         <div>
            <ExpenseEntryItemList />
         </div>
      );
   }
}
export default App;
index.js
Next, create a file, index.js under src folder.
import React from 'react';
import { createRoot } from 'react-dom/client';
import "bootstrap/dist/css/bootstrap.min.css";
import App from './components/App';
import { createStore } from 'redux';
import { Provider } from 'react-redux';
import rootReducer from './reducers';


const store = createStore(rootReducer);

const container = document.getElementById('root');
const root = createRoot(container);
root.render(
<Provider store={store}>
   <App />
</Provider>
);
Here,
Create a store using createStore by attaching the our reducer.
Used Provider component from React redux library and set the store as props, which enables all the nested component to connect to store using connect api.
Finally, create a public folder under the root folder and create index.html file.
<!DOCTYPE html>
<html lang="en">
   <head>
      <meta charset="utf-8">
      <title>React Containment App</title>
   </head>
   <body>
      <div id="root"></div>
      <script type="text/JavaScript" src="./index.js"></script>
   </body>
</html>
Next, serve the application using npm command.
npm start
Next, open the browser and enter http://localhost:3000 in the address bar and press enter.
Clicking the remove link will remove the item from redux store.