- React - Home
- React - Introduction
- React - Roadmap
- React - Installation
- React - Features
- React - Advantages & Disadvantages
- React - Architecture
- React - Creating a React Application
- React - JSX
- React - Components
- React - Nested Components
- React - Using Newly Created Components
- React - Component Collection
- React - Styling
- React - Properties (props)
- React - Creating Components using Properties
- React - props Validation
- React - Constructor
- React - Component Life Cycle
- React - Event management
- React - Creating an Event−Aware Component
- React - Introduce Events in Expense Manager APP
- React - State Management
- React - State Management API
- React - Stateless Component
- React - State Management Using React Hooks
- React - Component Life Cycle Using React Hooks
- React - Layout Component
- React - Pagination
- React - Material UI
- React - Http Server
- React - Http client programming
- React - Form Programming
- React - Forms
- React - Controlled Component
- React - Uncontrolled Component
- React - Formik
- React - Conditional Rendering
- React - Lists
- React - Keys
- React - Routing
- React - Redux
- React - Animation
- React - Bootstrap
- React - Map
- React - Table
- React - Managing State Using Flux
- React - Testing
- React - CLI Commands
- React - Building and Deployment
- React - Example
- Hooks
- React - Introduction to Hooks
- React - Using useState
- React - Using useEffect
- React - Using useContext
- React - Using useRef
- React - Using useReducer
- React - Using useCallback
- React - Using useMemo
- React - Custom Hooks
- React Advanced
- React - Accessibility
- React - Code Splitting
- React - Context
- React - Error Boundaries
- React - Forwarding Refs
- React - Fragments
- React - Higher Order Components
- React - Integrating With Other Libraries
- React - Optimizing Performance
- React - Profiler API
- React - Portals
- React - React Without ES6 ECMAScript
- React - React Without JSX
- React - Reconciliation
- React - Refs and the DOM
- React - Render Props
- React - Static Type Checking
- React - Strict Mode
- React - Web Components
- Additional Concepts
- React - Date Picker
- React - Helmet
- React - Inline Style
- React - PropTypes
- React - BrowserRouter
- React - DOM
- React - Carousel
- React - Icons
- React - Form Components
- React - Reference API
- React Useful Resources
- React - Quick Guide
- React - Cheatsheet
- React - Axios CheatSheet
- React - Useful Resources
- React - Discussion
React - Stateless Component
React component with internal state is called Stateful component and React component without any internal state management is called Stateless component. React recommends to create and use as many stateless component as possible and create stateful component only when it is absolutely necessary. Also, React does not share the state with child component. The data needs to be passed to the child component through child's properties.
An example to pass date to the FormattedDate component is as follows −
<FormattedDate value={this.state.item.spend_date} />
The general idea is not to overcomplicate the application logic and use advanced features only when necessary.
Create a stateful component
Let us create a React application to show the current date and time.
Step 1 − First, create a new react application, react-clock-app using Create React App or Rollup bundler by following instruction in Creating a React application chapter.
Open the application in your favorite editor.
Step 2 − Create src folder under the root directory of the application.
Create components folder under src folder.
Create a file, Clock.js under src/components folder and start editing.
Import React library.
import React from 'react';
Next, create Clock component.
class Clock extends React.Component {
   constructor(props) {
      super(props);
   }
}
Step 3 − Initialize state with current date and time.
constructor(props) {
   super(props);
   this.state = {
      date: new Date()
   }
}
Step 4 − Add a method, setTime() to update the current time −
setTime() {
   console.log(this.state.date);
   this.setState((state, props) => (
      {
         date: new Date()
      }
   ))
}
Step 5 − Use JavaScript method, setInterval and call setTime() method every second to ensure that the component's state is updated every second.
constructor(props) {
   super(props);
   this.state = {
      date: new Date()
   }
   setInterval( () => this.setTime(), 1000);
}
Step 6 − Create a render function.
render() {
}
Next, update the render() method to show the current time.
render() {
   return (
      <div><p>The current time is {this.state.date.toString()}</p></div>
   );
}
Finally, export the component.
export default Clock;
The complete source code of the Clock component is as follows −
import React from 'react';

class Clock extends React.Component {
   constructor(props) {
      super(props);
      this.state = {
         date: new Date()
      }
      setInterval( () => this.setTime(), 1000);
   }
   setTime() {
      console.log(this.state.date);
      this.setState((state, props) => (
         {
            date: new Date()
         }
      ))
   }
   render() {
      return (
         <div>
            <p>The current time is {this.state.date.toString()}</p>
         </div>
      );
   }
}
export default Clock;
index.js
Next, create a file, index.js under the src folder and use Clock component.
import React from 'react';
import { createRoot } from 'react-dom/client';
import Clock from './components/Clock';

const container = document.getElementById('root');
const root = createRoot(container);
root.render(<Clock />);
index.html
Finally, create a public folder under the root folder and create index.html file.
<!DOCTYPE html>
<html lang="en">
   <head>
      <meta charset="utf-8">
      <title>Clock</title>
   </head>
   <body>
      <div id="root"></div>
      <script type="text/JavaScript" src="./index.js"></script>
   </body>
</html>
Serve the application using npm command.
npm start
Open the browser and enter http://localhost:3000 in the address bar and press enter. The application will show the time and update it every second.
The current time is Sun Nov 09 2025 14:57:51 GMT+0530 (India Standard Time)
The above application works fine but throws an error in the console.
Can't call setState on a component that is not yet mounted.
The error message indicates that the setState has to be called only after the component is mounted.
What is mounting?
React component has a life-cycle and mounting is one of the stages in the life cycle. Let us learn more about the life-cycle in the upcoming chapters.
Introduce state in expense manager app
Let us introduce state management in the expense manager application by adding a simple feature to remove an expenses item.
Step 1 − Open expense-manager application in your favorite editor.
Open ExpenseEntryItemList.js file.
Initialize the state of the component with the expense items passed into the components through properties.
this.state = {
   items: this.props.items
}
Step 2 − Add the Remove label in the render()method.
<thead>
   <tr>
      <th>Item</th>
      <th>Amount</th>
      <th>Date</th>
      <th>Category</th>
      <th>Remove</th>
   </tr>
</thead>
Step 3 − Update the lists in the render() method to include the remove link. Also, use items in the state (this.state.items) instead of items from the properties (this.props.items).
const lists = this.state.items.map((item) =>
   <tr key={item.id} onMouseEnter={this.handleMouseEnter} onMouseLeave={this.handleMouseLeave}>
      <td>{item.name}</td>
      <td>{item.amount}</td>
      <td>{new Date(item.spendDate).toDateString()}</td>
      <td>{item.category}</td>
      <td><a href="#" onClick={(e) =>  this.handleDelete(item.id, e)}>Remove</a></td>
   </tr>
);
Step 4 − Implement handleDelete method, which will remove the relevant expense item from the state.
handleDelete = (id, e) => {
   e.preventDefault();
   console.log(id);

   this.setState((state, props) => {
      let items = [];

      state.items.forEach((item, idx) => {
         if(item.id != id)
            items.push(item)
      })
      let newState = {
         items: items
      }
      return newState;
   })
}
Here,
Expense items are fetched from the current state of the component.
Current expense items are looped over to find the item referred by the user using id of the item.
Create a new item list with all the expense item except the one referred by the user
Step 5 − Add a new row to show the total expense amount.
<tr>
   <td colSpan="1" style={{ textAlign: "right" }}>Total Amount</td>
   <td colSpan="4" style={{ textAlign: "left" }}>
      {this.getTotal()}
   </td>
</tr>
Step 6 − Implement the getTotal() method to calculate the total expense amount.
getTotal() {
   let total = 0;
   for(var i = 0; i < this.state.items.length; i++) {
      total += this.state.items[i].amount
   }
   return total;
}
The complete code of the render() method is as follows −
render() {
   const lists = this.state.items.map((item) =>
      <tr key={item.id} onMouseEnter={this.handleMouseEnter} onMouseLeave={this.handleMouseLeave}>
         <td>{item.name}</td>
         <td>{item.amount}</td>
         <td>{new Date(item.spendDate).toDateString()}</td>
         <td>{item.category}</td>
         <td><a href="#"
            onClick={(e) =>  this.handleDelete(item.id, e)}>Remove</a></td>
      </tr>
   );
   return (
      <table onMouseOver={this.handleMouseOver}>
         <thead>
            <tr>
               <th>Item</th>
               <th>Amount</th>
               <th>Date</th>
               <th>Category</th>
               <th>Remove</th>
            </tr>
         </thead>
         <tbody>
            {lists}
            <tr>
               <td colSpan="1" style={{ textAlign: "right" }}>Total Amount</td>
               <td colSpan="4" style={{ textAlign: "left" }}>
                  {this.getTotal()}
               </td>
            </tr>
         </tbody>
      </table>
   );
}
Finally, the updated code of the ExpenseEntryItemList is as follows −
import React from 'react';
import './ExpenseEntryItemList.css';

class ExpenseEntryItemList extends React.Component {
   constructor(props) {
      super(props);
      this.state = {
         items: this.props.items
      }
   }
   handleMouseEnter(e) {
      e.target.parentNode.classList.add("highlight");
   }
   handleMouseLeave(e) {
      e.target.parentNode.classList.remove("highlight");
   }
   handleMouseOver(e) {
      console.log("The mouse is at (" + e.clientX + ", " + e.clientY + ")");
   }
   handleDelete = (id, e) => {
      e.preventDefault();
      console.log(id);
      this.setState((state, props) => {
         let items = [];
         state.items.forEach((item, idx) => {
            if(item.id != id)
               items.push(item)
         })
         let newState = {
            items: items
         }
         return newState;
      })
   }
   getTotal() {
      let total = 0;
      for(var i = 0; i < this.state.items.length; i++) {
         total += this.state.items[i].amount
      }
      return total;
   }
   render() {
      const lists = this.state.items.map((item) =>
         <tr key={item.id} onMouseEnter={this.handleMouseEnter} onMouseLeave={this.handleMouseLeave}>
            <td>{item.name}</td>
            <td>{item.amount}</td>
            <td>{new Date(item.spendDate).toDateString()}</td>
            <td>{item.category}</td>
            <td><a href="#"
               onClick={(e) =>  this.handleDelete(item.id, e)}>Remove</a></td>
         </tr>
      );
      return (
         <table onMouseOver={this.handleMouseOver}>
            <thead>
               <tr>
                  <th>Item</th>
                  <th>Amount</th>
                  <th>Date</th>
                  <th>Category</th>
                  <th>Remove</th>
               </tr>
            </thead>
            <tbody>
               {lists}
               <tr>
                  <td colSpan="1" style={{ textAlign: "right" }}>Total Amount</td>
                  <td colSpan="4" style={{ textAlign: "left" }}>
                     {this.getTotal()}
                  </td>
               </tr>
            </tbody>
         </table>
      );
   }
}
export default ExpenseEntryItemList;
index.js
Update the index.js and include the ExpenseEntyItemList component.
import React from 'react';
import { createRoot } from 'react-dom/client';
import ExpenseEntryItemList from './components/ExpenseEntryItemList'
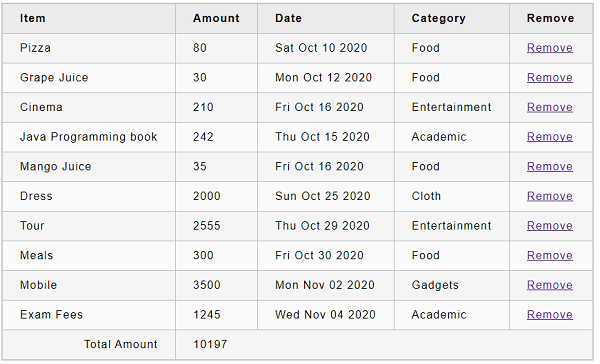
const items = [
{ id: 1, name: "Pizza", amount: 80, spendDate: "2020-10-10", category: "Food" },
{ id: 2, name: "Grape Juice", amount: 30, spendDate: "2020-10-12", category: "Food" },
{ id: 3, name: "Cinema", amount: 210, spendDate: "2020-10-16", category: "Entertainment" },
{ id: 4, name: "Java Programming book", amount: 242, spendDate: "2020-10-15", category: "Academic" },
{ id: 5, name: "Mango Juice", amount: 35, spendDate: "2020-10-16", category: "Food" },
{ id: 6, name: "Dress", amount: 2000, spendDate: "2020-10-25", category: "Cloth" },
{ id: 7, name: "Tour", amount: 2555, spendDate: "2020-10-29", category: "Entertainment" },
{ id: 8, name: "Meals", amount: 300, spendDate: "2020-10-30", category: "Food" },
{ id: 9, name: "Mobile", amount: 3500, spendDate: "2020-11-02", category: "Gadgets" },
{ id: 10, name: "Exam Fees", amount: 1245, spendDate: "2020-11-04", category: "Academic" }
]
const container = document.getElementById('root');
const root = createRoot(container);
root.render(<ExpenseEntryItemList items={items} />);
Serve the application using npm command.
npm start
Next, open the browser and enter http://localhost:3000 in the address bar and press enter.
Finally, to remove an expense item, click the corresponding remove link. It will remove the corresponding item and refresh the user interface as shown in animated gif.