- React - Home
- React - Introduction
- React - Roadmap
- React - Installation
- React - Features
- React - Advantages & Disadvantages
- React - Architecture
- React - Creating a React Application
- React - JSX
- React - Components
- React - Nested Components
- React - Using Newly Created Components
- React - Component Collection
- React - Styling
- React - Properties (props)
- React - Creating Components using Properties
- React - props Validation
- React - Constructor
- React - Component Life Cycle
- React - Event management
- React - Creating an Event−Aware Component
- React - Introduce Events in Expense Manager APP
- React - State Management
- React - State Management API
- React - Stateless Component
- React - State Management Using React Hooks
- React - Component Life Cycle Using React Hooks
- React - Layout Component
- React - Pagination
- React - Material UI
- React - Http Server
- React - Http client programming
- React - Form Programming
- React - Forms
- React - Controlled Component
- React - Uncontrolled Component
- React - Formik
- React - Conditional Rendering
- React - Lists
- React - Keys
- React - Routing
- React - Redux
- React - Animation
- React - Bootstrap
- React - Map
- React - Table
- React - Managing State Using Flux
- React - Testing
- React - CLI Commands
- React - Building and Deployment
- React - Example
- Hooks
- React - Introduction to Hooks
- React - Using useState
- React - Using useEffect
- React - Using useContext
- React - Using useRef
- React - Using useReducer
- React - Using useCallback
- React - Using useMemo
- React - Custom Hooks
- React Advanced
- React - Accessibility
- React - Code Splitting
- React - Context
- React - Error Boundaries
- React - Forwarding Refs
- React - Fragments
- React - Higher Order Components
- React - Integrating With Other Libraries
- React - Optimizing Performance
- React - Profiler API
- React - Portals
- React - React Without ES6 ECMAScript
- React - React Without JSX
- React - Reconciliation
- React - Refs and the DOM
- React - Render Props
- React - Static Type Checking
- React - Strict Mode
- React - Web Components
- Additional Concepts
- React - Date Picker
- React - Helmet
- React - Inline Style
- React - PropTypes
- React - BrowserRouter
- React - DOM
- React - Carousel
- React - Icons
- React - Form Components
- React - Reference API
- React Useful Resources
- React - Quick Guide
- React - Cheatsheet
- React - Axios CheatSheet
- React - Useful Resources
- React - Discussion
React - Constructor
In general, constructor method in a class is used to set the initial value of the newly created object. React also use the constructor() for the same initialization purpose. Yet in react, constructor is used for state initialization and event binding purposes as well.
Let us learn how to use constructor in the react component in this chapter.
Initialization of props
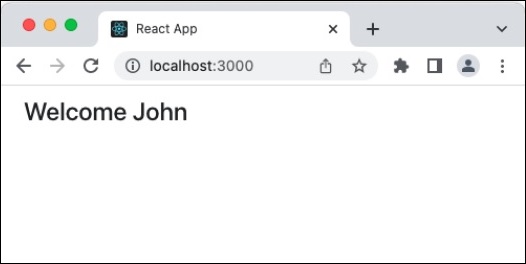
As we know, every react component will have props and state. The props should be initialized in the constructor using super keyword. If the props is not properly initialized in a class based react component, then this.props will not work properly and introduce bugs. Let us create a simple component with proper constructor method.
class Welcome extends React.Component {
   constructor(props) {
      super(props);
   }
   render() {
      return (
         <div><h3>Welcome {this.props.name}</h3></div>
      )
   }
}
Here,
super(props) will initialize the props in the Welcome component.
this.props.* will provide access to props details.
The component can be used as shown below −
function App() {
   return (
      <div className="container">
         <div style={{ padding: "10px" }}>
            <div>
               <Welcome name={'John'} />
            </div>
         </div>
      </div>
   );
}
The component will render the welcome message as shown below −
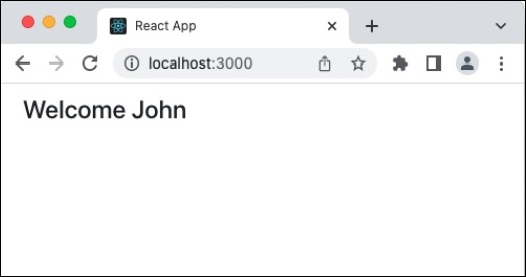
Initialization of the state
Similar to props initialization, initialization of state is very important and can be done in the constructor. In general, React provides different ways to set and get the state information in a component. They are as follows −
Using this.state = obj
This is used to initialize the state using object
this.state = {
   pageSize: 10
}
Using this.state.*
This is used to access the state information. (this.state.pageSize)
Using this.setState()
It is a function accepting either an object or a lambda function. Used to set the state information
this.setState({
   pageSize: 20
})
this.setState((state, props) => ({
   pageSize: state.pageSize + 1
}))
Let us create a simple component with proper state initialization
class Welcome extends React.Component {
   constructor(props) {
      super(props);
      this.state = {
         welcomeMessage: "Hello"
      }
   }
   render() {
      return (
         <div><h3>{this.state.welcomeMessage}, {this.props.name}</h3></div>
      )
   }
}
Here, this.state is used to set the default (initial) value of the welcome message. The component can be used as shown below −
function App() {
   return (
      <div className="container">
         <div style={{ padding: "10px" }}>
            <div>
               <Welcome name={'John'} />
            </div>
         </div>
      </div>
   );
}
The component will render the welcome message as shown below −
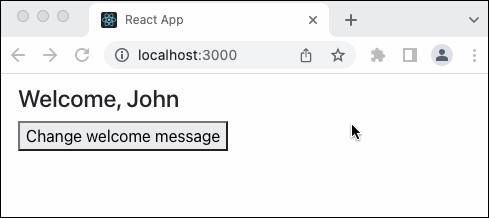
Event binding
Similar to props and state initialization, event handler has to be properly bind so that the this will be correctly accessed in the event handler. Let us create new button in our Welcome component to change the welcome message and add an event handler to handle the onClick event of the button as shown below −
import React from "react";

class Welcome extends React.Component {
   constructor(props) {
      super(props);
      this.state = {
         welcomeMessage: "Hello"
      }
      this.changeMessageHandler = this.changeMessageHandler.bind(this)
   }
   changeMessageHandler() {
      this.setState(prevState => ({
         welcomeMessage: prevState.welcomeMessage == "Hello" ? "Welcome" : "Hello"
      }));
   }
   render() {
      return (
         <div>
            <div><h3>{this.state.welcomeMessage}, {this.props.name}</h3></div>
            <div><button onClick={this.changeMessageHandler}>Change welcome message</button></div>
         </div>
      )
   }
}
export default Welcome;
Here,
Step1 − Add a button with an onClick event
<div><button onClick={this.changeMessageHandler}>Change welcome message</button></div>
Step 2 − Set this.changeMessageHandler method as onClick event handler
Step 3 − Bind the event handler, this.changeMessageHandler in the constructor
this.changeMessageHandler = this.changeMessageHandler.bind(this)
Step 4 − Added the event handler and updated the state using this.setState.
changeMessageHandler() {
   this.setState(prevState => ({
      welcomeMessage: prevState.welcomeMessage == "Hello" ? "Welcome" : "Hello"
   }));
}
The component can be used as shown below −
function App() {
   return (
      <div className="container">
         <div style={{ padding: "10px" }}>
            <div>
               <Welcome name={'John'} />
            </div>
         </div>
      </div>
   );
}
The component will render the welcome message as shown below −
Summary
Constructor is very important in the class based react component. It's main job is to setup the component in such a way that the props, state and events are configured correctly and ready to access by the component events and render methods.
