- Adobe InDesign CC Tutorial
- Adobe InDesign CC - Home
- Desktop Publishing - Introduction
- Popular DTP Software
- InDesign CC - Introduction
- InDesign CC - Workspace Basics
- Create the First Document
- InDesign CC - Page Management
- InDesign CC - Section Options
- InDesign CC - Text Frames
- InDesign CC - Story Editor
- Spellchecking Features
- InDesign CC - Find/Change Function
- InDesign CC - Import Images
- InDesign CC - Image Links
- InDesign CC - Edit Images
- InDesign CC - Image Fitting
- InDesign CC - Image Transparency
- InDesign CC - QR Codes
- Selection Tools & Fill Strokes
- Image Color & Transparency
- InDesign CC - Drop Shadows
- Special Effects to Objects
- InDesign CC - Eyedropper Tool
- Find/Change Feature for Objects
- InDesign CC - Swatches Panel
- InDesign CC - Color Panel
- InDesign CC - Gradients & Blends
- InDesign CC - Paths & Outlines
- InDesign CC - Stack Objects
- InDesign CC - Layers
- InDesign CC - Nest Objects
- InDesign CC - Align Objects
- Text Wrap & Anchor Objects
- InDesign CC - Object Transformation
- InDesign CC - Characters
- InDesign CC - Text Formatting
- InDesign CC - Paragraph Formatting
- Paragraph & Character Styles
- InDesign CC - Tables
- InDesign CC - Long Documents
- InDesign CC - Table of Contents
- InDesign CC - Interactive Documents
- InDesign CC - Ebook
- InDesign CC - Preflighting
- InDesign CC - Package Documents
- Print Documents & Booklets
- Export Documents as PDFs
- Selective Text Frame Export
- Word & InDesign
- Word File Import to InDesign
- Word To InDesign
- Photoshop & Illustrator Workflows
- Export InDesign Artwork
- Preserve Layers & Vectors
- Adobe InDesign CC Resources
- Adobe InDesign CC - Quick Guide
- Adobe InDesign CC - Resources
- Adobe InDesign CC - Discussion
Text Wrap and Anchor Objects
Text Wrapping
Text wrapping is making the text reflow along the boundaries of the frame or the object. Text wrapping options can be set using the Text Wrap panel from the Window menu.
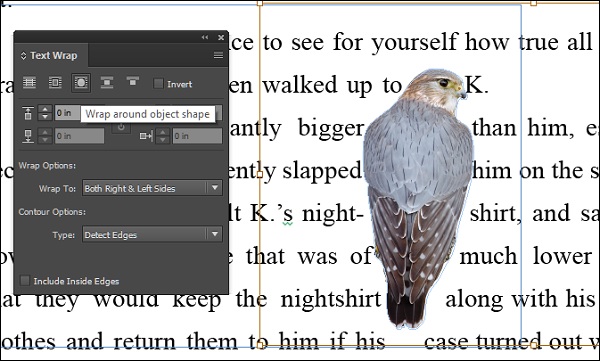
Let us take an example of text wrapping around an object. When you insert an image over text, the text normally wraps itself around the frame of the image (which is usually rectangular) but not the image itself (which can have a contour). The Text Wrap panel allows you to define the image around which the text should wrap itself.
Place the image in the document and open the Text Wrap panel. With the image frame selected, select the third option to wrap the text around the object. It is better if the imported image has some transparency or alpha channel applied to it.
In the Contour Options type, select either Alpha Channel or Detect Edges to wrap the text around the image. In the following example, we see that the text has been wrapped around the bird’s body contour.
Anchoring Objects
Anchored objects tell InDesign to keep the positioning of the object, while moving the other objects around it. To do this, first we must anchor the object.
The easiest way to anchor or make an object in-line is to select the object and cut it into the clipboard. Then use the Text tool to place the cursor in the original position of the cut object and paste the object from the clipboard back again.
You will notice that the object is now placed on top of the text. To restore it back to its original place, go to the Control Panel and select the Leading value to Auto as shown. This will tell InDesign to allocate as much area as required by the object.
You will see the object being properly inserted. If you change the text above or below the object, the object also flows along with the text as it is now anchored or in-line with the text.
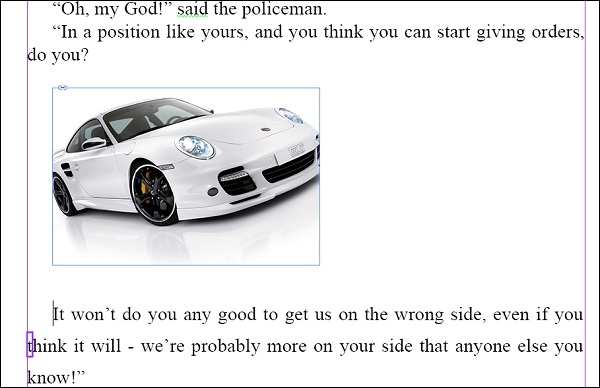
In this page, even if we choose to edit or delete the text above the car, the car will follow the edit instead of jumping above or below the text.