- Adobe InDesign CC Tutorial
- Adobe InDesign CC - Home
- Desktop Publishing - Introduction
- Popular DTP Software
- InDesign CC - Introduction
- InDesign CC - Workspace Basics
- Create the First Document
- InDesign CC - Page Management
- InDesign CC - Section Options
- InDesign CC - Text Frames
- InDesign CC - Story Editor
- Spellchecking Features
- InDesign CC - Find/Change Function
- InDesign CC - Import Images
- InDesign CC - Image Links
- InDesign CC - Edit Images
- InDesign CC - Image Fitting
- InDesign CC - Image Transparency
- InDesign CC - QR Codes
- Selection Tools & Fill Strokes
- Image Color & Transparency
- InDesign CC - Drop Shadows
- Special Effects to Objects
- InDesign CC - Eyedropper Tool
- Find/Change Feature for Objects
- InDesign CC - Swatches Panel
- InDesign CC - Color Panel
- InDesign CC - Gradients & Blends
- InDesign CC - Paths & Outlines
- InDesign CC - Stack Objects
- InDesign CC - Layers
- InDesign CC - Nest Objects
- InDesign CC - Align Objects
- Text Wrap & Anchor Objects
- InDesign CC - Object Transformation
- InDesign CC - Characters
- InDesign CC - Text Formatting
- InDesign CC - Paragraph Formatting
- Paragraph & Character Styles
- InDesign CC - Tables
- InDesign CC - Long Documents
- InDesign CC - Table of Contents
- InDesign CC - Interactive Documents
- InDesign CC - Ebook
- InDesign CC - Preflighting
- InDesign CC - Package Documents
- Print Documents & Booklets
- Export Documents as PDFs
- Selective Text Frame Export
- Word & InDesign
- Word File Import to InDesign
- Word To InDesign
- Photoshop & Illustrator Workflows
- Export InDesign Artwork
- Preserve Layers & Vectors
- Adobe InDesign CC Resources
- Adobe InDesign CC - Quick Guide
- Adobe InDesign CC - Resources
- Adobe InDesign CC - Discussion
Adobe InDesign CC - Paths and Outlines
There are many ways to create paths or Bezier curves in InDesign much similar to what can be done in Adobe Illustrator or any vector graphics software.
Using the Pen Tool to Draw Bezier Curves
Select the Pen tool from the toolbar and draw on the document. You will notice that you can start a new curve from the end vertex of the previous curve. If you hover the Pen tool over any of the vertex points, the cursor will change to a Pen with a minus symbol, which means that the vertex can be deleted.
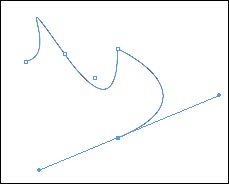
The Pen tool can be used for basic Bezier curve drawing, however, if you want a finer control over the geometry, you need to use the Pathfinder panel.
Using the Pathfinder Panel
The Pathfinder panel can be found by going to the Window menu, then to Objects and Layout and finally selecting Pathfinder. The Pathfinder consolidates all the path tools under one panel. You can close open paths or convert paths into known shapes.
For example, if you want to convert the earlier drawn path into a triangle, simply select the Converts shape to triangle in the Convert shape section and you will have a perfect triangle.
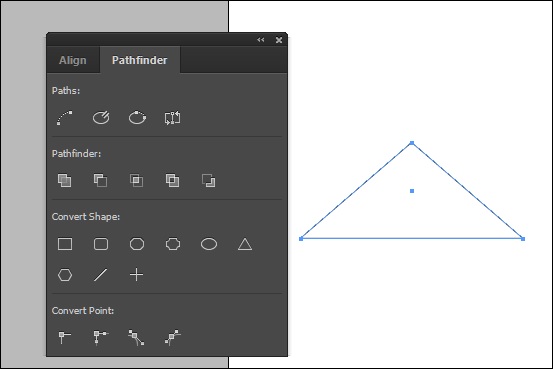
If you find the need to frequently work with paths, it is a good idea to dock the Pathfinder panel along with the other panels for easy access.
Creating Text Outlines
Creating text outlines is an easy and fun way to add some effects to text and change the characteristics of individual letters or words without needing to change the whole font.
To create an outline of a shape or letter, select it using the Selection tool and go to the Type menu and select Create Outlines.
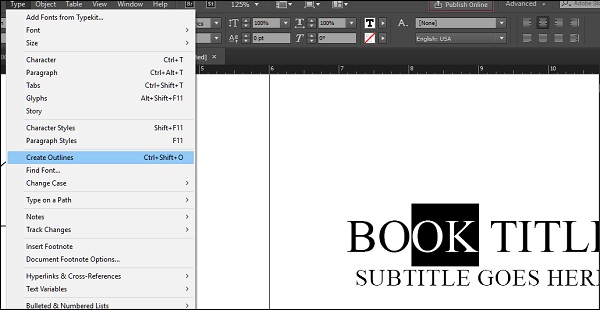
This will create an outline path of the selected text, in this case, the letters, O and K. There will be a lot of vertices which are the paths along this outline. You can selectively add effects to it such as transparency or drop shadows or just fill these outlines with an image or color to enhance the effect.
To do that, use the Place command or select a color swatch to change the O and K part of the letter. The outline of the object is treated like a frame within a frame. You can also select a group of objects and create outlines for them.