- Adobe InDesign CC Tutorial
- Adobe InDesign CC - Home
- Desktop Publishing - Introduction
- Popular DTP Software
- InDesign CC - Introduction
- InDesign CC - Workspace Basics
- Create the First Document
- InDesign CC - Page Management
- InDesign CC - Section Options
- InDesign CC - Text Frames
- InDesign CC - Story Editor
- Spellchecking Features
- InDesign CC - Find/Change Function
- InDesign CC - Import Images
- InDesign CC - Image Links
- InDesign CC - Edit Images
- InDesign CC - Image Fitting
- InDesign CC - Image Transparency
- InDesign CC - QR Codes
- Selection Tools & Fill Strokes
- Image Color & Transparency
- InDesign CC - Drop Shadows
- Special Effects to Objects
- InDesign CC - Eyedropper Tool
- Find/Change Feature for Objects
- InDesign CC - Swatches Panel
- InDesign CC - Color Panel
- InDesign CC - Gradients & Blends
- InDesign CC - Paths & Outlines
- InDesign CC - Stack Objects
- InDesign CC - Layers
- InDesign CC - Nest Objects
- InDesign CC - Align Objects
- Text Wrap & Anchor Objects
- InDesign CC - Object Transformation
- InDesign CC - Characters
- InDesign CC - Text Formatting
- InDesign CC - Paragraph Formatting
- Paragraph & Character Styles
- InDesign CC - Tables
- InDesign CC - Long Documents
- InDesign CC - Table of Contents
- InDesign CC - Interactive Documents
- InDesign CC - Ebook
- InDesign CC - Preflighting
- InDesign CC - Package Documents
- Print Documents & Booklets
- Export Documents as PDFs
- Selective Text Frame Export
- Word & InDesign
- Word File Import to InDesign
- Word To InDesign
- Photoshop & Illustrator Workflows
- Export InDesign Artwork
- Preserve Layers & Vectors
- Adobe InDesign CC Resources
- Adobe InDesign CC - Quick Guide
- Adobe InDesign CC - Resources
- Adobe InDesign CC - Discussion
Adobe InDesign CC - Paragraph Formatting
Just like character formatting, you can format paragraphs too with a wide range of options. The different options have been labeled 1-10 (in orange) so that you can easily follow.
To adjust paragraph formatting options, select the Paragraph Formatting Controls (1) icon.
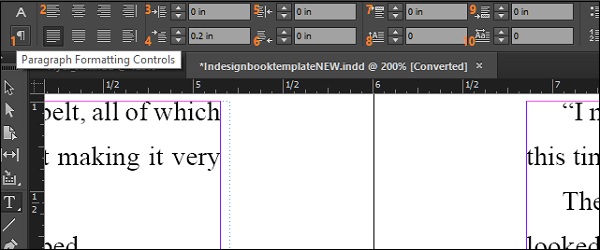
(2) represents all the paragraph alignment options available. You can align paragraphs left, right, top, or bottom and even align them along the spine (of a book) if you are creating a facing pages document.
(3) is the Left Indent and (4) is the First Line Left Indent. The difference is that, when you click Left Indent, the entire paragraph is indented according to the indent value you set. But that does not always look good, hence it is a good idea to indent only the first line of the paragraph, which is when you will need to use First Line Left Indent.
Similarly, (5) and (6) denote Right Indent and Last Line Right Indent respectively. They do a similar job like (3) and (4), this time, on the right side of the paragraph.
(7) and (9) represent the Space Before and Space After fields which allows you to insert a space before or after the paragraph. It is always a recommended practice to use Space Before and Space After instead of manually using tabs, spaces or Enter key for paragraph spacing.
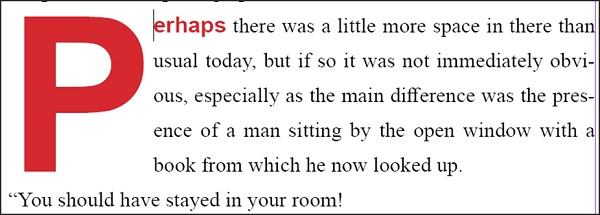
(8) and (10) are Drop Cap Number of Lines and Drop Cap One or More Characters. This is a unique effect, which allows you to extend the first letter which is usually in caps along the specified number of lines for a more elegant and professional look as shown in the above example.