- Adobe InDesign CC Tutorial
- Adobe InDesign CC - Home
- Desktop Publishing - Introduction
- Popular DTP Software
- InDesign CC - Introduction
- InDesign CC - Workspace Basics
- Create the First Document
- InDesign CC - Page Management
- InDesign CC - Section Options
- InDesign CC - Text Frames
- InDesign CC - Story Editor
- Spellchecking Features
- InDesign CC - Find/Change Function
- InDesign CC - Import Images
- InDesign CC - Image Links
- InDesign CC - Edit Images
- InDesign CC - Image Fitting
- InDesign CC - Image Transparency
- InDesign CC - QR Codes
- Selection Tools & Fill Strokes
- Image Color & Transparency
- InDesign CC - Drop Shadows
- Special Effects to Objects
- InDesign CC - Eyedropper Tool
- Find/Change Feature for Objects
- InDesign CC - Swatches Panel
- InDesign CC - Color Panel
- InDesign CC - Gradients & Blends
- InDesign CC - Paths & Outlines
- InDesign CC - Stack Objects
- InDesign CC - Layers
- InDesign CC - Nest Objects
- InDesign CC - Align Objects
- Text Wrap & Anchor Objects
- InDesign CC - Object Transformation
- InDesign CC - Characters
- InDesign CC - Text Formatting
- InDesign CC - Paragraph Formatting
- Paragraph & Character Styles
- InDesign CC - Tables
- InDesign CC - Long Documents
- InDesign CC - Table of Contents
- InDesign CC - Interactive Documents
- InDesign CC - Ebook
- InDesign CC - Preflighting
- InDesign CC - Package Documents
- Print Documents & Booklets
- Export Documents as PDFs
- Selective Text Frame Export
- Word & InDesign
- Word File Import to InDesign
- Word To InDesign
- Photoshop & Illustrator Workflows
- Export InDesign Artwork
- Preserve Layers & Vectors
- Adobe InDesign CC Resources
- Adobe InDesign CC - Quick Guide
- Adobe InDesign CC - Resources
- Adobe InDesign CC - Discussion
Adobe InDesign CC - Characters
InDesign offers a lot of choices for working with characters. Most of these options are in the Control Panel.
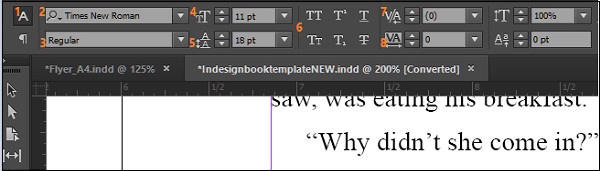
The different options have been labelled 1 to 8 (in orange) so that you can easily follow.
(1) denotes the Character Formatting Controls. Whenever you edit any text or want to change properties of the text, make sure that (1) is always selected.
(2) shows the fonts installed in the system. When you install InDesign, you will also be installing fonts apart from the ones that come default with Windows or Mac OS. All the fonts installed and their samples are listed here. You can also filter by name, if you are already aware of the font’s name.
(3) denotes the properties of the font. You can change the typeface between regular, bold, italics, etc. The exact properties depend on the font chosen.
(4) lets you change the size of the font. You can choose from an available list of sizes or input your own size.
(5) allows you to change the leading of the sentence or paragraph. The leading is a measurement of the space between the baseline of the text and the line above it. Be sure to change the leading by selecting the whole paragraph, otherwise you will have an uneven leading within the paragraph.
(6) has functions to convert all text to large caps, small caps, underline, strikethrough, subscript, or superscript.
(7) changes the kerning of the font. The kerning is the font space between individual characters.
(8) is called tracking, which is essentially kerning but for a group of characters such as a complete word or a group of words.
You can play with individual options to change the typeface to your liking.