- Adobe InDesign CC Tutorial
- Adobe InDesign CC - Home
- Desktop Publishing - Introduction
- Popular DTP Software
- InDesign CC - Introduction
- InDesign CC - Workspace Basics
- Create the First Document
- InDesign CC - Page Management
- InDesign CC - Section Options
- InDesign CC - Text Frames
- InDesign CC - Story Editor
- Spellchecking Features
- InDesign CC - Find/Change Function
- InDesign CC - Import Images
- InDesign CC - Image Links
- InDesign CC - Edit Images
- InDesign CC - Image Fitting
- InDesign CC - Image Transparency
- InDesign CC - QR Codes
- Selection Tools & Fill Strokes
- Image Color & Transparency
- InDesign CC - Drop Shadows
- Special Effects to Objects
- InDesign CC - Eyedropper Tool
- Find/Change Feature for Objects
- InDesign CC - Swatches Panel
- InDesign CC - Color Panel
- InDesign CC - Gradients & Blends
- InDesign CC - Paths & Outlines
- InDesign CC - Stack Objects
- InDesign CC - Layers
- InDesign CC - Nest Objects
- InDesign CC - Align Objects
- Text Wrap & Anchor Objects
- InDesign CC - Object Transformation
- InDesign CC - Characters
- InDesign CC - Text Formatting
- InDesign CC - Paragraph Formatting
- Paragraph & Character Styles
- InDesign CC - Tables
- InDesign CC - Long Documents
- InDesign CC - Table of Contents
- InDesign CC - Interactive Documents
- InDesign CC - Ebook
- InDesign CC - Preflighting
- InDesign CC - Package Documents
- Print Documents & Booklets
- Export Documents as PDFs
- Selective Text Frame Export
- Word & InDesign
- Word File Import to InDesign
- Word To InDesign
- Photoshop & Illustrator Workflows
- Export InDesign Artwork
- Preserve Layers & Vectors
- Adobe InDesign CC Resources
- Adobe InDesign CC - Quick Guide
- Adobe InDesign CC - Resources
- Adobe InDesign CC - Discussion
Adobe InDesign CC - Image Transparency
Image transparency or if you are an image editor, the alpha channel, is very important to ensure that the image you are inserting into the document blends with it instead of appearing like an amateur cut-and-paste job.
There are two ways to get the separate image or the alpha channel from the background and for both of these, we need to switch over to Photoshop.
One of the ways is to use the Clipping tool in Photoshop to draw a path around the object we want to isolate from the background. This method, although useful, can result in sharp edges and might not look professional especially when the clipped image is inserted into the document. Hence, we will focus on the other way which is to isolate the alpha layer from within Photoshop to get a better anti-aliased object that blends with the document.
In this example, let us say that you want to isolate the bird from the background. Place the image into InDesign and go to the Edit menu and select Edit with and in the submenu, choose Adobe Photoshop. You can also choose any other image editor you are accustomed to, if it shows up in the Edit with menu.

Remember that although you can work with JPEGs, it is better to use Photoshop PSD files as they preserve the channel information much better.
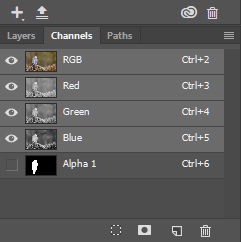
In this case, the selection of the bird has been made using the Magnetic Lasso tool (you can also use the Pen tool if you need more precise cut outs) and loaded the selected part of the image as a new Alpha channel called Alpha1.
Now, click the Channels tab and drag this Alpha1 channel onto the Load channel as selection icon, which is the first icon from the left in the bottom of the panel.
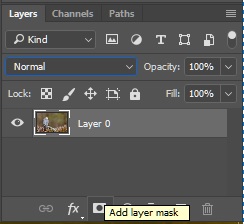
Next, go the Layers tab and click on Add layer mask icon to create a layer mask with the transparency (be sure to unlock the layer if its locked).
You will see that the bird has been isolated and the background has been made transparent.
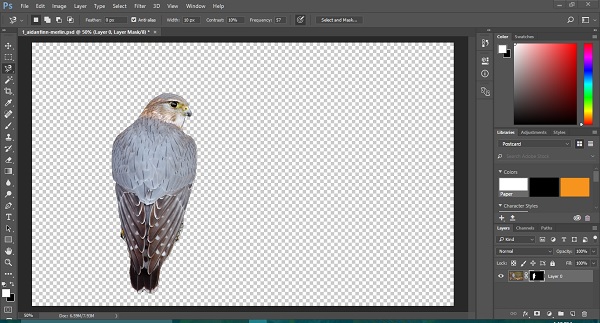
Save the image and return to InDesign to see the changes happen automatically.
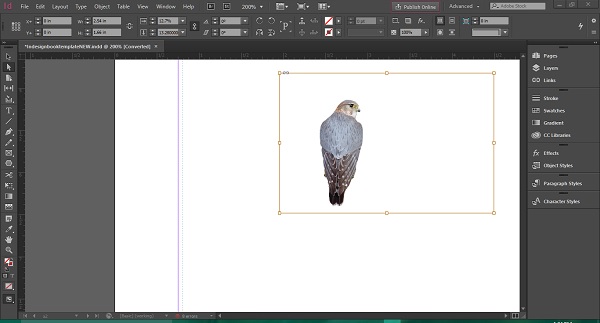
Since the image is linked, any change that you do in Photoshop will reflect automatically in InDesign. If you zoom into the image, you will find less of sharp edges and a much more refined outline.
You can now fit the image into the frame by applying the image fitting commands discussed in the previous chapter.