- Adobe InDesign CC Tutorial
- Adobe InDesign CC - Home
- Desktop Publishing - Introduction
- Popular DTP Software
- InDesign CC - Introduction
- InDesign CC - Workspace Basics
- Create the First Document
- InDesign CC - Page Management
- InDesign CC - Section Options
- InDesign CC - Text Frames
- InDesign CC - Story Editor
- Spellchecking Features
- InDesign CC - Find/Change Function
- InDesign CC - Import Images
- InDesign CC - Image Links
- InDesign CC - Edit Images
- InDesign CC - Image Fitting
- InDesign CC - Image Transparency
- InDesign CC - QR Codes
- Selection Tools & Fill Strokes
- Image Color & Transparency
- InDesign CC - Drop Shadows
- Special Effects to Objects
- InDesign CC - Eyedropper Tool
- Find/Change Feature for Objects
- InDesign CC - Swatches Panel
- InDesign CC - Color Panel
- InDesign CC - Gradients & Blends
- InDesign CC - Paths & Outlines
- InDesign CC - Stack Objects
- InDesign CC - Layers
- InDesign CC - Nest Objects
- InDesign CC - Align Objects
- Text Wrap & Anchor Objects
- InDesign CC - Object Transformation
- InDesign CC - Characters
- InDesign CC - Text Formatting
- InDesign CC - Paragraph Formatting
- Paragraph & Character Styles
- InDesign CC - Tables
- InDesign CC - Long Documents
- InDesign CC - Table of Contents
- InDesign CC - Interactive Documents
- InDesign CC - Ebook
- InDesign CC - Preflighting
- InDesign CC - Package Documents
- Print Documents & Booklets
- Export Documents as PDFs
- Selective Text Frame Export
- Word & InDesign
- Word File Import to InDesign
- Word To InDesign
- Photoshop & Illustrator Workflows
- Export InDesign Artwork
- Preserve Layers & Vectors
- Adobe InDesign CC Resources
- Adobe InDesign CC - Quick Guide
- Adobe InDesign CC - Resources
- Adobe InDesign CC - Discussion
Export Documents as PDFs
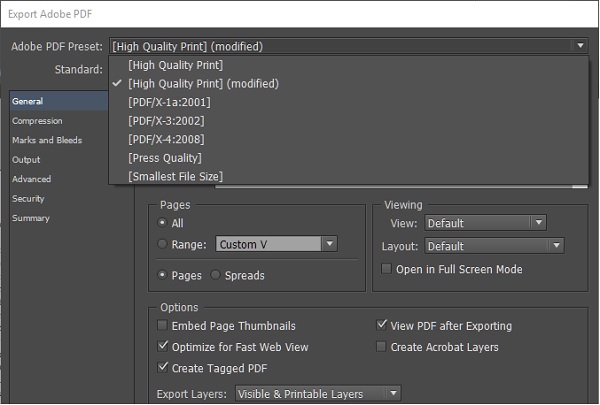
Exporting PDFs is very easy with InDesign. Just go to the Export dialog box from the File menu and select where you want to save the PDF. The Export Adobe PDF dialog box gives you a lot of presets to choose from right out of the box.
Selecting the Right Preset
If you click the Adobe PDF Preset dropdown menu, you will see that there are a lot of PDF format options available. The most used include PDF/x-1a (for North America) and PDF/x3a (for Europe). You might have to consult with your printing press before deciding on the format.
If your printing press supports it, select the PDF/x-4 for even more control over things such as transparency and a wider color gamut. For all other purposes, including on-screen ones, it is recommended to use the High Quality Print preset. It is better to avoid the Smallest File Size preset as much as possible as it can affect the resolution and colors of the images to reduce the file size.
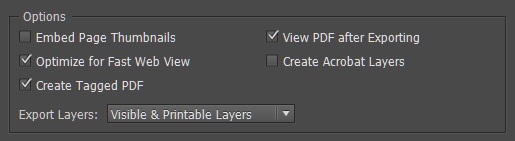
When you set the Compatibility to Acrobat 6 (PDF 1.5) or higher, you get the option to Create Tagged PDF in the Options section of this dialog box. This function allows you to tag keywords in the PDF, which makes indexing by search engines possible. It also allows for accessiblity options for the disabled as screen reader software can read the tagged data in the PDF.
Compression Options
You can determine the amount of compression that InDesign should use while exporting the PDF. It has a large impact on the resulting file size and also on how well the PDF renders for the web. If you are simply displaying the document for the web, a lower pixel per inch (ppi) value would suffice. If you intend to have a high quality printout, then you need a higher ppi. The compression options can be accessed from the Compression section of the Export Adobe PDF dialog box.
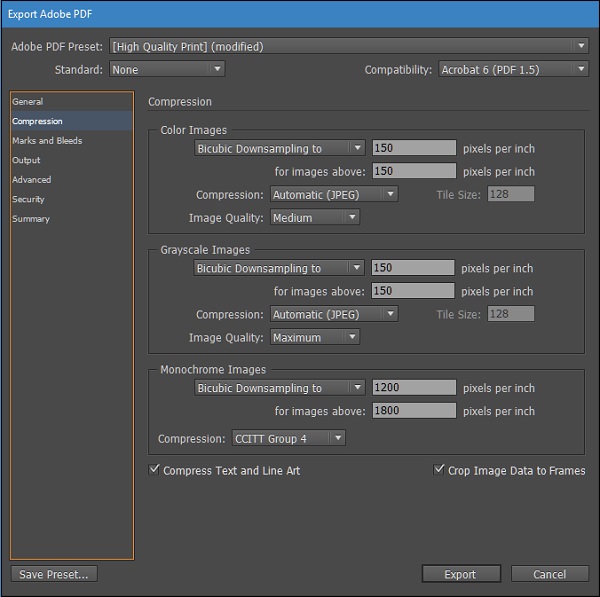
For exporting to the web, in the Color Images section, set the Bicubic Downsampling to box to about 150 and the Image Quality to Medium. Do the same for the Grayscale Images section as well if your document has grayscale images.
Output Options
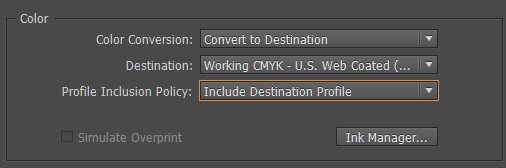
In the Output section of the Export Adobe PDF dialog box, you might want to review the settings in the Color area.
If you are going to view the PDF on-screen, it is better to leave the defaults as such and make sure that Include Tagged Source Profiles is selected in the Profile Inclusion Policy. This ensures that all images are a part of this PDF. This applies to only the RGB colors.
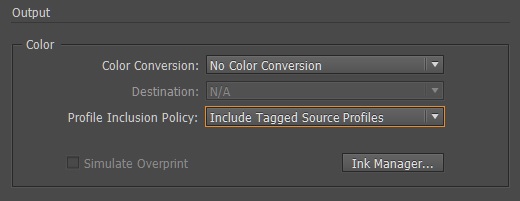
If you are printing, you need to change the Color Conversion option to Convert to Destination and select one of the different destination types, which are about the type of printed paper, in the Destination dropdown menu.
Security Options
A PDF being one of the most commonly used document exchange format, can be vulnerable if you are sharing sensitive data. It is always advisable to password protect your PDF file to ensure confidentiality of information.
In the Export Adobe PDF dialog box, go to the Security section and select the Require a password to open the document checkbox and enter a password. Only those who know the password can open the PDF.
You can also use passwords for conditional restrictions. You can select what a user can or cannot do when he/she opens the document. The earlier password protection feature restricts access to the entire document. Here, you can specify the tasks the user has permission for.
For example, you can prevent the document from printing in low resolution or high resolution or even from printing at all. You can even prevent users from copying the content of the document to the clipboard, commenting, and extracting specific pages or even filling forms and signing. This is perfect if your sharing highly sensitive information with colleagues or outsiders.

To Continue Learning Please Login