- Adobe InDesign CC Tutorial
- Adobe InDesign CC - Home
- Desktop Publishing - Introduction
- Popular DTP Software
- InDesign CC - Introduction
- InDesign CC - Workspace Basics
- Create the First Document
- InDesign CC - Page Management
- InDesign CC - Section Options
- InDesign CC - Text Frames
- InDesign CC - Story Editor
- Spellchecking Features
- InDesign CC - Find/Change Function
- InDesign CC - Import Images
- InDesign CC - Image Links
- InDesign CC - Edit Images
- InDesign CC - Image Fitting
- InDesign CC - Image Transparency
- InDesign CC - QR Codes
- Selection Tools & Fill Strokes
- Image Color & Transparency
- InDesign CC - Drop Shadows
- Special Effects to Objects
- InDesign CC - Eyedropper Tool
- Find/Change Feature for Objects
- InDesign CC - Swatches Panel
- InDesign CC - Color Panel
- InDesign CC - Gradients & Blends
- InDesign CC - Paths & Outlines
- InDesign CC - Stack Objects
- InDesign CC - Layers
- InDesign CC - Nest Objects
- InDesign CC - Align Objects
- Text Wrap & Anchor Objects
- InDesign CC - Object Transformation
- InDesign CC - Characters
- InDesign CC - Text Formatting
- InDesign CC - Paragraph Formatting
- Paragraph & Character Styles
- InDesign CC - Tables
- InDesign CC - Long Documents
- InDesign CC - Table of Contents
- InDesign CC - Interactive Documents
- InDesign CC - Ebook
- InDesign CC - Preflighting
- InDesign CC - Package Documents
- Print Documents & Booklets
- Export Documents as PDFs
- Selective Text Frame Export
- Word & InDesign
- Word File Import to InDesign
- Word To InDesign
- Photoshop & Illustrator Workflows
- Export InDesign Artwork
- Preserve Layers & Vectors
- Adobe InDesign CC Resources
- Adobe InDesign CC - Quick Guide
- Adobe InDesign CC - Resources
- Adobe InDesign CC - Discussion
Adobe InDesign CC - Long Documents
It is always easier to break a long document which often runs into several hundred pages into smaller chunks that are individual InDesign documents (file extension .indd) that can be easily managed. How many chunks you break is entirely up to your liking.
You can combine all these individual InDesign documents into an InDesign book (file extension. indb). To create a book, open the File menu, go to the New submenu and select Book… This will open the Save dialog box and ask you to save the book file. Give it a name and click OK. This will create the book and open the Book panel.
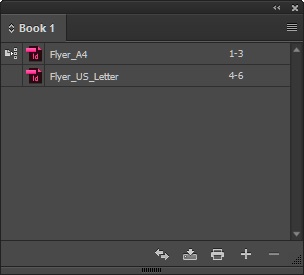
In the following example, we have taken two .indd files. However, you can choose any number of files by clicking the + symbol at the bottom of the panel. Once all the .indd files are added, you will see that the page numbers are made continuous.
The icon next to the first document in the Book panel indicates the style source. It means, this document is a source for whatever paragraph or character style changes that you make. You can select any document as a style source.
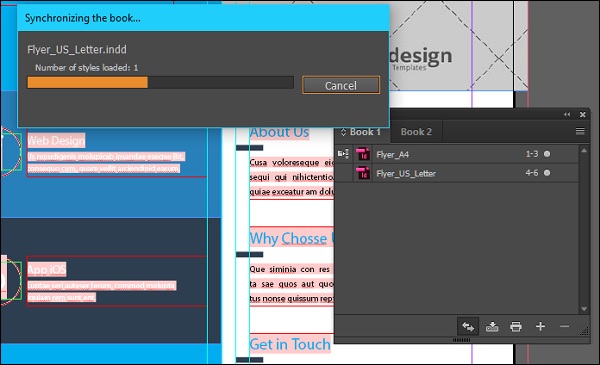
The best part about using the Book panel is that this style source can be synchronized with all other documents in the panel by clicking the double arrow icon in the bottom of the panel. This will tell InDesign to look for style elements in the first document and implement them in the subsequent documents.
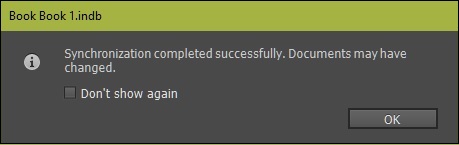
You will get a confirmation once the synchronization is complete.