- qTest - Home
- qTest - Introduction
- qTest - Features
- qTest - Free Trial Access
- qTest - Login
- qTest - Dashboard
- qTest - Invite Users
- qTest - Add a Project
- Test Plan & Release Management
- Test Plan & Build Management
- qTest - Modules Management
- qTest - Requirements
- qTest - Create Associated Test Cases
- qTest - Import Requirements
- qTest - Export Requirements
- qTest - Export RTM
- qTest - Test Design
- qTest - Calling a Test Case
- qTest - Approve a Test Case
- qTest - Import Test Cases
- qTest - Export Test Cases
- qTest - Test Cycle Management
- qTest - Test Suite Management
- qTest - Add Test Runs
- qTest - Test Execution
- qTest - Quick Run
- qTest - Submit a Defect
- qTest - Clone a Defect
- qTest - Import a Defect
- qTest - Reports
- qTest - Filter
- qTest - Drag & Drop
- qTest - Hotkeys
- qTest - Recycle Bin
- qTest - Search
- qTest - Toggle ID
- qTest - Tagging ID
qTest - Quick Guide
qTest - Introduction
qTest is a test management tool used for Project Management, Bug Tracking, and Test Management. It follows the centralized test management concept that helps to communicate easily and assists in rapid development of task across QA team and other stakeholders.
qTest is a cloud based tool and was developed by QASymphony. It supports all browsers especially Chrome, Firefox, IE, etc. and also supports different windows OS versions Windows XP, Vista, 7, etc. QTest provides a 14-days trial period for Business email id with access to 4 users. qTest can be integrated with many other tools JIRA, Bugzilla, FogBugz, Version One, etc.
License and Free Trial
Following points are related to the License and Free Trial of qTest and related services.
qTest is a commercial tool and available as a trial version for a limited period of 14 days.
To utilize JIRA services, a license is required.
qTest provides free license for Business Email ID.
The basic version (free trials) comes with access for 4-people group.
Uses of qTest
Following are the different uses of qTest −
Used in tracking all QA activities right from the first phase of the software testing lifecycle.
Supports Release Management, Build Management, and Module Management.
Supports all macro level activities performed by QA.
Useful in performing QA tasks such as writing TestCases, execution, reports, etc.
Useful in Project Management, Task Tracking, Requirement Management, and Test Management.
qTest Specifications
The following table lists down the different specifications on qTest along with the description for each.
| Sr.No. | Specification & Description |
|---|---|
| 1 |
Application copyright Handled by QASymphony Provides Commercial and Trial Version |
| 2 |
Tool Scope Used as a Test Automation framework Utilized as a Testing Utility |
| 3 |
Testing Methods Agile Testing Black-box Testing Exploratory Testing Functional/Manual Testing Traditional Testing |
| 4 |
Tool Objectives Desktop Testing Web Testing |
| 5 |
Management Features Requirement Management Release and Build Management Module Management Test Management Report |
| 6 |
Hardware Requirements CPU − P4 2.5GHz and latest RAM − 1GB and above Network speed − 1000Mbps and above Hard Disk − 1GB and above |
| 7 |
Error Handling Capture Screenshots |
| 8 |
User Interface Available COM API Direct UI GUI usability |
qTest - Features
qTest has a wide range of features to attract QAs and other stakeholders for test management In this chapter, we will discuss the core features of qTest.
qTest Core Features
Following table lists down the core features of qTest.
| Sr.No. | Core Features & Description |
|---|---|
| 1 |
Testing Support qTest supports the following test methodologies −
|
| 2 | Centralize & Organize
|
| 3 | Manage & Track Execution
|
| 4 | Notification
|
| 5 | Power Search
|
| 6 | Reports
|
| 7 | Scale with Team Growth
|
| 8 | Integration
|
| 9 | Common Features
|
| 10 | Recover Data
|
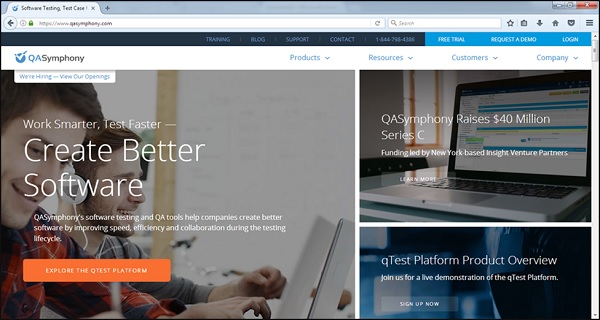
qTest - Free Trial Access
qTest provides 14 days free trials to business emails with a few basic features; this can be accessed bya maximum of four users. qTest has a range of plans as well with different advanced features and add-ins. The cost depends on the number of users.
By visiting https://www.qasymphony.com, you can view the different plans that are available on trial basis.
Set Up for Free Trials
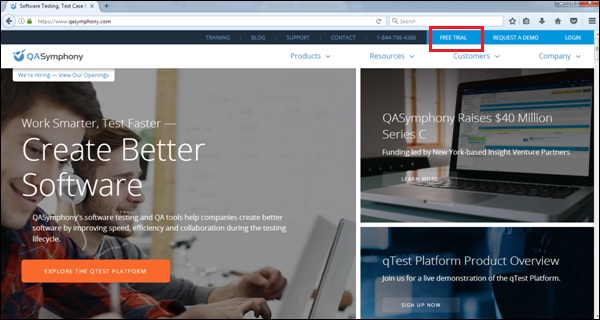
Let us now discuss how to set up for free trials. Follow these steps to understand the setup −
Step 1 − Visit https://www.qasymphony.com and click Free Trial tab on the right hand side of the menu bar as shown in the following screenshot.
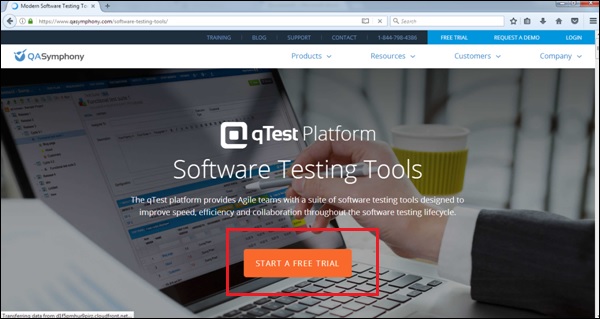
Step 2 − Click the Start Free Trial button.
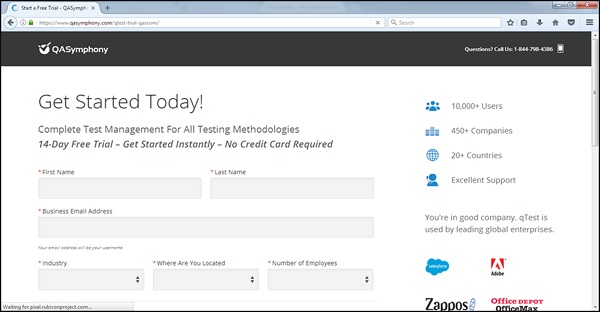
Step 3 − It opens a basic form to create a qTest account. Enter the following details as shown in the following screenshots.
First Name
Last Name
Business Email − Please note, it doesnt accept gmail, yahoo, and outlook IDs. It should be a business email. The same email can be used as the username to access qTest.
Industry
Where are you located
Number of Employees
Company Name
Create your qTest web address − It should be unique and this URL will be used to access the qTest application
Password − To authenticate access of this URL
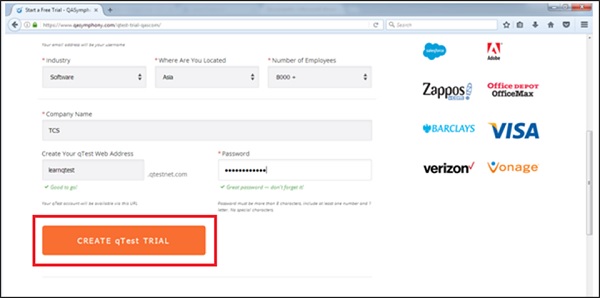
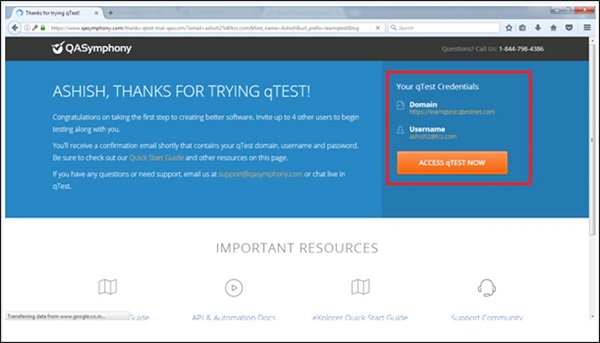
Step 4 − After entering all details, click CREATE qTest TRIAL button as shown in the above screenshot. It will display a Thank you page for the New User as in the following screenshot. You can see the entered Domain and Username with the Access qTest NOW button.
Step 5 − Now, click the Access qTEST NOW button. It will display the Dashboard of qTest. It has access to the URL that was entered while creating the free trials.

qTest - Login
In this chapter, we will discuss how to login to qTest.
Follow these steps to login to qTest.
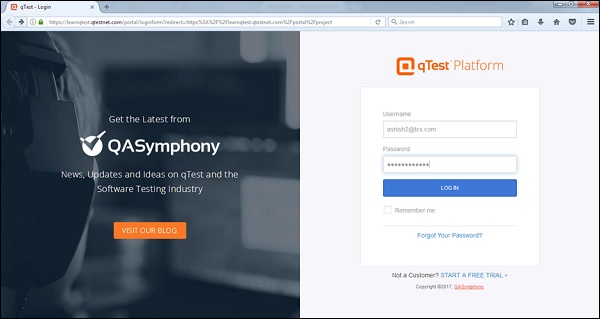
Step 1 − Go to your sample website selected while creating the free trial. It will open a login page.
Step 2 − Enter your registered business email address as Username and Password.
Step 3 − Click the LOG IN button.
The following screenshot shows how to login into qTest using credentials.
On Error
Let us now understand the situation wherein your login attempt is unsuccessful.
When a login attempt is unsuccessful, the following error page displays.
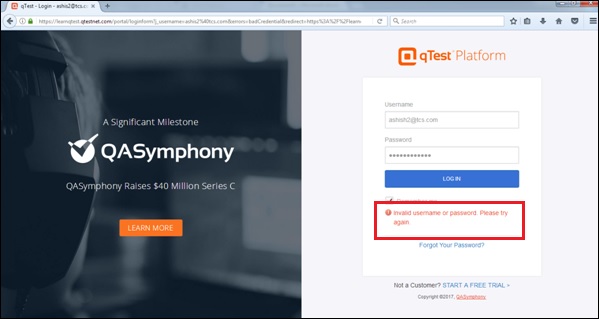
Error may occur due to wrong combination of email id or password.
Following screenshot shows the error message that a user receives, if the credentials are not correct −
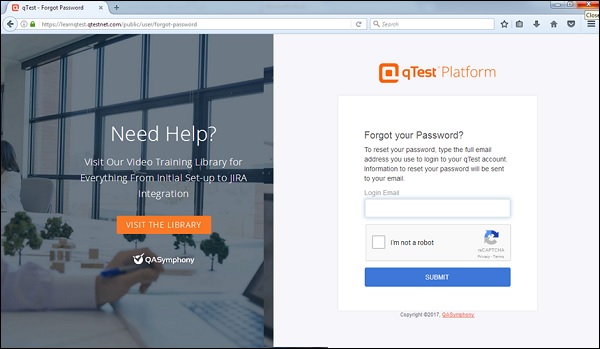
If you forgot the password, to recover it −
Click on the Forgot Your Password? link below the error message.
Enter the Login Email
Click Submit
The following screenshot shows how to recover the password if you forgot.
You will get an email with the details of username or link to reset the password.
On Successful Login
Upon successful login, the system dashboard will display if the account is associated with any project by admin or if you can create a sample project.
The following screenshot displays the welcome page/dashboard of qTest on successful login.
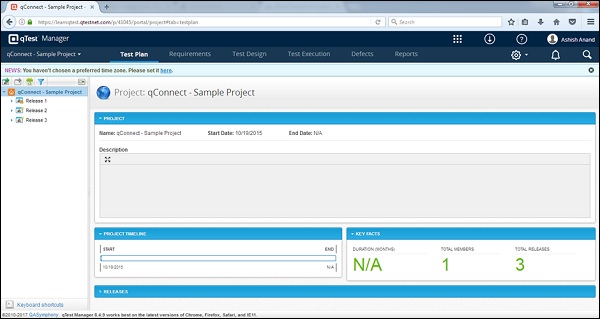
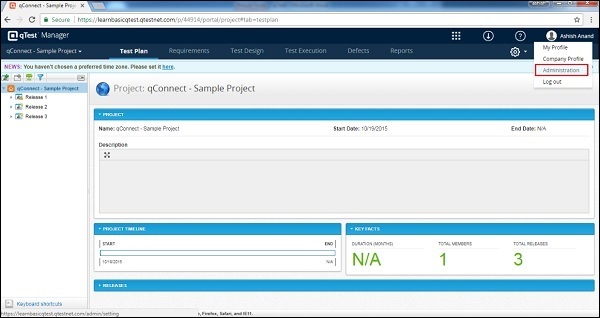
qTest - Dashboard
After logging into qTest, Dashboard is the first page that is displayed. The Dashboard is customized by Admin. Based on the roles, the admin can set the access to qTest.The admin even has the right to change the colors and logo of qTest.
Following are a few important points relating to the qTest Dashboard −
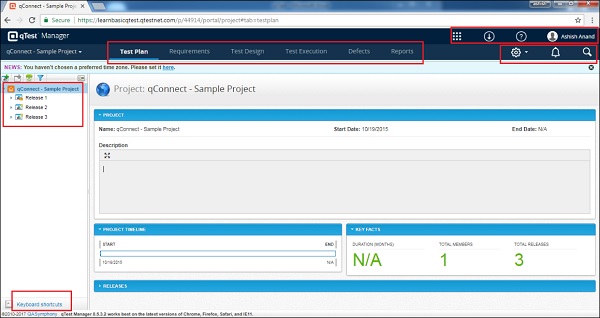
The navigation bar, present at the top of the qTest page, will be the same across all pages/screen of qTest.
qConnect − <Project Name>, Test Plan, Requirements, Test Design, Test Execution, Defects and Reportsare the main links. These links are used to navigate to respective functionalities.
Navigation bar contains links that provide quick access to the most useful functions of qTest.
By Default, the Test Plan page of the default project displays on successful login.
Below the navigation bar, the News bar of the page has an advisory to set a time zone as You havent chosen a preferred time zone. Please set it here.
The information provided on the left side of the white area is related to the releases of project along with a few exciting features of qTest.
On the right side of the Navigation bar, Settings, Notification and Search are the main features and remain the same across all pages/screen of qTest.
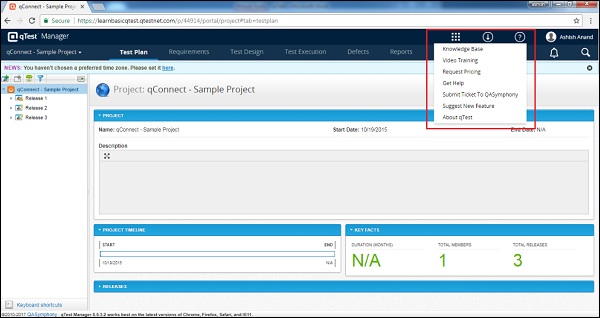
On the right side, above the navigation bar, there are few links qTest Apps, Resources, Repository, and Help for qTest and Profile Summary.
On the left bottom, there is a link Keyboard Shortcuts. When you click it, it displays different keyboard keys combination to navigate to a specific functionality.
Shift + D = Create Release
Shift + C = Create Build
Shift + X or Shift + Delete = Delete Object
CTRL + G = Save objects and move next
The following screenshot shows the overview of the Dashboard page of qTest.
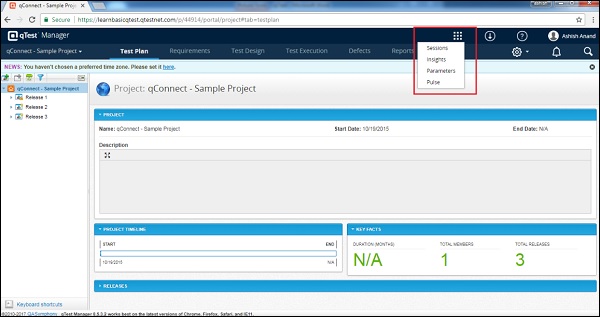
qTest Apps
qTest has many different apps. The most widely used app is the qTest Manager. Along with this, qTest also has Session, Insights, Parameters, and Pulse. These apps come with a lot of advantages and can be used along with the qTest Explorer and others.
Repository
It has many sub-links to access different documents about qTest. These documents provide information about qTest and also extend knowledge to new users on the functionalities of qTest. These documents also help to find a solution if you dont know how to accomplish a particular task.
The repository contains links to the following −
Knowledge Base − It provides information about the other apps of qTest.
Video training − It provides training to new users. New users can go through it to know the different functionalities and how to use qTest.
Request Pricing − A user can ask to provide a pricing chart based on the requirements.
Get Help − It is a documented section where a user can find all basic/advanced functionalities of qTest and can know how to use those.
Submit Ticket To QASymphony − The main purpose of this link is to provide real-time support to the users at instances, where they find difficulties in accomplishing tasks. This does not support free-trial users.
Suggest New Features − Here, a user can provide suggestions or feedback relating to qTest, which will make it more user-friendly.
About qTest − It provides the details of qTest such as Versions and Copyright Info.
Following screenshots shows the different documents available under Repository.
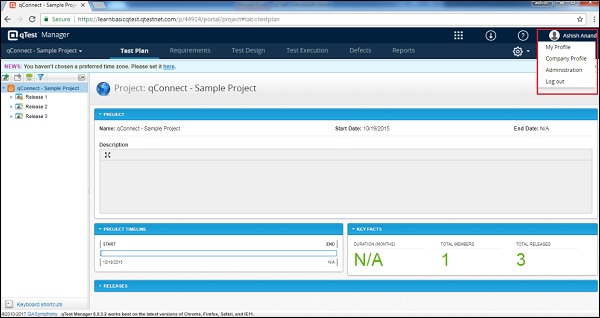
User Profile
By clicking the profile link, you can view your personal profile as My Profile and Company Profile as Company Profile and manage the sections. By clicking Logout, you will go back to the login page and will not be able to access the project details without logging again.
Administration is the role, the availability of which depends on the logged-in users role. If the user is an administrator, only then this link will be present. In free trials, all users are administrators by default.
Following screenshot shows the available functionality under the User-Profile section.
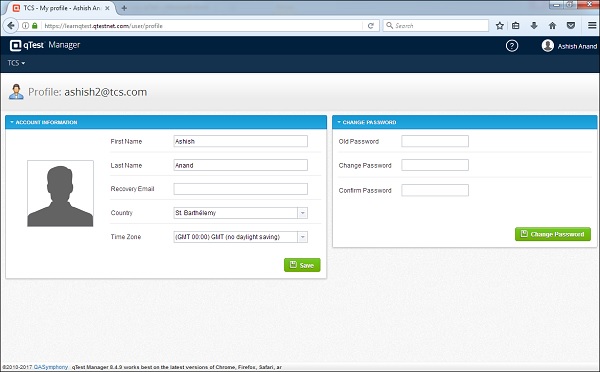
My Profile
By clicking My Profile, you can view and edit the details of your account. You need to click Save to save all edited details. There is an additional functionality to change the password here. After entering the required details, click Change Password to activate a new password.
Following screenshot displays the account information and the change password section.
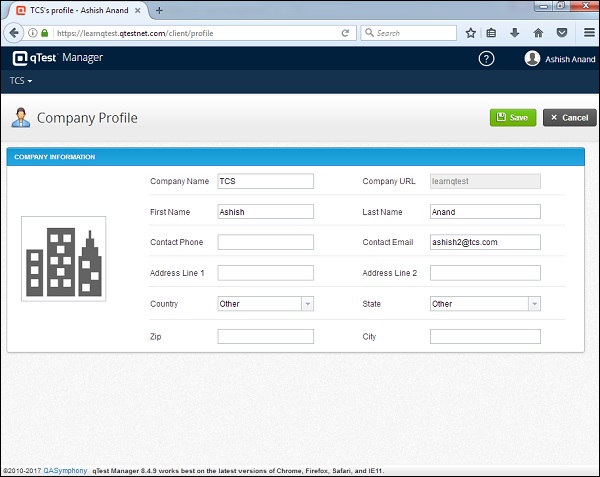
Company Profile
By clicking the Company Profile link, the basic information of the company is displayed. These are the details entered while registering. You can edit and add new details. Click Save to save the details.
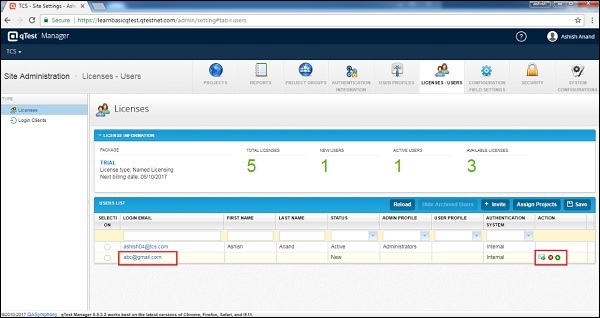
qTest - Invite Users
To invite new users into your qTest domain, following are the steps.
Step 1 − Navigate to the User Profile section and click Administration as shown in the following screenshot.
Step 2 − Click the Licenses - Users tab at the top right side.
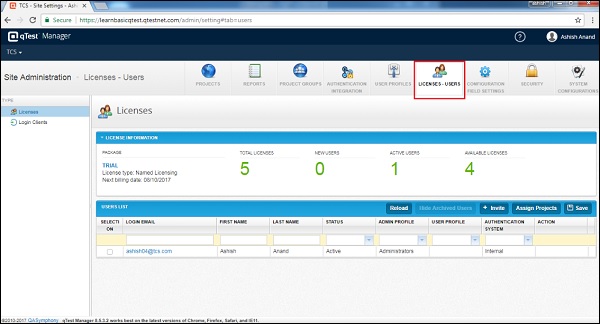
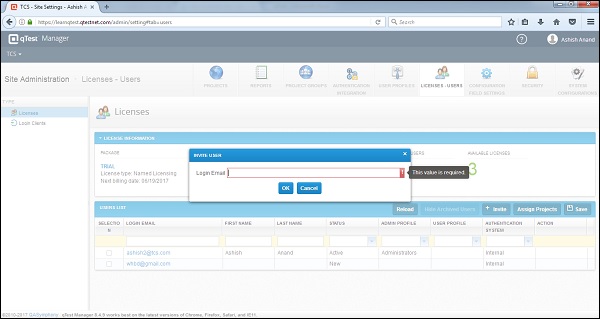
Step 3 − Click the +Invite button to send emails to invite new users into your qTest domain.

Step 4 − Upon clicking the +Invite button, the Invite user dialog box appears. Enter the email id of the invited person and click OK to send an email to the concerned person.
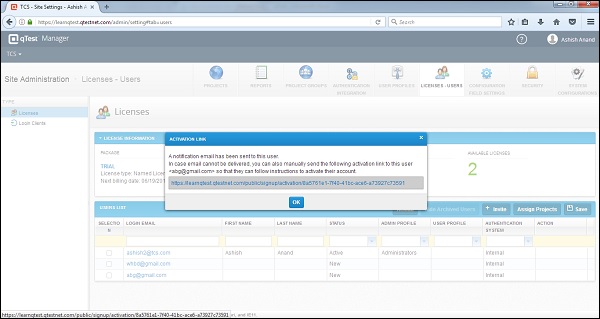
Once invited, they will receive a welcome email with an activation link. On the screen, a successful message will be displayed along with the Activation Link; in case the invited person did not receive a proper email, the admin can send it manually to add them.
Once the invited persons are added to the system, admin can grant them administration level access or set them up with a default user profile.
The list of invited users can be seen in a table as shown in the following screenshot. It has a Resend Invitation Link, Deactivate Users link, and Assign Project links in the Action column.
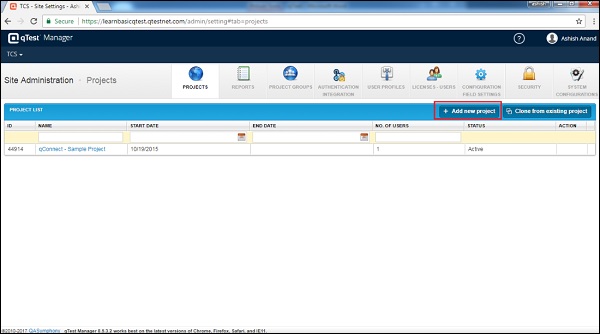
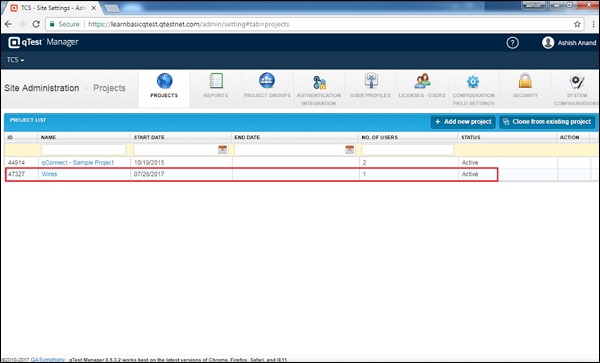
qTest - Add a Project
In this chapter, we will understand how to add a project into qTest. To add a project, you should have the Admin rights.
Create a Project
Following are the steps to add a project into qTest.
Step 1 − Go to the user profile section and click Administration as shown in the following screenshot.
By default, the Project tab displays the +Add new project button as shown in the following screenshot.
Step 2 − Enter the Project Name, Start and End date, Description and assign users as admin as shown in the following screenshot. Then, click the +Add button at the bottom.
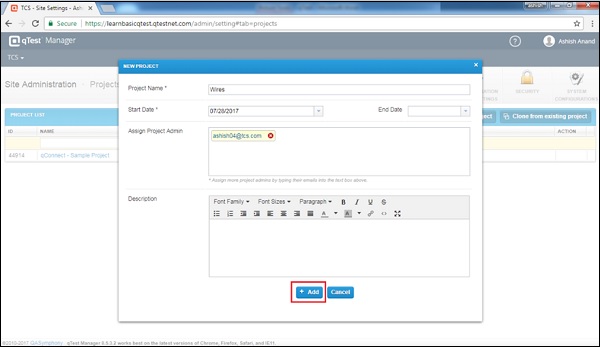
By clicking the +Add button, the project gets added successfully and a dialog box appears along with the OK button as shown in the following screenshot.
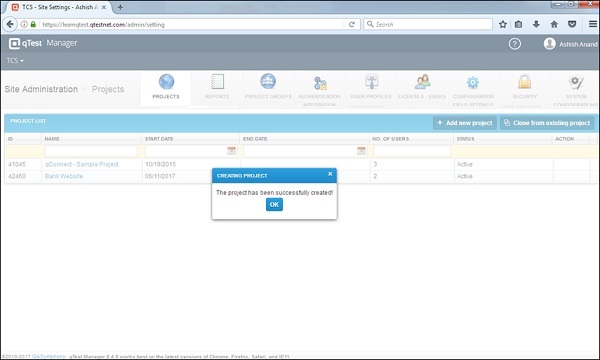
Step 3 − Click OK and you will be able to see the newly added project in the table.
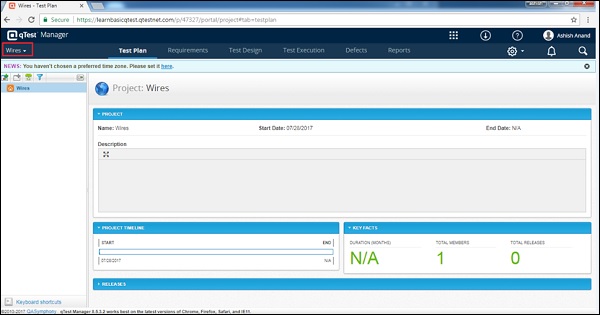
Step 4 − You can access this project by clicking the options on the top left corner of the screen and selecting the project name as shown in the following screenshot.
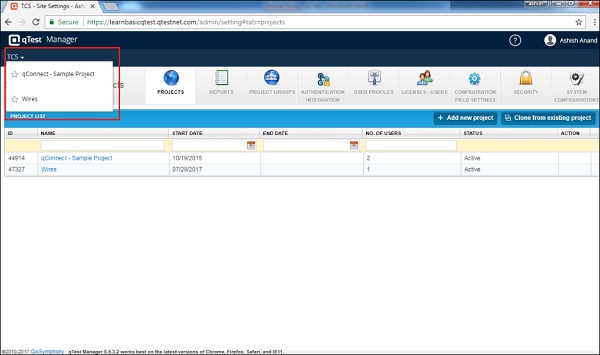
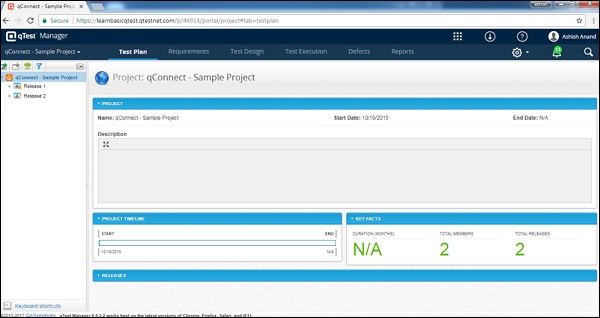
By clicking the Project name, the Test Plan page of the corresponding project is displayed.
qTest - Test Plan & Release Management
In this chapter, we will discuss what is a Test Plan and how a release is managed.
What is a Test Plan?
Consider the following points to understand what a Test Plan is.
qTest supports flexible and lightweight project management within the Test Plan module.
Test Plan supports the Release and Build Management sub-module.
Release is usually known as Sprint in Agile methodology.
Build is known as Sub-Sprint or Iteration in Agile
Test Plan allows the users and stakeholders to manage and track all testing and development work schedules and actual status.
Along with these, the users can add requirements to the scope of these Release and Build.
It helps in traceability from the test plan about requirements, defects, etc.
Create a New Release
A release is a sub-plan of a Test Plan. All releases combine with the complete objectives of a Test Plan. Release structure is synchronized from Test Plan to Test Execution.
To create a Release, you should have the Create Release permission.
Following are the steps to create a Release.
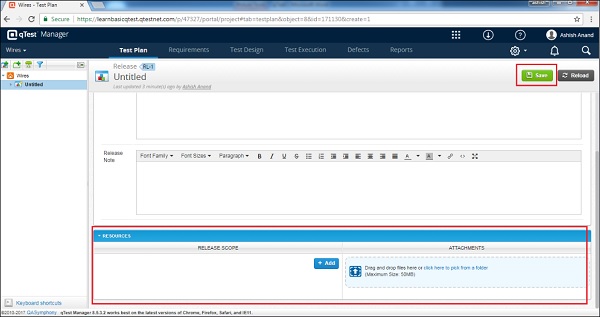
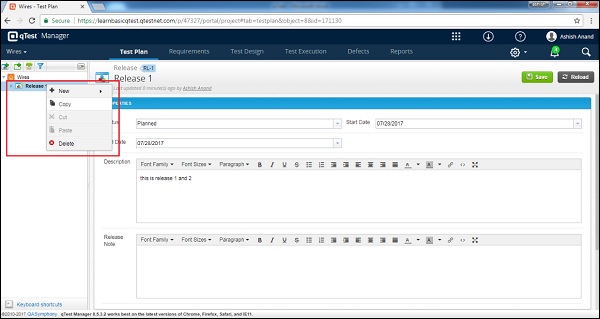
Step 1 − To create a new Release, there are two options. Right-click somewhere on the left panel and select New → New Release.

Step 2 − Click the New Release image on the left side of the panel as shown in the following screenshot.
Step 3 − Clicking any one of the options generate a Create Release form as shown in the following screenshot.
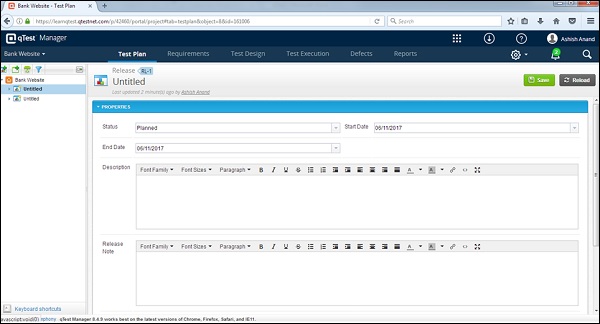
Step 4 − Enter the following fields in the form −
- Name of Release
- Status
- Start Date
- End Date
- Description
- Release Note
- Resources
- Attachments if any
Note − Make sure the Start and End date must be within the Project Timeline. The dates should be in sync with the Test Execution.

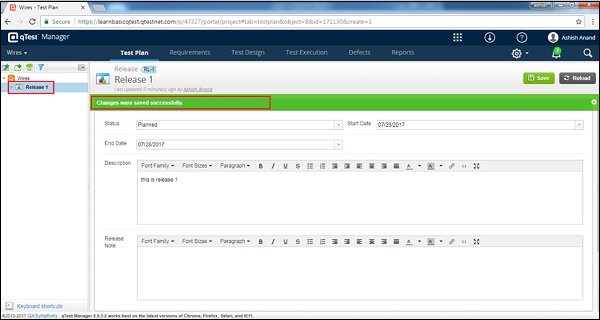
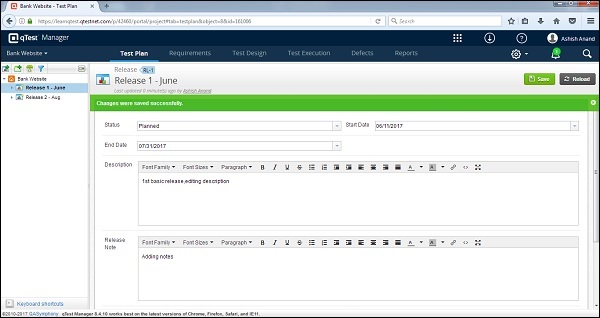
Step 5 − After entering all the details, click the Save button present on the top right corner of the screen.
After clicking Save, you will get a message which shows that all the changes are saved successfully. The Release Name appears on the left panel below the projects name as displayed in the following screenshot.
Edit a Release
Let us now discuss how to edit a release. To edit a release, you should have the Edit Release Permission.
Following are the steps to edit a release.
Step 1 − Select a Release to Edit and double-click to explore it further.
Step 2 − Edit the Release Name, Properties, Status, Start Date, End Date, Description, Release Note, or any other fields as shown in the following screenshot.
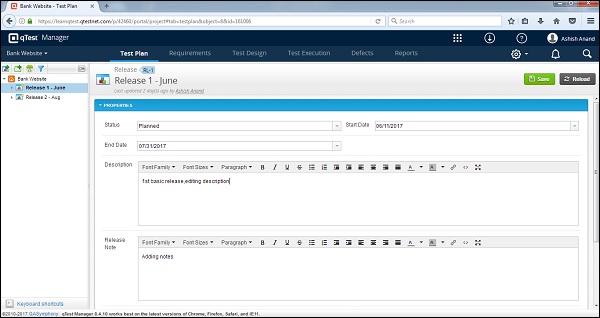
Step 3 − Click Save to finish editing.
Move/Copy a Release
We will now understand how to move or copy a release. To Move/Copy a release, a user should have the Create/Edit Preference. This functionality allows creating a duplicate of a Release or reordering of the release structure.
Follow these steps to move/copy a release.
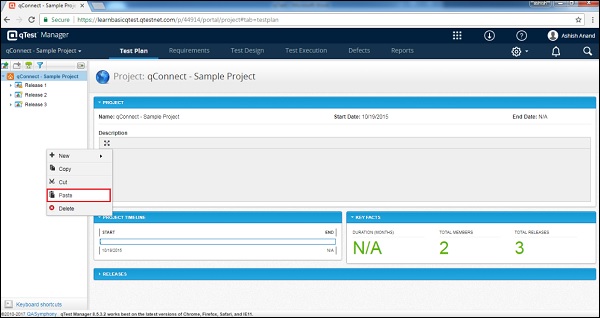
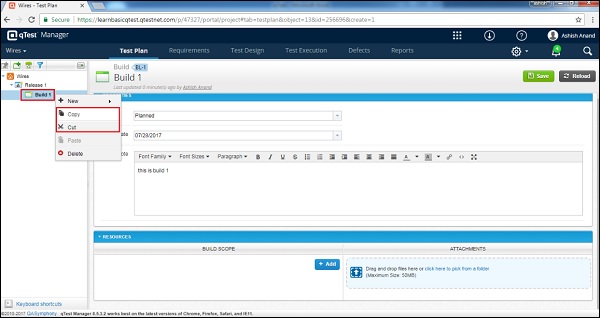
Step 1 − To copy single or multiple releases, select the releases and right-click the selected releases.
Step 2 − Click Copy as shown in the following screenshot.
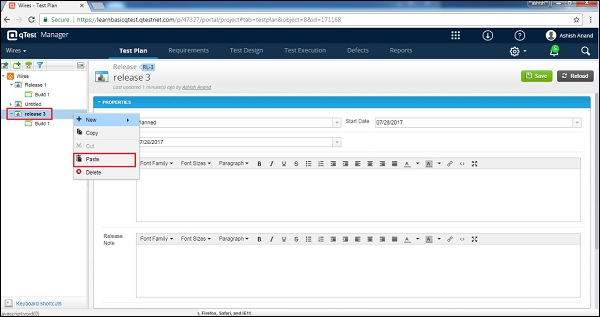
Step 3 − Now, right-click anywhere on the test plan tree and select Paste to copy the releases as shown in the following screenshot.
A closed Release can also be copied. It copies only the properties but not the scope and attachment.
Release can be moved only in the Test Plan structure not in Test Execution.
Delete a Release
Let us now understand how to delete a release. To delete a release, you should have the Delete Release Permission.
Follow these steps to delete a release.
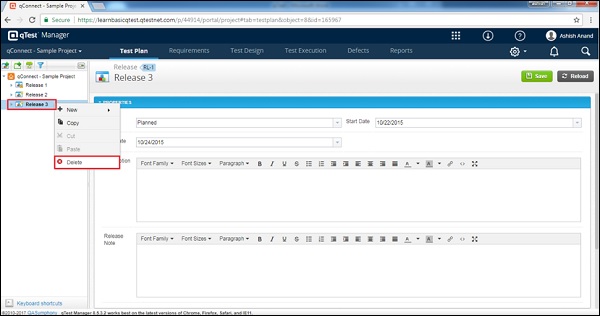
Step 1 − Select a single or multiple project to delete.
Step 2 − Right-click on selected Releases and click Delete as shown in the following screenshot.
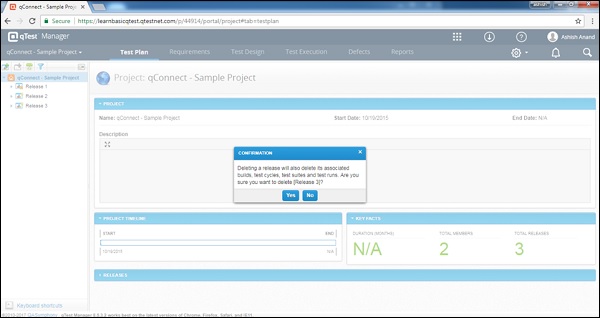
Step 3 − A dialog box appears asking for confirmation to delete. Click YES as shown in the following screenshot.
Step 4 − The page will be refreshed and the release will be deleted from the Test plan panel.
qTest - Test Plan & Build Management
To achieve the objective of a Release, there could be multiple builds. Build is always associated with only one Release. A build fulfills partial objective of Release with limited functionalities.
Build can be created only inside a Release, not in the root folder. If a Release gets closed, Build will automatically change to close status. Build scope defines within the release scope. If one requirement is defined into multiple builds, the requirement link will move to a new one from the old build.
Create a New Build
To create a Build, you should have the Create Builds Permission. Follow these steps to create a Build.
Step 1 − To create a new Build, select a Release and use any of the options as shown in the screenshot given below. Right-click somewhere in the left panel and select New → New Build.
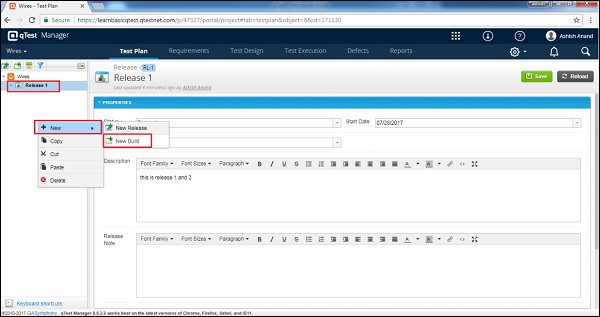
Step 2 − Click the New Build icon/image on the left side of the panel as shown in the following screenshot.
Step 3 − Choosing any one of the options opens the Create Build form.
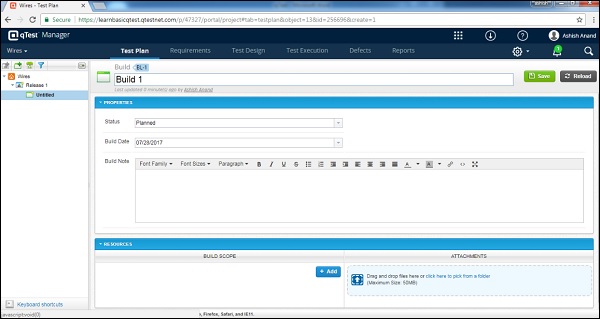
Step 4 − Enter the following fields in the form −
- Name of Build
- Status
- Build Date
- Build Note
- Resources as Build Scope
- Attachments, if any
Note − Make sure that the Build Date is within the Release Timeline. The date should be in sync with Test Execution.
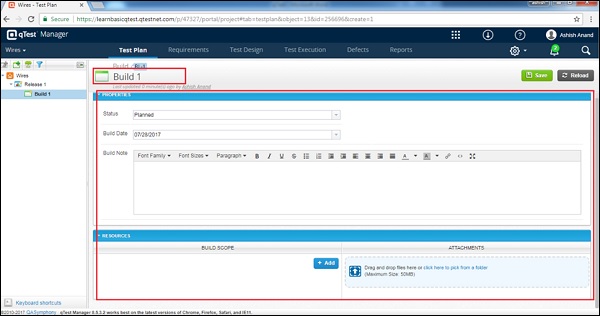
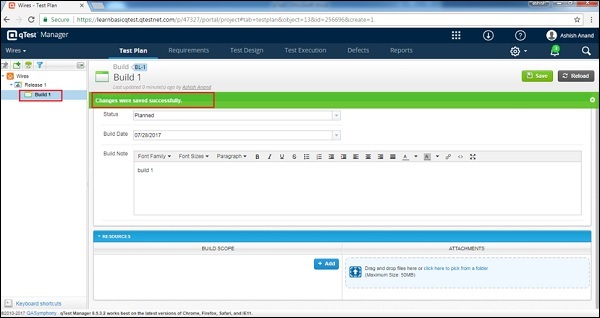
Step 5 − After entering all the details, click the Save button present at the top right hand corner of the screen.
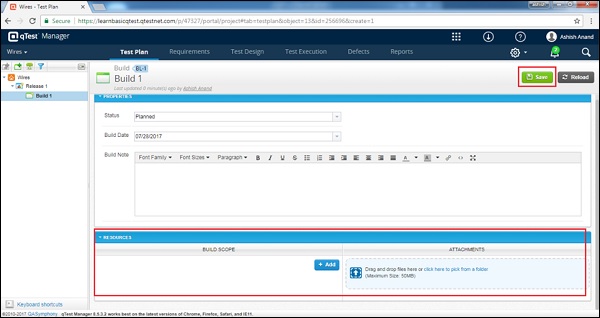
After clicking Save, you will receive a message which shows that the changes made were saved successfully. The Build Name appears on the left panel below the projects name as displayed in the following screenshot.
Edit a Build
In this section, we will understand how to edit a Build. To edit a build, you should have the Edit Builds Permission.
Follow these steps to edit a build.
Step 1 − Select a Build to Edit and double-click to open the details.
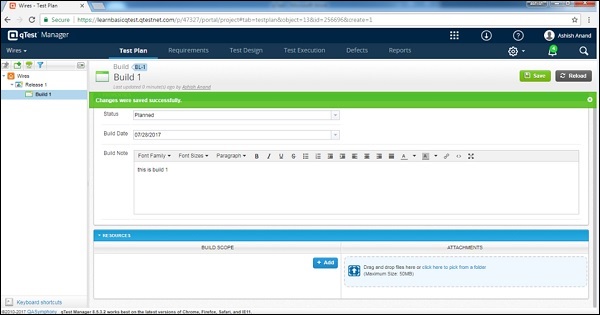
Step 2 − Edit the Builds Name, Properties, Status, Build Date, Build Note, or any other fields as shown in the following screenshot.
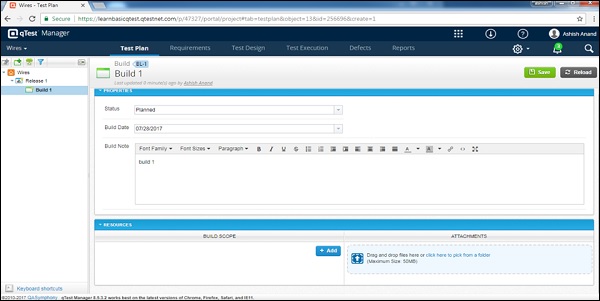
Step 3 − Click Save to finish editing.
Move/Copy a Build
To Move/Copy a build, you should have the Create/Edit Builds Permission. This functionality allows creating a duplicate of a Build or reordering of the build structure. Follow these steps to move/copy a Build.
Step 1 − To copy/cut a single or multiple builds, select builds. Right-click the selected builds.
Step 2 − Select Copy/Cut and click as shown in the following screenshot.
Step 3 − Now, select a release to paste and right-click. Select to paste the copied builds as shown in the following screenshot.
A closed build can also be copied, however it cannot be cut. It copies only the properties but not the scope and attachment.
Delete a Build
To delete a Build, you should have the Delete Builds Permission. Consider the following points while deleting a Build.
Multiple builds can be deleted at a time.
You cannot delete builds under closed Releases.
If a build is associated with an object in Test Execution as Test Suite, Test Run, or Test Cycle, before deletion you should remove the association. Otherwise, the delete functionality wont work.
Follow these steps to delete a build.
Step 1 − Select a single build or multiple builds to delete.
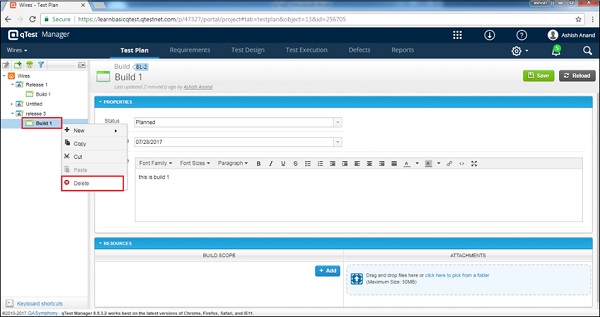
Step 2 − Right-click the selected build and click Delete as shown in the following screenshot.
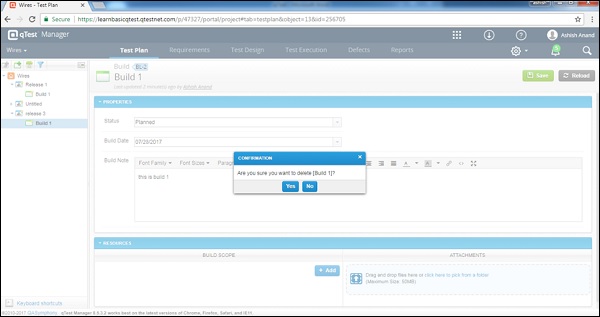
Step 3 − A dialog box appears asking for confirmation to delete; click YES as shown in following screenshot.
The page will be refreshed and the build will be deleted from the Test plan panel.
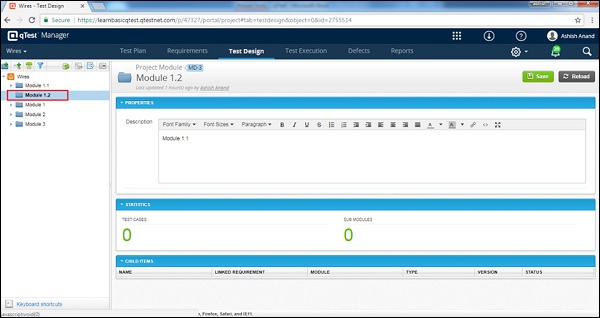
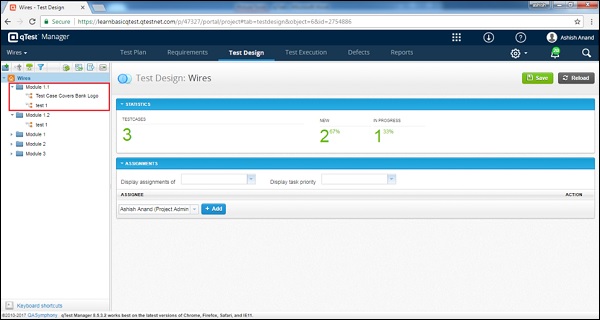
qTest - Modules Management
Modules are folder structures inside Requirements and Test Design menu. These modules contain Requirements and Test Cases in respective sections. You can define modules as a group of functionalities having the same nature of a product. The module structure gets synchronized automatically between Requirements and Test Design (Test cases).
Create a Module
To create a Module, you should have the Create Modules Permission. Following are the steps to create a Module −
Step 1 − Go to the Requirement or Test design section.
Step 2 − Select the root folder at the left Requirement Panel.
Step 3 − To create a new Module, use any of the options shown in the following screenshot. Right-click somewhere on the left panel and select New → New Module.
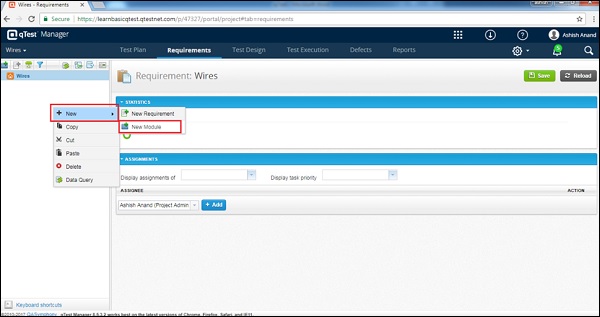
Step 4 − Click the New Module icon/image on the left side of the panel as encircled in red in the following screenshot.
Step 5 − Click any one of the options that opens the following Create Module form.
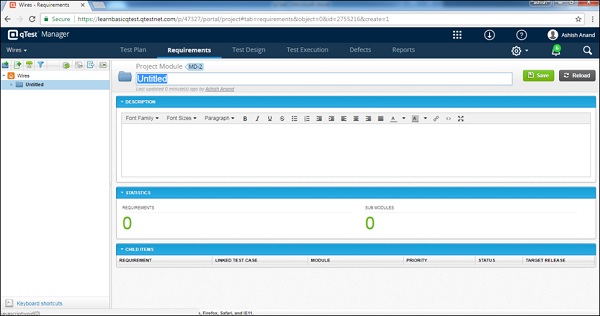
Step 6 − Enter the following fields in the form −
- Name of the module at the top
- Description
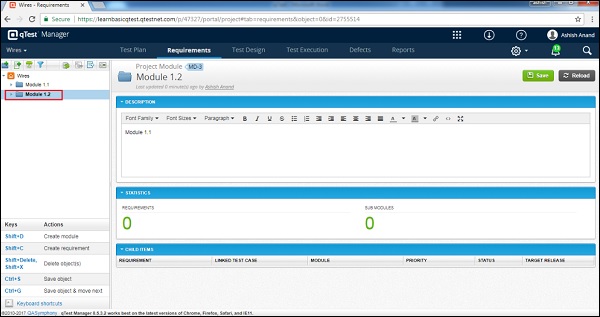
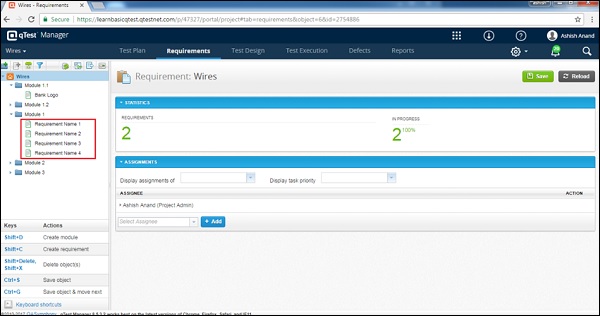
Note − The Module page has the statistics section. It displays the number of Requirements and sub-modules for the selected Module. In child items, it displays the detailed properties of individual requirements.
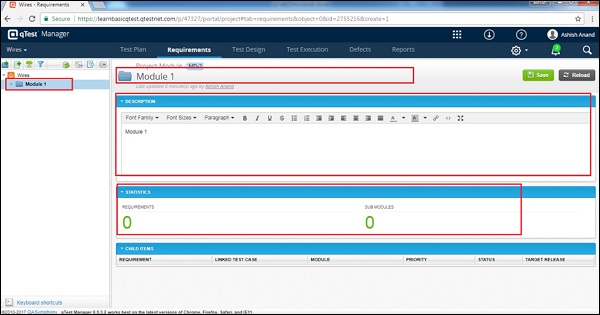
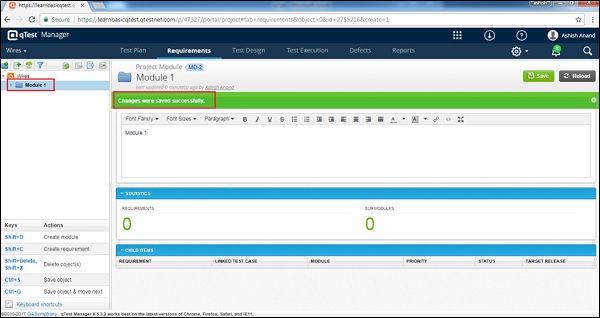
Step 7 − After entering the required details, click the Save button at the top right corner of the screen as displayed in the following screenshot.
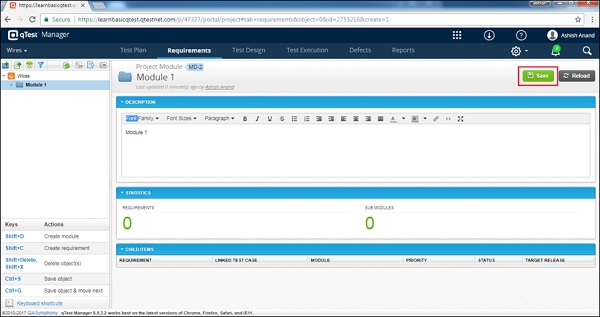
After clicking Save, you will receive a message which shows that the changes were saved successfully. The Module Name appears at the left panel below the projects name as displayed in the following screenshot.
Note − A user can add up to 99 levels of sub-modules. The module form doesnt support any custom fields.
Edit a Module
Let us now discuss how to edit a module. To edit a Module, you should have the Edit Modules Permission.
Following are the steps to edit a module −
Step 1 − Select a Module to Edit and double-click to explore it further.
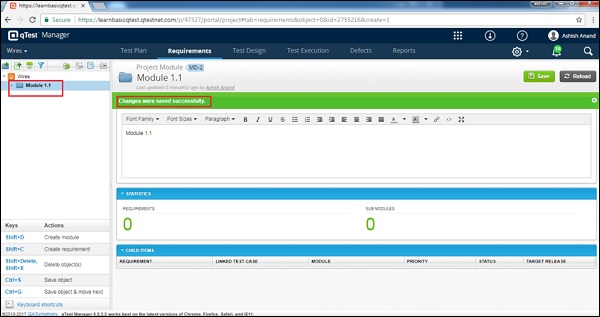
Step 2 − Edit the Modules Name and Description as shown in the following screenshot.
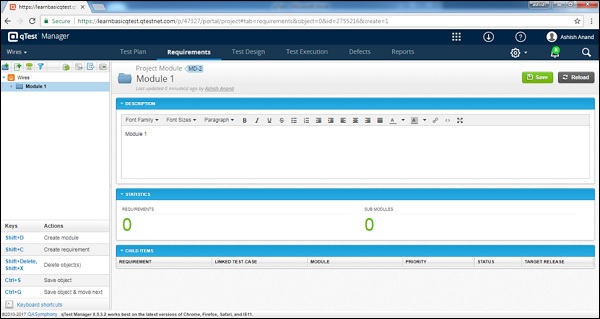
Step 3 − Click Save to finish editing.
Note − Any changes of the module in Requirement will update the Test Design and vice versa. Module structures are auto synced between Requirements and Test Designs.
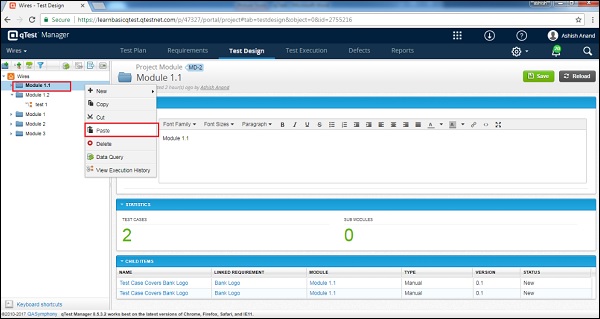
Move/Copy a Module
To Move/Copy a Module, you should have the Create/Edit Modules Permission. This functionality allows creating a duplicate of a Module or reordering of the module structure.
Following are the steps to Move/Copy a Module.
Step 1 − To copy/cut a single or multiple modules, select the modules. Right-click the selected builds.
Step 2 − Select Copy/Cut as shown in the following screenshot.
Step 3 − Now, select a module to paste and right-click it. Select the paste option for those copied modules as shown in the following screenshot.
Note − If a module has sub-modules while copying or moving the module, all other sub-modules will be copied/moved as well.
Delete a Module
To delete a Module, you should have the Delete Modules Permission. Consider the following points while deleting a module.
Multiple modules can be deleted at a time.
If a module has many sub-modules, even the sub-modules get deleted in the process of deleting the module.
Deleting modules in Requirement will also delete the synced modules in Test Design and vice versa.
A module can have requirements, test cases, etc. - while deleting it, it will delete all of these items.
Following are the steps to delete a build.
Step 1 − Select a single module or multiple modules to delete.
Step 2 − Right-click the selected modules and click Delete as shown in the following screenshot.
Step 3 − A dialog box will appear asking for confirmation to delete. Click YES as shown in the following screenshot.
The page will be refreshed and the module will be deleted from the Requirement and Test Design panel.
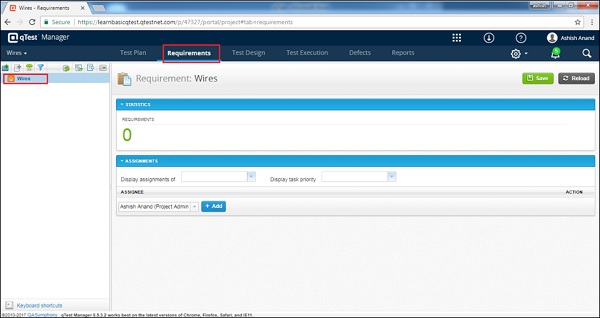
qTest - Requirements
In this chapter, we will understand the requirements of qTest. Consider the following points to understand the requirements of qTest.
qTest has a simple and flexible interface for Requirements. It syncs the project requirements structure to the test design structure automatically.
Using this interface, you can create, edit, move, and delete requirements within the Requirement repository.
Requirements can be created internally as well as imported externally from third party tools such as JIRA, Version One, etc.
A defect can be a link to a Requirement. The flow will be as Defects → Test Run → Test Case → Requirement → Test Plan.
You can track Requirement Traceability and Test Execution report.
Create a New Requirement
Requirements are always placed into modules. Before we start to create a requirement, the Module structure should be completed.
Following are the steps to create a Requirement.
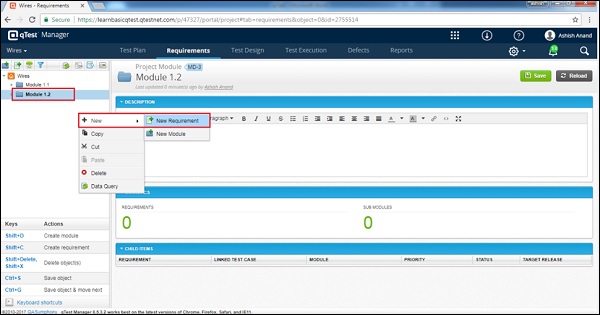
Step 1 − Go to the Requirement section.
Step 2 − Select the Module where the requirement is to be created at the left Requirement Panel.
Step 3 − To create a new Requirement, right-click somewhere on the left panel and select New → New Requirement. Following screenshot displays this step.
Step 4 − Click the New Requirement icon/image on the left side of the panel as shown in the following screenshot.
Step 5 − Click one of the options to open the Create Requirement form as shown in the following screenshot.
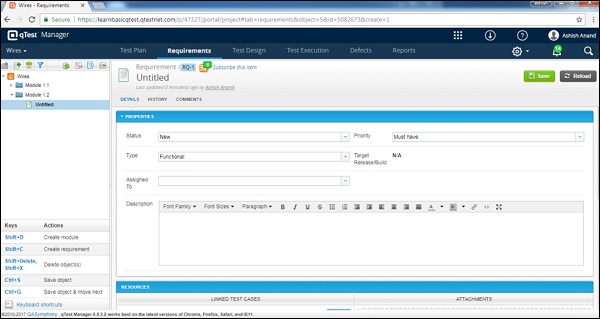
Step 6 − Enter the following fields in the form −
- Name of the Requirement
- Status
- Priority
- Type
- Assigned To
- Description
In the Resource section, the Link test case option is available. It is not mandatory to create Requirements right then. This can be done at a later stage as well.
The Create Associated Test Cases option is not mandatory and can be managed later too.
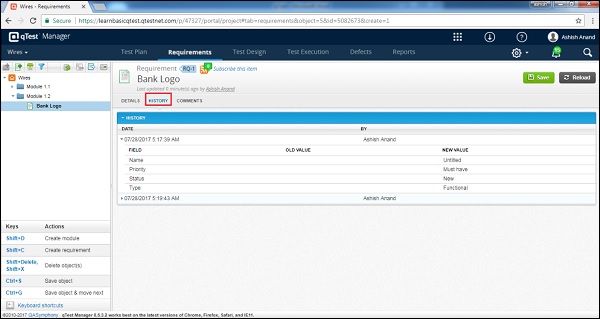
In the History tab, you can view all past actions performed on this Requirement.
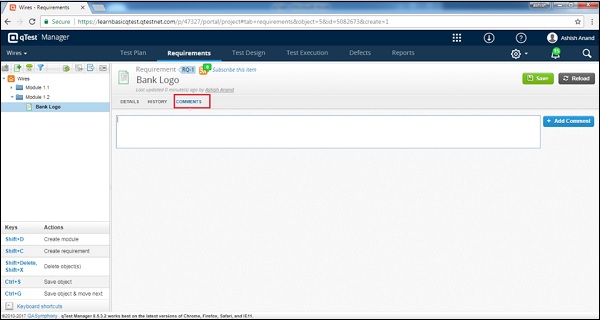
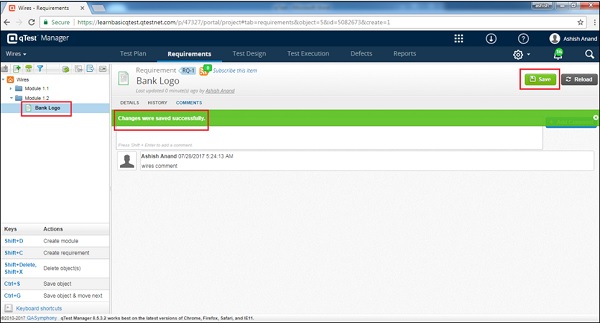
Step 7 − In the Comment tab, add comments and notes for reference as shown in the following screenshot.
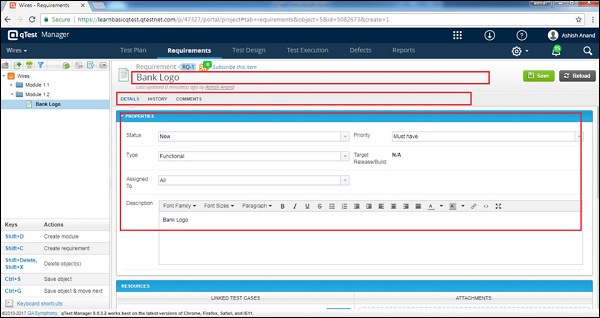
Step 8 − After entering all details, click the Save button present at the top right corner of the screen.
After clicking Save, you will get a success message of the changes made. The Requirement Name appears at the left panel below the projects name as displayed in the following screenshot.
Edit a Requirement
While editing a Requirement, changes will be notified for linked test cases as well as for review. Following are the steps to edit a requirement.
Step 1 − Select a Requirement to edit and double-click to open the details.
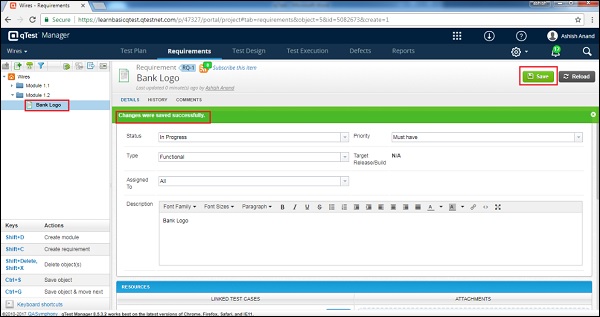
Step 2 − Edit the Requirements properties such as Name, Status, Assigned To, Description as shown in the following screenshot.
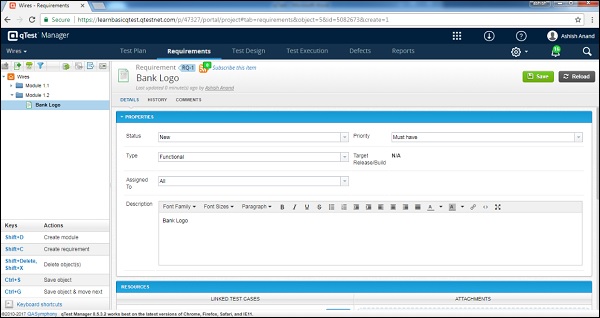
Step 3 − Click Save to finish editing.
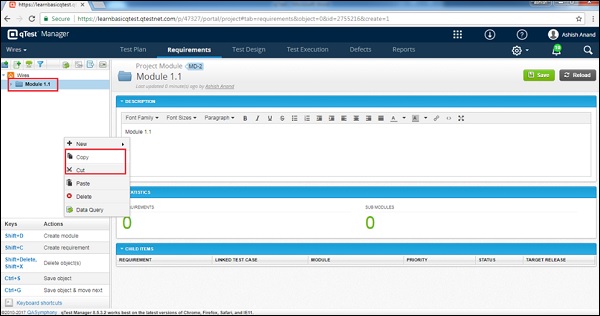
Move/Copy a Requirement
This functionality allows creating a duplicate of a Requirement or reordering requirements. Following are the steps to Move/Copy a Requirement.
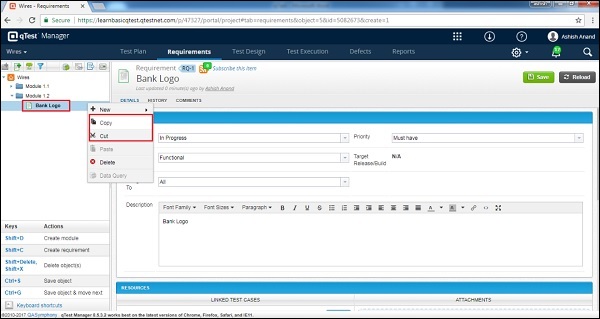
Step 1 − To copy/cut a single requirement or multiple requirements, select the requirements that need to copy/cut and right-click the selected requirements.
Step 2 − Select Copy/Cut and click as shown in the following screenshot.
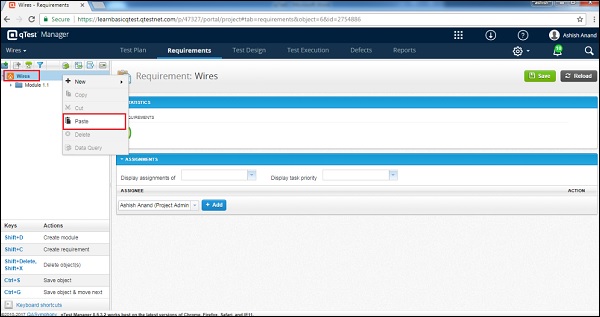
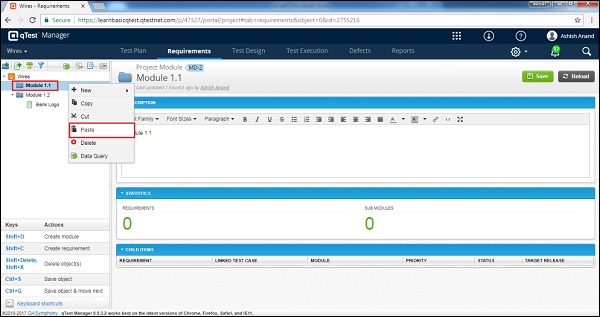
Step 3 − Now, select a module to paste and right-click. Select the paste option for the copied modules as shown in the following screenshot.
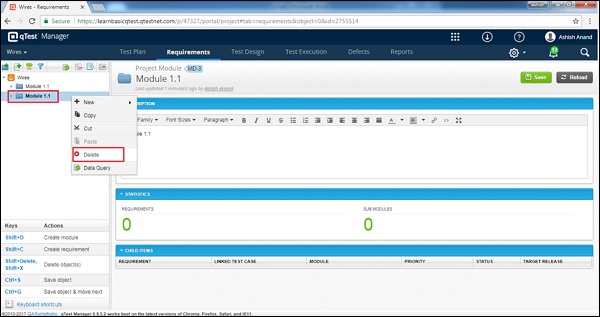
Delete a Requirement
We will now discuss how to delete a requirement. Consider these points while deleting a requirement −
- Multiple requirements can be deleted at a time.
- Deleting a requirement will not create an impact on the linked test cases.
- Linked test cases will be available in Test Design.
Following are the steps to delete a requirement.
Step 1 − Select a single requirement or multiple requirements to delete.
Step 2 − Right-click the selected requirements and click Delete as shown in the following screenshot.
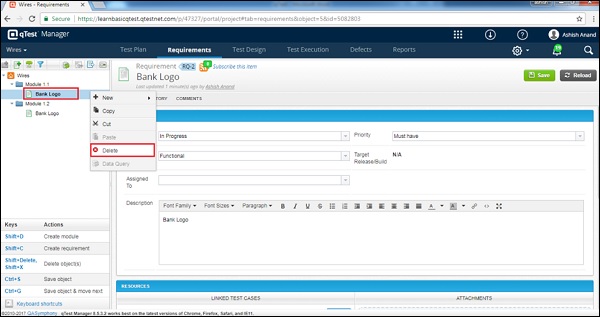
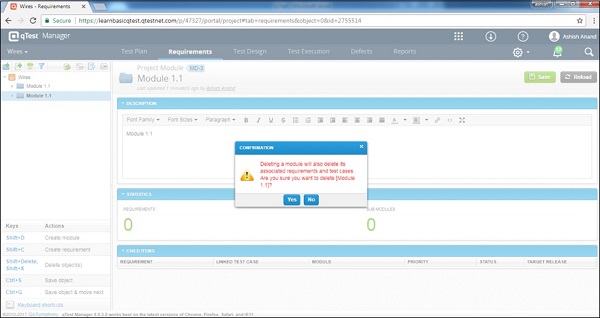
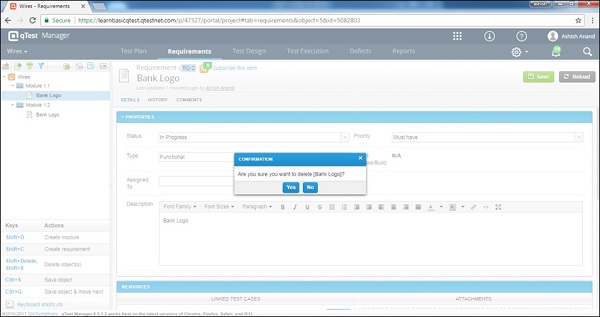
Step 3 − A dialog box will appear asking for confirmation to delete. Click YES as shown in the following screenshot.
The page will be refreshed and the module will be deleted from the Requirement and Test Design panel.
qTest - Create Associated Test Cases
qTest allows you to create test cases to cover specific requirements. You can create associated test cases while creating the requirement or later. You can create test case structure based on Requirements.
Following are the steps to create associated test case for a requirement.
Step 1 − Select a Requirement, i.e., Requirement or Test Design tab under the module folder.
The view/edit page of Requirement will open.
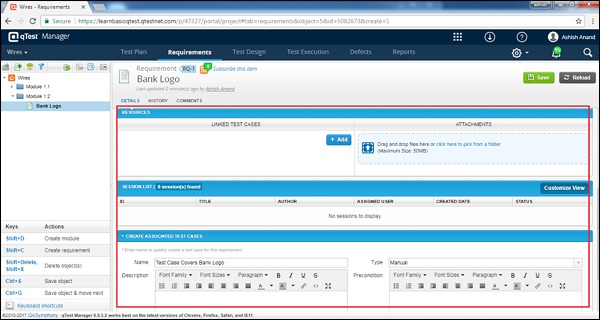
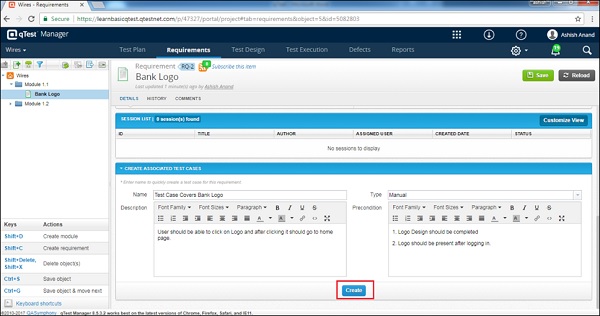
The following screenshot shows the section name written as Create Associated Test Cases.
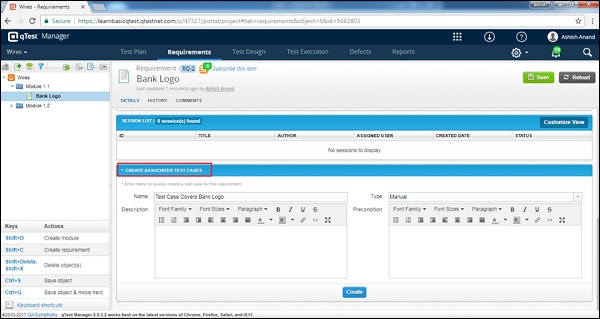
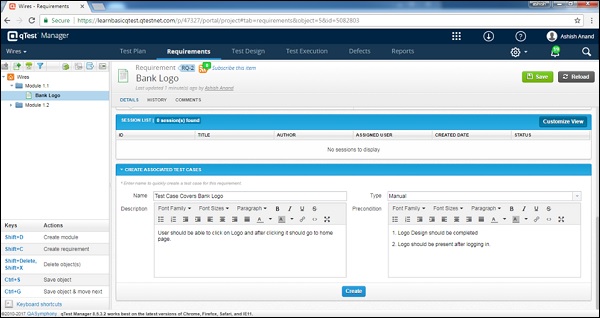
Step 2 − Enter the Name of test case, select one of the options from the type list. Enter the Description and Pre-condition of Test Cases.
The following screenshot shows how to enter the details for a test case.
Step 3 − Click the Create button to complete the creation process as shown in the following screenshot. You should not click the Save button after creating associated test cases in Requirement.
After the creation of the associated test case, the test case will automatically get linked to the requirement. Now, the Test Case appears at the Linked Test Case section as shown in the following screenshot.
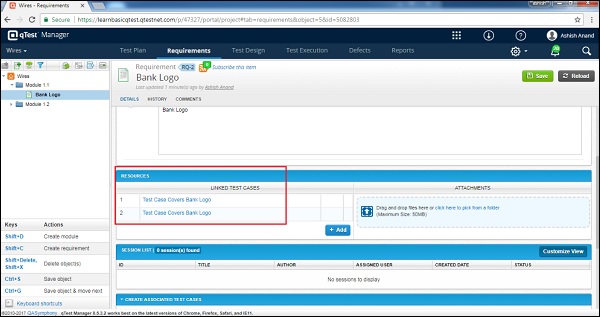
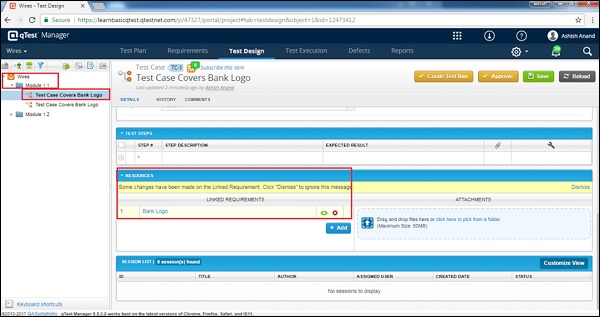
The same test case will automatically add into the Test Design as well under the same module and display the linked requirement.
The following screenshot presents an overview of the Test Design tab.
qTest - Import Requirements
You can create multiple requirements at a time using an excel spreadsheet. Excel files are text files represented by rows and columns as cells.
The following points need to be considered to import the data from Excel.
- Rules for Excel file.
- Import the excel file into the system.
Rules for Excel File
Let us now discuss the rules that we need to consider when working on Excel −
The Excel file should have data in the first sheet only.
The sheet name should be the same as the module name, where the requirements will be imported.
The first row should have the names of the headers in different columns. The next row onwards, data should represent each column.
The first row will be mapped with different fields of Requirement Forms while importing.
One column in the Excel file can be mapped with only one field in the Requirement form.
The Requirement ID field should not be mapped with any column. The system will automatically generate the Requirement ID.
The required fields must be mapped with the column of the excel sheet and it shouldnt be blank. Otherwise, the system will generate an error message of unsuccessful import.
The non-required fields can be left without mapping or data can be blank. While importing, either these fields will be blank or will have default values as defined in the projects settings.
qTest supports the modules name up to 500 characters while the Excel sheet supports only 31 characters length as the sheet name. Hence, make sure the Modules name is not too long or expands more than 31 characters.
Following is a sample excel sheet.
| Requirement ID | Requirement Name | Description | Status | Assigned To | Priority | Type | Custom Field 1(if any) |
|---|---|---|---|---|---|---|---|
| Requirement Name 1 | Description 1 | New | Must have | Functional | |||
| Requirement Name 2 | Description 2 | New | Must have | Functional | |||
| Requirement Name 3 | Description 3 | New | Must have | Functional | |||
| Requirement Name 4 | Description 4 | New | Must have | Functional |
Import Excel File
In this section, we will understand how to import an Excel File. Following are the steps to import an Excel File.
Step 1 − Go to the Requirement tab and select the root folder of the Requirement-Module structure. The Root folder will have the Project name.
Step 2 − Select the Import Excel icon from the toolbar just above the root folder.
Following screenshot shows the root folder selection in the Requirement tab and the Import Excel icon.
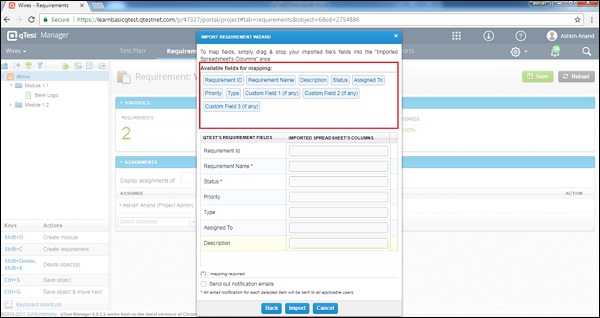
Step 3 − On clicking the Import Excel icon, the Import Requirement Wizard opens. It comes with a set of rules. Re-verify whether the Excel sheet fulfills those rules or not.
Step 4 − Now, browse the Excel file and upload. After successful upload, the filename displays in the Wizard as shown in the following screenshot.

Step 5 − Check the box Use imported file's first row as header. qTest uses the first row of Excel file as the header. qTest will get the file's header as available fields for mapping.
Step 6 − Select the file and click Next as in the above screenshot. You will see the Available fields for mapping as in the following screenshot.
If you do not select this option, qTest will get the columns order as available field mapping. Following screenshot displays the same.
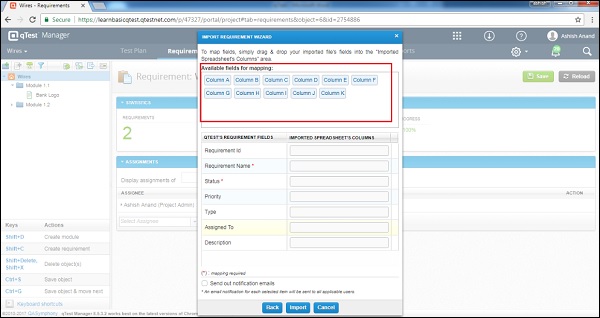
Step 7 − Using the drag and drop functionality, map the Requirement fields with the Excel sheet column name present at the Available fields for mapping as shown in the following screenshot.
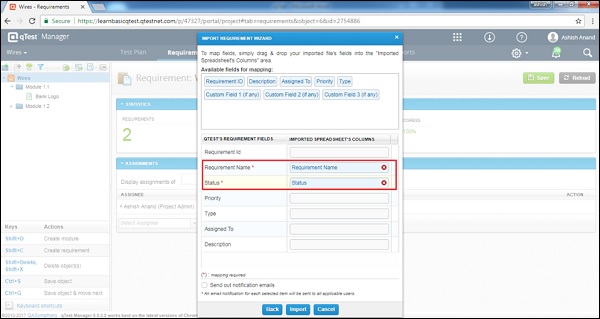
Step 8 − To delete a mapped field, click the X sign in the box. It will delete the field mapping and you can re-map the field with other column, if required.
If you check the Send out Notification Emails checkbox, an email will be sent to the user about the importing requirements.
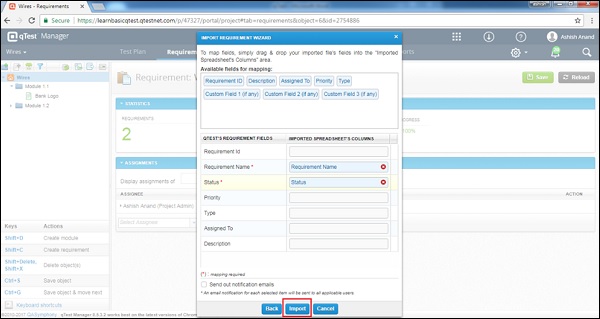
Step 9 − Click Import as shown in the following screenshot.
On successful import, you will get the imported information. A dialog box with three buttons appears as shown in the following screenshot.
OK − It will take you to the Requirement tab.
OK & Refresh − It will refresh the page and you will be able to see all the imported information.
View Log − This lets you see the imported logs.

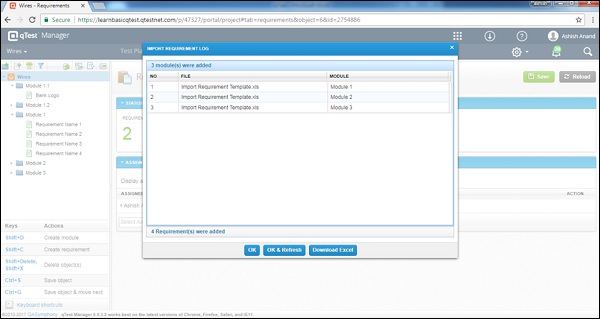
The following screenshot displays the imported information.
qTest - Export Requirements
qTest supports the functionality where you can export the Requirement details into HTML file or Excel file.
Following are the steps to export the requirement details.
Step 1 − Select the root folder and click the Export Requirement icon as shown in the following screenshot.
Step 2 − By clicking the icon, a set of options display (to download). Choose the Requirement Details Report and click.
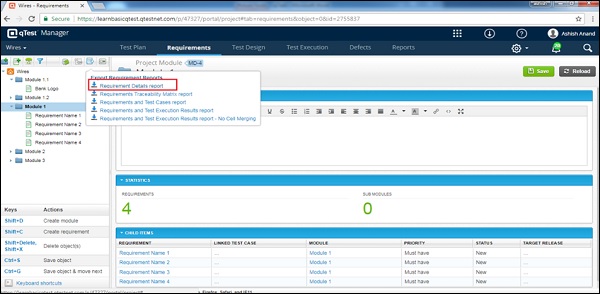
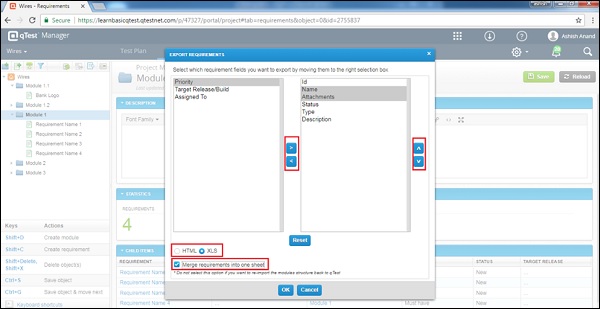
The Export Requirements wizard opens with columns having the details of requirements. Following screenshot shows the Export Requirement wizard.
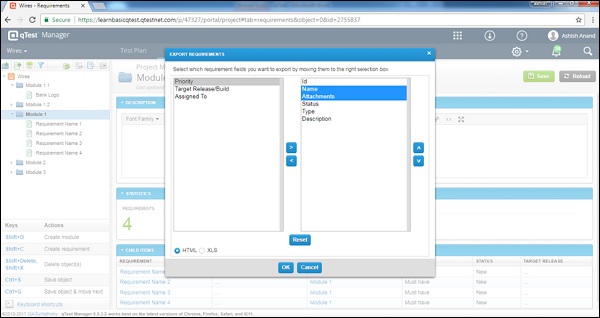
Step 3 − Select Requirement fields (all those fields that need to be exported) from the left to the right selection box. By using the up and down arrows on the right side, you can reorder the display of Requirement fields in the exported file. You can also select the radio buttons as HTML or XLS. Following screenshot displays the settings of the wizard, when HTML is selected as the exported file.
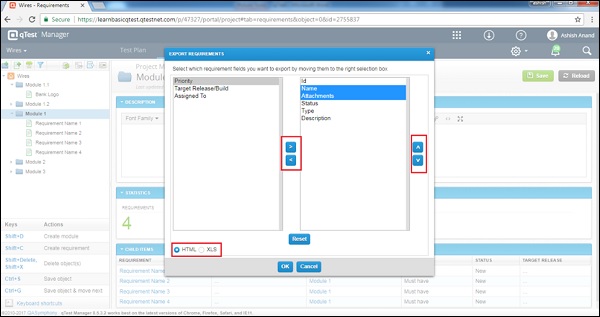
Step 4 − Select the XLS format, there is an additional checkbox that appears for confirmation to merge the requirements into one sheet. Click the checkbox and each module will be exported as a separate sheet containing the Requirements.
The following screenshot displays the XLS export settings in the wizard.
Clicking the Reset button will set all the Requirement fields to default to export. All settings will be changed to default.
Clicking the Cancel button will close the wizard and the control will be send back to the Requirement tab.
Clicking the OK button will export the Requirements into the files chosen on the wizard.
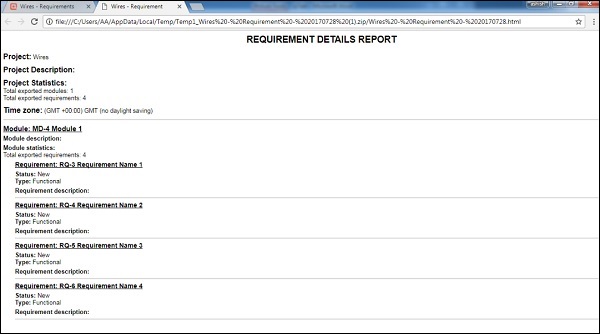
The following screenshot shows a sample exported HTML file.
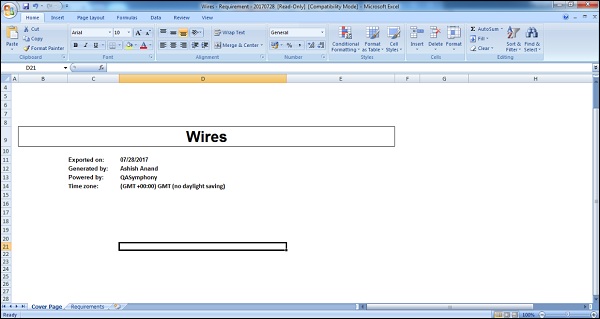
The following screenshot shows a sample exported XLS file. This serves as the cover page.
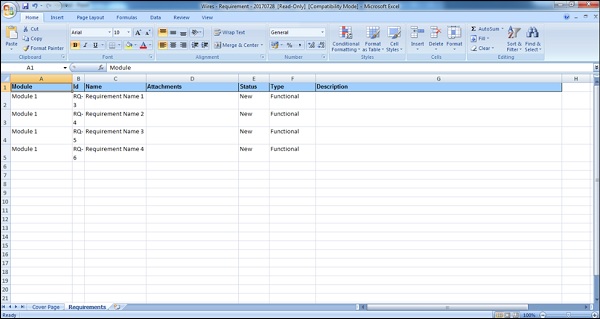
The following screenshot shows the exported Requirements.
You can select Individual Requirements of one module to export at a time.By selecting the Root folder, you will be able to export all the requirements present inside the modules and sub-modules of the root folder.
qTest - Export RTM
RTM stands for Requirement Traceability Matrix. A user can download RTM for Requirement tab to track Test cases and Requirements.
Following are the steps to export the requirement details.
Step 1 − Select the root folder and click the Export Requirement icon as shown in the following screenshot.

Step 2 − Clicking the icon displays a set of options (to download) as shown in the screenshot below. Select the Requirement Details Report.
As soon as you click the Requirement Traceability Matrix Report, an Excel file downloads along with details. Following screenshot shows a sample Excel file with the RTM details.

You can select Individual Requirements of one module to export at a time. By selecting the Root folder, you will be able to export all the requirements present inside the modules and the sub-modules of the root folder.
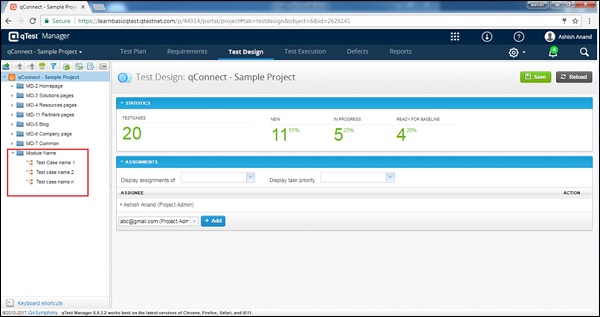
qTest - Test Design
In qTest Test Design module, you can create, move, edit and view requirements within the Requirement Repository. qTest supports creating, updating, and deleting test cases as well. Additionally, qTest follows an approval workflow to manage the approval of test cases and when there is an additional functionality that can be enabled to prevent testers from executing any test cases, those not yet approved by stakeholders.
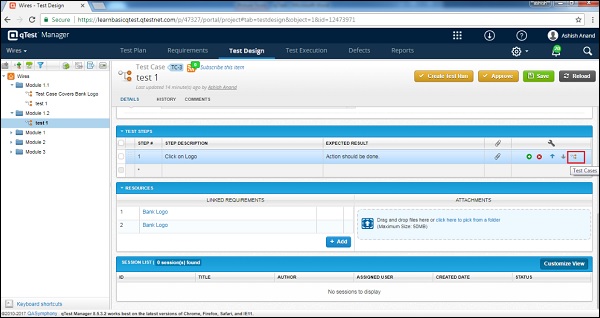
Creating a Test Case
To create a test case, you should have the Create Test Cases permission. Following are the steps to create a test case in the Test Design tab.
Step 1 − Go to the Test Design section.
Step 2 − Select the Module where the Test Case should be created on the left Panel as shown in the following screenshot.
Step 3 − To create a new Test Case, right-click somewhere in the left panel and select New → New Test Case.
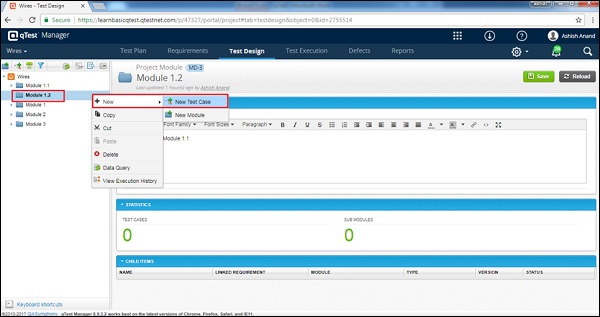
Step 4 − Click the New Test case icon/image on the left side of the panel as shown in the following screenshot.
The Create Test Case template opens up as shown in the following screenshot.
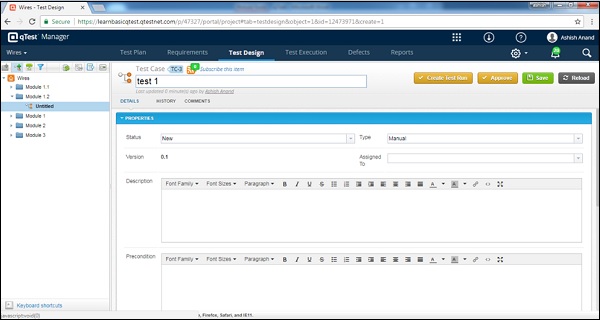
Step 5 − Enter the following fields in the form −
- Name of the Test case
- Status
- Type
- Assigned To
- Description
- Pre-Condition
- Priority
Step 6 − In the Test Step section, enter the Test Description and Expected Result. Use Shift + Enter to write into multiple lines for step 1. Then, press tab or click on the + sign to enter a new step. To re-order test steps, use the up-down arrows. To delete a test step, use the cross symbol.
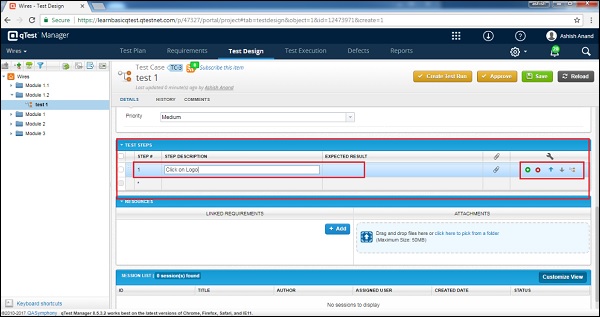
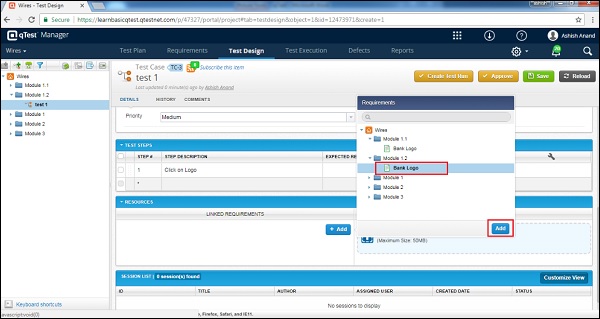
Step 7 − In the Resources tab, add Linked Requirements by clicking the Add button. A list of Requirements opens up. Select the requirements and click the Add button as shown in the following screenshot.
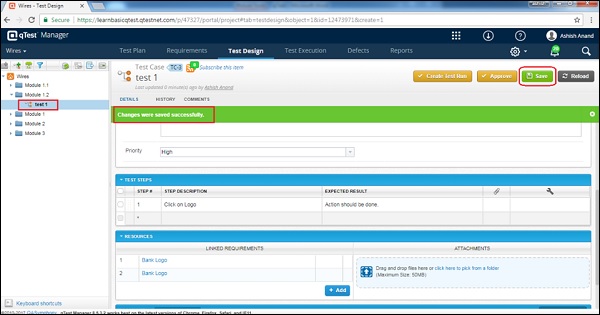
Step 8 − Click the Save button to save the test case as shown in the following screenshot.
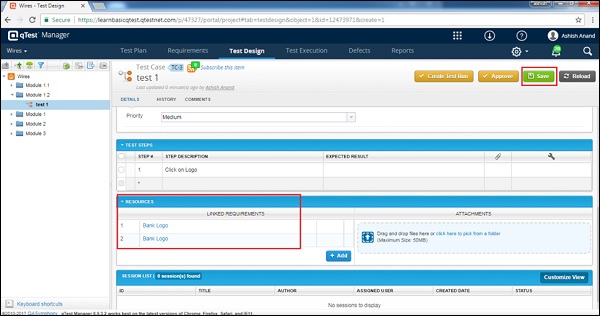
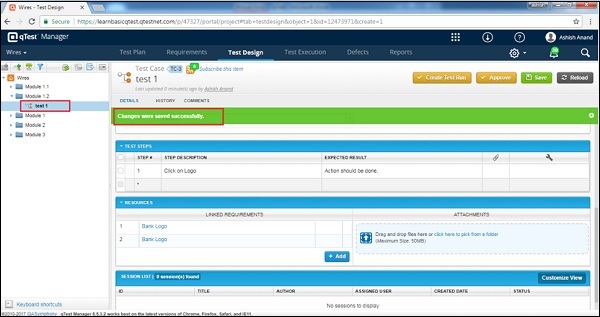
After clicking Save, you will receive a success message of the changes saved. Test case appears on the left panel below the modules name as displayed in the following screenshot.
Edit a Test Case
To edit a test case, you should have the Edit Test Case permission. Following are the steps to edit a test case.
Step 1 − Select a Test case to Edit and double-click to explore further. Edit the test cases properties such as Name, Status, Assigned To, Description, as shown in the following screenshot.

Step 2 − Click Save to finish editing.
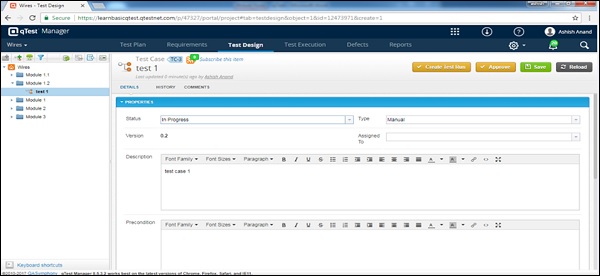
Note − Test Cases version is updated by 0.1 each time whenever any changes are made and saved. The same version gets updated in test execution as well if it is added to test run.
Move/Copy a Test Case
This functionality allows creating a duplicate of a test case or reordering of test cases. You should have the create/edit test cases permission to perform this functionality. Following are the steps to move/copy a test case.
Step 1 − To copy/cut a single or multiple test cases, select test cases those need to copy/cut and right-click on the selected requirements.
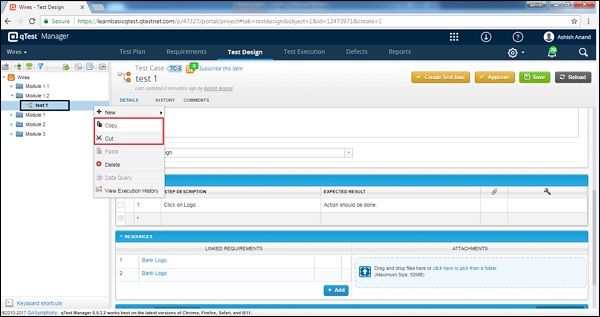
Step 2 − Now, select a module to paste and right-click. Select the paste option for those copied modules as shown in the following screenshot.
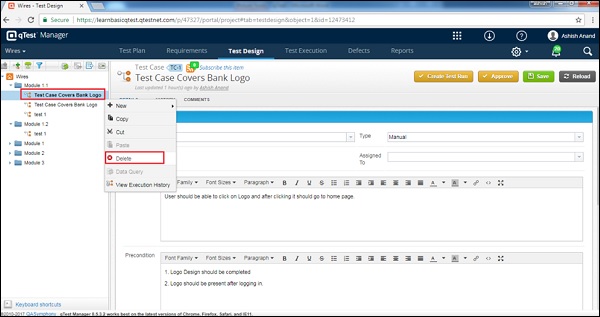
Delete a Test Case
In this section, we will understand how to delete a test case. Consider the following points while deleting a test case.
Multiple test cases can be deleted at a time.
You should have the Delete Test Case permission to delete a test case.
If the deleted test case was associated with a requirement, the association in the Requirement gets deleted as well.
Following are the steps to delete a requirement.
Step 1 − Select a single requirement or multiple requirements to delete.
Step 2 − Right-click the selected requirements and click Delete as shown in the following screenshot.
Step 3 − A dialog box will appear asking for confirmation to delete. Click YES as shown in the following screenshot.
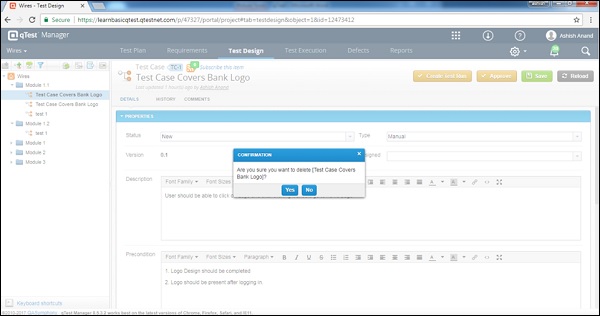
The page will be refreshed and the module will be deleted from the Requirement and Test Design panel.
qTest - Calling a Test Case
This feature is very useful when a test case has the same steps as other test cases along with few additional steps. This feature allows replacing an individual test step by another test case.
Following are the steps to call a test case.
Step 1 − Go to the Test Step section, where you want to call a test case.
Step 2 − Go to individual step where the user will call the function.
Step 3 − In the Settings tab of the Test step, click the Test Case icon as shown in the following screenshot.
Step 4 − The Test Cases wizard opens, where all the test cases are listed. Select a specific test case that is to be called in this step. After selection of the test case, click the Add button. Following screenshot displays the Test Case wizard and the Add button.
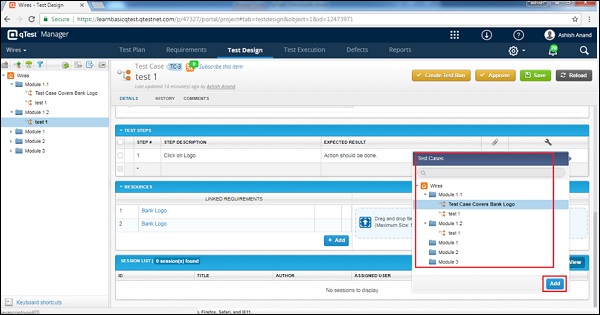
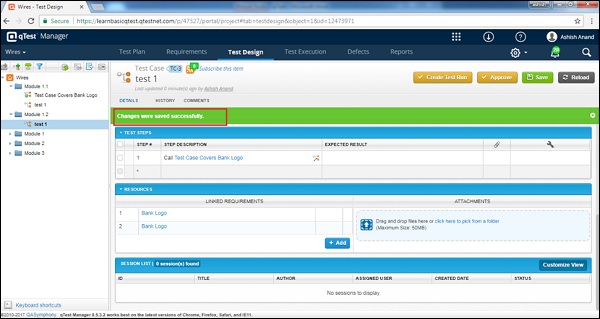
Step 5 − After clicking the Add button, a test case will be called in the test step as shown in the following screenshot.
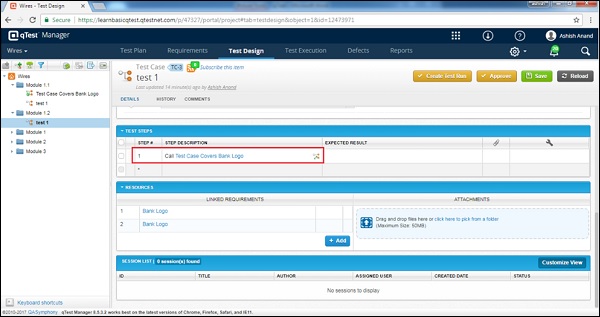
Step 6 − Click the Save button on the top right corner of the screen to keep the latest version of the test case.

Step 7 − A successful message is displayed as shown in the following screenshot.
Important Points
Following are a few important points related to the calling of a test case.
A Test Case cannot call itself.
Only Approved Test Case can be called by another Test Case. Otherwise, a dialog box will appear asking for confirmation to approve the test case first before calling.
A Test Case can call the same Test Case in different Test Steps.
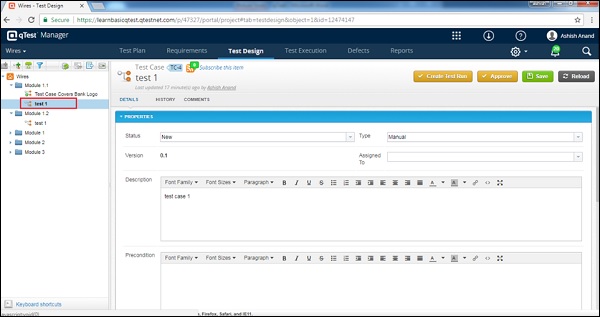
qTest - Approve Test Case
qTest supports test case approval workflow. It is like the stakeholder will review test cases and approve it if everything goes right. You cant execute a test case until it gets approved. You can approve multiple test cases at a time. To approve a test case, you should have the Approve Test Case permission.
Approve a Single Test Case
Following are the steps to approve a single test case.
Step 1 − Go to Test Design and expand the module where the test case is written.
Step 2 − Click the test case name. It will open the test case detail page on the right side as shown in the following screenshot.
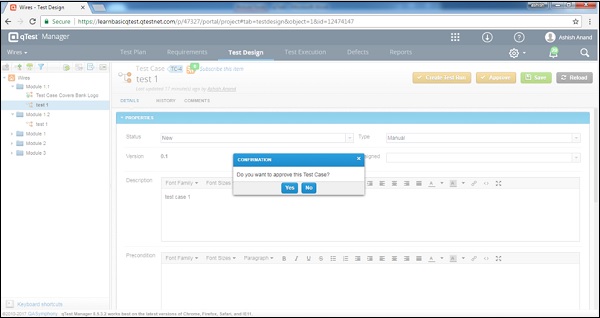
Step 3 − Click the Approve button at the top right corner of the screen before the Save button.
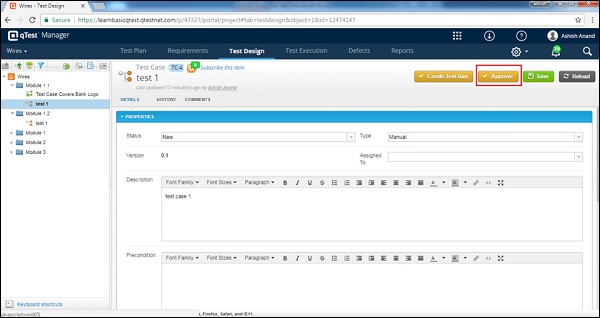
Step 4 − A confirmation dialog box appears asking to approve the test case. Click YES to approve it.
Step 5 − After approval, the test case gets a green color tick sign on the left panel as shown in the following screenshot.

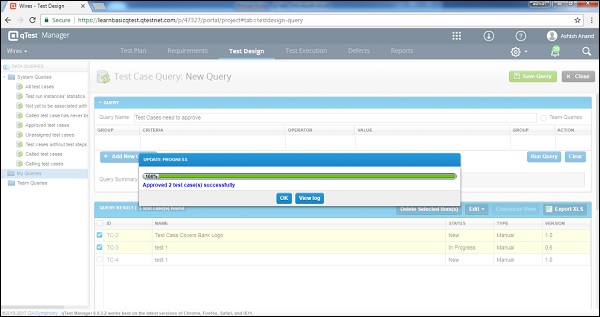
Approve Multi Test Cases
Following are the steps to approve multiple test cases at a time.
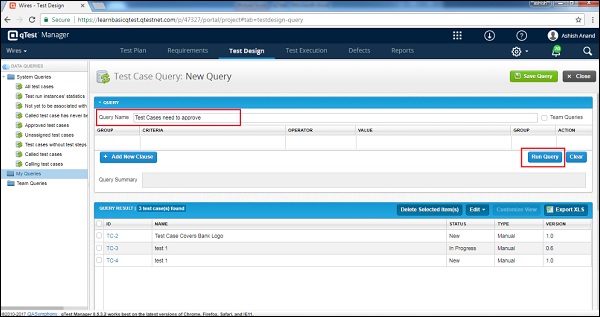
Step 1 − Go to the Test Design tab and click the Data Query icon as shown in the following screenshot.
Step 2 − In the Query name, write Test Cases Need to approve and click Run Query.
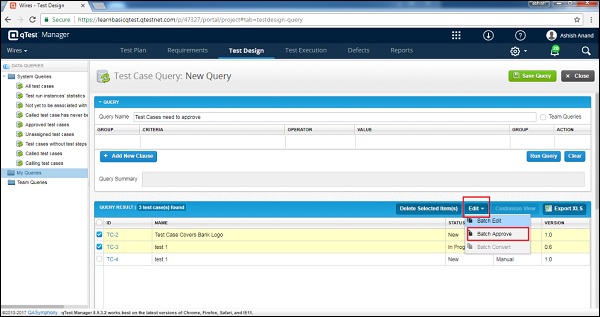
Step 3 − Select test cases from the Query Result table to approve test cases. Later, click Edit → Batch Approve as shown in the following screenshot.
Step 4 − A confirmation dialog box will be displayed. Click the Confirm button. You can check the checkbox to get email notification as well.
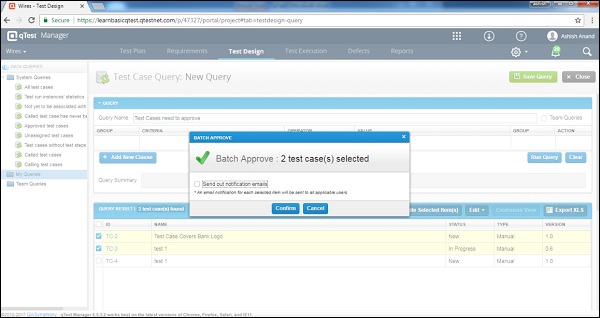
Step 5 − After clicking Confirm, the progress of the approval status is displayed. Click OK, once the progress is 100% complete.
qTest - Import Test Cases
A user can create multiple test cases at a time using the Excel spreadsheet. Excel files are text files represented by rows and columns as cells.
Rules for Excel file
While creating an Excel file, the following points must be considered −
The Excel file should have data in the first sheet only.
The sheet name should be the same as the module name, where test cases will be imported.
The first row should have the names of headers in different columns and the next onwards; data should be represented in columns.
Please note, the first row will be mapped with different fields of the Test Case Forms while importing.
One column in Excel file can be mapped with only one field in the test case form.
The test case ID field should not be mapped with any column. The system will automatically generate test case ID.
The required fields must be mapped with the column of Excel sheet and it should not be blank. Otherwise, the system will generate an error message of unsuccessful import.
The non-required fields can be left without mapping or data can be blank. While importing either, these fields will be blank or default values as defined in the projects settings.
qTest supports the modules name up to 500 characters, while Excel sheet supports only 31 characters length as the sheet name. Hence, make sure the Modules name is not too long or expands more than 31 characters.
Following is a sample Excel sheet.
| Pre-Condition | Step # | Step Description | Expected Result | Test Case Type | Test Case Status | Test Case Priority | Test Case Assigned To | Custom Field 1 (if any) |
|---|---|---|---|---|---|---|---|---|
| Pre-condition of the test case 1 | 1 | Step 1 | Step Expected Result 1 | |||||
| 2 | Step 2 | Step Expected Result 2 | ||||||
| 3 | Step 3 | Step Expected Result 3 | ||||||
| Pre-condition of the test case 2 | 1 | Step 1 | Step Expected Result 1 | |||||
| 2 | Step 2 | Step Expected Result 2 | ||||||
| n | Step n | Step Expected Result n | ||||||
| Pre-condition of the test case n | 1 | Step 1 | Step Expected Result 1 | |||||
| 2 | Step 2 | Step Expected Result 2 | ||||||
| n | Step n | Step Expected Result n |
Import an Excel File
Let us now discuss how to import an Excel file.
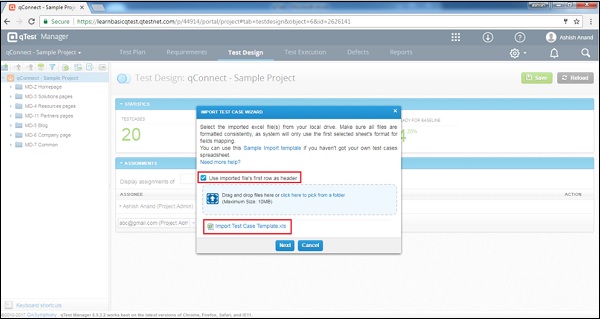
Step 1 − Go to the Test Design tab and select the root folder. The root folder will have the Project name.
Step 2 − Select the Import Excel icon from the toolbar just above the root folder. Following screenshot shows the Import Excel icon and the root folder selection in the Test Design tab.
Step 3 − The Import Test Case Wizard opens up. It comes with a set of rules. Re-verify whether the Excel sheet fulfills those rules or not.
Step 4 − Browse the Excel file and upload. After successful upload, the filename displays in the Wizard as shown in the following screenshot.Check the box "Use imported file's first row as header". qTest uses the first row of Excel file as header. qTest will get the file's header as available fields for mapping.
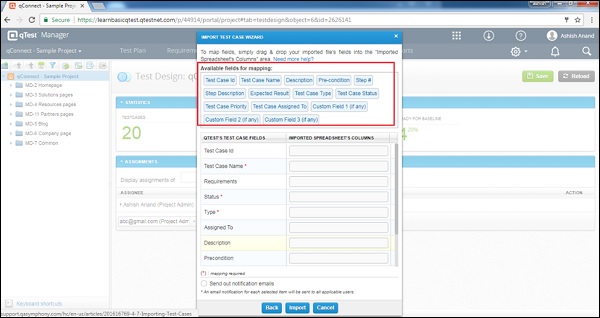
The following screenshot shows the Available fields for mapping after the check box is selected.
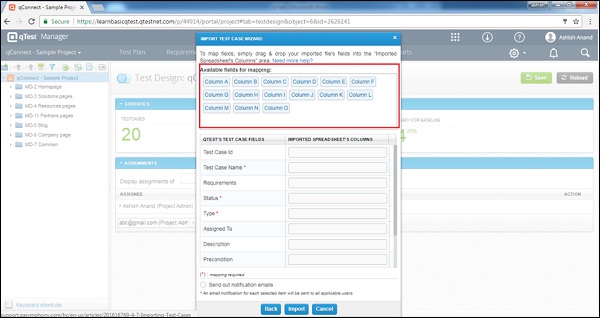
If you do not select this option, qTest will get the columns order as the available field mapping. Following screenshot displays the same.
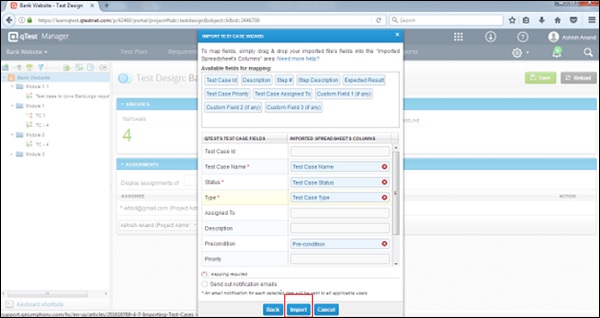
Step 5 − Using the drag and drop functionality, map the test case fields with the Excel sheet column name present at the Available fields for mapping as shown in the following screenshot.
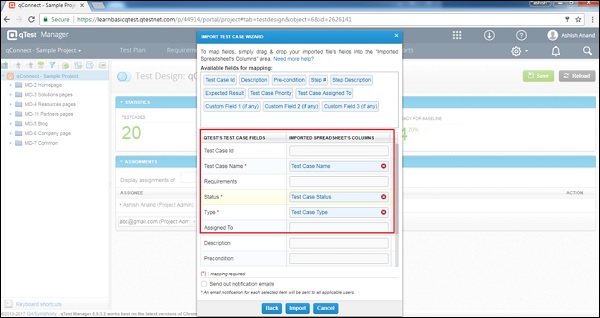
Step 6 − To delete a mapped field, click on the X sign in the box. It will delete the field mapping and you can re-map the field with other column, if required.
Step 7 − By checking the Send out Notification emails checkbox, an email will be sent to import the test cases. Now, click Import as shown in the following screenshot.
Step 8 − On successful import, you will get the imported information as shown in the following screenshot.
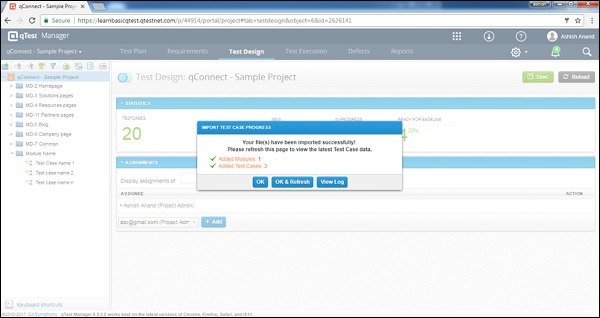
A dialog box with three buttons appears as in the above screenshot −
OK − It will take you to the Test Design tab.
OK & Refresh − It will refresh the page and you will be able to see all imported information.
View Log − This lets you see the imported logs.
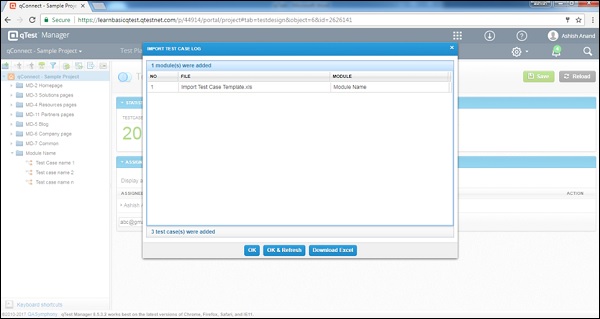
The following screenshot displays the imported information.
qTest - Export Test Cases
qTest supports the functionality where you can export the details of Test Cases into an Excel file. Following are the steps to export test cases details.
Step 1 − Select the root folder and click the Export Test Cases icon as shown in the following screenshot.
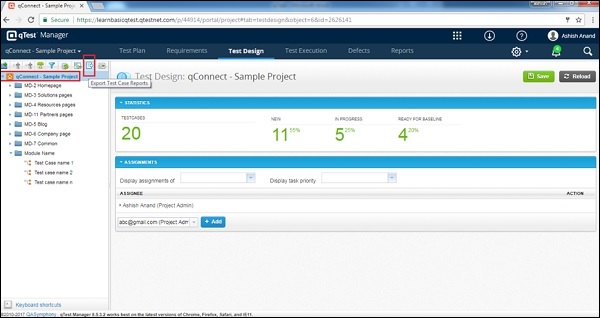
Step 2 − By clicking the Export Test Cases icon, a set of options is displayed (to download). Choose the Test Case Details Report and click.
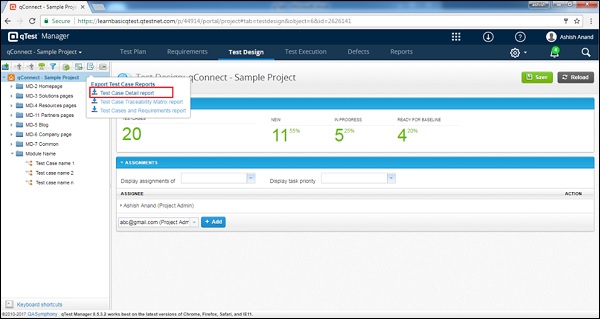
The Export Test Cases wizard opens up. This has the columns with the details of the test cases. Following screenshot shows the Export Test Cases wizard.
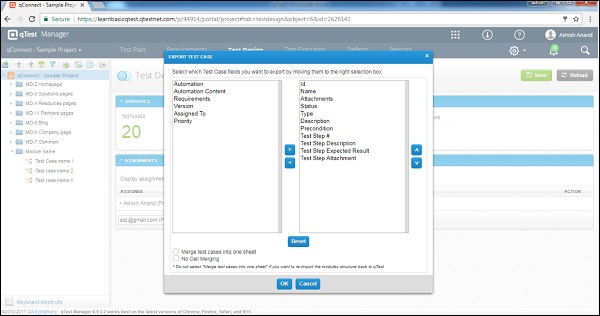
Step 3 − Select the Test Cases fields (those fields which need to be exported) from the left to the right selection box.
Step 4 − By using the up and down arrows on the right side, you can reorder the display of the Requirement fields in the exported file. Following screenshot displays the setting of wizard for exporting the file.
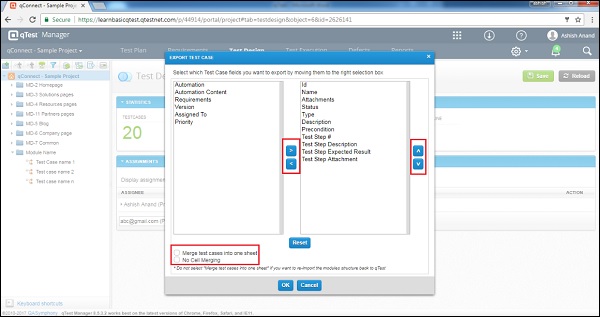
Clicking the Reset button will set all the test cases fields to export. All settings will be changed to default.
Clicking the Cancel button will close the wizard and Control will send back to Test Cases tab.
Clicking the OK button will export the Test Cases into the files chosen on the wizard.
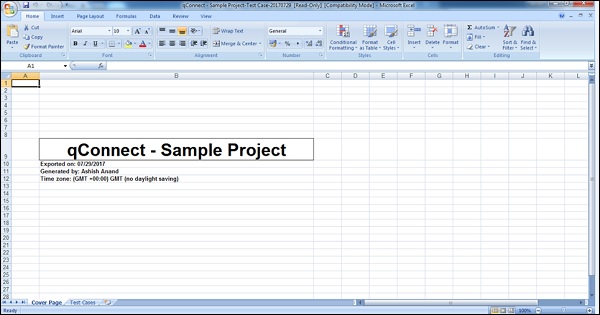
The following screenshot shows the sample exported file.
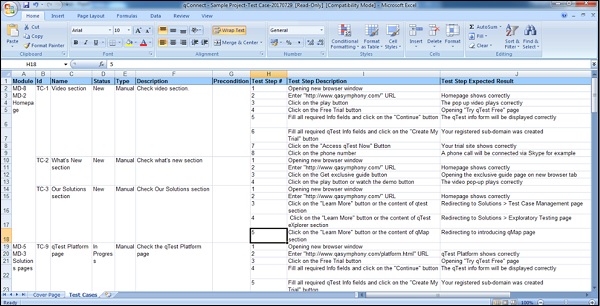
The following screenshot shows the Exported Requirements.
You can select individual test cases of one module to export at a time. By selecting the Root folder, you will be able to export all the test cases present inside the modules and submodules of the root folder.
qTest - Test Cycle Management
Test Execution is managed in different Releases and each release can have multiple test cycles to complete the test execution and ensure functionalities. Test Cycle is always a part of Single Release and it is defined in the scope of the Test Release.
Create a New Test Cycle
To create a Test Cycle, you should have the Create Test Cycles permission. Following are the steps to create a Test Cycle.
Step 1 − To create a new Test Cycle, follow either of these two options −
Go to the Test Execution tab, select the Root folder or a Release. Then, right-click somewhere on the left panel and select New → New Test Cycle
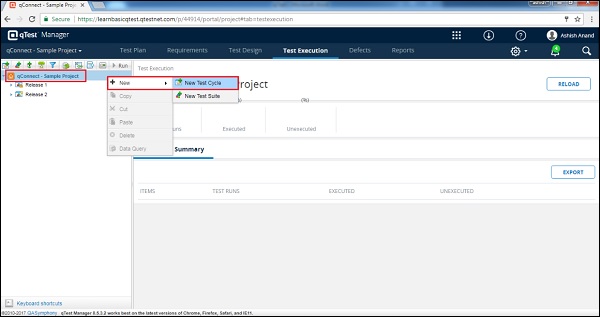
Click the New Test Cycle image on the left side of the panel as shown in the following screenshot.
The Create Test Cycle form opens up.
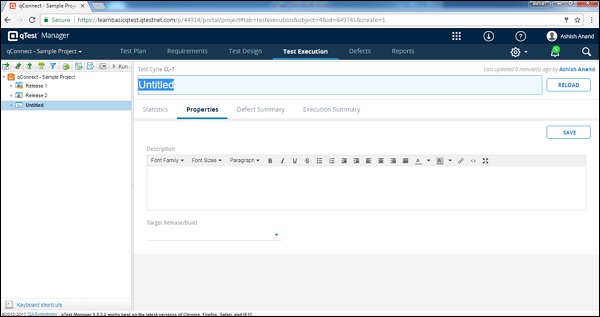
Step 2 − Enter the following fields in the form −
- Name of the Test Cycle
- Description
- Target Release/Build
Step 3 − After entering all the details, click the Save button present at the top right corner of the screen.
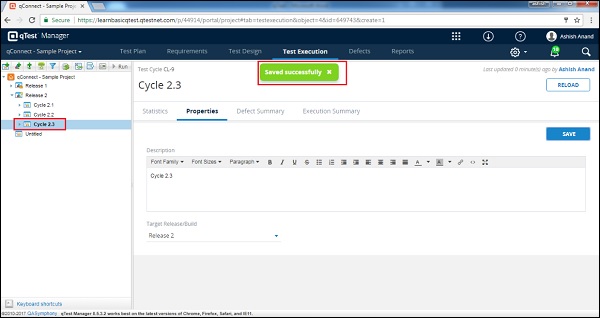
After clicking Save, you will get a success message of changes and the Test Cycle Name appears on the left panel, below the projects name as displayed in the following screenshot.
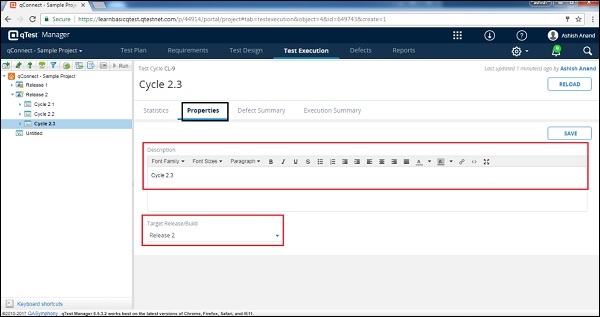
Edit a Test Cycle
To edit a test cycle, you should have the Edit Test Cycle Permission. Following are the steps to edit a test cycle.
Step 1 − Select a test cycle to Edit and click to open the details.
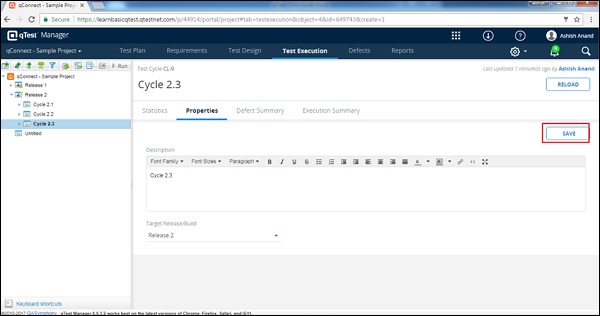
Step 2 − Edit the Name, Properties, Description, Target Release Build, or any other fields as shown in the following screenshot.
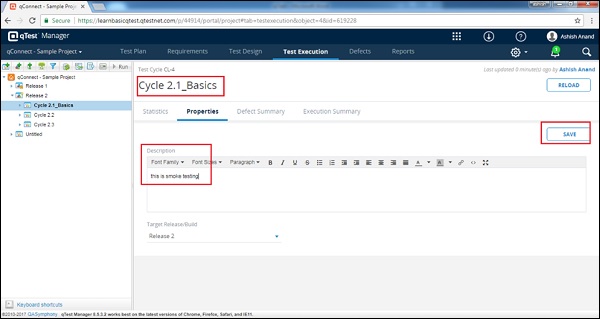
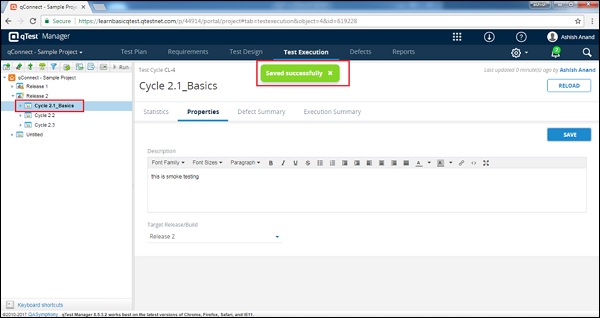
Step 3 − Click Save to finish editing.
Move/Copy a Test Cycle
To Move/Copy a test cycle, you should have the Create/Edit Test Cycle Preference. This functionality allows creating a duplicate of a Test Cycle or reordering of structure. Following are the steps to Move/Copy a Test Cycle.
Step 1 − To copy a single or multiple test cycles, select the test cycles that need to be copied and right-click the selected cycles.
Step 2 − Select Copy and click as shown in the following screenshot.
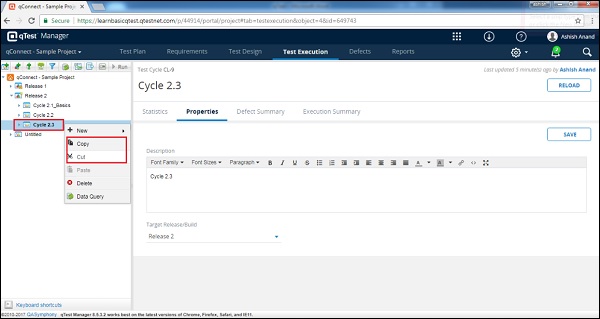
Step 3 − Right-click anywhere on the test plan tree and paste the copied cycle.
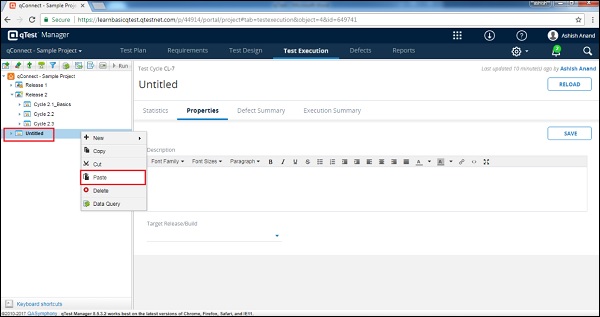
Note − A closed cycle cannot be copied or moved.
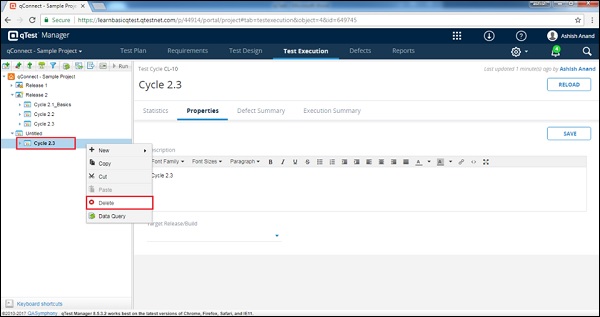
Delete a Test Cycle
To delete a Test Cycle, you should have the Delete Test Cycle Permission. Following are the steps to delete a test cycle.
Step 1 − Select a single test cycle or multiple test cycles to delete.
Step 2 − Right-click the selected cycles and click the Delete button.
Step 3 − A dialog box will appear asking for confirmation to delete. Click YES as shown in the following screenshot.
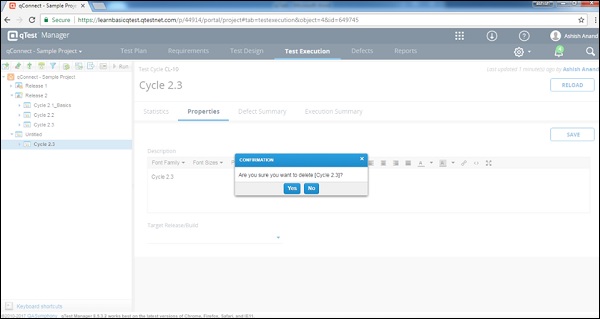
The page is refreshed and the release will be deleted from the Test Plan panel.
qTest - Test Suite Management
In test execution, test runs are managed into different test suites and these test suites are part of the test cycle, and ultimately the test release. In this chapter, we will understand what is Test Suite Management.
Create a New Test Suite
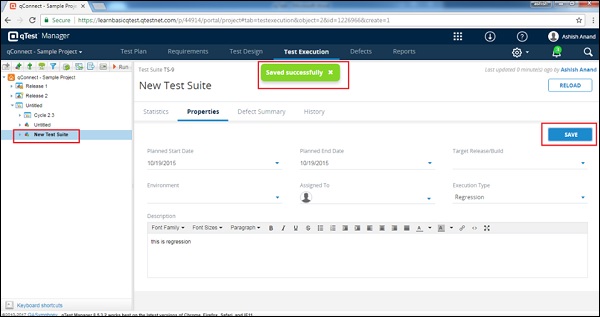
To create a Test Suite, you should have the Create Test Suites permission. Following are the steps to create a Test Suite.
Step 1 − To create a new Test Cycle, use either of the two options −
Go to the Test Execution tab, select the Root folder, a Release or a test cycle; then, right-click somewhere on the left panel and select New → New Test Suite.
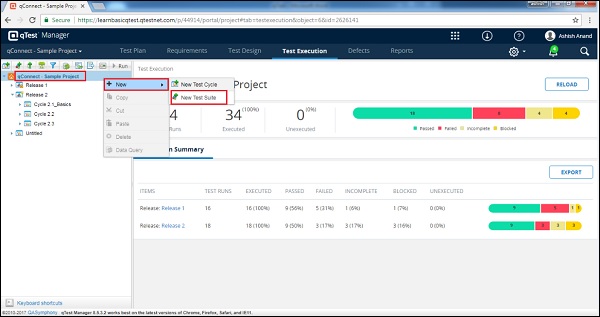
Click the New Test Suite icon on the left side of the panel as shown in the following screenshot.
The Create Test Suite form opens up.
Step 2 − Enter the following fields in the form −
- Name of Test Suite
- Description
- Target Release/Build
- Environment
- Execution Type
- Planned Start Date and End Date
Step 3 − After entering all the details, click the Save button present at the top right corner of the screen.
After clicking Save, you will get a success message of the changes made and the Test Suite Name appears on the left panel below the projects name and the selected release as displayed in the following screenshot.
Edit a Test Suite
To edit a test suite, you should have the Edit Test Suite Permission. Following are the steps to edit a test suite.
Step 1 − Select a test suite to Edit and click to open the details.
Step 2 − Edit the Name, Properties, Description, Target Release Build, or any other fields as shown in the following screenshot.

Step 3 − Click Save to finish editing.
Move/Copy a Test Suite
To Move/Copy a test suite, you should have the Create/Edit Test Suite Permission. This functionality allows creating a duplicate of a Test Suite or reordering of structure.
Following are the steps to move/copy a test suite.
Step 1 − To copy a single test suite or multiple test suites, select the test suites that need to be copy/cut and right-click the selected suites. Select Copy/cut and click as shown in the following screenshot.
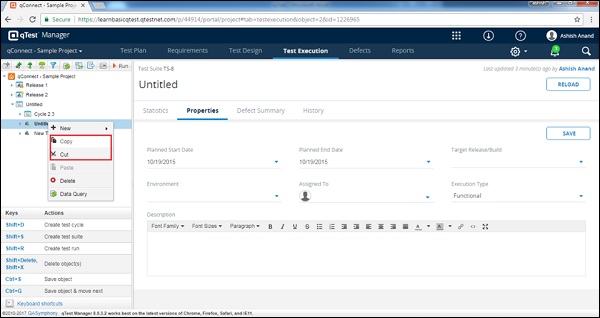
Step 2 − Right-click anywhere on the test plan tree and select to paste the copied cycles as shown in the following screenshot.
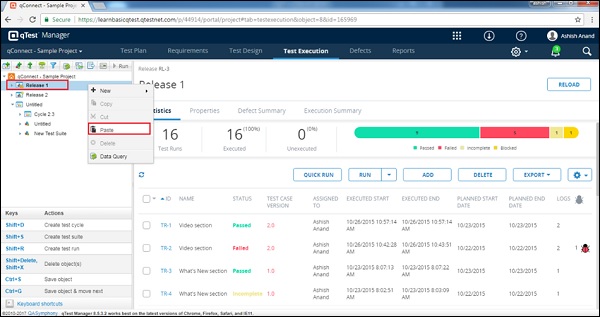
Note − A closed cycle cannot be copied or moved.
Delete a Test Suite
To delete a Test Suite, you should have the Delete Test Suite Permission. Following are the steps to delete a test suite.
Step 1 − Select a single test suite or multiple test suites to delete.
Step 2 − Right-click the selected suites and click the Delete button.
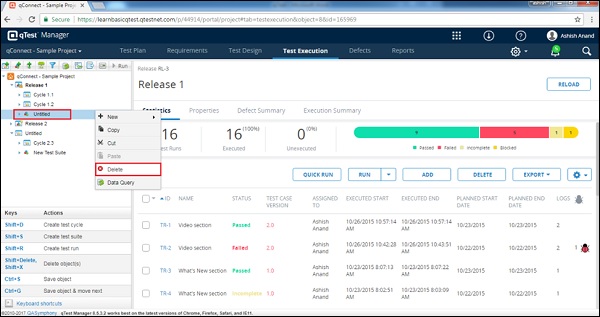
Step 3 − A dialog box will appear asking for confirmation to delete; click YES as shown in the following screenshot.

The page is refreshed and the test suite is deleted from the Test Plan panel.
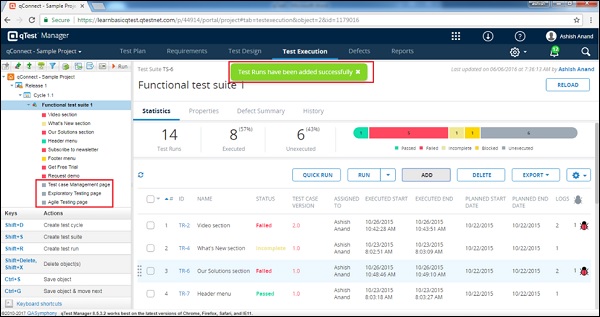
qTest - Add Test Runs
In this chapter, we will understand how to add test runs in qTest. To execute a Test Run, you should have the Create Test Runs permission. A Test Run can be created under the Root, a Release, a cycle, or a test suite.
Following are the steps to create a Test Suite.
Step 1 − To create a new Test Cycle, there are different methods such as −
Go to the Test Execution tab, select the Root folder, a Release, or a test cycle; then, click the Add Test Runs icon on the toolbar as shown in the following screenshot.
Press Shift + R
Click on the Add Test Runs button on the right side of the panel after the selection of Test Suite as shown in the following screenshot.
Step 2 − By using any one of the above methods, the Add Test Run wizard form opens up.
Step 3 − Select the test cases from the Requirement/Test Design/Test Execution/Defects tab and click the Add button.
After clicking Add, the page is refreshed and the test cases get added as displayed in the following screenshot.
Consider the following important points while creating a Test Suite and further adding test runs −
Do not add duplicates test cases. A test suite will not add any duplicate test case.
Display test cases that have not been added. By checking it, the wizard displays only those test cases that are not added in the selected folder.
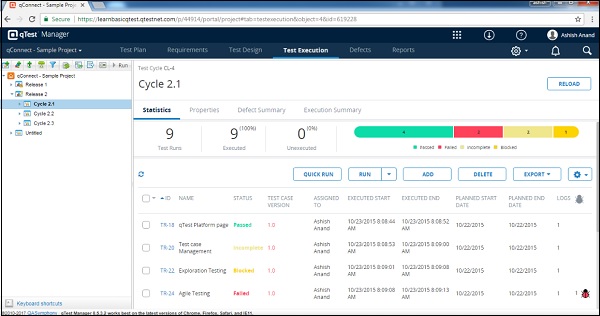
qTest - Test Execution
In this chapter, we will learn about Test Execution in qTest.
To execute a test Run, you should have the Execute Test Runs Permission. You can execute a single or multiple Test Runs and Test Suites. You can also do a quick run to mark an overall status to all selected test cases.
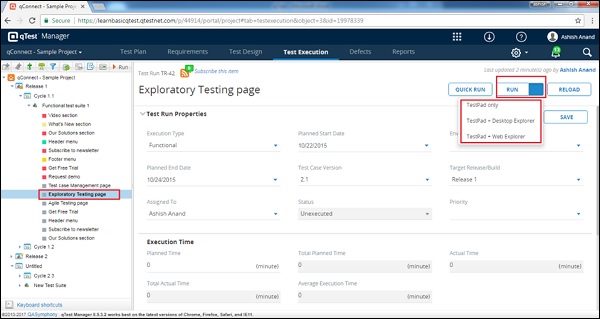
Default Mode
qTest has three default modes to execute −
- Execute without session recording
- Execute with Explorer Integrated Edition
- Execute with Web Explorer
Following are the steps to set the default mode −
On the Test Runs Grid or individual Test Run main page, select the drop-down arrow next to the Run button.
Select one of the three options.
Click Save to set the default execution mode.
The following screenshot displays how to set the default option.
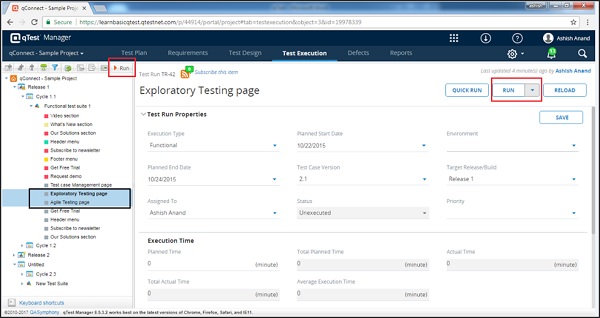
Execute a Single/Multiple Test Run
In this section, we will discuss how to execute single/multiple test run. Following are the steps for execution −
Step 1 − Select a single/multiple test run using shift + click.
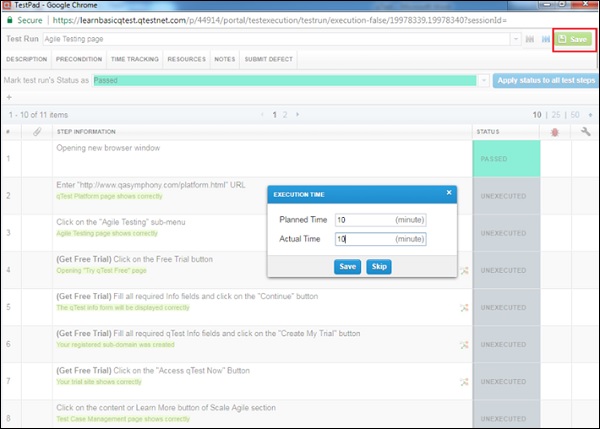
Step 2 − Click the Run button either on the Execution toolbar or Test Run detail screen as shown in the following screenshot.
Step 3 − Test Run will open in a dialog box with detailed Test steps and the description will be loaded. You can update the test result here. Following screenshot will help you understand this step.
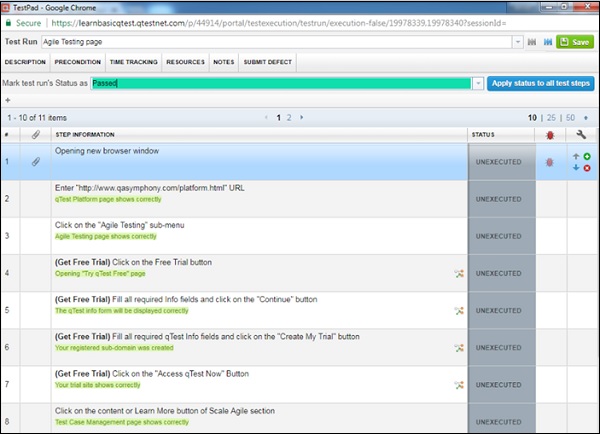
Step 4 − Bring the cursor at the status of each step. It displays a list of status that can be selected to mark the test step execution status.
Step 5 − Click the Save button. It displays a dialog box where the planned and actual time are entered. After entering the details, click the Save button again.
Similarly, you can execute a single or multiple Test Suites at a time. Each test case will appear one by one.
Test Pad Features
After clicking the Run button, Test Pad loads the selected Test Runs for execution. Test Pad has a few important features. We will understand these features by performing the following steps −
Step 1 − Select Test Runs in the drop-down list to execute a specific test case.
Click Forward or Backward icons to execute Test Runs in order as shown in the above screenshot.
Click the Load Last Run button to view the last result of the Test Run.
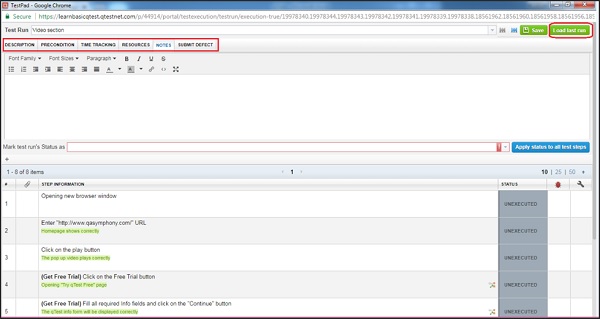
View Test Case's Description, Precondition, Notes, and Attachments in Test Run Information section.
Description and Precondition loads from its associated Test Case's Properties.
Notes will display in the Test Run Log.
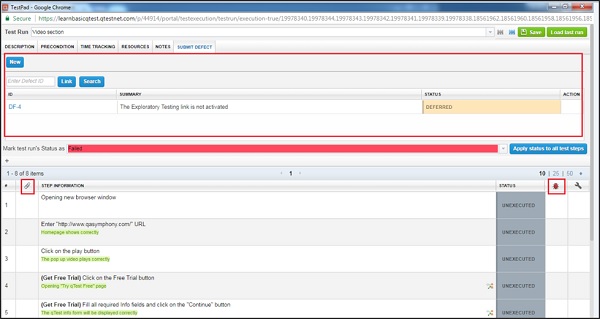
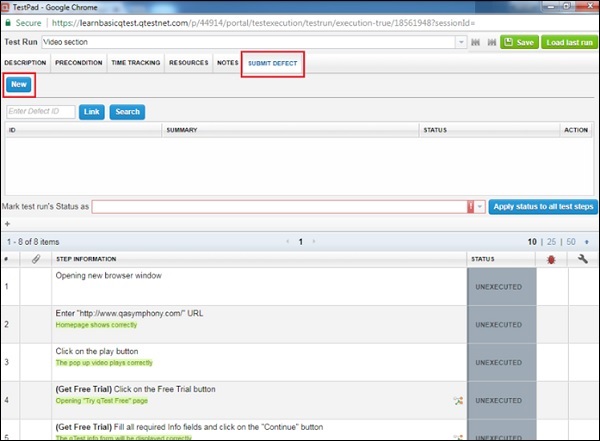
Submit/Link Defect to Test Log.
The following screenshot shows the above functionalities.
The following screenshot displays where to Link defect.
Add Attachments for Test Case and Test Log separately in the Resources
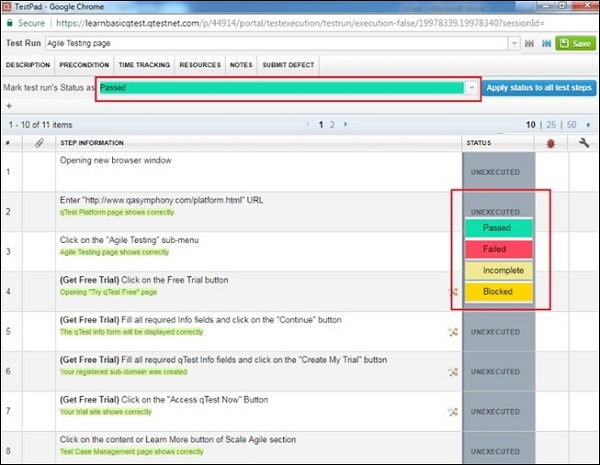
Select Overall Status for the Test Run. You can also apply the overall Test Run Status to all Test Run's steps.
Select Status for Individual Test Steps.
Click the Bug icon to submit defect(s) for individual Test Steps as shown in the above screenshot.
Click the Clip icon to add Attachments for Individual Test Steps as shown in the above screenshot.
Step 2 − Click individual steps to edit Test Step's Description, Expected Results, and add Actual Results during the execution as shown in the following screenshot.
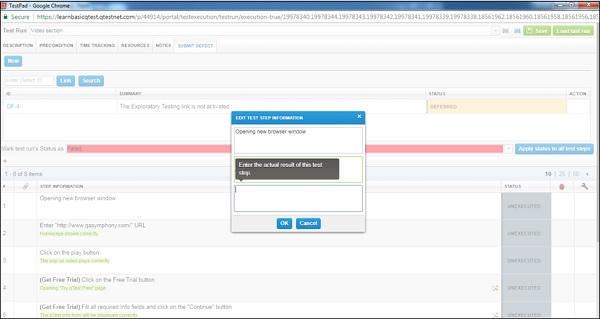
The Expected Result is displayed in Green color while the Actual Result is displayed in light red/pink color.

qTest - Quick Run
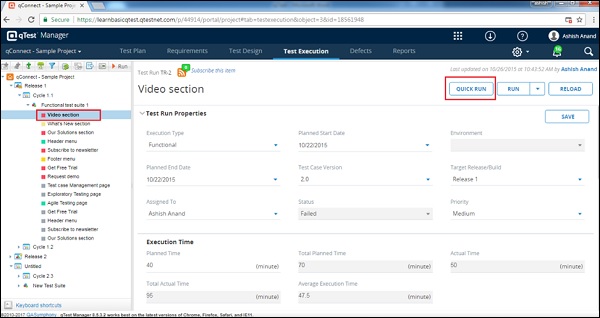
You can quickly update the overall status of the Test Runs using the Quick Run button. You can quick run Individual Test Runs or an entire Test Suite.
Quick Run a Single Test Run
Let us now discuss how to quick run a single test run using the following steps.
Step 1 − Select a single Test Run on the Execution tree.
Step 2 − Click the Quick Run button on the Test Run Detail screen as shown in the following screenshot.
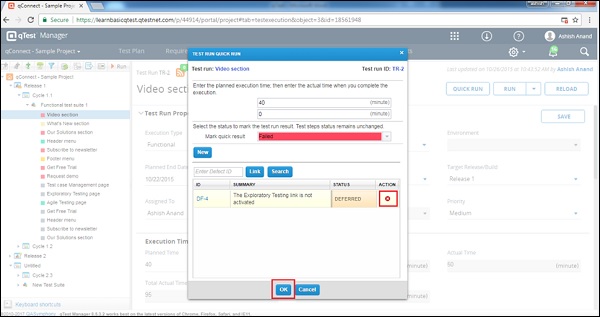
Step 3 − The Quick Run dialog box opens. Select the Mark quick result as the overall Test Run's result.
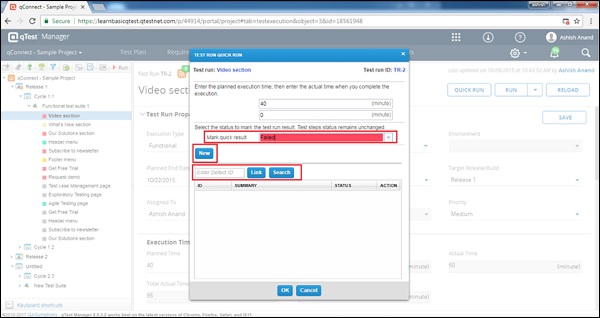
- Click the New button to submit a Defect.
- Enter an existing Defect ID or Search Defect to link to the Test case.
- Click the Delete icon to remove a linked Defect from the Test Case.
Step 4 − Click the OK button to confirm the result.
In Quick Run, the Overall Test Run status only updates and not the Test Step level.
In Quick Run, individual Test Step would be in Unexecuted Status unless you change them manually.
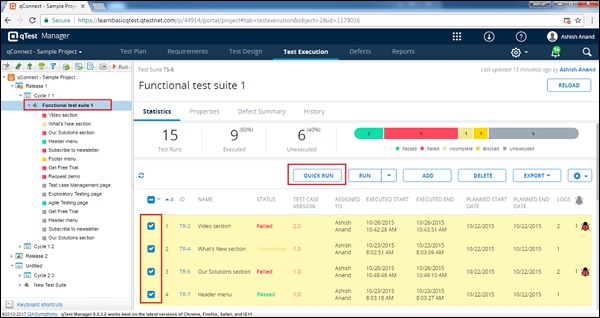
Quick Run of Multiple Test Runs
Following are the steps to quick run multiple test runs.
Step 1 − Select a Test Suite on the Execution tree.
Step 2 − In the Test Runs Grid, select multiple or all Test Runs.
Step 3 − Click the Quick Run button on the Test Runs grid as shown in the following screenshot.
Step 4 − The Quick Run dialog box opens as shown in the following screenshot.
Select the Status for individual Test Runs or select multiple test cases by checking the checkboxes.
Select the Status and click the Apply button. It updates the status to selected Test Runs at a time.
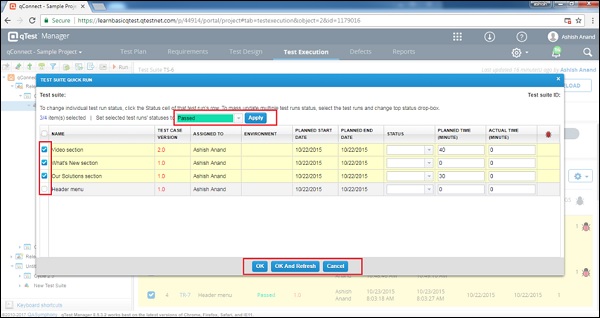
Click the OK button to confirm the status update, or the OK and Refresh button to submit the latest Test Runs' result to the Test Suite.
qTest - Submit a Defect
In the Defects module, you can create, view, and edit defects which are created. qTest defect tracker is simple but a powerful tool. It allows to manage the defects in real-time. You can easily customize the fields and values related to defects to identify and track their resolution process. In addition to these, qTest allows to subscribe to email notifications upon submission, assignment, update, or comment on the selected defect.
There are three ways wherein, you can submit a defect while executing or after execution to a specific test case −
- Submit during quick run execution
- Submit during default Run execution
- Submit after Test execution completion
Submit While Executing a Test
This process is similar to submitting a defect during quick run or default run execution. In both the cases, the only difference is initiation of execution, the remaining steps are as follows −
You can submit a defect for a particular test step or a test case, applicable to all the steps.
Step 1 − To add at test case level, click the Submit Defect section as shown in the following screenshot and then click New.
Step 2 − Similarly, to add defect at the test step level, click the Submit Defect icon as shown in the following screenshot and then click New.
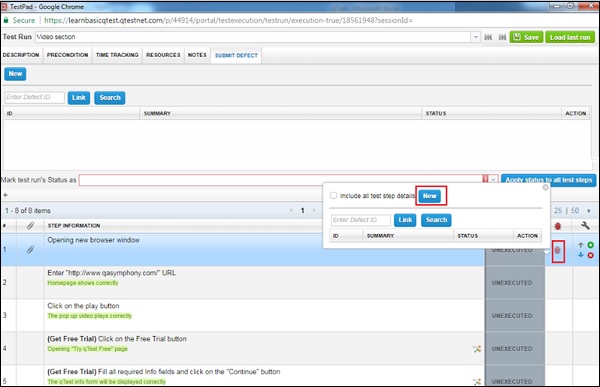
Step 3 − In both of the above cases, the Defect submission form opens in a separate window. Enter the following fields before the submission of defect −
- Summary
- Fixed Release/Build
- Assign to
- Type
- Reason
- Environment
- Add Attachments to verify discrepancies such as screenshots, logs, etc.
Step 4 − After entering the details, click the Save & Close button as shown in the following screenshot.
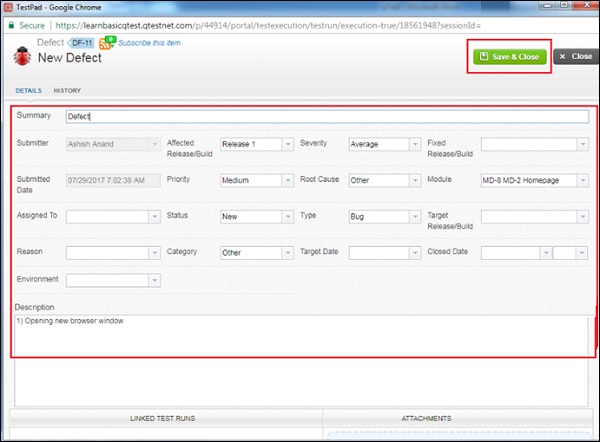
In the History tab, you can see all action or edition performed on this defect.
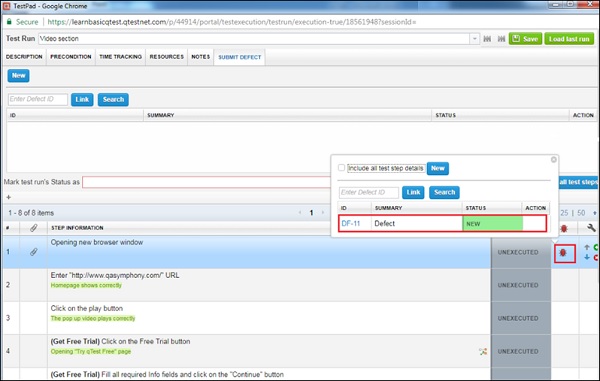
A Defect ID is generated and you can see the defects that are linked with the test step by moving the cursor on the defect symbol as shown in the following screenshot.
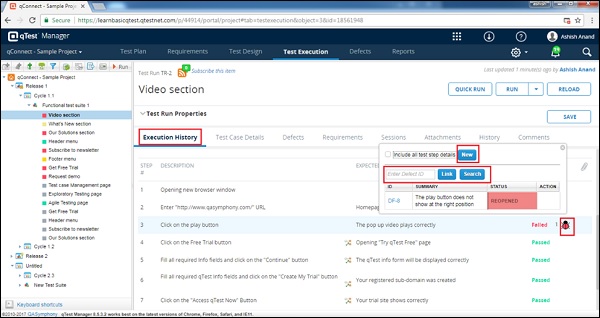
Submit Defects After Test Execution Completion
You can submit or link defects to individual Test Steps or Test Case after the completion of execution. Following are the steps to submit defects.
Step 1 − Select the Defect icon in a Test Case in Execution History section to submit/link Defects to an entire Test Case.
Step 2 − Alternatively, select the Defect icon in Test Log Details to submit/link Defects to individual Test Steps of an executed Test Log.
Step 3 − Click the Bug icon. It will open a dialog box with options to submit/link Defects.
Step 4 − Click New to submit a Defect linked to the Test Log.
Step 5 − Enter an existing Defect ID or Search Defect to link to the Test Log.
Step 6 − Click the Delete icon to remove a linked Defect out of the Test Log.
The following screenshot displays the steps discussed above.
qTest - Clone a Defect
While viewing a defect, you can easily create a copy of the defect using the Clone Defect function. To clone a defect, you should have the Create and Edit Defects permission.
Following are the steps to clone a defect.
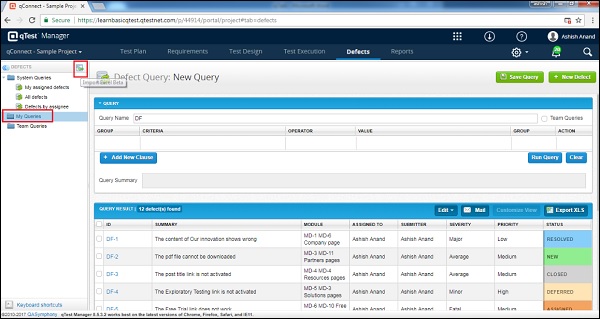
Step 1 − Open an existing defect. Go to the Defect section and enter a Query type Defect ID. Click Run Query. The result will get displayed at the bottom as shown in the following screenshot.
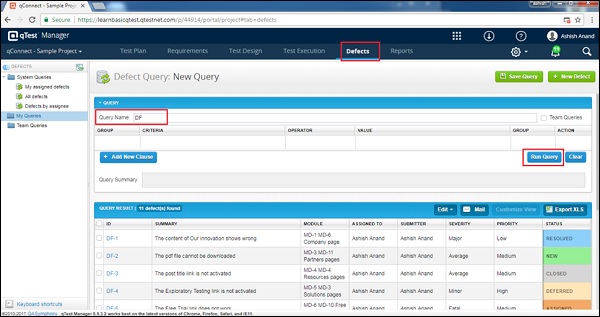
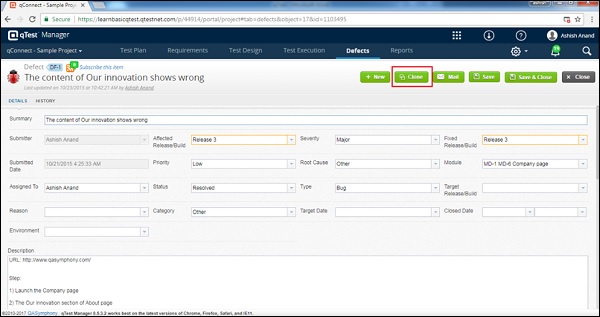
Step 2 − Click the Defects ID to open the details of the defect.
Step 3 − Click the Clone button. A new defect form displays with all the details is copied as shown in the following screenshot.
Step 4 − After clicking the Clone button, the button gets disabled and the Summary has a name as Cloned defect.
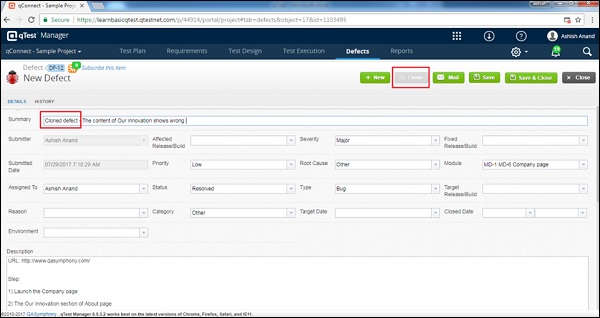
Step 5 − Edit Details in Cloned defect. Then, click the Save button to submit the clone defect.
A new Defect ID generates with reference to the original defect id as shown in the following screenshot.
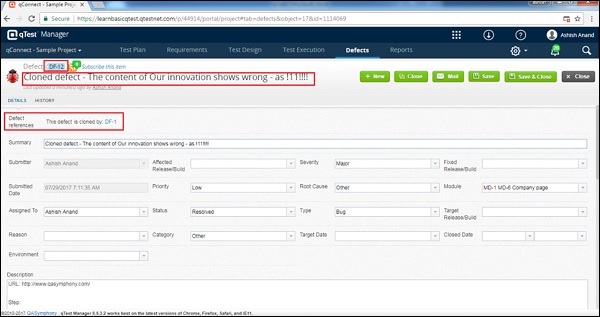
Consider the following points while cloning a defect −
- Clone defect will always be in New status.
- Only the details of the defect are copied from the original defect.
- Linked Test Runs, Attachments, Comment, and History will not be copied.
qTest - Import a Defect
You can import a defect using the Excel spreadsheet. Excel files are text files represented by rows and columns as cells.
The following need to be considered while importing the data from Excel.
- Rules for Excel file
- Import the Excel file into the system
Rules for Excel File
Consider the following points while creating an Excel file −
The Excel file should have data in the first sheet only.
The sheet name should be Defects.
The first row should have the name of headers in different columns and next onwards; data should represent each column.
Note that the first row will be mapped with different fields of the Defect Creation Form while importing.
One column in Excel file can be mapped with only one field of the Defect Creation form.
The Defect ID field should not be mapped with any column. The system will automatically generate a Defect ID.
The required fields must be mapped with the column of Excel sheet and it shouldnt be blank. Otherwise, the system will generate an error message of unsuccessful import.
The non-required fields can be left without mapping or data can be blank. While importing, either these fields will be blank or default values will be as defined in the projects settings.
Import an Excel File
Let us now discuss how to import an Excel file. Following are the steps to perform the same.
Step 1 − Go to the Test Defect tab.
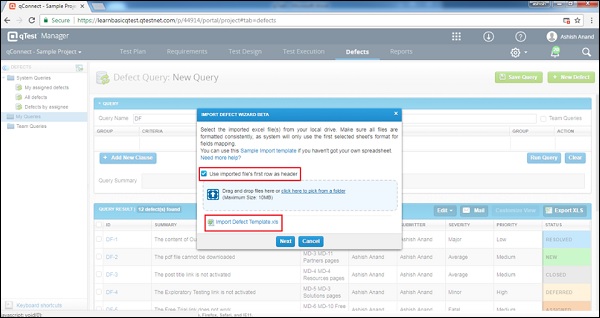
Step 2 − Select the Import Excel BETA icon from the toolbar just above the root folder. Following screenshot will help you understand this step.
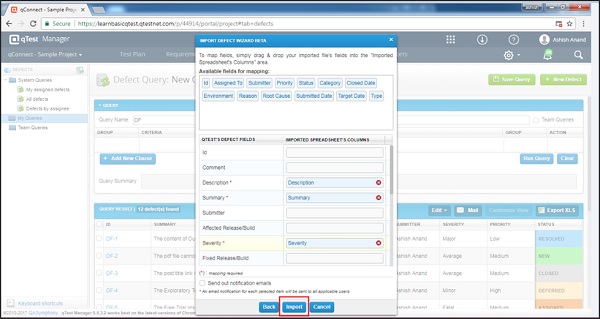
Step 3 − On clicking the Import Excel icon, the Import Defect Wizard BETA opens up. It comes with a set of rules. Re-verify whether the Excel sheet fulfills those rules or not.
Step 4 − Browse the Excel file and upload. After successful upload, the filename displays in the Wizard as shown in the following screenshot. Check the "Use imported file's first row as header" box. qTest uses the first row of Excel file as the header. qTest will get the file's header as available fields for mapping.
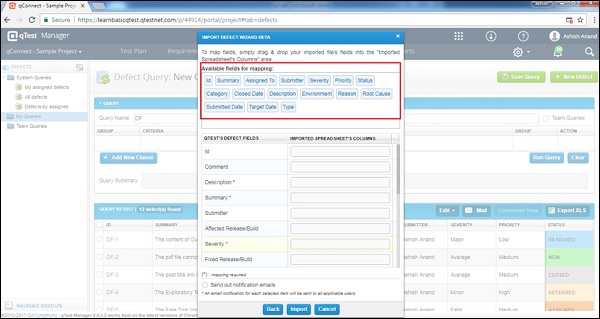
The following screenshot shows the Available fields for mapping if the check box in the above step is selected and the Next button is clicked.
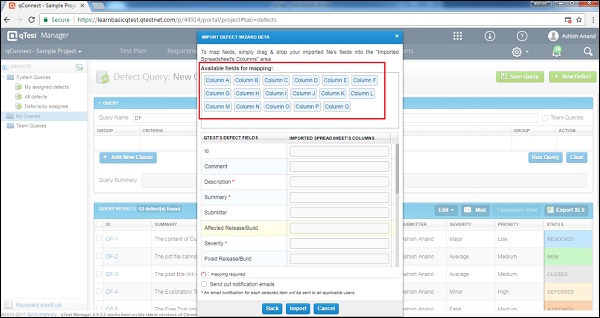
For instance, you do not select the option as in the above step, then qTest will get the columns order as the available field mapping. Following screenshot displays the same.
Step 5 − Using the drag and drop functionality, map the Defects field with the Excel sheet column name present at the Available fields for mapping as shown in the following screenshot.
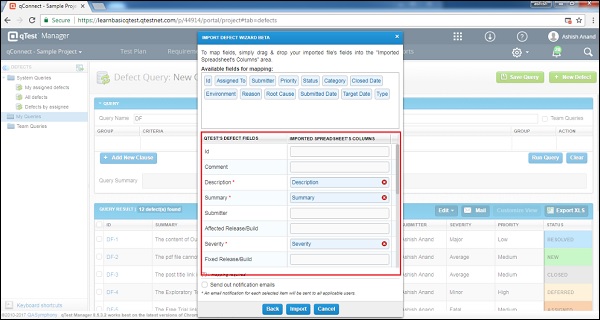
To delete a mapped field, click the X sign in the box. It will delete the field mapping and you can re-map the field with other columns, if required.
By checking the Send out Notification emails checkbox, an email will be sent about importing defects.
Step 6 − Now, click the Import button as shown in the following screenshot.
Upon successful import, you will get the imported information as shown in the following screenshot.
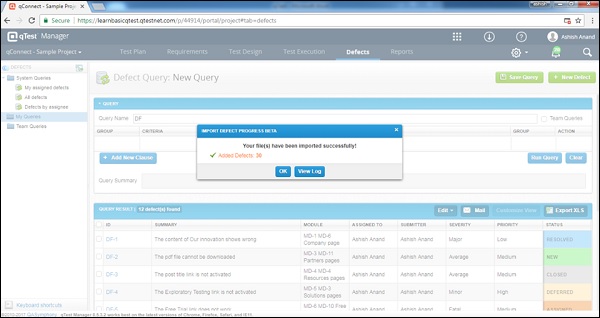
A dialog box with two buttons appears as in the above screenshot −
- OK − It will take you to the Defects tab.
- View Log − Using this, you will be able to see the imported logs.
qTest - Reports
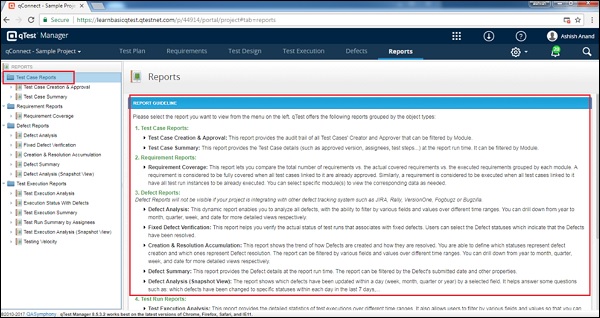
In the Reports module, you can create, view, and export reports supported by qTest. qTest supports a wide range of reports at all phases of STLC to better track the progress such as test execution, defect creation, requirements coverage, and test case creation. These reports contain various filters to fetch the most important information to prepare any of the metrics.
When you navigate to the Reports section, it displays a list of available reports for different activities on the left panel. On the right panel, qTest has a detailed description of each report as shown in the following screenshot.
Prepare Reports
In this section, we will learn how to prepare reports in qTest. Following are the steps −
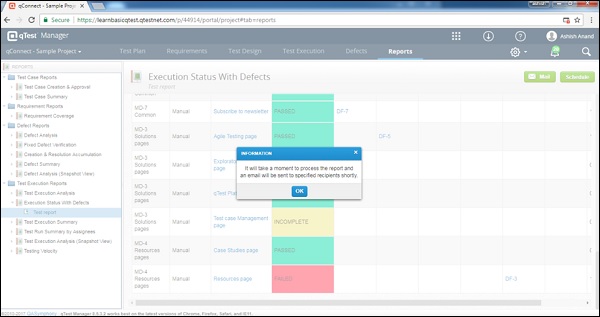
Step 1 − To create a report, select the report name in the left panel. The following screenshot shows Execution Status with Defects is selected under the Test Execution Report. A set of filter options displays to narrow down the report. In this case, there is Module, Release, and Test Case Type filters.
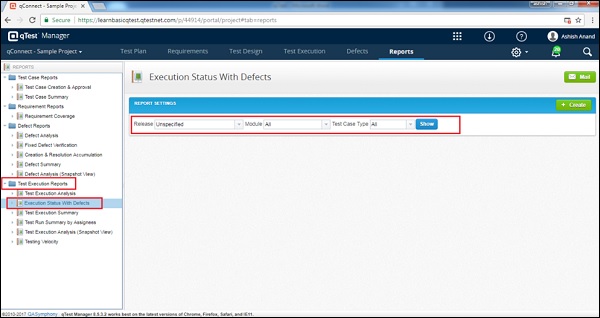
Step 2 − Select the options based on the available list in each filter. Click Show as in the above screenshot. It will generate the Reports in chart. It also displays the data in a tabular column.
Step 3 − Email the report in XLS, CSV, or PDF format by clicking the Mail button at the top right corner of the screen. It displays a dialog box wherein, you can select Sent to others and type the email address and click OK.
The following screenshots display how to send reports in email.
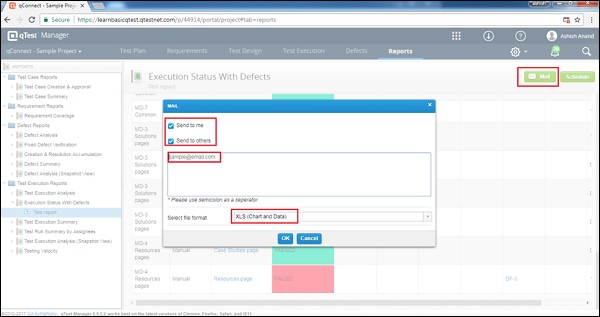
A dialog box appears providing information on the processing of the email request.
Similarly, any of the available reports can be generated. The first step is the selection of reports. The second step is to perform Reports setting with the available filter options and then click the Show button.
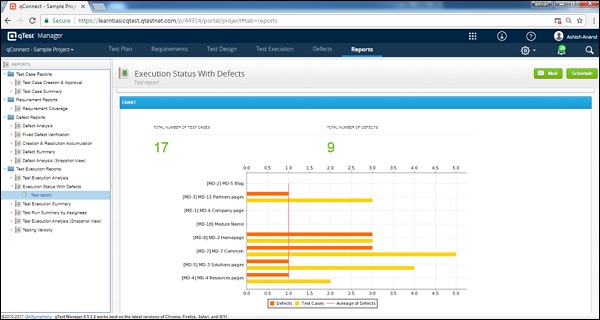
The Reports are generated in the three following parts −
- Latest information − It is statistic data.
- Chart − It may be a pie or tabular chart.
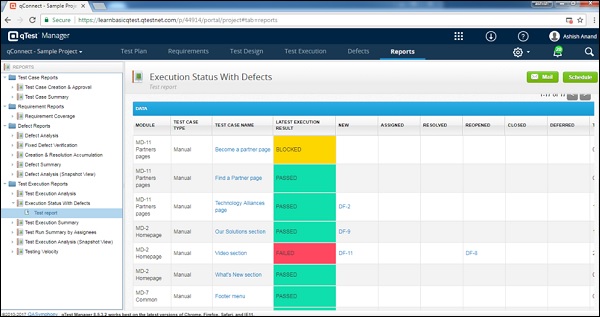
- Data Grid − Data used to prepare the report.
qTest - Filter
qTest supports the filter functionality to narrow down the display items. Filter is available on the left panel toolbar only for Test Plan, Requirements, Test Design and Test Execution tab. Filter does not support Defects and Reports section; these sections have different filters to narrow down the items.
How to Use Filter?
Following are the steps to use the Filter functionality.
Step 1 − Go to the Test Plan section and click the Filter icon in the toolbar on the left panel as shown in the following screenshot.
Step 2 − Select the Set Filter icon, it displays a dialog box as in the following screenshot. You can set filters by choosing Filter by as Release or Build.
For both options, you will get the following filter options Release or Build, Start Date, Status and End Date. After selection, click the Filter button.
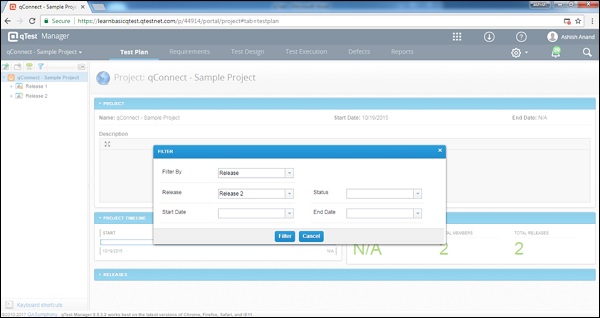
Now, only the details of Release 2 is displayed as shown in the following screenshot.

Step 3 − To remove the filter, Click Filter → Clear Filter.
Similarly, Filter can be set or cleared for other sections Requirement, Test Design and Test Execution.
qTest - Drag & Drop
qTest supports the Drag & Drop functionality. It helps to quickly move or copy an object within the same project. This functionality comes with a limitation you cannot drag and drop from one project to another.
Following are the steps to use this functionality.
Step 1 − To move/reorder the object, hold the left button of the mouse and drag the object to the destination folder.
Step 2 − To copy the object and place it into another folder, continue to hold the left button of the mouse and the CTRL key. Now, drag the object to the destination. It will copy the objects into the destination folder.
qTest - Hotkeys
qTest supports a wide range of hotkeys at each section. Hotkeys are also known as Keyboard Shortcuts. You can see these shortcuts at the left bottom of each section as shown encircled in red in the following screenshot.
The following table lists down the supported hotkeys. To use a specific hotkey, you should be on the respective page. For example, while using the hotkey to create a release, you should first navigate to the Test plan section and then use Shift + D.
| Hotkeys | Page | |||||
|---|---|---|---|---|---|---|
| Test Plan | Requirements | Test Design | Test Execution | Defects | Reports | |
| Ctrl + S | Save an object | Save an object | Save an object | Save an object | Save an object | X |
| Ctrl + G | Save an object & go to the next item (of the same level on the object tree) | Save an object & go to the next item (of the same level on the object tree) | Save an object & go to the next item (of the same level on the object tree) | Save an object & go to the next item (of the same level on the object tree) | X | X |
| Shift + D | Create a release | Create a module | Create a module | Create a test cycle | X | X |
| Shift + Delete, Shift + X | Delete object(s) | Delete object(s) | Delete object(s) | Delete object(s) | X | X |
| Shift + C | Create a build | Create a requirement | Create a test case | X | X | X |
| Shift + S | X | X | X | Create a test suite | X | X |
| Shift + R | X | X | X | Create a test run | X | X |
| Ctrl + E | X | X | X | X | Save & close a defect | X |
qTest - Recycle Bin
qTest supports the Recycle bin concept, i.e., you can temporarily delete unnecessary objects and restore them later, if required. While deleting an object, qTest moves the object in the Recycle Bin and you can restore these objects later to their original locations. Recycle bin supports only Test Plan, Requirements, Test Design, and Test Execution section. This functionality is not applicable to Defects and Reports section.
To delete and restore, you should have Delete objects permission.
Temporary Deletion
As discussed earlier, you can use the drag and drop functionality to move an object into the Recycle bin. Alternatively, you can also delete the object, which will eventually move it to the recycle bin.
A dialog box will appear asking for confirmation, click YES.

To view all the deleted objects, click the Recycle bin at the toolbar.
Permanent Deletion
Let us now discuss how to delete objects on a permanent basis.
Step 1 − Click the Recycle bin icon on the left navigation bar. Select Menu and Object to delete an object permanently.
Step 2 − To delete multiple objects at a time, check the checkbox present for each item as shown in the following screenshot.

Step 3 − Click the Delete Permanently button present at the bottom of the page as shown in the above screenshot.
You will get the permanently delete message. Upon clicking this, an object permanently disappears from the Recycle Bin.
Restore Object
In this section, we will discuss how to restore objects in qTest.
Step 1 − Click the Recycle Bin icon on top of the toolbar of the left panel.
Step 2 − Select the Menu and Objects to find the objects to restore from the Recycle Bin.
Step 3 − Click the Restore button at the bottom of the page to confirm. The selected objects will be moved back to their original locations.
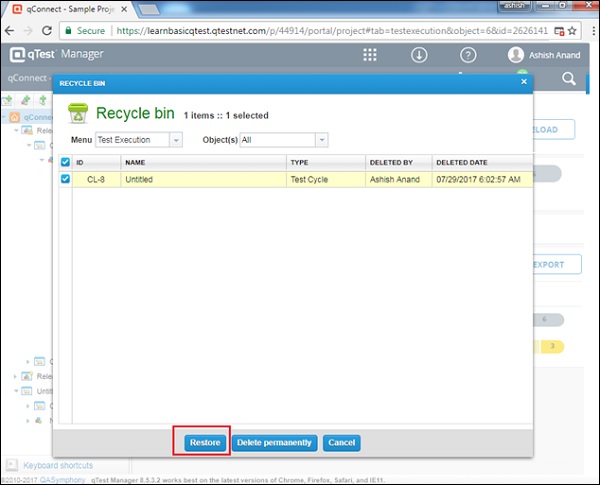
qTest - Search
You can quickly search a system object such as requirement, test case, test run, or defect. You can also search for partial information that belongs to a system object such as a description or a comment by entering the keywords into the Search box located on the top right corner of any page.
The following screenshot displays the location of the Search box.
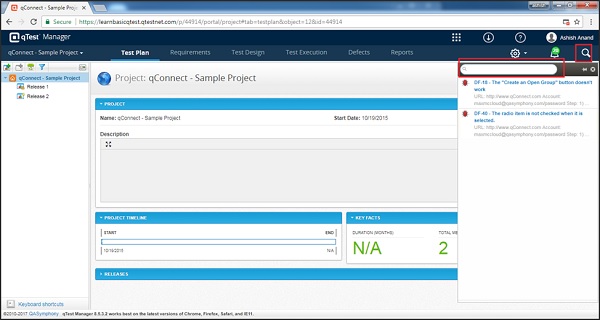
qTest also supports free text search and syntax search.
Free-text Search
The system searches for free-text, which you key in and then returns all the objects that have free-text. Apart from that, the following set of pre-defined functions can be used to find an object −
Release − ID, Name, Status, Description, Release Note
Build − ID, Name, Status, Build Note
Requirement − ID, Name, Status, Description, Type, Comment
Test Case − ID, Name, Description, Status, Type, Test Step Description, Test Step Expected Result, Comment
Test Suite − ID, Name, Description, Execution Type
Defect − ID, Summary, Description, Status, Type, Comment
Test Run − ID, Name, Status, Execution Type, Test Step Description, Test Step Expected Result, Test Step Actual Result
Syntax Search
Syntax search helps to narrow down the searched result or find unique objects, based on the following details.
Search by IDs
Each qTest object is associated with an ID (a prefix and followed by an ID number). It helps to refer to unique objects as well as search them quickly. Following syntax can be used to find an object using id.
id:id_number − This syntax returns the object which has the specified ID number. For example: id:50 will return all objects having ID numbers as 50, such as requirement RQ-50, defect DF-50, test case TC-50, etc.
id:prefixid_number − This works the same way as obj: object_typeid:id_number. To find a unique object, you can define with the object prefixes (RQ, TC, DF, etc.). This syntax will return a unique object of the specified type and the ID number. For example, id:tc-50 or obj:tc id:50 will return the test case TC-50.
Combine Different Keywords
You can narrow down the search results by using a more advanced syntax search, such as obj:object_typeobject_field: free text AND/OR ( ) obj:object_typeobject_field: free text. Following table lists down the keywords that can be used to make advanced syntax search.
| Objects | Object_type search keys | Object_field | Object_field search keys |
|---|---|---|---|
| Release | rls | Name | name |
| Status | stat | ||
| Description | des | ||
| Release note | note | ||
| Build | bld | Name | name |
| Status | stat | ||
| Build note | note | ||
| Test Case | tc | Name | name |
| Description | des | ||
| Status | stat | ||
| Type | type | ||
| Comment | cmt | ||
| Test Step Description | tsdes | ||
| Test Step Expected Result | tsexp | ||
| Requirement | req | Name | name |
| Description | des | ||
| Status | stat | ||
| Priority | prt | ||
| Type | type | ||
| Comment | cmt | ||
| Test Suite | ts | Name | name |
| Description | des | ||
| Execution type | type | ||
| Test Run | tr | Name | name |
| Status | stat | ||
| Execution Type | type | ||
| Test Step Description | tsdes | ||
| Test Step Expected Result | tsexp | ||
| Test Step Actual Result | tsact | ||
| Defect | df | Summary | sum |
| Description | des | ||
| Severity | svt | ||
| priority | prt | ||
| Status | stat | ||
| Type | type | ||
| Comment | cmt |
qTest - Toggle ID
Every object in qTest such as Test Case, Requirements, Modules, Release, Test Suite, Test Run, etc. has a unique ID and is always attached with an object. You can display or hide this ID along with the objects name. This functionality can be done using the Toggle ID.
Following are the steps to display or hide a Toggle ID.
Step 1 − Go to any one of the tabs, except Defects and Reports.
Step 2 − Click the toggle id icon on the left panel toolbar.
Based on the tabs, it will display the objects by checking them. You will be able to see the Toggle ID. Unchecking them will hide the Toggle ID.
The following screenshot displays the Toggle ID functionality under the Test Plan tab.
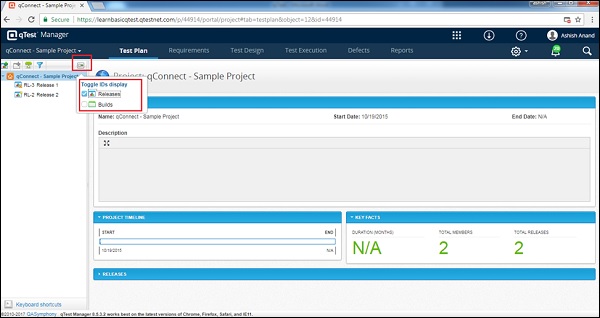
The following screenshot displays the Toggle ID functionality under the Requirements tab.
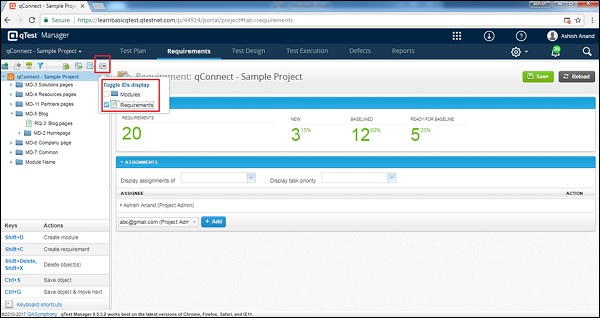
The following screenshot displays the Toggle ID functionality under the Test Design tab.

The following screenshot displays the Toggle ID Functionality under the Test Execution tab
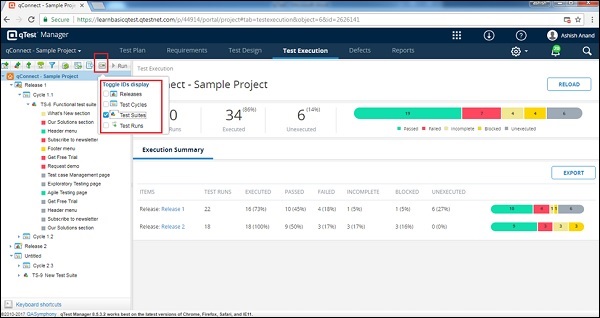
qTest - Tagging ID
The Tagging ID feature allows to link/tag objects with each other in rich text field such as Description. You can mention the names of other objects in the description that will further be converted into a link. Using this link, you will be able to navigate to the linked object.
Following are the steps to tag an ID.
Step 1 − Go to any rich text field such as Test Design → Test Suite → Description.
Step 2 − Use the syntax as @object ID;for example,@TC-1. As soon as you enter any object ID, a wild search takes place and all the matched objects are displayed. Here, you can select the object to tag as shown in the following screenshot.
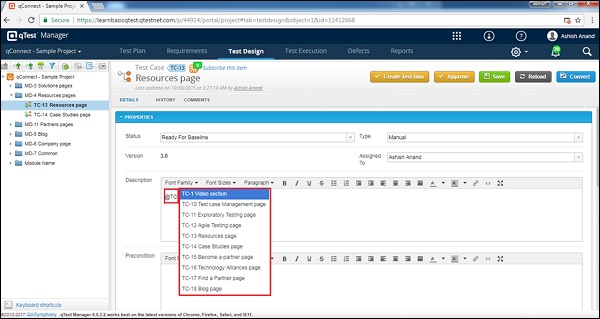
Step 3 − After selection, the tagged ID will be shown as a hyperlink. Click Save to keep the changes.
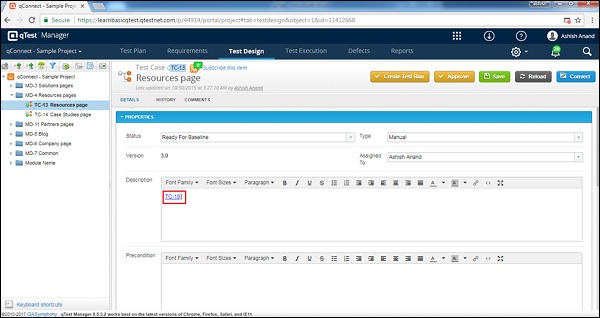
Step 4 − Click the tagged object hyperlink, to view the details of the linked object.
