- qTest - Home
- qTest - Introduction
- qTest - Features
- qTest - Free Trial Access
- qTest - Login
- qTest - Dashboard
- qTest - Invite Users
- qTest - Add a Project
- Test Plan & Release Management
- Test Plan & Build Management
- qTest - Modules Management
- qTest - Requirements
- qTest - Create Associated Test Cases
- qTest - Import Requirements
- qTest - Export Requirements
- qTest - Export RTM
- qTest - Test Design
- qTest - Calling a Test Case
- qTest - Approve a Test Case
- qTest - Import Test Cases
- qTest - Export Test Cases
- qTest - Test Cycle Management
- qTest - Test Suite Management
- qTest - Add Test Runs
- qTest - Test Execution
- qTest - Quick Run
- qTest - Submit a Defect
- qTest - Clone a Defect
- qTest - Import a Defect
- qTest - Reports
- qTest - Filter
- qTest - Drag & Drop
- qTest - Hotkeys
- qTest - Recycle Bin
- qTest - Search
- qTest - Toggle ID
- qTest - Tagging ID
qTest - Import Requirements
You can create multiple requirements at a time using an excel spreadsheet. Excel files are text files represented by rows and columns as cells.
The following points need to be considered to import the data from Excel.
- Rules for Excel file.
- Import the excel file into the system.
Rules for Excel File
Let us now discuss the rules that we need to consider when working on Excel −
The Excel file should have data in the first sheet only.
The sheet name should be the same as the module name, where the requirements will be imported.
The first row should have the names of the headers in different columns. The next row onwards, data should represent each column.
The first row will be mapped with different fields of Requirement Forms while importing.
One column in the Excel file can be mapped with only one field in the Requirement form.
The Requirement ID field should not be mapped with any column. The system will automatically generate the Requirement ID.
The required fields must be mapped with the column of the excel sheet and it shouldnt be blank. Otherwise, the system will generate an error message of unsuccessful import.
The non-required fields can be left without mapping or data can be blank. While importing, either these fields will be blank or will have default values as defined in the projects settings.
qTest supports the modules name up to 500 characters while the Excel sheet supports only 31 characters length as the sheet name. Hence, make sure the Modules name is not too long or expands more than 31 characters.
Following is a sample excel sheet.
| Requirement ID | Requirement Name | Description | Status | Assigned To | Priority | Type | Custom Field 1(if any) |
|---|---|---|---|---|---|---|---|
| Requirement Name 1 | Description 1 | New | Must have | Functional | |||
| Requirement Name 2 | Description 2 | New | Must have | Functional | |||
| Requirement Name 3 | Description 3 | New | Must have | Functional | |||
| Requirement Name 4 | Description 4 | New | Must have | Functional |
Import Excel File
In this section, we will understand how to import an Excel File. Following are the steps to import an Excel File.
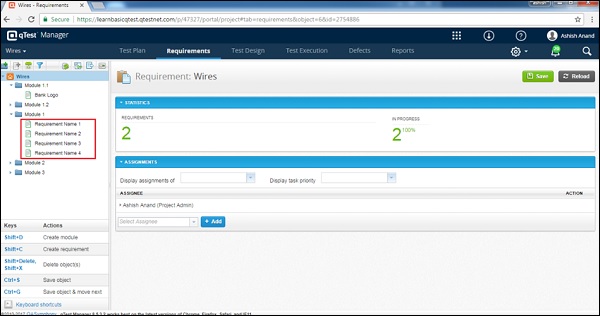
Step 1 − Go to the Requirement tab and select the root folder of the Requirement-Module structure. The Root folder will have the Project name.
Step 2 − Select the Import Excel icon from the toolbar just above the root folder.
Following screenshot shows the root folder selection in the Requirement tab and the Import Excel icon.
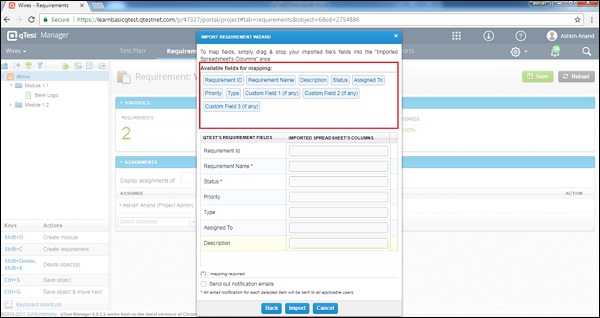
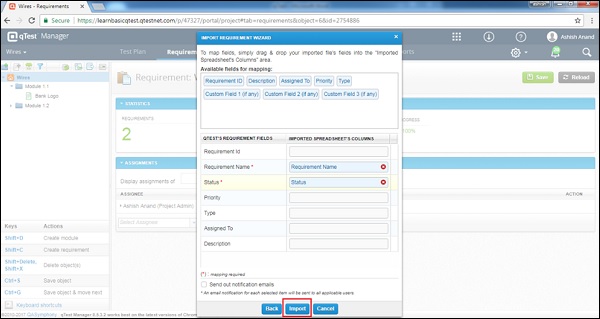
Step 3 − On clicking the Import Excel icon, the Import Requirement Wizard opens. It comes with a set of rules. Re-verify whether the Excel sheet fulfills those rules or not.
Step 4 − Now, browse the Excel file and upload. After successful upload, the filename displays in the Wizard as shown in the following screenshot.

Step 5 − Check the box Use imported file's first row as header. qTest uses the first row of Excel file as the header. qTest will get the file's header as available fields for mapping.
Step 6 − Select the file and click Next as in the above screenshot. You will see the Available fields for mapping as in the following screenshot.
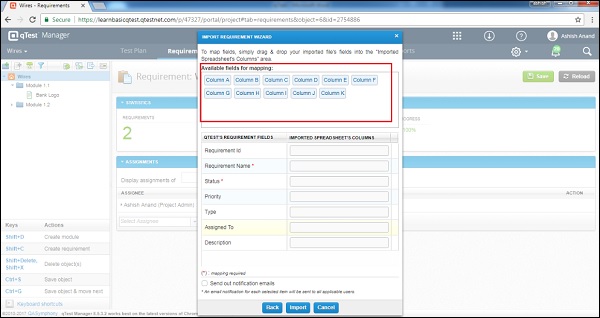
If you do not select this option, qTest will get the columns order as available field mapping. Following screenshot displays the same.
Step 7 − Using the drag and drop functionality, map the Requirement fields with the Excel sheet column name present at the Available fields for mapping as shown in the following screenshot.
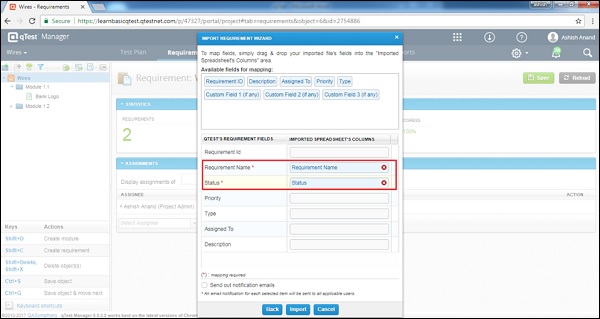
Step 8 − To delete a mapped field, click the X sign in the box. It will delete the field mapping and you can re-map the field with other column, if required.
If you check the Send out Notification Emails checkbox, an email will be sent to the user about the importing requirements.
Step 9 − Click Import as shown in the following screenshot.
On successful import, you will get the imported information. A dialog box with three buttons appears as shown in the following screenshot.
OK − It will take you to the Requirement tab.
OK & Refresh − It will refresh the page and you will be able to see all the imported information.
View Log − This lets you see the imported logs.

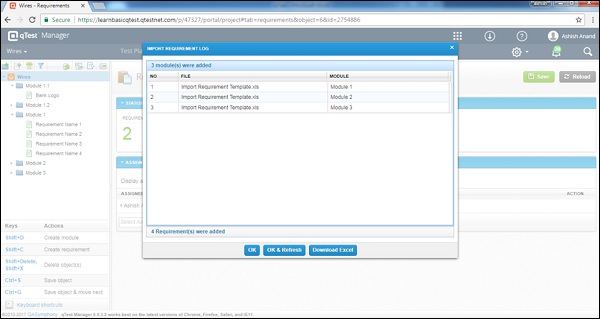
The following screenshot displays the imported information.