- Kivy Tutorial
- Kivy - Home
- Kivy Basics
- Kivy - Getting Started
- Kivy - Installation
- Kivy - Architecture
- Kivy - File Syntax
- Kivy - Applications
- Kivy - Hello World
- Kivy - App Life Cycle
- Kivy - Events
- Kivy - Properties
- Kivy - Inputs
- Kivy - Behaviors
- Kivy Buttons
- Kivy - Buttons
- Kivy - Button Events
- Kivy - Button Colors
- Kivy - Button Size
- Kivy - Button Position
- Kivy - Round Buttons
- Kivy - Disabled Buttons
- Kivy - Image Button
- Kivy Widgets
- Kivy - Widgets
- Kivy - Label
- Kivy - Text Input
- Kivy - Canvas
- Kivy - Line
- Kivy - Checkbox
- Kivy - Dropdown List
- Kivy - Windows
- Kivy - ScrollView
- Kivy - Carousel
- Kivy - Slider
- Kivy - Images
- Kivy - Popup
- Kivy - Switch
- Kivy - Spinner
- Kivy - Splitter
- Kivy - Progress Bar
- Kivy - Bubble
- Kivy - Tabbed Panel
- Kivy - Scatter
- Kivy - Accordion
- Kivy - File Chooser
- Kivy - Color Picker
- Kivy - Code Input
- Kivy - Modal View
- Kivy - Toggle Button
- Kivy - Camera
- Kivy - Tree View
- Kivy - reStructuredText
- Kivy - Action Bar
- Kivy - Video Player
- Kivy - Stencil View
- Kivy - VKeyboard
- Kivy - Touch Ripple
- Kivy - Audio
- Kivy - Videos
- Kivy - Spelling
- Kivy - Effects
- Kivy - Input Recorder
- Kivy - OpenGL
- Kivy - Text
- Kivy - Text Markup
- Kivy - Settings
- Kivy Layouts
- Kivy - Layouts
- Kivy - Float Layout
- Kivy - Grid Layouts
- Kivy - Box Layouts
- Kivy - Stack Layout
- Kivy - Anchor Layout
- Kivy - Relative Layout
- Kivy - Page Layout
- Kivy - Recycle Layout
- Kivy - Layouts in Layouts
- Kivy Advanced Concepts
- Kivy - Configuration Object
- Kivy - Atlas
- Kivy - Data Loader
- Kivy - Cache Manager
- Kivy - Console
- Kivy - Animation
- Kivy - Multistroke
- Kivy - Clock
- Kivy - SVGs
- Kivy - UrlRequest
- Kivy - Clipboard
- Kivy - Factory
- Kivy - Gesture
- Kivy - Language
- Kivy - Graphics
- Kivy - Drawing
- Kivy - Packaging
- Kivy - Garden
- Kivy - Storage
- Kivy - Vector
- Kivy - Utils
- Kivy - Inspector
- Kivy - Tools
- Kivy - Logger
- Kivy - Framebuffer
- Kivy Applications and Projects
- Kivy - Drawing App
- Kivy - Calculator App
- Kivy - Stopwatch App
- Kivy - Camera Handling
- Kivy - Image Viewer
- Kivy - Bezier
- Kivy - Canvas Stress
- Kivy - Circle Drawing
- Kivy - Widget Animation
- Kivy - Miscellaneous
- Kivy Useful Resources
- Kivy - Quick Guide
- Kivy - Useful Resources
- Kivy - Discussion
Kivy - Widgets
The user interface of a Kivy app is designed with various widgets in Kivy library. The "kivy.uix" module includes definitions of classes corresponding to the widget names. These classes provide the properties and functionality of the corresponding widget object.
The various widgets in Kivy library can be classified under following categories −
General Purpose Widgets
These widgets are classical in nature in the sense they are used in the interface design of most applications. The UX widgets like Label, various Button types, input box, Image container, slider and progress indicator etc. belong to this category.
Some of the UX widgets are shown below −
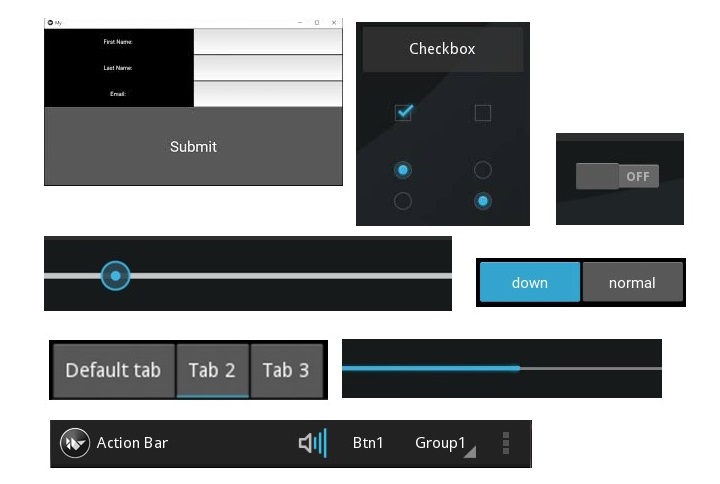
Layouts
The Kivy app window can contain only one widget as its root object. However, if you need to compose the app interface with more than one controls, you have to use the layout widget, and place multiple UX widgets in it and then put the layout as the root widget on the app window.
It may be noted that the layout widgets do not have a visual representation of their own. Kivy provides various layouts such as grid layout, box layout, float layout etc.
Complex UX Widgets
The widgets of this type are the the result of combining multiple classic widgets. They are complex because their assembly and usage are not as generic as the classical widgets.
Examples in the category of complex widgets are Drop-Down List, FileChooser, Spinner, Video player, VKeyboard etc.
Behaviors Widgets
These widgets do not have their own rendering but respond to the graphics instructions or interaction (touch) behavior of their children. Scatter, Stencil View widgets are of this type.
Screen Manager
Manages screens and transitions when switching from one to another.
Widget Class
The Widget class, defined in kivy.uix.widget module is the base for all the widget classes. The common properties such as size, width, height, pos, pos_hint, etc. defined in this Widget class are inherited by other widgets.
The interactivity of any Widget object depends on two aspects: the "event handlers" and the "property callbacks". If a widget is bound to a certain handler in the occurrence of an event of certain type, the corresponding handler function is invoked.
def callback(instance):
   print('Callback handler')

wid = Widget()
wid.bind(on_event=callback)
A callback function is also invoked on the basis of a certain property. If a property changes, the widget can respond to the change in the 'on_<propname>' callback.
def on_pos_change(instance, value):
   print('The widget position changed to ', value)

wid = Widget()
wid.bind(pos=on_pos_change)
Neither the base Widget class nor any of the Widgets have a draw() method. Every widget has its own Canvas that you can use to draw.
widget = Widget()
with widget.canvas:
   Rectangle(pos=widget.pos, size=widget.size)
The graphic instruction such as Color, Rectangle and Line, Scale and Rotate can be added to the Canvas of any widget.
In Kivy, events are propagated upwards from the first child through the other children. If a widget has children, the event is passed through its children before being passed on to the widget after it.
Each widget is added to its parent by the add_widget() method. Each addition is identified by an incrementing index.
box = BoxLayout()
l1=Label(text="a")
l1=Label(text="b")
l1=Label(text="c")
box.add_widget(l1)
box.add_widget(l2)
box.add_widget(l3)
The indices at which the labels are added are 0,1 and 2 for l1, l2, l3 respectively. You can explicitly give the index argument to the add_widget() method.
box.add_widget(l1, index=1)
box.add_widget(l2, index=0)
box.add_widget(l3, index=2)
In case the widget arrangement is nested, the event on the innermost widget is propagated upwards. Suppose that a Button is a child widget, added to the Widget object itself. Hence, the touch_down callback will be invoked for both the objects. To confirm that the touch event has occurred on the button only, use collide_points() method.
def callback(self, touch):
   if instance.collide_point(touch.x, touch.y):
      #consume event
      return True
   else:
      #the upper level widget processes the event
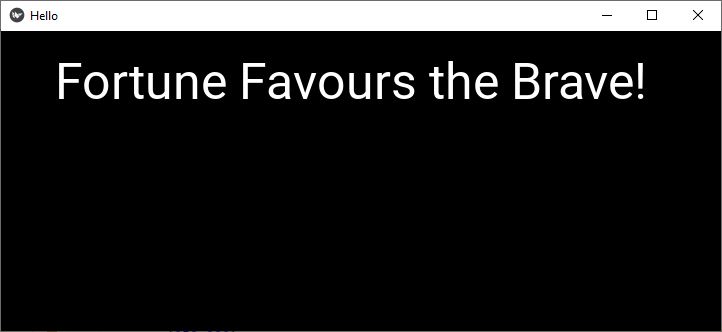
Example
A basic Kivy app shows a simple one line message on a label added to a Widget object with the code below −
from kivy.app import App
from kivy.uix.label import Label
from kivy.uix.widget import Widget
from kivy.core.window import Window

Window.size = (720,300)

class HelloApp(App):
   def build(self):
      w = Widget()
      l1=Label(
         text='Fortune Favours the Brave!',
         font_size=50, size=(200,100),
         pos_hint={'center_x':.5, 'center_y':.5},
         pos=(250,200)
      )
      w.add_widget(l1)
      return w

app = HelloApp()
app.run()
Output
When you run this code, it will produce the following output window −
To Continue Learning Please Login