- Kivy Tutorial
- Kivy - Home
- Kivy Basics
- Kivy - Getting Started
- Kivy - Installation
- Kivy - Architecture
- Kivy - File Syntax
- Kivy - Applications
- Kivy - Hello World
- Kivy - App Life Cycle
- Kivy - Events
- Kivy - Properties
- Kivy - Inputs
- Kivy - Behaviors
- Kivy Buttons
- Kivy - Buttons
- Kivy - Button Events
- Kivy - Button Colors
- Kivy - Button Size
- Kivy - Button Position
- Kivy - Round Buttons
- Kivy - Disabled Buttons
- Kivy - Image Button
- Kivy Widgets
- Kivy - Widgets
- Kivy - Label
- Kivy - Text Input
- Kivy - Canvas
- Kivy - Line
- Kivy - Checkbox
- Kivy - Dropdown List
- Kivy - Windows
- Kivy - ScrollView
- Kivy - Carousel
- Kivy - Slider
- Kivy - Images
- Kivy - Popup
- Kivy - Switch
- Kivy - Spinner
- Kivy - Splitter
- Kivy - Progress Bar
- Kivy - Bubble
- Kivy - Tabbed Panel
- Kivy - Scatter
- Kivy - Accordion
- Kivy - File Chooser
- Kivy - Color Picker
- Kivy - Code Input
- Kivy - Modal View
- Kivy - Toggle Button
- Kivy - Camera
- Kivy - Tree View
- Kivy - reStructuredText
- Kivy - Action Bar
- Kivy - Video Player
- Kivy - Stencil View
- Kivy - VKeyboard
- Kivy - Touch Ripple
- Kivy - Audio
- Kivy - Videos
- Kivy - Spelling
- Kivy - Effects
- Kivy - Input Recorder
- Kivy - OpenGL
- Kivy - Text
- Kivy - Text Markup
- Kivy - Settings
- Kivy Layouts
- Kivy - Layouts
- Kivy - Float Layout
- Kivy - Grid Layouts
- Kivy - Box Layouts
- Kivy - Stack Layout
- Kivy - Anchor Layout
- Kivy - Relative Layout
- Kivy - Page Layout
- Kivy - Recycle Layout
- Kivy - Layouts in Layouts
- Kivy Advanced Concepts
- Kivy - Configuration Object
- Kivy - Atlas
- Kivy - Data Loader
- Kivy - Cache Manager
- Kivy - Console
- Kivy - Animation
- Kivy - Multistroke
- Kivy - Clock
- Kivy - SVGs
- Kivy - UrlRequest
- Kivy - Clipboard
- Kivy - Factory
- Kivy - Gesture
- Kivy - Language
- Kivy - Graphics
- Kivy - Drawing
- Kivy - Packaging
- Kivy - Garden
- Kivy - Storage
- Kivy - Vector
- Kivy - Utils
- Kivy - Inspector
- Kivy - Tools
- Kivy - Logger
- Kivy - Framebuffer
- Kivy Applications and Projects
- Kivy - Drawing App
- Kivy - Calculator App
- Kivy - Stopwatch App
- Kivy - Camera Handling
- Kivy - Image Viewer
- Kivy - Bezier
- Kivy - Canvas Stress
- Kivy - Circle Drawing
- Kivy - Widget Animation
- Kivy - Miscellaneous
- Kivy Useful Resources
- Kivy - Quick Guide
- Kivy - Useful Resources
- Kivy - Discussion
Kivy - Events
Kivy is a Python library that helps you to build cross-platform GUI applications. Any GUI application is event driven, wherein the flow of the program is not sequential (top to bottom), but is decided by the user interactions with the widgets on the interface. User actions such as clicking a button, "selecting an item from a list" or "choosing an option from available radio buttons", etc. are called events.
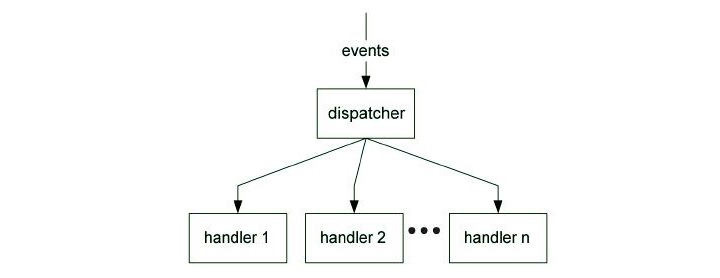
A GUI-based program anticipates all possible events that can occur in and around its environment and dispatch them to appropriate handler functions as and when (and if) a certain event occurs.
When the run() method of Kivy's App object is called, the application starts an "event listening" loop and triggers appropriate callback functions, one each for a type of event.
Global Event Dispatcher
The Kivy framework includes the EventDispatcher class. It dispatches the event object to the widget tree and the event is propagated through the widget hierarchy. When a widget that is in a position to process the event, its associated callback handler is triggered. The Widget, Animation and Clock classes are examples of event dispatchers.
Clock is a global event dispatcher that allows you to schedule and trigger events at specific intervals. It defines methods such as 'schedule_once()' and 'schedule_interval()' to register functions or methods to be called after a certain delay or at regular intervals. This mechanism is useful for handling timed events, animation updates, and other recurring tasks in your app.
Example
In the following example, we have put a label and two buttons in the widget tree. The button captioned "Start" schedules an event to occur periodically after every one second. The schedule_interval() function is written with the following syntax −
Clock.schedule_interval(callback, timeout)
On the other hand, the second button captioned as "Stop" calls the unscheduled() method which removes the scheduled event.
from kivy.app import App
from kivy.uix.label import Label
from kivy.uix.button import Button
from kivy.uix.boxlayout import BoxLayout
from kivy.clock import Clock
from kivy.config import Config

# Configuration
Config.set('graphics', 'width', '720')
Config.set('graphics', 'height', '400')
Config.set('graphics', 'resizable', '1')

class DemoApp(App):
   def build(self):
      lo = BoxLayout(orientation='vertical')
      self.l1 = Label(text="0", font_size=100)
      self.b1 = Button(text="start", font_size=100, color=(0, 0, 1, 1))

      self.b1.bind(on_press=self.onstart)
      self.b2 = Button(text="Stop", font_size=100, color=(1, 0, 0, 1))
      self.b2.bind(on_press=self.onstop)
      lo.add_widget(self.l1)
      lo.add_widget(self.b1)
      lo.add_widget(self.b2)
      return lo

   def onstart(self, event):
      print("started")
      Clock.schedule_interval(self.update_label, 1)

   def onstop(self, event):
      Clock.unschedule(self.update_label)

   def update_label(self, event):
      self.l1.text = str(int(self.l1.text) + 1)

if __name__ == '__main__':
   DemoApp().run()
Output
Run the above program. The label initially shows "0". Click the Start button. The label starts incrementing the number on it with each second. Press the "Stop" button to unschedule the event.

Widget Events
Most of the widgets Kivy have built-in event handling capabilities. In fact, each widget is designed to handle specific type of events. For example, the Button widget handles the event caused by clicking it. You can register event handlers for specific events that occur on a widget, such as button clicks, touch events, or keyboard events.
Usually, the event handlers are defined as methods in your widget's class or App class. They generally are prefixed with 'on_' followed by the name of the event. For example, 'on_press' for a button press event.
When an event occurs, Kivy automatically calls the corresponding event handler method, passing relevant information about the event as arguments. Inside the event handler, you can define the desired behavior or actions to perform.
Events Associated with Widgets
Given below is a list of the events associated with some of the most commonly used widgets −
Button
on_press − Triggered when the button is pressed.
on_release − Triggered when the button is released.
on_touch_down − Triggered when a touch event starts on the button.
on_touch_up − Triggered when a touch event ends on the button.
TextInput
on_text_validate − Triggered when the user finishes editing the text input (by pressing Enter or Return).
on_focus − Triggered when the text input receives or loses focus.
on_text − Triggered whenever the text in the input field changes.
CheckBox
on_active − Triggered when the checkbox is checked or unchecked.
Slider
on_value − Triggered when the slider's value changes.
on_touch_down − Triggered when a touch event starts on the slider.
on_touch_up − Triggered when a touch event ends on the slider.
ToggleButton
on_state − Triggered when the toggle button's state changes (toggled on or off).
on_press − Triggered when the toggle button is pressed.
ListView
on_select − Triggered when an item in the list view is selected.
FileChooser
on_selection − Triggered when a file or directory is selected in the file chooser.
Switch
on_active − Triggered when the switch is toggled on or off.
Video
on_load − Triggered when the video finishes loading.
on_play − Triggered when the video starts playing.
on_pause − Triggered when the video is paused.
on_stop − Triggered when the video stops playing.
Spinner
on_text − Triggered when an item is selected from the spinner.
ActionButton
on_press − Triggered when the action button is pressed.
Examples − Event Handling in Kivy
These events will be discussed when we explain each of the widgets in Kivy framework. However, for this chapter, two examples of event handling are given here.
Example 1
The first example shows the "on_press" event of a Button widget. In the code below, we have a Label and a Button widget, arranged in a BoxLayout. To process the on_press event, we bind the button with onstart() method defined in the DemoApp class
from kivy.app import App
from kivy.uix.label import Label
from kivy.uix.button import Button
from kivy.uix.boxlayout import BoxLayout
from kivy.config import Config

# Configuration
Config.set('graphics', 'width', '720')
Config.set('graphics', 'height', '400')
Config.set('graphics', 'resizable', '1')

class DemoApp(App):
   def build(self):
      lo = BoxLayout(orientation='vertical')
      self.l1 = Label(text="0", font_size=100)
      self.b1 = Button(text = "start", font_size = 100, color=(1,0,0,1))
      self.b1.bind(on_press=self.onstart)
      lo.add_widget(self.l1)
      lo.add_widget(self.b1)
      return lo

   def onstart(self, event):
      print ("started")
      self.l1.text = str(int(self.l1.text)+1)

if __name__ == '__main__':
   DemoApp().run()
Output
Save the above code as "demo.py" and run it from command line or a Python IDE. The program starts with the label showing 0 as its caption. Every time the button is clicked, the caption increments by 1.
Example 2
In this example, we have a TextInput widget and a Label. The TextInput is bound to a onkey() method. Each keystroke input by the user is reflected on the Label.
from kivy.app import App
from kivy.uix.label import Label
from kivy.uix.textinput import TextInput
from kivy.uix.boxlayout import BoxLayout

from kivy.clock import Clock
from kivy.core.window import Window

Window.size = (720,400)

class DemoApp(App):
   def build(self):
      lo = BoxLayout(orientation='vertical')
      self.t1 = TextInput(multiline=False)
      self.l1 = Label(font_size=50)
      self.t1.bind(text=self.onkey)

      lo.add_widget(self.t1)
      lo.add_widget(self.l1)
      return lo

   def onkey(self, event, value):
      print ("press")
      self.l1.text = value

if __name__ == '__main__':
   DemoApp().run()
Output
Run the program and enter some text in the text box. As you type, the Label caption is updated.
It is also possible to define custom events and event handlers to handle application-specific events. To do so, you need to subclass the 'EventDispatcher' class and define the desired properties and methods.
Custom events can be dispatched and handled using the 'trigger()' and 'on_event_name' pattern similar to widget events.
To Continue Learning Please Login