- QlikView - Home
- QlikView - Overview
- QlikView - Desktop Installation
- QlikView - Architecture
- QlikView - Navigation
- QlikView - Excel file
- QlikView - Delimited file
- QlikView - XML file
- QlikView - Web file
- QlikView - Database
- QlikView - Inline Data
- QlikView - Resident Load
- QlikView - Preceding Load
- QlikView - Incremental Load
- QlikView - Data - files(QVD)
- QlikView Report Interface
- QlikView - Sheet and Objects
- QlikView - Scripting
- Qlikview - Functions
- QlikView - IntervalMatch
- QlikView - Aggregate Functions
- QlikView - Match Function
- QlikView - Rank Function
- QlikView - Peek Function
- QlikView - RangeSum Function
- QlikView - Documents
- QlikView - List Box
- QlikView - Multi Box
- QlikView - Text Object
- QlikView - Bar Chart
- QlikView - Pie Chart
- QlikView - Dashboard
- QlikView Data Transformation
- QlikView - Transformation Wizard
- QlikView - Fill Function
- QlikView - Column Manipulation
- QlikView - Rotating Tables
- QlikView Data Model
- QlikView - Dimensions & measures
- QlikView - Star Schema
- QlikView - Synthetic Key
- QlikView - Generating Data
- QlikView Data Analysis
- QlikView - Cross Tables
- QlikView - Straight Tables
- QlikView - Pivot Tables
- QlikView - Set Analysis
- QlikView - Joins
- QlikView - Keeps
- QlikView - Concatenation
- QlikView - Master Calendar
- QlikView - Mapping Tables
- QlikView - Circular Reference
- Qlikview Useful Resources
- Qlikview - Questions/Answers
- Qlikview - Quick Guide
- Qlikview - Useful Resources
- Qlikview - Discussion
QlikView - Delimited File
QlikView can use the data in plane text file where the fields are separated by characters like comma, tab, semicolon etc. Here, we will take CSV as an example. A file in which each column of data is separated by a comma is known as a CSV file. It is a very widely used file format to store plane text-data organized as columns and rows.
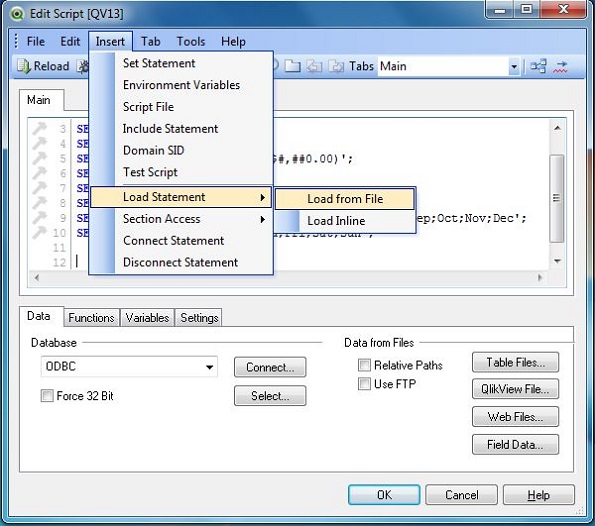
QlikView loads csv files using the Data from files options available in the script editor under the File Menu. Alternatively, you can also open a new QlikView document and press control+E to get the script editor window as shown below. Choose the file Product_details.csv from the appropriate path.
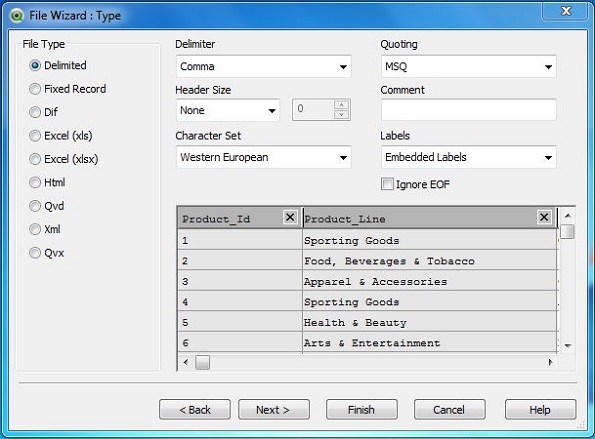
Select the File Headers
On opening the selected CSV file, a window as shown below comes up. Under Labels choose Embedded Labels, as our file has a header row as its first row. Click Finish.
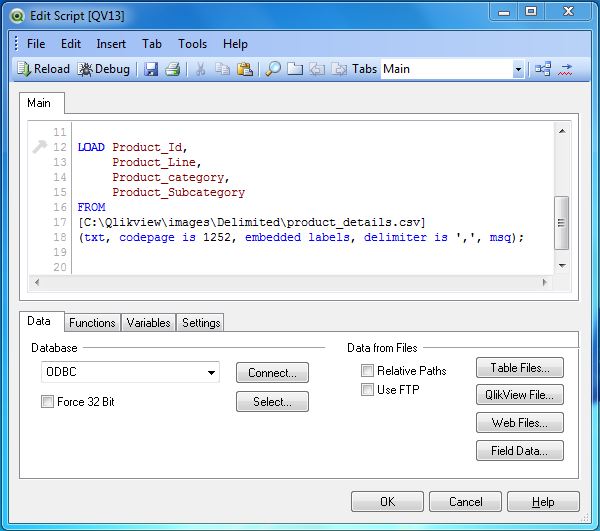
Load Script
The loading of the file into QlikView is done through the load script, which can be seen in the screen shot below. Hence, when we use any delimited file, we can tweak the below script as per the file format.
Now the script wizard prompts to save the file in the form of *.qvw file extension. It asks to select a location where you need to save the file. Click "Next step" to proceed. Now, it is time to see the data that is loaded from the delimited file. We use a Table Box sheet object to display this data.
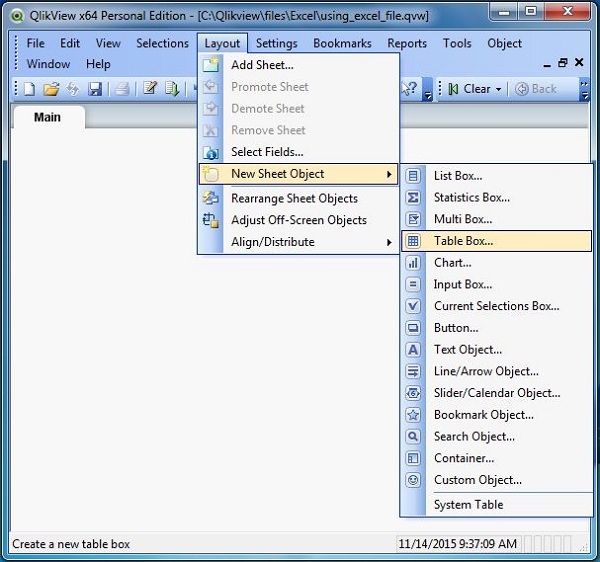
Create Table Box
The Table Box is a sheet object to display the available data as a table. It is invoked from the menu Layout → New Sheet Object → Table Box.
On clicking Next, we get the option to choose the fields from the Table Box. You can use the Promote or Demote buttons to rearrange the fields.
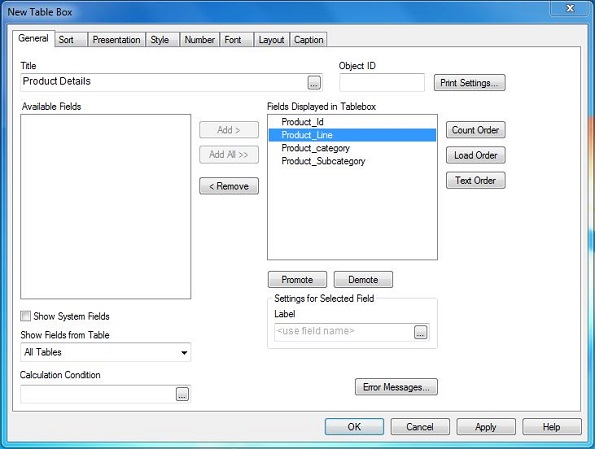
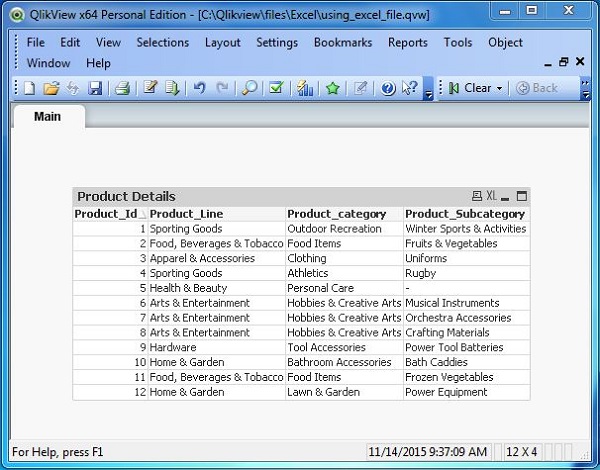
Table Box Data
On completing the above step, the Table Box Sheet Object appears which shows the data that is read from the Excel file.