- Adobe InDesign CC - Home
- Desktop Publishing - Introduction
- Popular DTP Software
- InDesign CC - Introduction
- InDesign CC - Workspace Basics
- Create the First Document
- InDesign CC - Page Management
- InDesign CC - Section Options
- InDesign CC - Text Frames
- InDesign CC - Story Editor
- Spellchecking Features
- InDesign CC - Find/Change Function
- InDesign CC - Import Images
- InDesign CC - Image Links
- InDesign CC - Edit Images
- InDesign CC - Image Fitting
- InDesign CC - Image Transparency
- InDesign CC - QR Codes
- Selection Tools & Fill Strokes
- Image Color & Transparency
- InDesign CC - Drop Shadows
- Special Effects to Objects
- InDesign CC - Eyedropper Tool
- Find/Change Feature for Objects
- InDesign CC - Swatches Panel
- InDesign CC - Color Panel
- InDesign CC - Gradients & Blends
- InDesign CC - Paths & Outlines
- InDesign CC - Stack Objects
- InDesign CC - Layers
- InDesign CC - Nest Objects
- InDesign CC - Align Objects
- Text Wrap & Anchor Objects
- InDesign CC - Object Transformation
- InDesign CC - Characters
- InDesign CC - Text Formatting
- InDesign CC - Paragraph Formatting
- Paragraph & Character Styles
- InDesign CC - Tables
- InDesign CC - Long Documents
- InDesign CC - Table of Contents
- InDesign CC - Interactive Documents
- InDesign CC - Ebook
- InDesign CC - Preflighting
- InDesign CC - Package Documents
- Print Documents & Booklets
- Export Documents as PDFs
- Selective Text Frame Export
- Word & InDesign
- Word File Import to InDesign
- Word To InDesign
- Photoshop & Illustrator Workflows
- Export InDesign Artwork
- Preserve Layers & Vectors
Adobe InDesign CC - Tables
InDesign provides several ways of working with tables. You can create a table from scratch within a text frame or convert an existing data into a table. Note that the table created will be an anchored object for the text frame.
Creating a New Table
To create a new table, simply select the Text tool and draw an area that you want to create as a table.

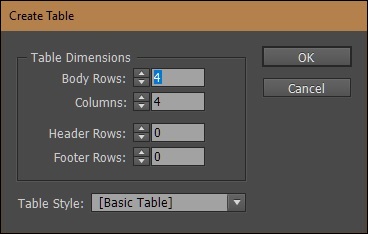
Then go to the Tables menu and select Create Table to open the Create Table dialog box. Here, you can specify the number of rows and columns that you want in your table and also specify if you need headers and footers for the table. Clicking OK will create the table within your text frame.
You can now enter data within this table. Moving the cursor over any of the rows or columns will allow you to resize the row or column. Use Shift and drag outside of the table to adjust the entire table proportionally.
Remember that to drag the rows or columns, you need the Type tool selected on the toolbar as the table is considered to be a text frame. If you use the Selection tool, it will move the whole text frame instead of just the row or column.
To delete the table, simply drag over the table and press Delete on your keyboard.
Creating a Table from Existing Data
Most of the time, it makes sense to convert an existing data into a table. You can import a Word, Excel, Access (database) file, or even a text document and convert the contents into a table.
Use the Text tool to create the text frame for your table. Then, use the Place command to place your data into the text frame.
In the following example, we will use a simple text file containing information about websites of some pharma companies and convert this into a table.

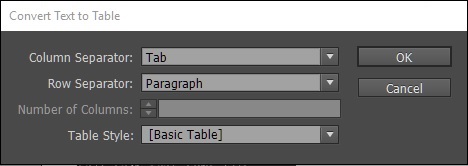
Select all the contents of the text frame by clicking the text and pressing Ctrl+A on Windows or Command+A on the Mac. Go to the Table menu and select the Convert Text to Table option to open the Convert Text to Table dialog box.
You need to tell InDesign what it should consider as a row and column separator. For now, the defaults will work. Click OK to create the table.
We see that InDesign has created a table with the given data.
| Company | Website |
|---|---|
| Krebs | http://www.krebsbiochem.com/unit2_research.htm |
| Divis Labs | http://www.divislabs.com/inside/productionblock2.asp |
| Mylan | mylanlabs.in |
| Cornelius | http://www.cornileus.com/career.html |
| Dr.Reddys | http://www.dreddys.com |
| Raks Pharma | rakspharma.com |
| Avra | avralab.com |
You can edit the contents of each cell just like how you would edit a regular text frame. If you want an even distribution of rows and columns, you can simply select the rows or columns and go to the Table menu and select either Distribute Rows Evenly or Distribute Columns Evenly or both.
Formatting Tables
InDesign gives plenty of options to format the layout of the table.
All table formatting options are accessible from the Table Options dialog box. To access this, simply go to the Table menu, then go to the Table Options submenu and choose Table Setup
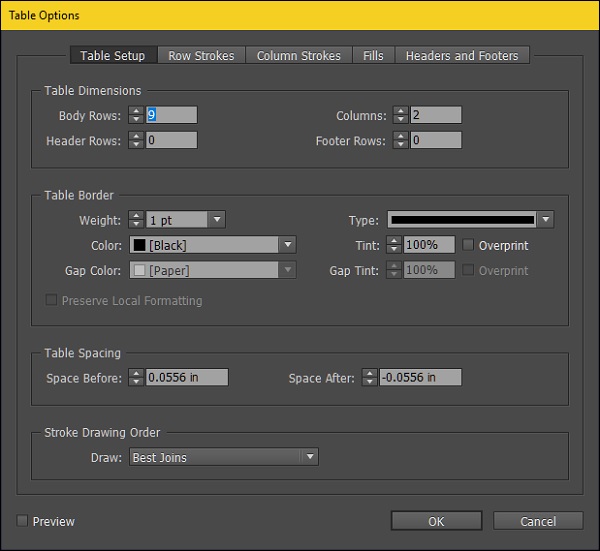
From here, you can choose how your borders should look like and what should be their stroke, how you want individual rows and columns to be colored and a whole lot more. It is easy to explore the options and change the necessary settings.
For this example, let us see the final output after doing some basic formatting. Before doing this, it would be a good practice to define the first row of the table as the header. To do this, go to the Table menu, then to the Convert Rows submenu and select, To Header. This is useful when you have a table spanning multiple pages and it helps to have the header on all the pages for easy reference.

Now, we have a table that is reasonably well formatted. You can explore further options in the Table Options dialog box to adjust the formatting to your liking.
