- Adobe InDesign CC - Home
- Desktop Publishing - Introduction
- Popular DTP Software
- InDesign CC - Introduction
- InDesign CC - Workspace Basics
- Create the First Document
- InDesign CC - Page Management
- InDesign CC - Section Options
- InDesign CC - Text Frames
- InDesign CC - Story Editor
- Spellchecking Features
- InDesign CC - Find/Change Function
- InDesign CC - Import Images
- InDesign CC - Image Links
- InDesign CC - Edit Images
- InDesign CC - Image Fitting
- InDesign CC - Image Transparency
- InDesign CC - QR Codes
- Selection Tools & Fill Strokes
- Image Color & Transparency
- InDesign CC - Drop Shadows
- Special Effects to Objects
- InDesign CC - Eyedropper Tool
- Find/Change Feature for Objects
- InDesign CC - Swatches Panel
- InDesign CC - Color Panel
- InDesign CC - Gradients & Blends
- InDesign CC - Paths & Outlines
- InDesign CC - Stack Objects
- InDesign CC - Layers
- InDesign CC - Nest Objects
- InDesign CC - Align Objects
- Text Wrap & Anchor Objects
- InDesign CC - Object Transformation
- InDesign CC - Characters
- InDesign CC - Text Formatting
- InDesign CC - Paragraph Formatting
- Paragraph & Character Styles
- InDesign CC - Tables
- InDesign CC - Long Documents
- InDesign CC - Table of Contents
- InDesign CC - Interactive Documents
- InDesign CC - Ebook
- InDesign CC - Preflighting
- InDesign CC - Package Documents
- Print Documents & Booklets
- Export Documents as PDFs
- Selective Text Frame Export
- Word & InDesign
- Word File Import to InDesign
- Word To InDesign
- Photoshop & Illustrator Workflows
- Export InDesign Artwork
- Preserve Layers & Vectors
InDesign CC - Create the First Document
Being able to properly define the document that you intend to create is a fundamental prerequisite to get the best out of InDesign. You can create a new document by pressing Ctrl+N on Windows or Command+N on the Mac or go to the File menu, select New, and then click on Document. This opens the New Document dialog box.
There are other options in the New menu, which allows you to create a Book or a Library which we will deal with in later chapters. We shall focus on the Document command for now. It pays to have a general understanding of the various options available in the New Document dialog box so let us have a look at each of them.
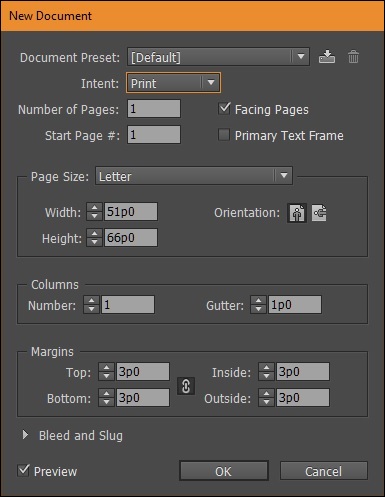
Before moving on, it helps to turn on the Preview checkbox in the lower left corner of the dialog box. This creates a preview of the document in which it is easy to visualize changes such as page dimensions and other properties before creating the actual document. Note, that the preview will disappear when you cancel creating the document.
Defining the Intent of the Document
We see that there are a lot of options in the New Document dialog box. The first step is to define the intent of the document. Expanding the Intent dropdown menu gives us three options Print, Web and Mobile.
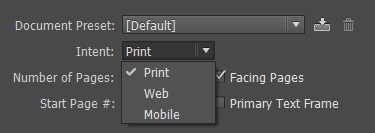
The Print option is the de facto option that is chosen by most working with InDesign. It is not just for printing documents on a printer, but also used for almost all forms of publishing such as a product sheet or template or even a document for uploading to the Web.
Selecting the Print option changes the measurements to picas and the color space to CMYK. Of course, these can be changed later.
The Web option can be slightly confusing as it doesnt actually mean a web page. It means documents that are delivered electronically such as PDFs or other on-screen documents. Selecting the Web option changes the document measurements to pixels and the color space to RGB, which is ideal for on-screen documents. Of course, the measurement values can be custom set.
The Mobile option (sometimes called Digital Publishing in older versions of InDesign), lets you prepare documents as independent apps or eBooks targeting specific device form factors.
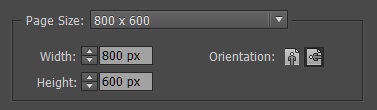
When you choose Mobile, the Page Size now gives you an option of directly choosing from popular devices and populates the Width and Height fields accordingly by changing the units of measurement to pixels.
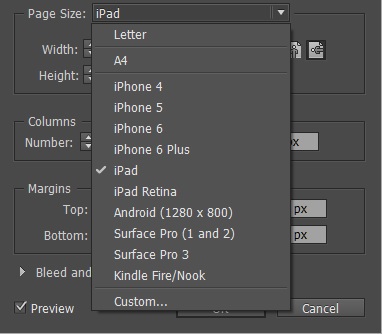
You can also specify a custom screen size for your device.
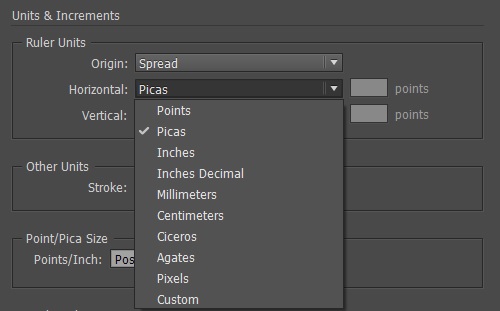
Selecting the Right Measurements
If you are comfortable with other scales of measurement, you can change them by going to the Edit menu, Preferences and selecting Units and Increments. InDesign gives you a whole range of units to choose from.
Once, youve determined the intent of the document, you need to decide if you need to have facing pages.

The Facing Pages option should only be selected if your document has left and right pages that face each other like in a book. If you are only going to create a single page document or a document that has different information in different pages such as a brochure, it is better to turn the option off.
The Primary Text Frame adds a text frame to your Master Page which is useful if the text flows from chapter to chapter like in a book. This can be left off by default.
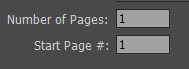
Setting the Number of Pages and the Page Size
You can also set the number of pages the document will contain. This can also be left at 1 and additional pages added later. If you are working on a multi-chapter book, you can choose to select from which page of the book you want to start from. Again, this can also be set later.
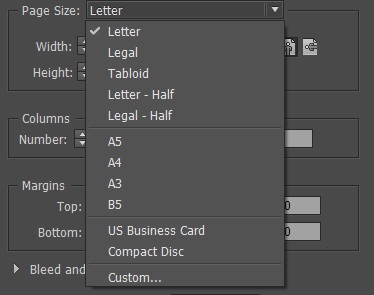
The Page Size field is important to determine how this document will be printed. Selecting the right page size is important so that the printer knows the exact measurements of the printed page. You can choose from a set of default page sizes or define your own. Notice that the Width and Height will change automatically based on the chosen option.
When you select the Custom option, you get to input your own values in the Width and Height boxes. You can input the values in a measurement of your choice and InDesign will automatically convert that into the current measurement used in the document as defined in the Units and Measurements preferences.
Say, for example, you input a value of 10 inches in the Width field by entering 10in and pressing the TAB key. InDesign will automatically convert that value to 60p0 (60 picas) which is the default measurement unit for this document.
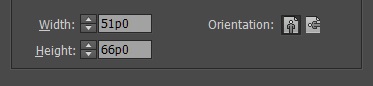
You can also toggle the Orientation between landscape or portrait which essentially swaps the Width and Height values.
The Columns area helps you define how many columns are to be created in the document. The default is 1. The Gutter helps in defining the separation space between these columns.

Setting the Margins, Bleed, and Slug
The Margins area helps in defining the margins of the page. You can obviously go outside the margins with your content but defining the margins helps in providing a perspective to your document.
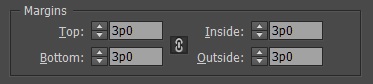
Notice that there is a chain icon in the middle, which means that the values are linked. If you change a value for the Top margin, then the other values will also change. You can also toggle the chain icon to decouple the values of the margins if you want custom margins on each side. Note that the older versions of InDesign have Left and Right for the Inside and Outside margin values respectively.
There is a Bleed and Slug option that is usually collapsed but can be revealed by clicking the arrow beside it. Bleed is the amount of space outside the margins that you set so that the printing press doesnt cut off the actual content near the margins. Slug is the space where you enter information for the printer to understand such as the color space used or the number of pages, etc.
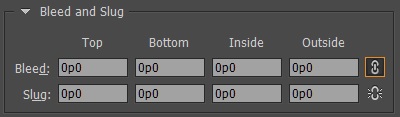
Again, these options can be linked or set alone and generally need to be set only when sending the page to an actual printing press.
Saving a Document Preset
As one works with a lot of document types and dimensions, you may find the need to recall the settings in a click for each of the document types you work with. You can save each of your settings as a custom preset and recall them whenever necessary.

Click the Save Document Preset icon right next to the Document Preset field and give a name that you can remember so that it becomes easy to recall the settings later. You can also delete the preset by clicking the Delete Document Preset icon right next to the Save Document Preset icon.
Viewing the Document Display
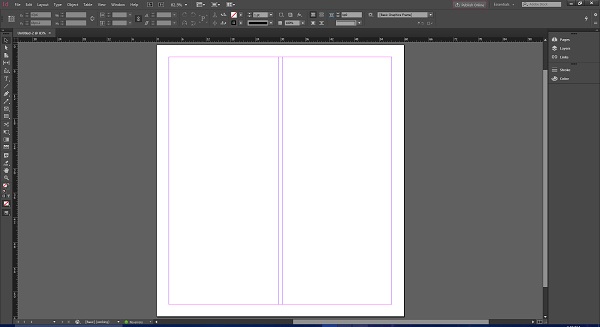
The final two-column document looks like this and you can start adding your assets to this document. Your workspace may vary a bit but that can be easily customized too. It is imperative to get the right document settings in order to get the most out of InDesign.