- Adobe InDesign CC - Home
- Desktop Publishing - Introduction
- Popular DTP Software
- InDesign CC - Introduction
- InDesign CC - Workspace Basics
- Create the First Document
- InDesign CC - Page Management
- InDesign CC - Section Options
- InDesign CC - Text Frames
- InDesign CC - Story Editor
- Spellchecking Features
- InDesign CC - Find/Change Function
- InDesign CC - Import Images
- InDesign CC - Image Links
- InDesign CC - Edit Images
- InDesign CC - Image Fitting
- InDesign CC - Image Transparency
- InDesign CC - QR Codes
- Selection Tools & Fill Strokes
- Image Color & Transparency
- InDesign CC - Drop Shadows
- Special Effects to Objects
- InDesign CC - Eyedropper Tool
- Find/Change Feature for Objects
- InDesign CC - Swatches Panel
- InDesign CC - Color Panel
- InDesign CC - Gradients & Blends
- InDesign CC - Paths & Outlines
- InDesign CC - Stack Objects
- InDesign CC - Layers
- InDesign CC - Nest Objects
- InDesign CC - Align Objects
- Text Wrap & Anchor Objects
- InDesign CC - Object Transformation
- InDesign CC - Characters
- InDesign CC - Text Formatting
- InDesign CC - Paragraph Formatting
- Paragraph & Character Styles
- InDesign CC - Tables
- InDesign CC - Long Documents
- InDesign CC - Table of Contents
- InDesign CC - Interactive Documents
- InDesign CC - Ebook
- InDesign CC - Preflighting
- InDesign CC - Package Documents
- Print Documents & Booklets
- Export Documents as PDFs
- Selective Text Frame Export
- Word & InDesign
- Word File Import to InDesign
- Word To InDesign
- Photoshop & Illustrator Workflows
- Export InDesign Artwork
- Preserve Layers & Vectors
Adobe InDesign CC - Quick Guide
Desktop Publishing - Introduction
Desktop Publishing (DTP) is the creation of electronic forms of information such as documents, presentations, brochures, books, or even website content using computer programs. DTP has evolved to be an important component of creating and disseminating information as it allows an amalgamation of various tasks that are generally performed independently at printing presses such as layouts, typesetting, graphic design, etc.
Evolution of DTP Software
Earlier, DTP was specifically meant to cater to printed matter but modern DTP allows for even more forms of electronic content. A modern DTP software can be your word processor, graphic design tool and publishing tool, all rolled into one package. With the explosive growth of smartphones and mobile PCs, the way people consume information has changed dramatically over the last decade. Modern DTP software enables content output that caters dynamically to all screen sizes, without the need to republish the same for each device or form factor.
Types of DTP Content
The content created by DTP software can be broadly classified into two categories −
- Electronic Pages
- Virtual Pages
Electronic pages commonly refer to websites, manuals, eBooks, digital archives, presentations, etc. which are normally not printed but are shared digitally. This tutorial is an example of an electronic page which can be opened in a browser.
Virtual pages on the other hand are electronic pages created in the DTP software which are eventually published as printed pages. Virtual pages allow the author to visualize exactly how the printed page will look and can help in easy editing. The process is called WYSIWYG which stands for, What You See Is What You Get. This means all the changes and formatting that are made will be exactly replicated in print.
Desktop Publishing - Popular DTP Software
DTP software comes in all shapes and sizes. There are software to cater to every need right from free software to professional grade subscription based software. Although InDesign has now taken over the DTP market, in this section, we will take a look at some of the popular DTP software other than InDesign that are also quite popular with the publishers.
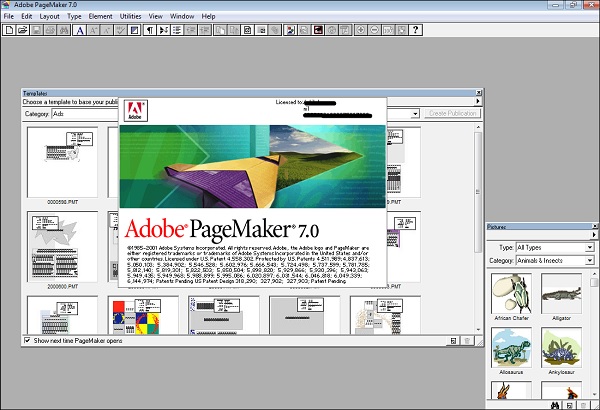
Adobe PageMaker
PageMaker was first originally developed by Aldus and was later acquired by Adobe in the 90s. PageMaker is one of the most popular DTP software even today but its development has been stopped after version 7 although it is still being marketed to a select set of users. PageMakers features are now integrated with InDesign, which Adobe actively promotes.
PageMaker has tools for almost all DTP applications except book publishing. It can import files from PDFs, HTML, and convert QuarkXpress and Microsoft Publisher formats. It has support for plugins and runs on both Mac and Windows.
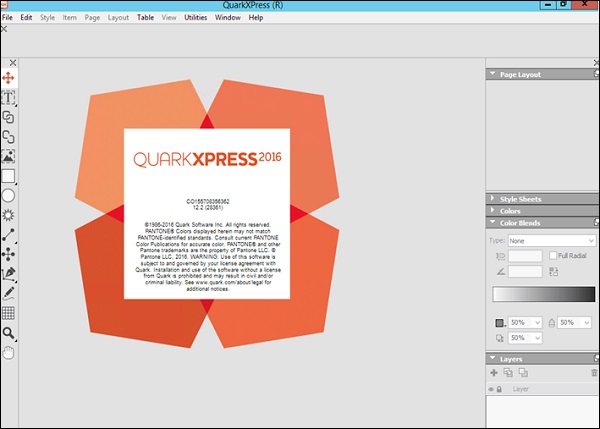
QuarkXpress
QuarkXpress was the de facto publishing standard before the advent of InDesign. It is still under active development on both Mac and Windows and the latest version is more or less feature similar to InDesign.
QuarkXpress supports converting Illustrator, PDF, EPS or even InDesign files into native QuarkXpress objects and runs on a perpetual license instead of a subscription model. The latest update also includes the ability to export HTML5 interactive publications. It also supports plugins called, XTensions for additional capabilities.
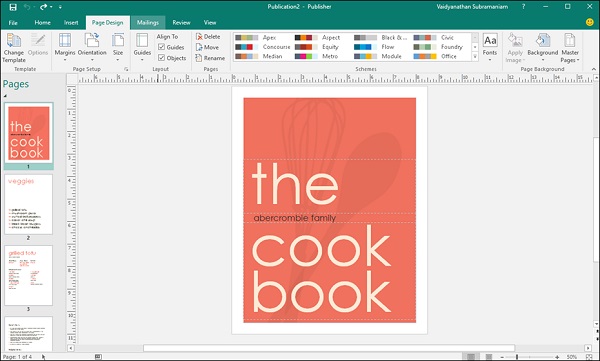
Microsoft Publisher
Microsoft Publisher is part of the Office 365 suite and is distributed as a standalone application. It is extremely simple to create flyers, brochures or cover art with this program as the interface is similar to other Office programs such as Word or Excel. It is more of an entry level software targeted at home and small businesses and does not directly compete with QuarkXpress or InDesign.
Microsoft Publisher is very easy to use and supports professional effects for text and pictures along with the ability to natively import albums from Facebook, Flickr, and other cloud services.
Serif PagePlus
PagePlus has now become a legacy software with the reins passing on to Affinity Publisher, which is yet to be released. However, Serif PagePlus continues to be a delight to anyone who is at an intermediate level with respect to DTP.
It is a step up from Microsoft Publisher and supports the CMYK color space, which is commonly used by printers and also OpenType fonts. It also has advanced features such as font kerning and dynamic text flow along with a host of templates on the Serif website. An icing on the cake is the presence of an integrated photo editor called PhotoLab, which gives easy access to picture correction tools. The latest version also supports creation of PDF files and eBooks suitable for Amazon Kindle. Theres also a free Starter Edition available if you want to try out the software.
Adobe InDesign CC - Introduction
Adobe InDesign is the industry leading DTP software for designing and layout of professional documents for the web, print, as well as for mobile devices such as tablets or smartphones.
InDesign has evolved from being a successor to PageMaker in version 1.0 to becoming a powerhouse software, which can seamlessly work with other Adobe Creative Suite applications such as Adobe Photoshop and Adobe Illustrator in the Creative Cloud suite.
The workflow in InDesign also comprises of word processing, which is usually done in a standalone word processing program such as Microsoft Word, although InDesign is also a capable word processor in itself. However, a lot of Microsoft Word styles are not carried into InDesign when the users switch between these programs. Adobe released a complimentary word processing program to InDesign called InCopy, which can read and export the various text formatting styles that InDesign uses.
InDesign uses the .indd file format for storing InDesign content. Newer versions have backward compatibility with files created in older versions of the program. Newer versions can save the InDesign document as a .idml file, which can be read by versions till CS4. For even more backward compatibility, the newer version can also export in the .inx format.
InDesign can either be purchased individually or as a part of the Creative Suite under a Creative Cloud subscription. The subscription enables the user to receive ongoing product updates without purchasing new versions every time a major version number update is released.
New features in Creative Cloud and InDesign CC 2017
Adobe InDesign is part of Creative Cloud (CC) which is a subscription service that bundles InDesign along with other popular programs such as Photoshop, Illustrator, Lightroom, Audition, Premiere Pro, After Effects, and many more.
The latest 2017 version of Creative Cloud can be downloaded by logging into the Adobe website and downloading the Creative Cloud app which will allow you to install the various CC programs that you are eligible for. You can also download trial versions to test drive the software before committing to buying them.
In addition to commonly used apps, Adobe is introducing two new apps with the 2017 version called Experience Designer (XD) and Project Felix. Adobe XD provides UX designers and UX testers with the tools to create great user interfaces for a variety of screen sizes and device form factors. You can design interactive prototypes to test out a wide variety of UX designs to ensure maximum app engagement by the users. Project Felix is under beta testing and it aims to combine 2D and 3D workflows in one app without having to learn the nuances of 3D creation.
The 2017 version of InDesign comes with some great new features to boost your productivity. It includes new footnote capabilities to create footnotes that can span across multiple pages and enhancements to the OpenType fonts. It includes direct integration with Adobe Stock to find the assets licensed by Adobe, which you can simply drag and drop into your document.
You can also add public Creative Libraries, where you can share assets with a team across all your Adobe apps. You can directly buy industry leading fonts from the Typekit marketplace from within InDesign. These fonts are available to all the other CC apps as well.
The cool new feature is the integration with Adobe Animate CC, which you can use to create great animation effects to incorporate into EPUBs designed with InDesign, and create interactive eBooks.
Adobe InDesign CC - Workspace Basics
It is important to properly understand the user interface to get the most out of InDesign. Let us take a quick tour of the user interface.
What we see above is the default interface for most installations. Remember that the interface is fully customizable. The interface is grouped into many panels as follows.
Application Bar
First up, is the Application Bar on the top of the window beside the Help menu which allows us to set the document zoom level or allow turning the rulers and guides on and off. It also allows us to tile multiple windows vertically or horizontally. The Br and St icons stand for Adobe Bridge and Adobe Stock respectively and you may or may not see them depending on your installation.

Control Panel
Below the application bar is the long strip called the Control Panel which is a quintessential component of the UI. The Control Panel basically allows you to change properties such as text formatting, color fill, and a host of contextually dependent functions. It is freely movable and you can float or dock it. Make sure you dock it in a place, which is convenient as youll be using this very often.

Document Layout
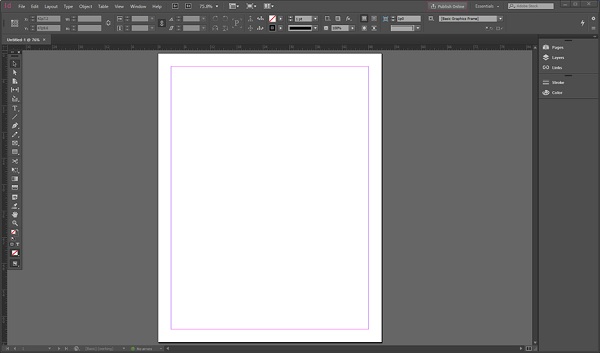
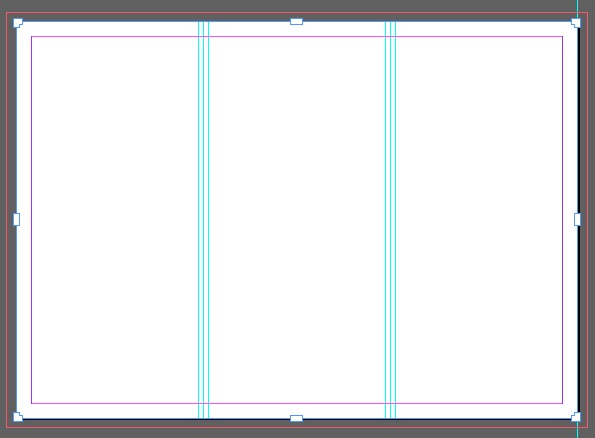
Next, we will take a look at the blank document. This blank document was created using the default options in the New dialog box. We will be learning more about the New dialog box in the next chapter. If you observe closely, the blank document is surrounded by black borders. That is the limit of the printed page. The pink guides on the top and bottom define the margins. The purple guides on the left and right are column guides.

If you have multiple columns, you will find that the purple guides define each column. Neither the pink nor the purple guides print out or will be seen in the exported PDF.
Toolbar
The Toolbar which is usually to the left of the main workspace contains all the tools required to work with the document. It has the selection tools, the text tools, eyedropper tools, etc. Clicking on these tools will open up further functions relevant to that tool in the Control Panel described above. Some tools like the Type tool for example have a small arrow underneath them which can reveal a similar tool with a different function.

Panels Bar
To the right of the workspace is the Panels bar which has some additional fucntions. What you see on the Panels bar can vary based on the workspace. Similar to the other window components described above, the Panels bar can be moved around freely or docked to a suitable position.
Clicking a button in the Panels bar will open up additional options. For example, clicking the Stroke option will open a pop-out window allowing us to change the properties of the stroke. You can add more functions to the Panel bar by going to the Window menu and choosing the desired function.

Ruler Measurements
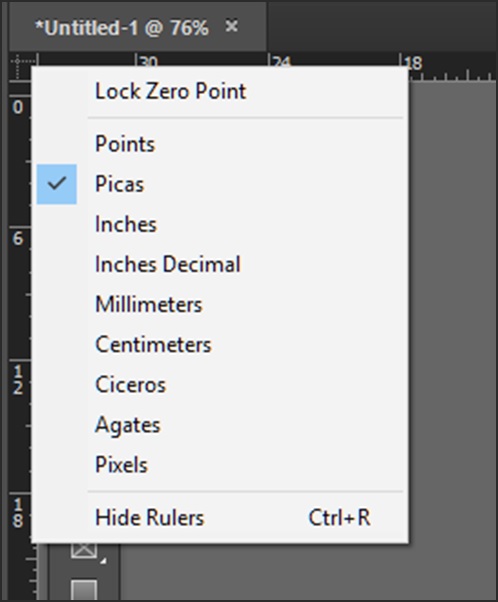
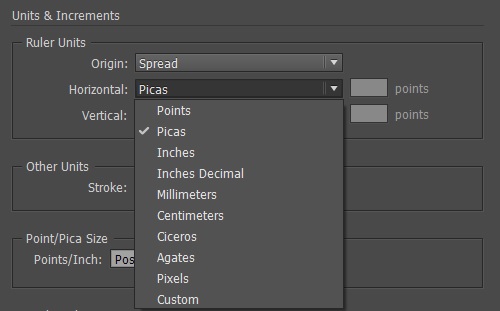
It is important to be able to set the ruler measurements as desired. There are two ways of doing this. One of the ways, is to right-click on the point where the horizontal and vertical rulers intersect and select the desired measurement units. You can also hide the rulers, if you dont need them.
The other way, if you want to use a different measurement from now on for all new documents, is to use the Units and Increments option in the Preferences dialog box in the Edit menu or simply press Ctrl + K on Windows or Command + K on the Mac to open the Preferences dialog box. This is detailed in the subsequent chapters.
InDesign CC - Create the First Document
Being able to properly define the document that you intend to create is a fundamental prerequisite to get the best out of InDesign. You can create a new document by pressing Ctrl+N on Windows or Command+N on the Mac or go to the File menu, select New, and then click on Document. This opens the New Document dialog box.
There are other options in the New menu, which allows you to create a Book or a Library which we will deal with in later chapters. We shall focus on the Document command for now. It pays to have a general understanding of the various options available in the New Document dialog box so let us have a look at each of them.
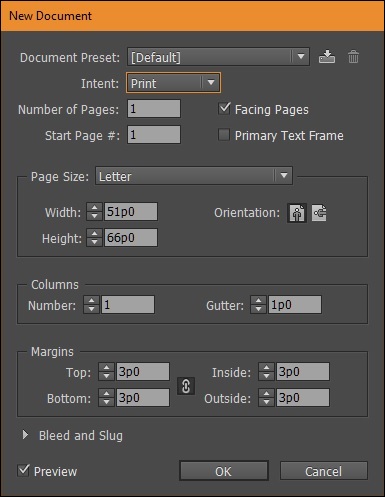
Before moving on, it helps to turn on the Preview checkbox in the lower left corner of the dialog box. This creates a preview of the document in which it is easy to visualize changes such as page dimensions and other properties before creating the actual document. Note, that the preview will disappear when you cancel creating the document.
Defining the Intent of the Document
We see that there are a lot of options in the New Document dialog box. The first step is to define the intent of the document. Expanding the Intent dropdown menu gives us three options Print, Web and Mobile.
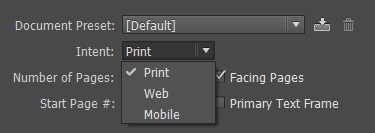
The Print option is the de facto option that is chosen by most working with InDesign. It is not just for printing documents on a printer, but also used for almost all forms of publishing such as a product sheet or template or even a document for uploading to the Web.
Selecting the Print option changes the measurements to picas and the color space to CMYK. Of course, these can be changed later.
The Web option can be slightly confusing as it doesnt actually mean a web page. It means documents that are delivered electronically such as PDFs or other on-screen documents. Selecting the Web option changes the document measurements to pixels and the color space to RGB, which is ideal for on-screen documents. Of course, the measurement values can be custom set.
The Mobile option (sometimes called Digital Publishing in older versions of InDesign), lets you prepare documents as independent apps or eBooks targeting specific device form factors.
When you choose Mobile, the Page Size now gives you an option of directly choosing from popular devices and populates the Width and Height fields accordingly by changing the units of measurement to pixels.
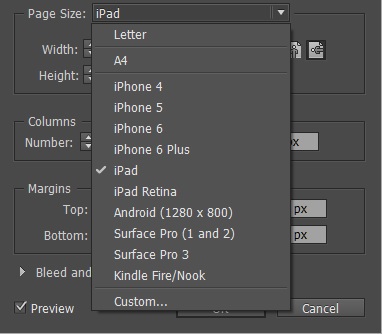
You can also specify a custom screen size for your device.
Selecting the Right Measurements
If you are comfortable with other scales of measurement, you can change them by going to the Edit menu, Preferences and selecting Units and Increments. InDesign gives you a whole range of units to choose from.
Once, youve determined the intent of the document, you need to decide if you need to have facing pages.

The Facing Pages option should only be selected if your document has left and right pages that face each other like in a book. If you are only going to create a single page document or a document that has different information in different pages such as a brochure, it is better to turn the option off.
The Primary Text Frame adds a text frame to your Master Page which is useful if the text flows from chapter to chapter like in a book. This can be left off by default.
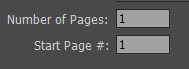
Setting the Number of Pages and the Page Size
You can also set the number of pages the document will contain. This can also be left at 1 and additional pages added later. If you are working on a multi-chapter book, you can choose to select from which page of the book you want to start from. Again, this can also be set later.
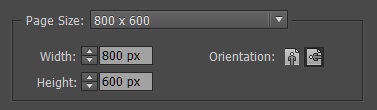
The Page Size field is important to determine how this document will be printed. Selecting the right page size is important so that the printer knows the exact measurements of the printed page. You can choose from a set of default page sizes or define your own. Notice that the Width and Height will change automatically based on the chosen option.
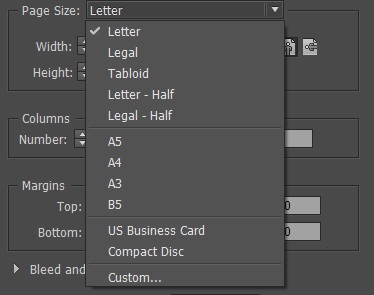
When you select the Custom option, you get to input your own values in the Width and Height boxes. You can input the values in a measurement of your choice and InDesign will automatically convert that into the current measurement used in the document as defined in the Units and Measurements preferences.
Say, for example, you input a value of 10 inches in the Width field by entering 10in and pressing the TAB key. InDesign will automatically convert that value to 60p0 (60 picas) which is the default measurement unit for this document.
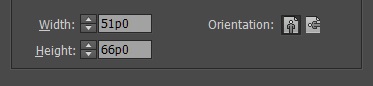
You can also toggle the Orientation between landscape or portrait which essentially swaps the Width and Height values.
The Columns area helps you define how many columns are to be created in the document. The default is 1. The Gutter helps in defining the separation space between these columns.

Setting the Margins, Bleed, and Slug
The Margins area helps in defining the margins of the page. You can obviously go outside the margins with your content but defining the margins helps in providing a perspective to your document.
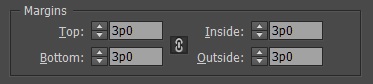
Notice that there is a chain icon in the middle, which means that the values are linked. If you change a value for the Top margin, then the other values will also change. You can also toggle the chain icon to decouple the values of the margins if you want custom margins on each side. Note that the older versions of InDesign have Left and Right for the Inside and Outside margin values respectively.
There is a Bleed and Slug option that is usually collapsed but can be revealed by clicking the arrow beside it. Bleed is the amount of space outside the margins that you set so that the printing press doesnt cut off the actual content near the margins. Slug is the space where you enter information for the printer to understand such as the color space used or the number of pages, etc.
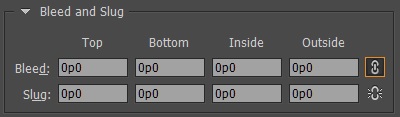
Again, these options can be linked or set alone and generally need to be set only when sending the page to an actual printing press.
Saving a Document Preset
As one works with a lot of document types and dimensions, you may find the need to recall the settings in a click for each of the document types you work with. You can save each of your settings as a custom preset and recall them whenever necessary.

Click the Save Document Preset icon right next to the Document Preset field and give a name that you can remember so that it becomes easy to recall the settings later. You can also delete the preset by clicking the Delete Document Preset icon right next to the Save Document Preset icon.
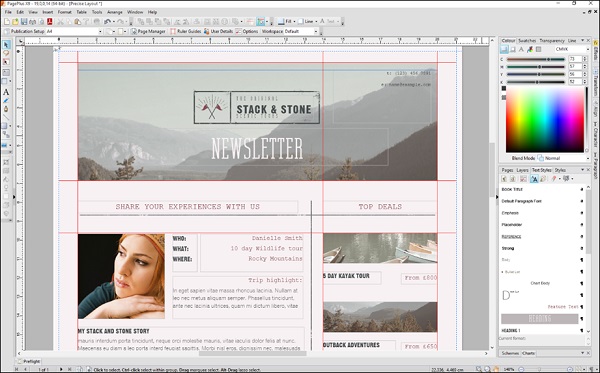
Viewing the Document Display
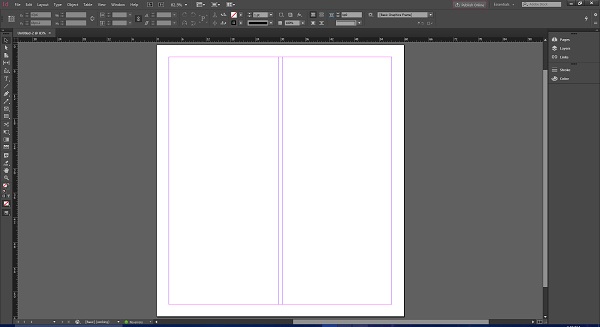
The final two-column document looks like this and you can start adding your assets to this document. Your workspace may vary a bit but that can be easily customized too. It is imperative to get the right document settings in order to get the most out of InDesign.
Adobe InDesign CC - Page Management
Page management is important if you are dealing with a document having multiple pages. InDesign provides a lot of easy ways to insert, remove, or duplicate pages. Most of these functions are accessed from the Pages menu under the Layout main menu. However, we will use the Pages panel in the Panel Bar as it is much easier and intuitive.
The Pages Panel
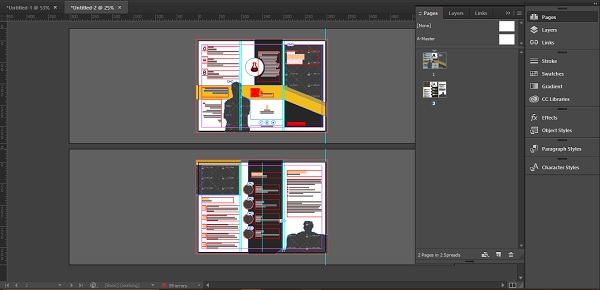
We see that this document has two pages in two spreads. Clicking the Pages button on the Panel Bar opens the flyout showing various options that are possible with this document. Let us explore some of the options available in this panel.
The bottom of the Pages panel has three buttons. The first button is called Edit page size. This lets you change the dimensions of the page, say from A4 to US Letter or A3. The second button is called Create new page. This allows you to create a page right next to the page currently selected in the Pages panel. The third button is called Delete selected pages and allows you to delete the selected pages.

You can create pages and re-arrange them simply by dragging and dropping them as desired within the Pages panel. You can also select multiple pages by pressing Ctrl on Windows or Command on Mac and selecting the desired pages.
Options in the Pages Panel
You can also make use of some more options to work with pages. Clicking the menu button on the Pages panel opens up a menu, which allows you to have more control over page management.
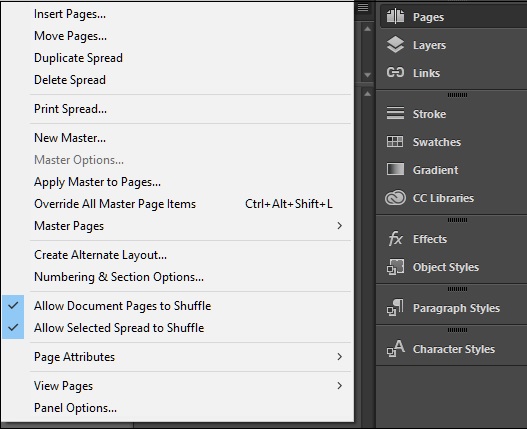
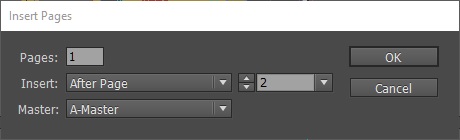
If you want to insert more than 1 page in the document, click the Insert Pages command in the menu. This opens up a dialog box wherein you can specify exactly how many pages you want to insert and where you want them to be inserted.
Say, for example, you want to insert a page after page number 2, specify them in this box to insert the page. You can also choose to insert the pages before, after, at the start, or at the end of the document.
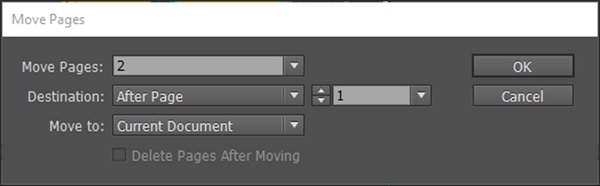
If you want to move a page after a particular page number, you can use the Move Pages command in the same menu. You can specify the page number that you want to move and the page number that you want to either move after, before, or at the start or end of the document. Of course, you can also click and drag the pages to the desired position.
A neat feature is that you can also move pages from one open document to other.
Using the Page Tool
You can change the page dimensions of the pages in your document by going to the File menu and selecting Document Setup You can then specify your new Width and Height values here. Do keep in mind that all the pages in the document will be affected by this.
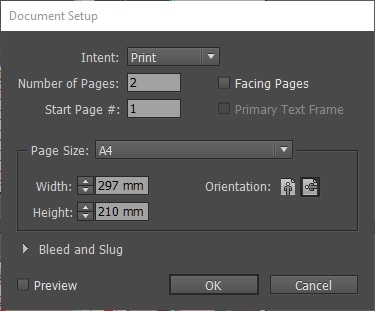
What if you wanted to change the dimensions of only a single page? The Page tool on the toolbar is your answer. You might want to change the dimensions of a specific page if you are preparing flyers or brochures that fold at specific pages. Using the Page tool is simple and straightforward but you must remember to set the correct reference point.
The above screenshot shows a two-page spread. If you look carefully, the first page on the left-hand side has some handles along its four sides. This is the indication that the Page tool is active on this particular page. Now, on the Control Panel at the top, you can specify your desired dimensions.

Remember the reference point, we discussed earlier? That is the left most button with the 9 small spheres. Each sphere is a reference from which the rest of the adjustments to the dimensions are made.
Say, for example, you want to reduce the page size towards the right, you would put a reference point in any of the left most spheres to ensure that the left part of the page is kept constant, while the right side is adjusted. This helps to avoid gaps in the page which can look out of place in the finished document.
Master Pages
A master page, like the name suggests, defines the overall layout of the document. Any changes to the size or number of pages on the master page affects the whole document. You can have any number of master pages, but the first master is called the A-Master. There is also a None master page which is devoid of the schema of the other master pages.
Master pages are very essential when working with books or magazines where the content flows from one page to the other.
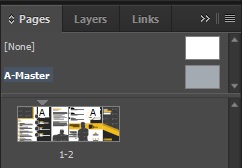
Clicking the Pages panel opens the flyout where you can select the A-Master and None master pages. Double-clicking on the A-Master opens the two-page spread master page which is basically blank. Notice that the individual pages in the panel show an A symbol. That means that the A-Master master page is applied to them.
You can specify items on the master page such as header, footer, page numbers, or design layouts that would apply to all the other pages to which this master page is applied.
Dont want a master page element on any of your subsequent pages? No problem. Simply drag the None master page in the Pages panel onto your desired page to remove any master page defined layouts.
Creating Page Numbers
Creating page numbers in InDesign is easy. Since you would want the page numbers to appear on every page, you need to specify the location of page numbers in the master page.
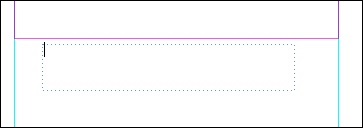
Say, for example, you want to number the pages in a book. Open the master page as described earlier, and select a location for the display of your page numbers. Let us select the bottom of the page for this example and draw a text bar at the bottom by clicking the Type icon in the toolbar and dragging the textbox to the bottom of the page.
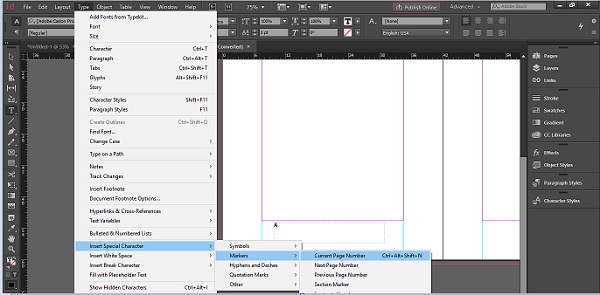
The key thing to remember is, you dont enter any actual numbers here. What you do is, tell InDesign that you want page numbers to appear in that position. To do that, go to the Type menu, go to Insert Special Character, then Markers and finally select Current Page Number. This will insert a symbol A in the textbox referring to the master page, A.
You can duplicate this page number textbox to the second page of the master page by holding down Alt + Shift on Windows or Opt + Shift on Mac and dragging the textbox to the same position on the next page.
Now, when you check the other document pages, you will have the page numbers at the exact position and with the same formatting youve specified in the master page.
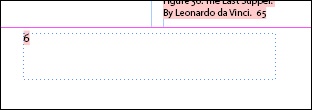
In the above document, it can be seen that InDesign has automatically designated page number 6 to the 6th page. Page number assignment is dynamic. As you add or delete pages, the numbers are adjusted automatically saving you the trouble of manually verifying them.
Adobe InDesign CC - Section Options
In InDesign, it is possible to segregate the document into sections to specify different types of page numbers for different types of content. For example, if youre creating a book, you might want to specify the beginning chapters such as Acknowledgements and Preface in Roman numerals, while the actual chapters have normal numbers.
To do this, you need to create sections of the document to tell InDesign that the numbering of each section is different. The section and numbering options can be accessed from the menu of the Pages panel.
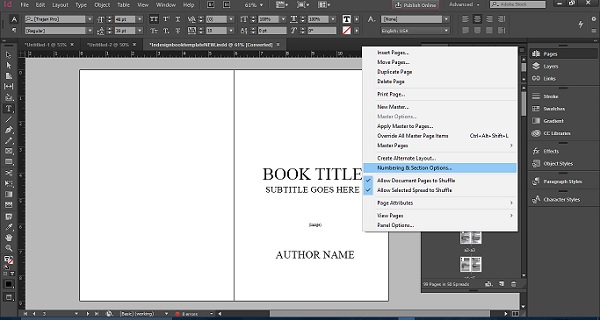
Clicking the Numbering and Section Options command will open a dialog box wherein you can specify the starting page number for the page that youve selected. You can also choose the style of numbering. The pages will follow the numbering system that you have chosen till you select another page and repeat the same process.
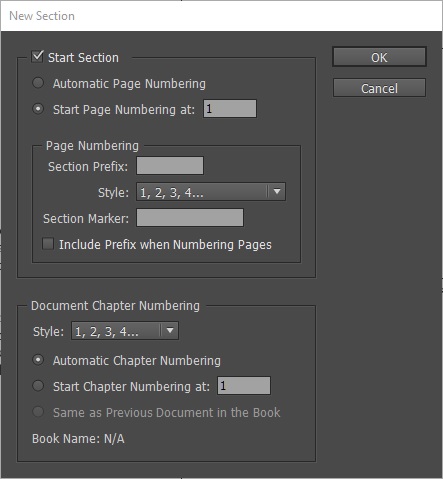
The new section will start from the new selected page and this time you can select another page numbering scheme.
Adobe InDesign CC - Text Frames
InDesign makes it easy to work with text. Like with every object in InDesign, text is composed in frames called text frames.
Creating Text Frames
You can use the Type tool to create a text frame in which you can write the text. This frame can be adjusted on the fly or even later.
It is also possible to convert a shape into a text frame. Simply draw the shape on to the document, select the Type tool from the toolbar and click inside the shape. Note that the cursor changes indicating that the shape is now being converted into a text frame. You can enter text into the shape.
Placing a Word Document as a Text Frame
It is possible to directly place a Word document as a text frame within an InDesign document.
Go to the File menu and click on Place... This opens the Place dialog box. Select any Word, RTF or text document that you want to insert into the document.
InDesign will analyze the document and show you a cursor with the text attached which you can click on a desired area to directly place on the document or drag the cursor to place it in a desired frame size.
Note that some formatting changes might occur when you place the Word document.

Note − The Place command places the document within the defined text frame even if it contains many pages. If your document has multiple pages of text and you want everything to be imported into InDesign, press and hold the Shift key while using the Place command. You will notice that all the required pages are populated with your imported content.
Adobe InDesign CC - Story Editor
InDesign has a nifty feature that allows you to edit text without any distractions or the need to zoom in and zoom out of text frames. This feature is called the Story Editor which you can invoke by selecting any text frame and going to the Edit menu and clicking Edit in Story Editor or simply by pressing Ctrl + Y on Windows or Command + Y on Mac.
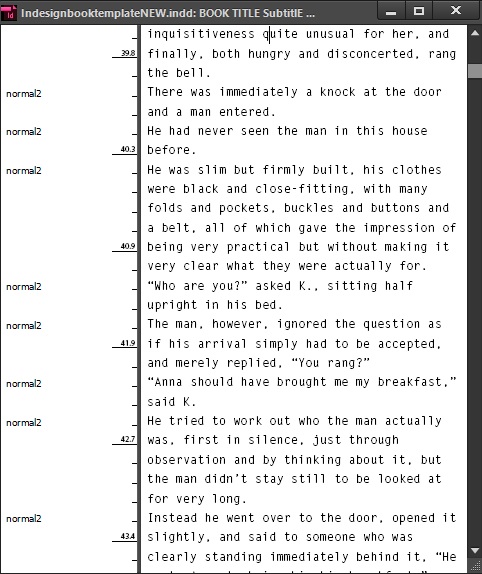
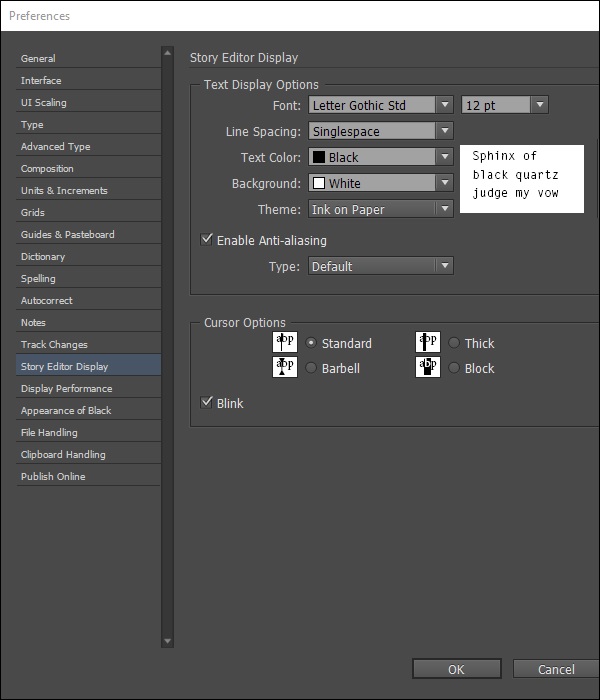
The Story Editor presents an easy to read, alternative layout for editing text. The default font in the Story Editor may put off a lot of people but it can be changed in the Story Editor Display section in Preferences. In this section, you can change the font, line spacing, text color, background, and the theme.
Note − The changes are limited only to the Story Editor window and will not affect the font in the actual text frame.
Changes made in the Story Editor reflect immediately in the text frame. The Story Editor also shows the entire text even if the actual text frame has only limited text in it.
Another ease of using the Story Editor can be seen by opening the Info panel, going to the Window menu, and selecting Info.
The Info panel shows precisely the number of words and characters selected and can be very useful when working with large amounts of text.

Adobe InDesign CC - Spellchecking Features
Spellchecking is often an important part of making the document look professional and error-free. Just like your regular word processor, InDesign also has integrated spellchecking capabilities with a few tricks up its sleeve.
The easiest way to spellcheck the document is to go to the Edit menu, select Spelling and click on Check Spelling or simply press Ctrl + I on Windows or Command + I on the Mac. This will open the Check Spelling dialog box.
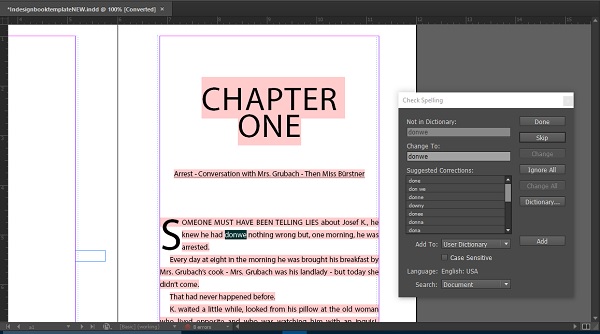
The Check Spelling dialog box scans the entire document and lists all the potential corrections for a wrongly spelled word. You can either explore the corrections or skip the word or if you know it to be correct, you can add the word to the dictionary.
InDesign also has a feature called Dynamic Spelling, which shows all the misspelt words as you type. You can enable this by going to the Edit menu and selecting Dynamic Spelling.
Sometimes, you might need to use words from a different language to enhance the vocabulary, which InDesign might interpret as a mistake. For example, something like Merci, which means thanks in French. Fortunately, you can tell InDesign that this is a different language by first selecting the word, then going to the Control Panel on the top and selecting the desired language.

Adobe InDesign CC - Find/Change Function
Find/Change is one of those functions that is simple but extremely powerful. As the name suggests, the Find/Change function lets you find your query and change to something else. You can find and change literally anything even obscure stuff such as finding multiple spaces and converting them to a single space or even changing frames from one type to the other.
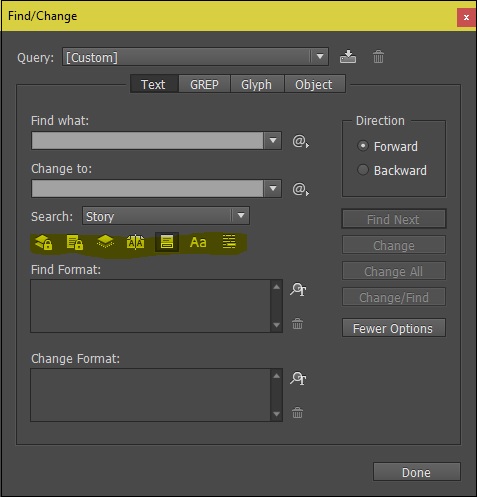
The most important part of this dialog box is defining the search criteria, which is highlighted in yellow. You can confine your search using these options to locked layers, hidden objects, footnotes, or even master pages. You can also limit your search to case sensitive words or search only for specific words.
The most important of all is using GREP. GREP in itself, requires a separate tutorial but in short, GREP is a standard for finding patterns in text and is derived from a UNIX command line utility called grep which stands for globally search a regular expression and print.
InDesign makes it easy to use GREP to find expression patterns in text such as special characters or spaces or simply to apply character styles.
In this example, we want to find all dashes within the text and convert them into endashes. An en-dash is slightly longer than a hyphen but shorter than an em-dash.
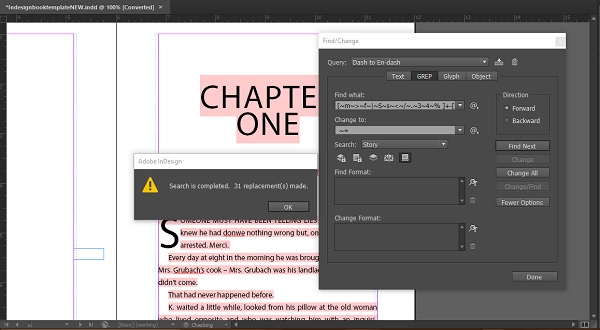
It is not possible to type an en-dash using a regular computer keyboard as it is a special character. Most word processors convert a double hyphen into an em-dash but not an endash.
To do this, go to the Query drop-down menu near the top of the Find/Change dialog box and from the drop-down menu, select the Dash to En-dash option. You will see that InDesign automatically populates the Find what and Change to fields with the GREP code.
Now just press the Change All button. In this case, InDesign has scanned the entire document and made 31 replacements, i.e. it has converted all 31 instances where the dash occurs, into an en-dash.
This can be very useful when working with large bodies of text where it is practically impossible to scan each and every line of text to make changes.
Adobe InDesign CC - Import Images
InDesign offers more than a few ways to import images into your document. Of course, you can copy paste between image programs and InDesign but it is better to use the Place function instead, which offers more flexibility.
Go to the Place command in the File menu and select the image or images you want. Then click anywhere inside the document where you want to insert the image or drag the frame to insert the image within the frame dimensions. Note, that the aspect ratio is maintained while dragging the frame.
You can directly drop an image into a frame, like a shape frame, if you already have one in the document. You can also select multiple images and cycle through them. Selecting multiple images can be especially useful if you want to stack them up vertically or horizontally.
Select the required number of images and click Open in the Place dialog box to see the Place cursor. Now, while holding down the left mouse button, draw a frame and press the Up Arrow key to create a vertical stack or the Right Arrow key to create a column. You can keep doing this till you are able to accommodate all your objects together. When you leave the mouse button, the images will be stacked in the columns you have chosen.

Adobe InDesign CC - Image Links
Sometimes, when you try opening an InDesign file from another computer or online, you will most likely encounter an error that says there are missing or modified links. What does that mean?
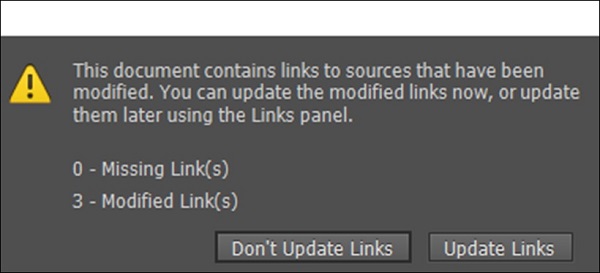
Whenever you import or place an image or object into InDesign, you are not actually placing the entire object or image but only a reference to it. InDesign assumes that the original image or object is located separately on the disk. In most cases, you can just press Update Links and InDesign will update any references of the modified links provided you have them. It cannot however update the missing links that has to be done by ourselves.
However, if you want to know which are the exact objects that have gone missing or modified, you need to use the Links panel.
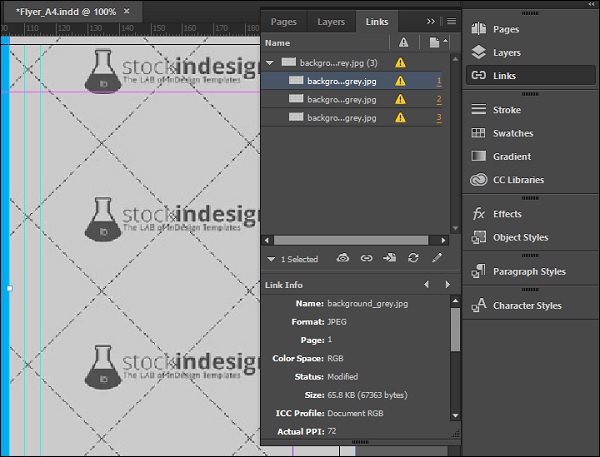
In this example, we have 3 modified links. These are seen collapsed under a single link which when expanded, shows us the modified links (the ones with an exclamation mark in a yellow triangle icon) and the corresponding page numbers.
Clicking on the page numbers directly takes us to the link that is modified. The Links panel has functions to relink the files or create new ones. It also shows information about the link such as the resolution, ICC profile, size, etc.
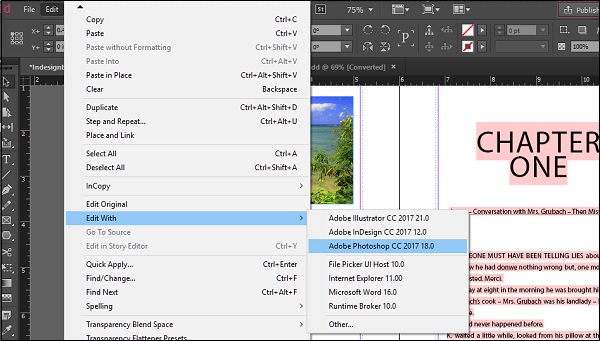
Adobe InDesign CC - Edit Images
InDesign is not an image editor per se but that should not stop you from making changes to your images. InDesign gives you two options to edit your images Edit original and Edit with, both available in the Edit menu.
Weve seen earlier that InDesign does not directly import images but only places the links in that document. This enables a lot of flexibility when it comes to editing images. When you choose Edit original, InDesign opens the image in an image editor. Just make the required changes, save and close the image editor and the changes will instantly reflect in your document because it is linked. No need to even relink the images.
Now, InDesign does not know that you have an editor such as Photoshop or Illustrator installed. It merely relies on the file associations defined in your OS. Therefore, the Edit original does not always open the right program, which is why we have Edit with.
Edit with enables you to select the editing program of your choice. Simply, open the file, save the changes and close it. When you switch back to InDesign, you will see the changes just as youve intended.
Adobe InDesign CC - Image Fitting
Often, the images that we want to place in the document are larger and dont fit completely in the frame we want. InDesign offers tools to ensure that you are able to fit the images exactly within the frames you want.
To do this, go to the Objects menu and then to the Fitting submenu. You will see that there are a few fitting options for you.
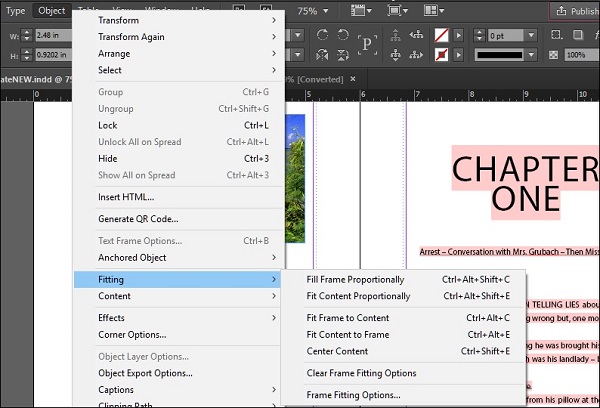
The Fill Frame Proportionally command adjusts the image in the frame so that it fills the frame completely. However, this can result in some of the image being cropped off as shown in the following example.
The Fit Content Proportionally command fills the whole content within the frame without cropping the image.
Fit Frame to Content changes the frame size with respect to the size of the image.
Fit Content to Frame scales the image to fit in the frame. However, use this only when needed as the scaling can be disproportionate.
Centre Content centers the image within the frame.
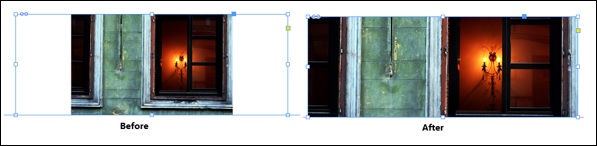
Adobe InDesign CC - Image Transparency
Image transparency or if you are an image editor, the alpha channel, is very important to ensure that the image you are inserting into the document blends with it instead of appearing like an amateur cut-and-paste job.
There are two ways to get the separate image or the alpha channel from the background and for both of these, we need to switch over to Photoshop.
One of the ways is to use the Clipping tool in Photoshop to draw a path around the object we want to isolate from the background. This method, although useful, can result in sharp edges and might not look professional especially when the clipped image is inserted into the document. Hence, we will focus on the other way which is to isolate the alpha layer from within Photoshop to get a better anti-aliased object that blends with the document.
In this example, let us say that you want to isolate the bird from the background. Place the image into InDesign and go to the Edit menu and select Edit with and in the submenu, choose Adobe Photoshop. You can also choose any other image editor you are accustomed to, if it shows up in the Edit with menu.

Remember that although you can work with JPEGs, it is better to use Photoshop PSD files as they preserve the channel information much better.
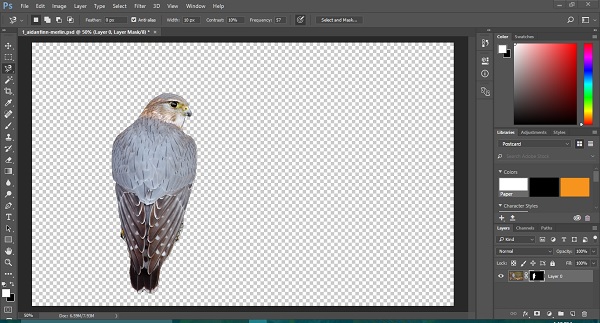
In this case, the selection of the bird has been made using the Magnetic Lasso tool (you can also use the Pen tool if you need more precise cut outs) and loaded the selected part of the image as a new Alpha channel called Alpha1.
Now, click the Channels tab and drag this Alpha1 channel onto the Load channel as selection icon, which is the first icon from the left in the bottom of the panel.
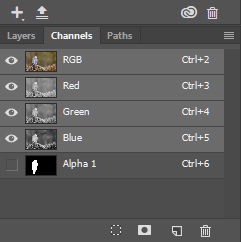
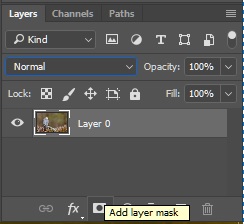
Next, go the Layers tab and click on Add layer mask icon to create a layer mask with the transparency (be sure to unlock the layer if its locked).
You will see that the bird has been isolated and the background has been made transparent.
Save the image and return to InDesign to see the changes happen automatically.
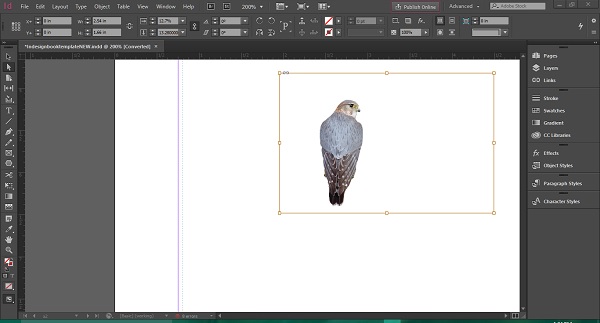
Since the image is linked, any change that you do in Photoshop will reflect automatically in InDesign. If you zoom into the image, you will find less of sharp edges and a much more refined outline.
You can now fit the image into the frame by applying the image fitting commands discussed in the previous chapter.
Adobe InDesign CC - QR Codes
QR codes are square blocks of graphical code that contain embedded information. QR codes are being increasingly used to condense all information into a single image. The QR code can contain an URL or product information or contact details.
QR codes can be read by smartphone cameras and a QR reader app. InDesign allows for creation of QR codes to contain virtually any information. It is most useful if you have contact details for a brochure and want to insert a QR code so that smartphone users can easily lookup your information without having to enter it.
Go to the Object menu and select Generate QR Code. This will open a dialog box where you can enter the information you want to generate a code.
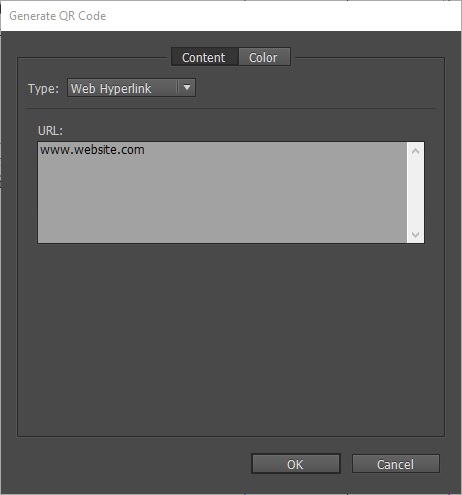
You can select the type of QR code you want. It can be a website, plain text, email message or even a business card. You can also change the color of the code to your liking. When you click OK, you will get a cursor similar to placing an image frame. Just drag it to the desired size to insert the code. You can also place QR codes in existing frames.

Selection Tools and Fill Strokes
In this chapter, you will learn about the various selection tools in Adobe InDesign and how to apply fill and strokes colors.
Selection Tools
There are two types of selection tools in InDesign. The commonly used Selection tool (black arrow selection tool) and the Direct Selection tool.
You can perform a selection either by selection and drawing along the document to select desired frames or simply press Ctrl+A on Windows or Command+A on the Mac to select everything. You will notice that the selection shows some frames in red and some in blue and even green. These indicate that these frames are in different layers which you will notice if you have the Layers panel open.
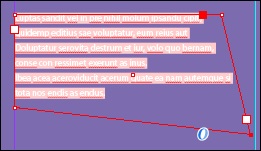
The Direct Selection tool allows you to select a single point on a path and move just one point. In the following example, just the vertex of the lower right of the frame has been dragged while keeping the other points intact. The contents of the frame reflow automatically.
Applying Fill and Stroke Colors
InDesign makes it very easy to change the background color or fill and the border color or stroke of any object image or text.
Let us discuss fill first. Let us say that you would like to change the background color of the object. First, make sure the object is selected. Go to the Control Panel on the top and click the arrow next to the Fill function. The button directly below Fill is the Stroke.
You can select the available colors from here or create your own custom color value using RGB, CMYK, or any of the many available color profiles. Say, you want to apply a Red swatch. Select it from the menu to see the change.
Now, if you want to change the stroke of the object, simply select the Stroke and decide on the color as before. Let us make it black for this example. We see that the borders of the image have now become black. Of course, you can select or define any color you like and also customize the thickness of the border.
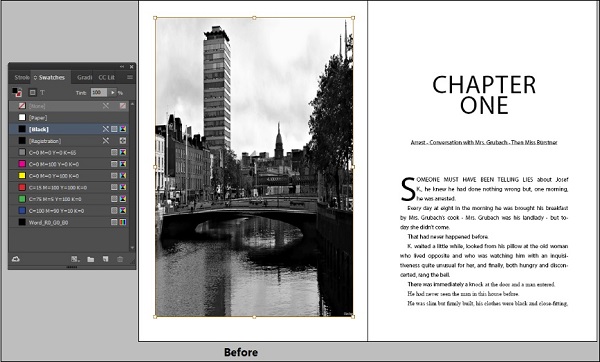
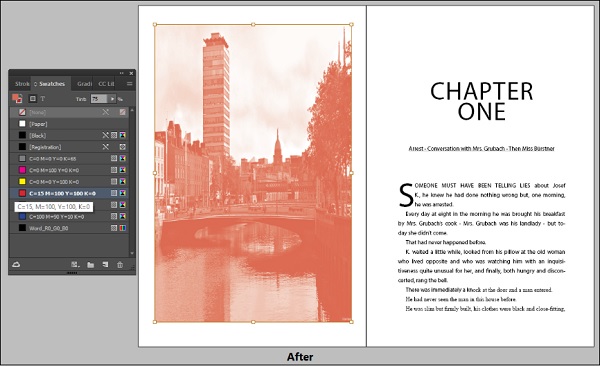
InDesign CC - Image Color and Transparency
Coloring Imported Images
You can add color to images just like you add to objects. However, there are a few caveats to keep in mind. This works only with raster images (such as Photoshop images, JPEGs, TIFFs, etc.) and not with vector art (such as Illustrator).
The image should be saved in grayscale with no transparency.
Import any image using the Place command and either draw a frame or insert it into an existing frame. You should double-click within the frame to select the image, otherwise whatever color you choose will apply to the frame but not to the image itself.
Then go to the Swatches panel, make sure the foreground fill is selected and select the desired color to be applied. You can also reduce or increase the intensity of the color by adjusting the Tint value in the Swatches panel.
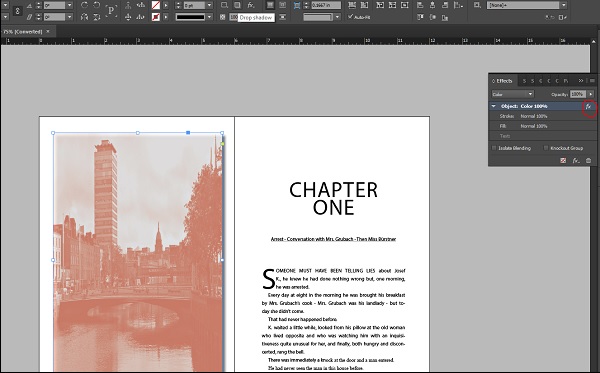
Applying Transparency to Objects
It is easy to add transparency to objects in InDesign. You can add transparency to images, text, or any other object. You can even change the transparencies of the fill and stroke.
Select the object that you want to apply the transparency effect to. Remember to click inside the frame if you want to apply the effect to the image or text. Otherwise, the effect will be applied to the frame.
Now, go to the Effects panel and adjust the opacity value to get the desired effect.
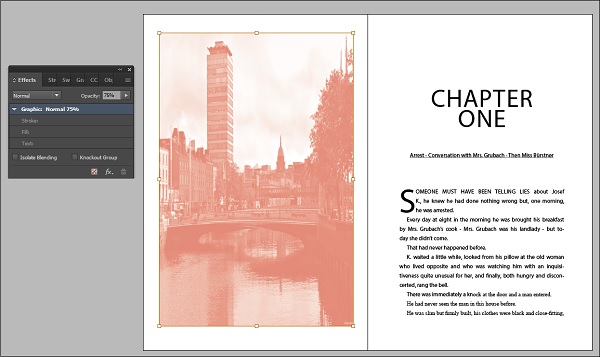
If the selected object is text, you can also experiment with different blending modes.
Adobe InDesign CC - Drop Shadows
Drop shadows are a great way to make an object stand out and can give a sense of depth to the object. However, care must be taken not to overuse them else, the document can look too gaudy.
There are two ways to implement drop shadows in InDesign.
Using the Default Drop Shadow Function
There is a direct and easy way to create a drop shadow in InDesign. Just go to the Control Panel and click the Drop Shadow icon. This will instantly create a drop shadow for the object under selection.
You will see that a drop shadow has been applied to the image. If you notice carefully, there is a fx written beside the object in the Effects panel (circled in red).
You can double-click the fx icon to gain more control over the drop shadow which we will see next. Hovering over the fx icon gives a tooltip that tells you the effect applied to the object.
More Drop Shadow Settings
Double-clicking the fx icon opens up a dialog box to further fine tune the shadow characteristics.
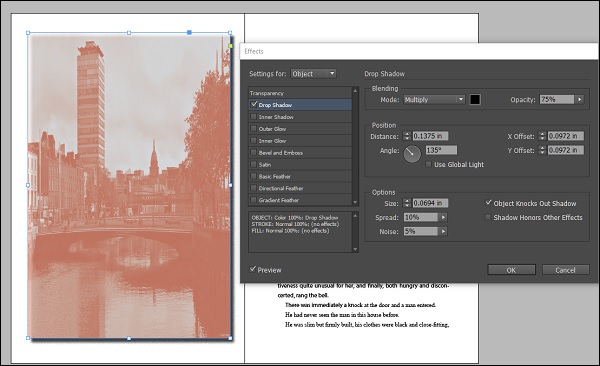
Here, you can change various parameters such as the spread, angle, and offset of the shadow. You can also add a custom color to the shadow.
It is always a good idea to add some noise to the shadow (about 3-5%) to make it look more natural.
InDesign CC - Special Effects to Objects
InDesign allows you to add a whole range of effects to objects in your document. For this example, we will look at some text effects such as Bevel and Emboss.
Remember that you however cannot apply effects to individual letters in the text but only to the entire text frame.
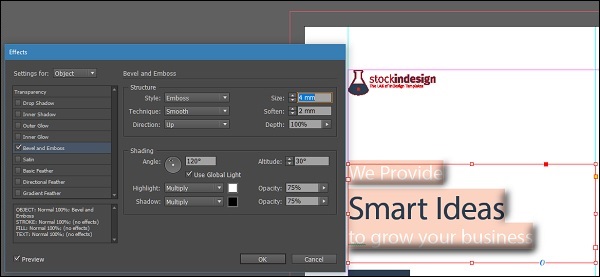
In this example, we see that the Bevel and Emboss function creates a beveling effect to the text. Like any other effect, you can adjust the intensity, angle, offset, and other parameters.
You can play around with some of the other effects such as Inner Shadow, Inner Glow, Outer Glow, etc. to create just the right effect to the objects in your document.
You can also apply multiple effects to the same object.
Adobe InDesign CC - Eyedropper Tool
The Eyedropper tool is an easy way to apply formatting from one object or text to the other.
Select the Eyedropper tool from the toolbar and click any formatting or style that you want. You will notice that the Eyedropper which showed an empty icon, now shows a partially filled one. You can now take this partially filled Eyedropper and apply it on to any text or image.
In this example, the text style under the Get in Touch section is selected and the same is applied for the text under the Social Media section.
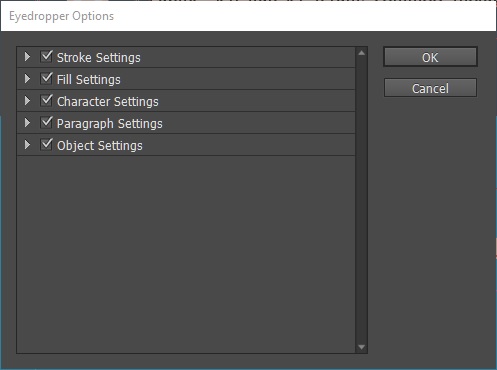
You can also customize what styles the eyedropper should copy by double-clicking the Eyedropper icon in the toolbar. This opens a dialog box where you can select which properties of the item to eyedrop and which ones to exclude.
Find/Change Feature for Objects
We have seen earlier how to use the Find/Change feature to find and replace specific text items easily. The same can be applied to objects.
For example, you can find an object with specific features such as fill or stroke and change all objects matching this criterion to properties that you wish to change to.
Open the Find/Change dialog box by going to the Edit menu and selecting Find/Change or simply press Ctrl+F on Windows or Command+F on the Mac and in the Find/Change box, select the Object tab.
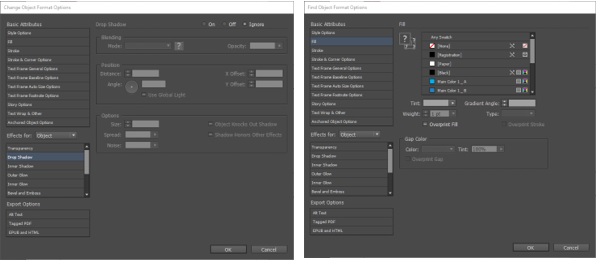
Click inside the Find Object Format box to open the Find Object Format Options dialog box. You can specify the criteria that you want to find within this box such fill, stroke, weight of the stroke, etc.
Repeat the same for the Change Object Format area to open the Change Object Format Options dialog box. Here, you will need to specify the resulting criteria. Once, youve done that, return back to the Find/Change dialog box and press Change All.
InDesign will scan the whole document and make the changes youve specified.
This feature is much more efficient than the Eyedropper tool, especially if you are working on a large document.
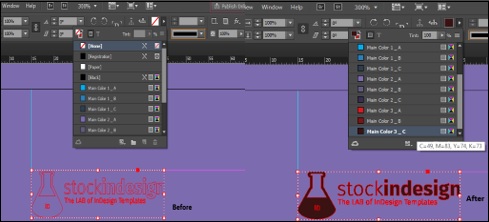
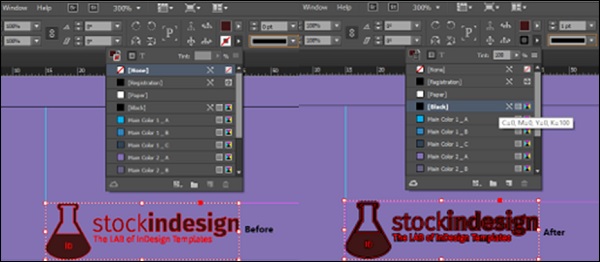
Adobe InDesign CC - Swatches Panel
The Swatches panel or the colors panel is the main place to define colors or swatches for your objects.
You can change colors or define custom colors based on the objective of your document. If your primary destination is on-screen, you can define and select any CMYK or RGB color. If you want to ensure printer compatibility, you can define any of the PANTONE colors which are commonly used by printing presses.
Changing the color of an object, be it text or image (if it is non-transparent and in grayscale) is simply a matter of selecting it and applying a desired color from the Swatches panel.
If you want to edit a color, you can right-click on the color and select Swatch Options This opens the Swatch Options dialog box.
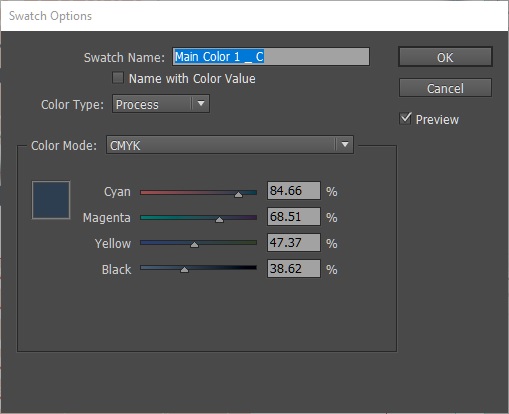
In this dialog box, you can manually adjust the CMYK values to get the target color you want. In the Color Type dropdown menu, there are two options Process and Spot. Process is used when working with on-screen documents and is usually the default. Spot is used if you want to define colors for printing.
In addition to editing an existing swatch, you can also create new swatches with the appropriate color values.
Once you are done creating or editing the swatch, you can select any frame and click the desired swatch to apply the color to the frame.
Adobe InDesign CC - Color Panel
In addition to the Swatches panel, you can also use the Color panel to select and define colors.
The Color panel can be invoked by going to the Window menu, then to the Color submenu and finally selecting the Color panel or simply press F6 on the keyboard.
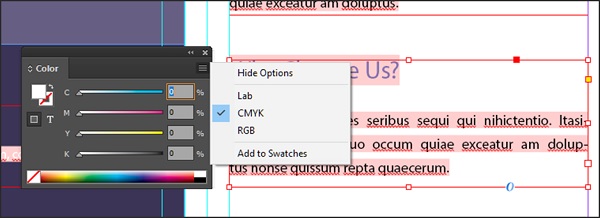
When you open the Color panel, you can choose if you want it to display either the Lab, CMYK or RGB color space.
The bottom of the color panel shows the tint ramp (if its a single color) or the Lab, CMYK or RGB spectrum. Hovering over this tint ramp or spectrum, turns the cursor into the Eyedropper tool, which you can use to select the desired color.
You can play around with the Color panel just like you would on the Swatches panel but make sure you add color to your existing swatch collection by clicking Add to Swatches in the Color panel options. Doing so, will enable you to reuse the color within, as well as outside the document. Otherwise, it might be difficult to exactly reuse the same color as the color selection from the Color panel is unnamed.
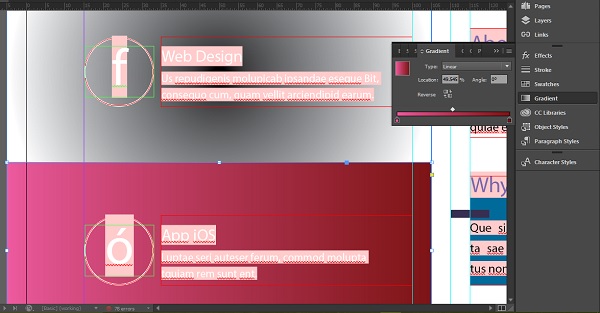
Adobe InDesign CC - Gradients and Blends
Applying Gradients
Using gradients can lend some great effects to the document. For using gradients, create an empty gradient swatch by going to the options of the Swatches panel and selecting New Gradient Swatch and click Ok.
Right-click the new gradient swatch, which you will see now and select Swatch Options to open the Gradient Options dialog box.
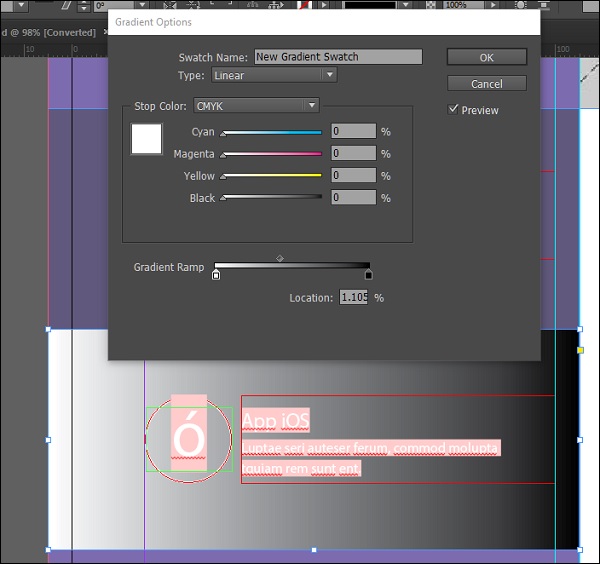
In this case, the default gradient color is from white to black. Clicking the first stop (the small white icon) in the Gradient Ramp allows you to define the CMYK color which you want as the starting point of the gradient. You can also change this to RGB to Lab by selecting the appropriate option from the Stop Color dropdown menu.
The Stop Color dropdown menu also allows you to select an existing swatch as your gradient color.
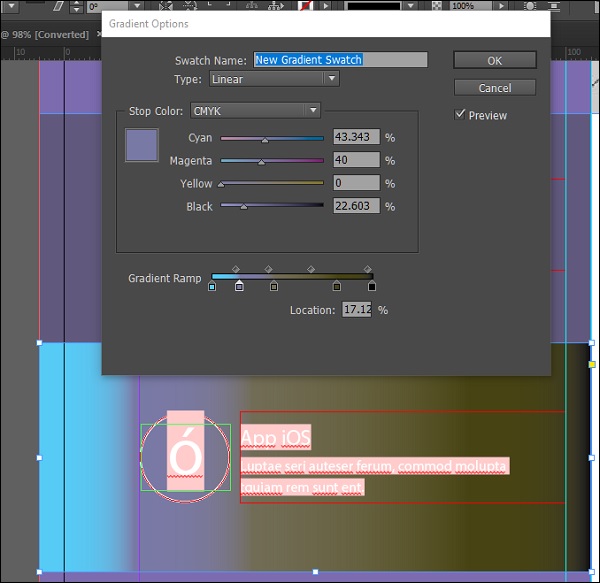
You can also add a multi-stop gradient by clicking the Gradient Ramp. If you notice, you will see a diamond shaped handle on top of the Gradient Ramp. That allows you to define the extent of the gradient.
If you want to remove any of the gradient stops, click and drag the stop out of the ramp.
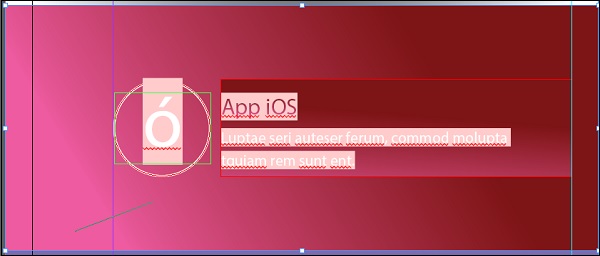
Blending Gradients
You can fine tune the gradients you have created to have a more consistent look with the rest of the document.
For this, let us create two gradient swatches one will be a radial gradient and one will be a linear one. Select the frames that you want these gradients to be applied.
To fine tune the gradients, select the Gradient panel and adjust the gradients start and end points.
You can also select the Gradient Swatch Tool from the toolbar and simply drag a line within the frame in the direction you want the gradient to be applied.
Adobe InDesign CC - Paths and Outlines
There are many ways to create paths or Bezier curves in InDesign much similar to what can be done in Adobe Illustrator or any vector graphics software.
Using the Pen Tool to Draw Bezier Curves
Select the Pen tool from the toolbar and draw on the document. You will notice that you can start a new curve from the end vertex of the previous curve. If you hover the Pen tool over any of the vertex points, the cursor will change to a Pen with a minus symbol, which means that the vertex can be deleted.
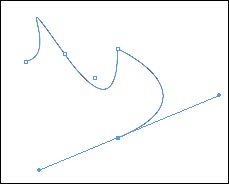
The Pen tool can be used for basic Bezier curve drawing, however, if you want a finer control over the geometry, you need to use the Pathfinder panel.
Using the Pathfinder Panel
The Pathfinder panel can be found by going to the Window menu, then to Objects and Layout and finally selecting Pathfinder. The Pathfinder consolidates all the path tools under one panel. You can close open paths or convert paths into known shapes.
For example, if you want to convert the earlier drawn path into a triangle, simply select the Converts shape to triangle in the Convert shape section and you will have a perfect triangle.
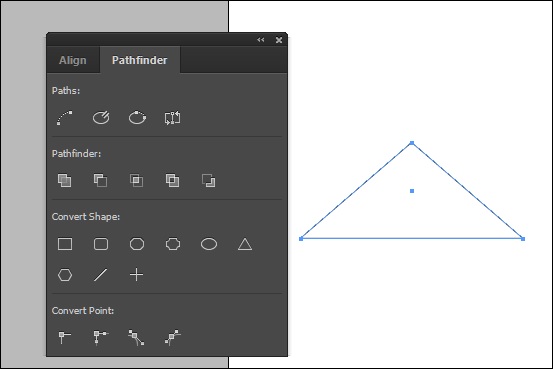
If you find the need to frequently work with paths, it is a good idea to dock the Pathfinder panel along with the other panels for easy access.
Creating Text Outlines
Creating text outlines is an easy and fun way to add some effects to text and change the characteristics of individual letters or words without needing to change the whole font.
To create an outline of a shape or letter, select it using the Selection tool and go to the Type menu and select Create Outlines.
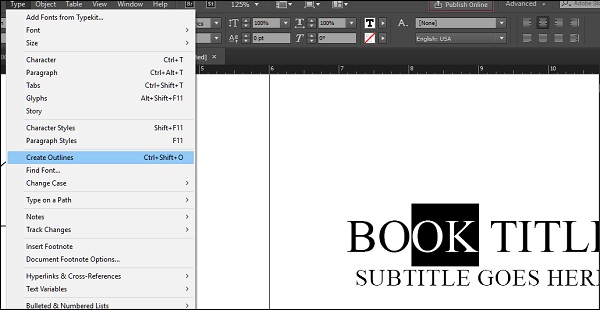
This will create an outline path of the selected text, in this case, the letters, O and K. There will be a lot of vertices which are the paths along this outline. You can selectively add effects to it such as transparency or drop shadows or just fill these outlines with an image or color to enhance the effect.
To do that, use the Place command or select a color swatch to change the O and K part of the letter. The outline of the object is treated like a frame within a frame. You can also select a group of objects and create outlines for them.

Adobe InDesign CC - Stack Objects
All objects are arranged as stacks in the InDesign workspace. Every object has a X, Y, and Z coordinate which will pinpoint the location and orientation of the object with respect to the rest of the stack. You can bring the objects forward or move them backward as needed.
To do this, select the object that you want to move forward or backward, go to the Object menu, then to the Arrange submenu and select the appropriate option.
Note that sometimes, the object might appear as though it has disappeared when you bring it to the front or back. It has not gone anywhere. There could be another object layer in between which is causing the object to visually disappear.
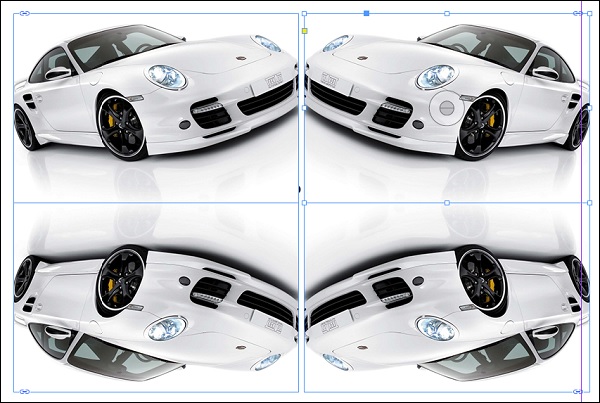
For example, the car in this image, disappears when sent to back but comes back when brought forward. This is because of the presence of another layer between the car image and the text object.

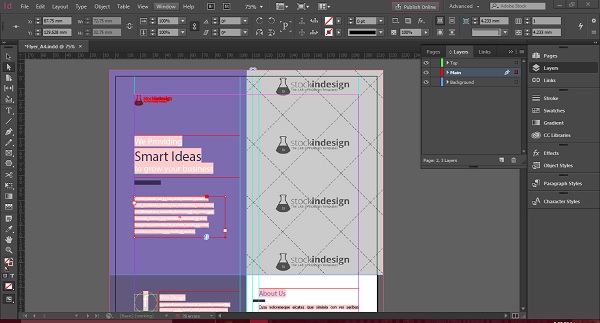
Adobe InDesign CC - Layers
As seen before, working directly with object stacks can get confusing. Therefore, the ideal way is to use layers to determine how the objects are actually stacked upon each other.
Layers can be used to create better organized objects. You can access layers from the Layers panel.
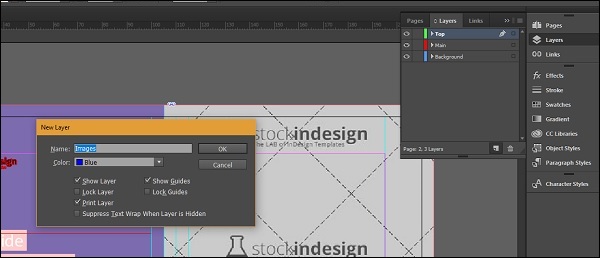
Creating a New Layer
Clicking the Layers panel will reveal the layers in the document. You can create a new layer by clicking the Create New Layer at the bottom on the Layers panel, which will directly create a new layer or you can also hold down the Alt key on Windows or Option key on the Mac and click on Create New Layer to get the New Layer dialog box.
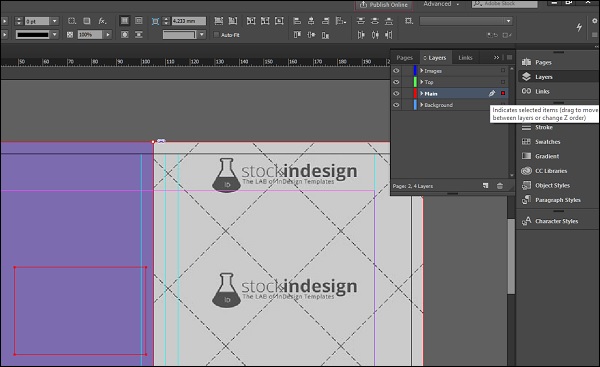
You will notice that each layer is color coded and has an active square beside its name. That square is an indication that elements of that layer are being worked on currently. You can click and drag the square to another layer, which will reveal items belonging to that layer. In the following example, clicking and dragging the blue square from the Background layer to the Main layer, changes the square to red and highlights the elements in the document belonging to the Main layer.
Clicking the eyeball icon in front of the layer name will hide or reveal the layer. Clicking the box just beside the eyeball will lock the layer and prevent you from making edits to it.
Sometimes, you might want to see the layer on screen but need not have to print the objects in that layer. To do this, double-click on the layer in which the object is present to open the New Layer dialog box weve seen earlier. Then remove the checkmark beside the Print Layer option. This will show the layer on screen but will not print it on paper or when exported to PDF.
Layer Objects
Every layer is composed of objects which can be rearranged within the layer or even between the layers. Each object is given a name within a layer.
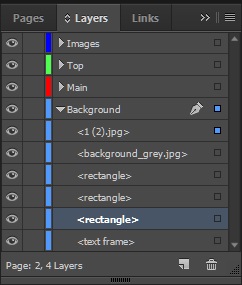
For example, collapsing the Background layer will reveal the objects within it. The name <rectangle> means the rectangular frame. Images if any, will be shown by their file names. If there is some text within a text frame, the starting words of the text will be shown so as to easily identify it.
It is possible to rearrange these objects by simply clicking and dragging the object (for multiple object select by holding Ctrl on Windows or Command on Mac) into the desired layer.
Sometimes, in a complex document, it can be difficult to keep track of what each <rectangle> actually means. You can simply rename the object name by clicking once, pausing for a second and clicking again. This will enable you to rename the object to something more recognizable.
Adobe InDesign CC - Nest Objects
In this chapter, you will learn how to nest objects within frames. It is possible to nest one frame within another frame or one object within another using the Paste Into command in the Edit menu.
Nesting frames offers a lot of possibilities to create some good effects and the nesting can continue even further.
In this example, we will nest the image in polygons to get a sense of perspective.
Create polygon frames by selecting the Polygon tool from the toolbar and draw as many polygons as needed. You can get as creative as possible.
Now cut the background image by selecting it using the Selection tool and press Ctrl+X on Windows or Command+X on the Mac.
Select each polygon and go to the Edit menu and select Paste Into to paste the relevant parts of the image into each polygon.

You can add some effects to this to make it stand out. To add effects to all the polygons at once, click and drag along all the polygons with the Selection tool to select all of them and go to the Objects menu and select Group to group them as a single object.
Now, go to the Effects panel and apply the desired effect, say a little bit of Bevel and Emboss effect.
Nesting is very useful to create high impact content. You can also nest a text frame into this new nest.
Adobe InDesign CC - Align Objects
InDesign offers a lot of flexibility when it comes to aligning objects. There are two ways in which you can align objects with respect to each other one is by using alignment guides and the other is by using the Align panel.
Aligning Objects Using Alignment Guides
When you click and drag objects to position them with respect to other objects, you will see green lines which serve as alignment guides. You can use these green lines to guide you on positioning the object either with respect to the center of the reference object/frame or with respect to the edges of the surrounding object/frame.
In the above example, it can be seen that the green box is being aligned with respect the text box above and the vertical green line is the alignment guide, which shows the center of the text box.
Aligning Objects Using the Align Panel
The Align panel makes it easy to align multiple objects at once. To access the Align panel, go to the Window menu, then go to the Object and Layout submenu and click Align to open the Align panel. Note, that the Align panel is contained in the same Pathfinder panel weve seen earlier.
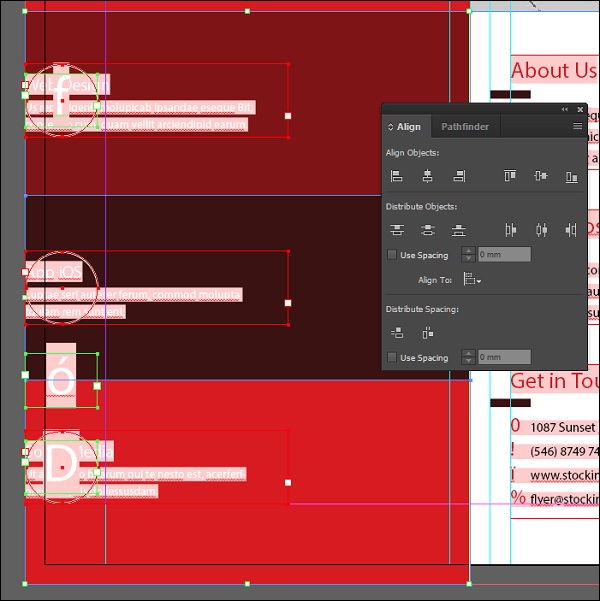
The top row of the Align panel has options to align everything left, right, top, or bottom.
You can also use the Align panel to distribute objects within a given distance or align other objects with respect to a reference object or the key object. In the above example, it can be seen that all the selected objects could be aligned to the left with one click instead of relying on alignment guides.
Text Wrap and Anchor Objects
Text Wrapping
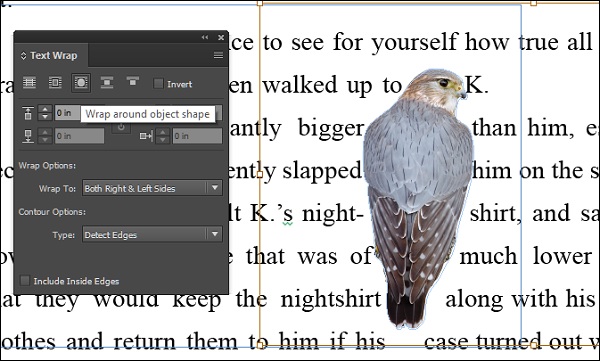
Text wrapping is making the text reflow along the boundaries of the frame or the object. Text wrapping options can be set using the Text Wrap panel from the Window menu.
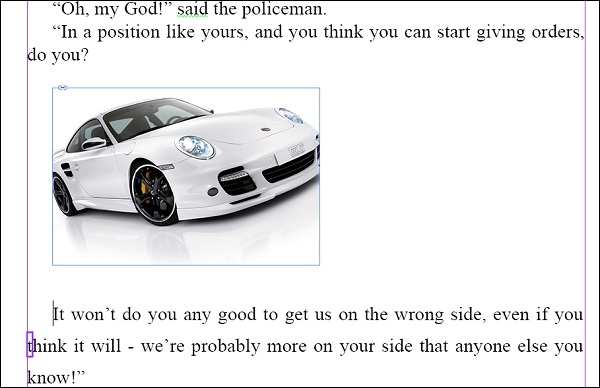
Let us take an example of text wrapping around an object. When you insert an image over text, the text normally wraps itself around the frame of the image (which is usually rectangular) but not the image itself (which can have a contour). The Text Wrap panel allows you to define the image around which the text should wrap itself.
Place the image in the document and open the Text Wrap panel. With the image frame selected, select the third option to wrap the text around the object. It is better if the imported image has some transparency or alpha channel applied to it.
In the Contour Options type, select either Alpha Channel or Detect Edges to wrap the text around the image. In the following example, we see that the text has been wrapped around the birds body contour.
Anchoring Objects
Anchored objects tell InDesign to keep the positioning of the object, while moving the other objects around it. To do this, first we must anchor the object.
The easiest way to anchor or make an object in-line is to select the object and cut it into the clipboard. Then use the Text tool to place the cursor in the original position of the cut object and paste the object from the clipboard back again.
You will notice that the object is now placed on top of the text. To restore it back to its original place, go to the Control Panel and select the Leading value to Auto as shown. This will tell InDesign to allocate as much area as required by the object.
You will see the object being properly inserted. If you change the text above or below the object, the object also flows along with the text as it is now anchored or in-line with the text.
In this page, even if we choose to edit or delete the text above the car, the car will follow the edit instead of jumping above or below the text.
Adobe InDesign CC - Object Transformation
InDesign allows for a lot of object transformations such as duplication, rotation, scaling, skewing, and mirroring. We will discuss each in the subsequent sections.
Duplication
There are many ways to duplicate objects in InDesign but the simplest way is to press Alt on Windows or Option on Mac and drag the object to create a duplicate. You will notice that the object is duplicated in exactly the same proportions as the original.
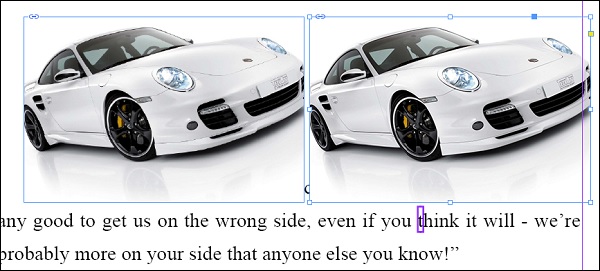
You can also go to the Edit menu and select Duplicate to duplicate the object with the same offsets. Or hold down Shift+Alt on Windows or Shift+Option on Mac and drag the object to duplicate with the same alignment as the original.
Rotation
It is very easy to rotate an object within InDesign. You can either use the Rotate tool on the toolbar or use the rotate option in the Control Panel. The rotate options allow you to also specify the precise angle of rotation and also the axis of the rotation. The preset rotate options in the Control Panel allow you to rotate the object at 90o angles.
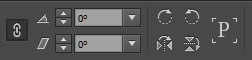
You also flip the images vertically or horizontally using the Flip Horizontal and Flip Vertical icons below the rotate icons.
Scaling
There are many ways to scale objects in InDesign. You can use either the Free Transform tool or the Selection tool from the toolbar.
Click the Free Transform tool and select the edge of the object and drag it to scale to the desired size. You can hold down the Shift key while dragging to constrain the proportions.
You can also use the Selection tool for the same effect. However for proper scaling, you have to press Shift + Ctrl on Windows or Shift + Command on Mac to scale proportionally.
Skew
It is easy to skew the image or object to the precise required value. A straightforward way is to use the Shear X Angle command in the Control Panel and enter a desired skew angle.

You can also use the Shear tool in the toolbar to skew an object. Select the Shear tool and click within the object to set a reference point. Then simply turn the object till you get the desired skew angle.
Mirroring or Flipping
Select the image or object to flip and click the Flip Horizontal or Flip Vertical in the Control Panel.
It is important to pay attention to the reference point at the far left of the Control Panel to ensure that the image does not go off the document.
You can also flip using Alt on Windows or Option on Mac and clicking either the Flip Horizontal or Flip Vertical button in the Control Panel. This makes a duplicate of the image while flipping.
Adobe InDesign CC - Characters
InDesign offers a lot of choices for working with characters. Most of these options are in the Control Panel.
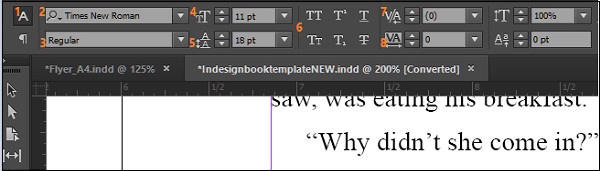
The different options have been labelled 1 to 8 (in orange) so that you can easily follow.
(1) denotes the Character Formatting Controls. Whenever you edit any text or want to change properties of the text, make sure that (1) is always selected.
(2) shows the fonts installed in the system. When you install InDesign, you will also be installing fonts apart from the ones that come default with Windows or Mac OS. All the fonts installed and their samples are listed here. You can also filter by name, if you are already aware of the fonts name.
(3) denotes the properties of the font. You can change the typeface between regular, bold, italics, etc. The exact properties depend on the font chosen.
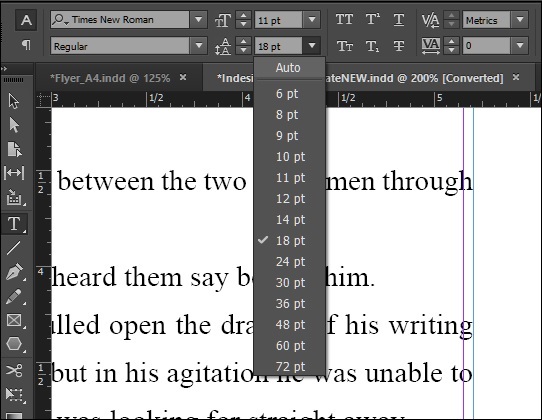
(4) lets you change the size of the font. You can choose from an available list of sizes or input your own size.
(5) allows you to change the leading of the sentence or paragraph. The leading is a measurement of the space between the baseline of the text and the line above it. Be sure to change the leading by selecting the whole paragraph, otherwise you will have an uneven leading within the paragraph.
(6) has functions to convert all text to large caps, small caps, underline, strikethrough, subscript, or superscript.
(7) changes the kerning of the font. The kerning is the font space between individual characters.
(8) is called tracking, which is essentially kerning but for a group of characters such as a complete word or a group of words.
You can play with individual options to change the typeface to your liking.
Adobe InDesign CC - Text Formatting
As weve seen earlier, Find/Change is a versatile tool. You can now use it to change the formatting across documents instead of having to manually search and replace them yourselves.
To do this, select the text you want to change, copy it to the clipboard, bring up the Find/Change dialog box from the Edit menu and paste the copied text into the Find what field.
You can then specify the parameters you want the text to change into by clicking the Change Format box and specify the changes that you want.
Before clicking Change All, just make sure to define the scope in the Search dropdown menu as Story or Document to ensure that the change is reflected across the entire document. Otherwise, the formatting change will be limited only to the selected text.
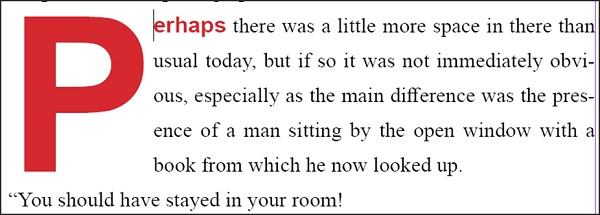
In the following example, we wanted to change the style of the text, Perhaps into something different.
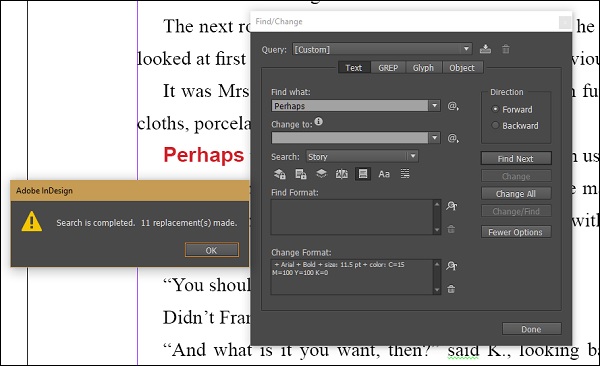
We see that there are a total of 11 changes made within the document along with the initial word that was copied.
Adobe InDesign CC - Paragraph Formatting
Just like character formatting, you can format paragraphs too with a wide range of options. The different options have been labeled 1-10 (in orange) so that you can easily follow.
To adjust paragraph formatting options, select the Paragraph Formatting Controls (1) icon.
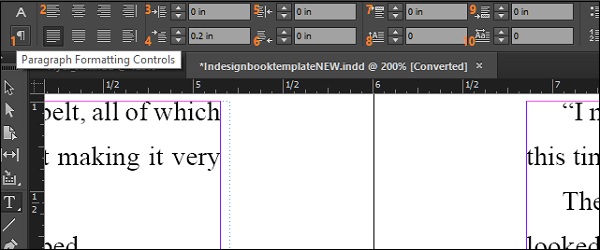
(2) represents all the paragraph alignment options available. You can align paragraphs left, right, top, or bottom and even align them along the spine (of a book) if you are creating a facing pages document.
(3) is the Left Indent and (4) is the First Line Left Indent. The difference is that, when you click Left Indent, the entire paragraph is indented according to the indent value you set. But that does not always look good, hence it is a good idea to indent only the first line of the paragraph, which is when you will need to use First Line Left Indent.
Similarly, (5) and (6) denote Right Indent and Last Line Right Indent respectively. They do a similar job like (3) and (4), this time, on the right side of the paragraph.
(7) and (9) represent the Space Before and Space After fields which allows you to insert a space before or after the paragraph. It is always a recommended practice to use Space Before and Space After instead of manually using tabs, spaces or Enter key for paragraph spacing.
(8) and (10) are Drop Cap Number of Lines and Drop Cap One or More Characters. This is a unique effect, which allows you to extend the first letter which is usually in caps along the specified number of lines for a more elegant and professional look as shown in the above example.
Paragraph and Character Styles
Styles are useful in applying multiple formatting options at once with a single click. Styles can be applied to paragraphs, characters, and even tables.
Paragraph Styles
It is easy to apply a set of styles to an entire paragraph with paragraph styles. To reveal the paragraph styles in the current document, open the Paragraph Styles panel. Here, you will see a list of styles in that document. Simply click any paragraph on the page and choose the desired paragraph style to apply the formatting.
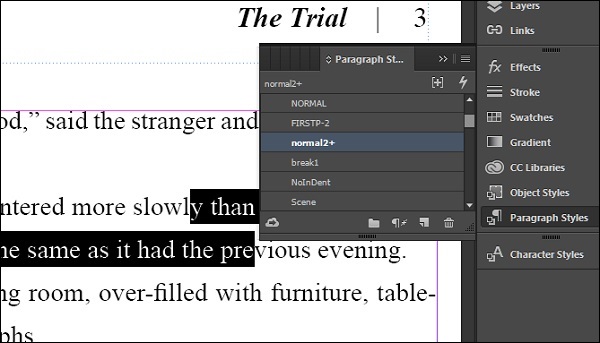
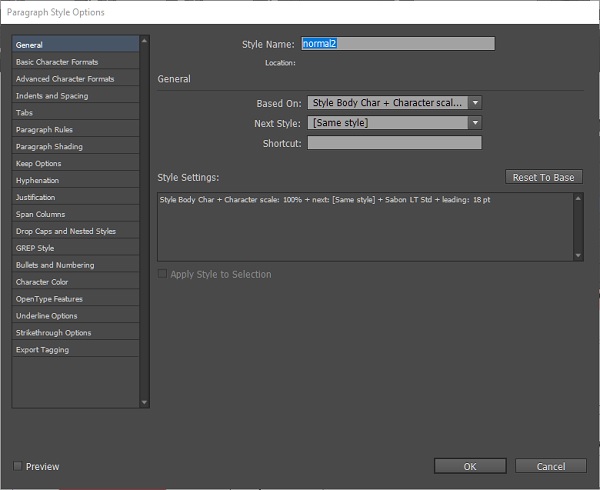
You can double-click on any paragraph style to edit it. This opens the Paragraph Style Options dialog box in which you can specify the parameters you want to change. The Style Settings area shows a summary of the different parameters for this style.
Character Styles
Unlike the paragraph style, a character style can be set to define a single parameter such as font, color, size, or a combination of any of these.
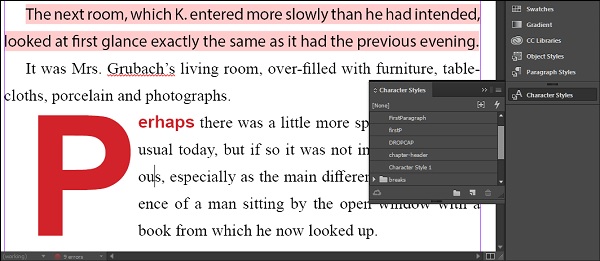
Character styles can be set by opening the Character Styles panel and choosing the desired style.
Similar to the paragraph style, you can simply double-click any character style to open the Character Style Change dialog box. Even there, the Style Settings area shows a summary of the different parameters for this style.

Although technically possible, character styles should be applied only to a word or two or at the maximum, a sentence but never to a complete paragraph.
Adobe InDesign CC - Tables
InDesign provides several ways of working with tables. You can create a table from scratch within a text frame or convert an existing data into a table. Note that the table created will be an anchored object for the text frame.
Creating a New Table
To create a new table, simply select the Text tool and draw an area that you want to create as a table.
Then go to the Tables menu and select Create Table to open the Create Table dialog box. Here, you can specify the number of rows and columns that you want in your table and also specify if you need headers and footers for the table. Clicking OK will create the table within your text frame.
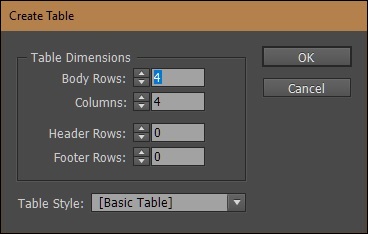
You can now enter data within this table. Moving the cursor over any of the rows or columns will allow you to resize the row or column. Use Shift and drag outside of the table to adjust the entire table proportionally.
Remember that to drag the rows or columns, you need the Type tool selected on the toolbar as the table is considered to be a text frame. If you use the Selection tool, it will move the whole text frame instead of just the row or column.
To delete the table, simply drag over the table and press Delete on your keyboard.
Creating a Table from Existing Data
Most of the time, it makes sense to convert an existing data into a table. You can import a Word, Excel, Access (database) file, or even a text document and convert the contents into a table.
Use the Text tool to create the text frame for your table. Then, use the Place command to place your data into the text frame.
In the following example, we will use a simple text file containing information about websites of some pharma companies and convert this into a table.

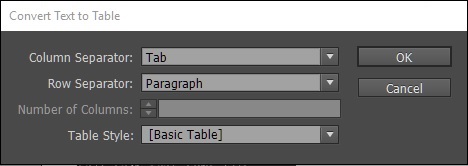
Select all the contents of the text frame by clicking the text and pressing Ctrl+A on Windows or Command+A on the Mac. Go to the Table menu and select the Convert Text to Table option to open the Convert Text to Table dialog box.
You need to tell InDesign what it should consider as a row and column separator. For now, the defaults will work. Click OK to create the table.
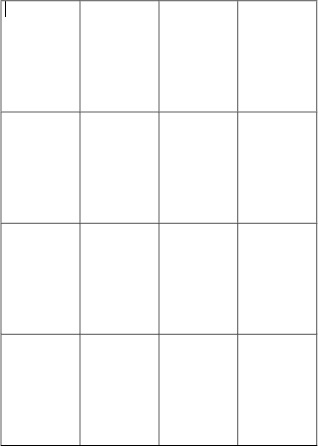
We see that InDesign has created a table with the given data.
| Company | Website |
|---|---|
| Krebs | http://www.krebsbiochem.com/unit2_research.htm |
| Divis Labs | http://www.divislabs.com/inside/productionblock2.asp |
| Mylan | mylanlabs.in |
| Cornelius | http://www.cornileus.com/career.html |
| Dr.Reddys | http://www.dreddys.com |
| Raks Pharma | rakspharma.com |
| Avra | avralab.com |
You can edit the contents of each cell just like how you would edit a regular text frame. If you want an even distribution of rows and columns, you can simply select the rows or columns and go to the Table menu and select either Distribute Rows Evenly or Distribute Columns Evenly or both.
Formatting Tables
InDesign gives plenty of options to format the layout of the table.
All table formatting options are accessible from the Table Options dialog box. To access this, simply go to the Table menu, then go to the Table Options submenu and choose Table Setup
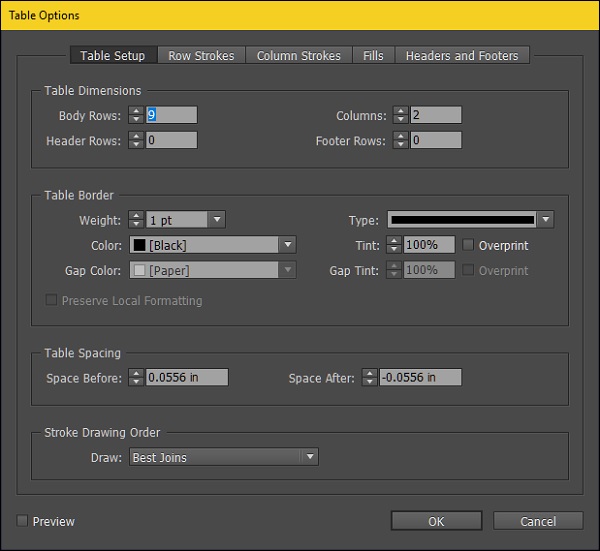
From here, you can choose how your borders should look like and what should be their stroke, how you want individual rows and columns to be colored and a whole lot more. It is easy to explore the options and change the necessary settings.
For this example, let us see the final output after doing some basic formatting. Before doing this, it would be a good practice to define the first row of the table as the header. To do this, go to the Table menu, then to the Convert Rows submenu and select, To Header. This is useful when you have a table spanning multiple pages and it helps to have the header on all the pages for easy reference.

Now, we have a table that is reasonably well formatted. You can explore further options in the Table Options dialog box to adjust the formatting to your liking.
Adobe InDesign CC - Long Documents
It is always easier to break a long document which often runs into several hundred pages into smaller chunks that are individual InDesign documents (file extension .indd) that can be easily managed. How many chunks you break is entirely up to your liking.
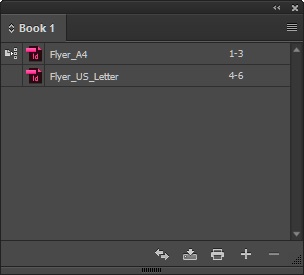
You can combine all these individual InDesign documents into an InDesign book (file extension. indb). To create a book, open the File menu, go to the New submenu and select Book This will open the Save dialog box and ask you to save the book file. Give it a name and click OK. This will create the book and open the Book panel.
In the following example, we have taken two .indd files. However, you can choose any number of files by clicking the + symbol at the bottom of the panel. Once all the .indd files are added, you will see that the page numbers are made continuous.
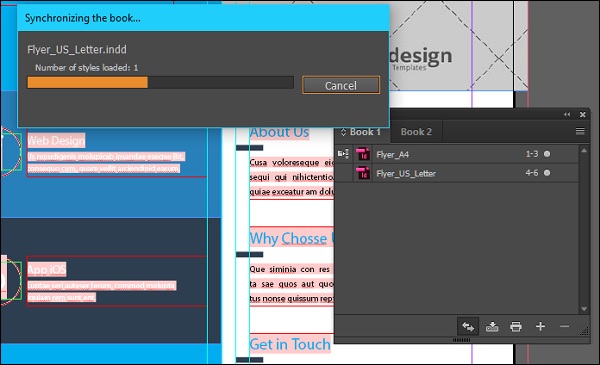
The icon next to the first document in the Book panel indicates the style source. It means, this document is a source for whatever paragraph or character style changes that you make. You can select any document as a style source.
The best part about using the Book panel is that this style source can be synchronized with all other documents in the panel by clicking the double arrow icon in the bottom of the panel. This will tell InDesign to look for style elements in the first document and implement them in the subsequent documents.
You will get a confirmation once the synchronization is complete.
Adobe InDesign CC - Table of Contents
The Table of Contents (ToC) is a very useful feature in InDesign not just to create a chapter-wise ToC, but also to list out basically anything that has a paragraph style.

To access the ToC options, go to the Layout menu and select Table of Contents to open the Table of Contents dialog box. You might need to click More Options to reveal additional options in the dialog box.
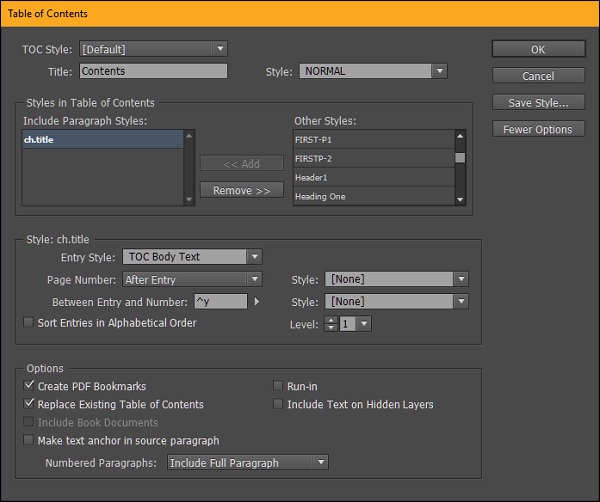
There are a lot of options in here but the most important thing is to add the paragraph style that resembles the chapter headings. In the above example, we have selected the ch.title from the Other Styles area and pressed the <<Add button to add the style to the Include Paragraph Styles area.
Next, define the entry style by selecting the appropriate style for your ToC in the Entry Style dropdown menu. The entry style defines how the ToC labels look like. If you dont define the entry style, you will be having the original paragraph style in your ToC, which might not look good.
Select the After Entry option in the Page Number dropdown menu to keep the page numbers after the chapter entry. You also need to specify the code between the chapter entry and the page number. The Right Indent Tab is specified by the code ^y. If you dont know the code, you can click the small right arrow beside the Between Entry and Number box. The Right Indent Tab ensures that the page numbers align perfectly at the end of the right side of the text frame.
Review the options and click OK to see the ToC. The above example shows a very basic ToC. You can of course go ahead and customize the paragraph styles that you want as discussed earlier and use them in the ToC to get all sorts of custom ToCs.
Adobe InDesign CC - Interactive Documents
InDesign makes it easy to add hyperlinks and bookmarks to make your document interactive. However, keep in mind that the interactivity you add will not be evident in the InDesign workspace but will be seen in the exported PDF. We will discuss a few interactive elements in this chapter. It makes sense to set the workspace from Advanced to Interactive for PDF to enable easy access to interactive panels.
Adding URL Hyperlinks
It is very easy to add URL hyperlinks to any object in InDesign. You can add hyperlinks to an object so that clicking the object in the PDF will take the user to the website or you can add hyperlinks to text to get the same result.
In the following example, we have selected the text to point to a hyperlink. Go to the Hyperlink panel and click the Create new hyperlink at the bottom of the panel to open the New Hyperlink dialog box.
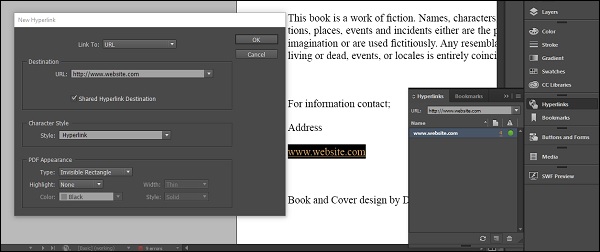
Make sure the Link To field is set to URL. Type the URL in the URL field and click OK. InDesign now creates the URL for the text selected. Whenever you export this as a PDF and click the text, it will open the URL in your default web browser.
Hyperlinking a Page
Similar to hyperlinking a URL, it is also possible to hyperlink an object or text to a specific page in the document. Clicking the text or object will take the user to the linked page.
In the following example, let us consider a text called Introduction, clicking which we want the user to go to Chapter 1. Select the text and click the Create new hyperlink at the bottom of the panel to open the New Hyperlink dialog box.
This time, instead of the URL, select Page in the Link To dropdown menu. We know Chapter 1 of this book starts from page a1, so in the Page dropdown menu, select a1. We want the contents of the chapter to zoom to fit inside window, so we will select Fit in Window in the Zoom Setting. Click OK to add the hyperlink to the document.
Now, whenever this is exported as a PDF, any user who clicks on the Introduction text will go directly to Chapter 1.
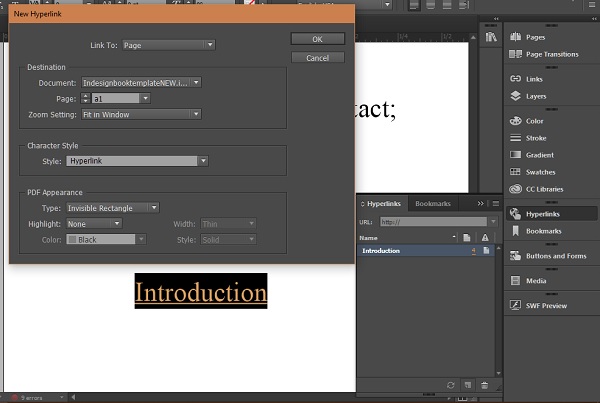
Adding Bookmarks
Bookmarks are also hyperlinks which make it easier for the user to navigate the document. You can create a bookmark for every page or simply create a ToC to insert bookmarks. Bookmarks are automatically created when you insert a ToC.
In this example, we have already created the ToC from the earlier chapter. You can access the bookmarks from the Bookmarks panel present in the same Hyperlinks panel.
Exporting Interactive Documents
As discussed in the beginning of this chapter, you cannot view the interactivity within the actual InDesign workspace. You have to export it as a PDF. There are several options available when you export it as a PDF.
To export a document as a PDF, go to the File menu, then click on Export If you notice, among the various export formats available, there are two Adobe PDF export options one is the Adobe PDF (Interactive) and the other is Adobe PDF (Print).
For all intents and purposes, you need to select the Adobe PDF (Print) unless you have multimedia content such as movies or audio in the document. Click Save. This will open the Export Adobe PDF dialog box.
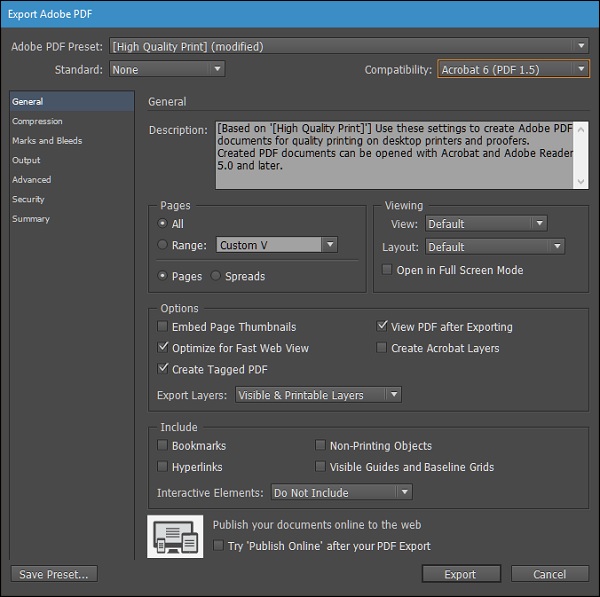
There are a lot of settings to get the exact PDF output you want but just make sure to set the Compatibility to Acrobat 6 (PDF 1.5) or higher.
In the Include section, make sure Bookmarks and Hyperlinks checkboxes are turned on. You can also turn on the View PDF after Exporting in the Options section to open the PDF in your PDF viewer after export.
Adobe InDesign CC - Ebook
The EPUB format is the standard format for publishing eBooks which can be read on a variety of mobile devices. If you want your book to have a wide audience, you should definitely consider publishing it in the EPUB format. InDesign allows you to directly export the book as an EPUB. Creating EPUBs from InDesign is actually a complex process but we will cover the basics here to get you started.

To export the file, go to the File menu, click Export and choose the Save as type as EPUB (Fixed Layout). This will open the EPUB export options dialog box. You can directly click OK, if you dont want to change the options. But doing so, might not give you the document with the correct layout.
To get the most accurate layout possible for your EPUB, you need to let InDesign know the sequence of your content. To do this, go to the Window menu and select Articles to open the Articles panel. Here, click the Create New Article button to add an article.
Now, use the Selection tool to drag a frame onto this created article. You can also select a frame using the Selection tool and click on the + symbol in the Articles panel.
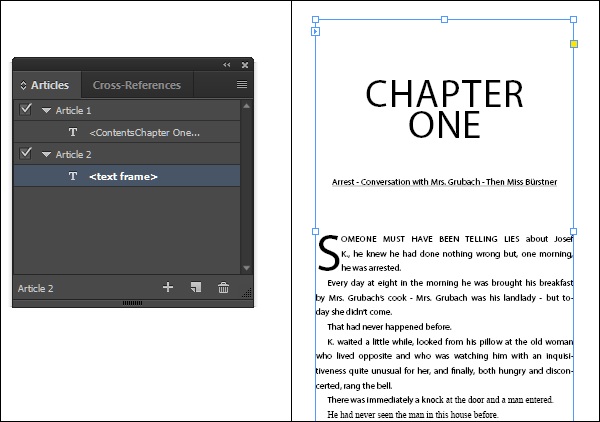
Once youve added all the articles, go back to the EPUB export options and now select Same as Articles Panel in Order dropdown menu in the Content section. This will make sure that InDesign follows the exact same order you have specified in the Articles panel. Click OK to export the document and view in your default EPUB reader.
If you do not have an EPUB reader installed, you can download one from Adobe called Adobe Digital Editions from http://labs.adobe.com
Adobe InDesign CC - Preflighting
Preflighting is the process of ensuring that all aspects of the document are perfect before going to print. InDesign constantly preflights the documents every time you work with them.
Viewing Preflight Errors
The above document shows it has 8 errors in the status bar. Double-clicking this message in the status bar will open the Preflight panel, which lists all the errors that InDesign has found. You can directly jump to the page in which the error has been discovered. Once all the errors are corrected, the red error light changes to green, indicating, No errors.
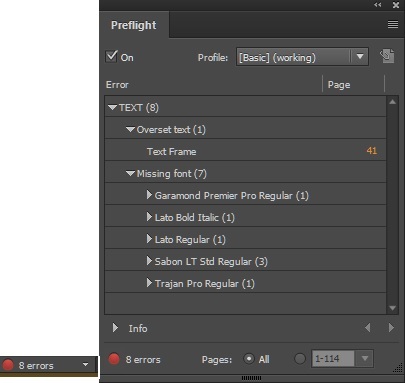
Changing Preflight Profiles
It is possible to define your own preflight profile so that you get to determine the errors you should be alerted to. To do this, go to the Define Profiles option in the Preflight panel menu to open the Preflight Profiles dialog box. InDesign ships with two built-in preflight profiles Basic and Desktop Publishing with the option of adding your own profiles. You can choose the errors that InDesign should look for when preflighting the document. Remember that the Basic profile cannot be edited.

Adobe InDesign CC - Package Documents
We have seen how InDesign links images and objects into the document instead of embedding them directly. This works well most of the time till you want to share the document, say, with your printing press. Most of the time, they will not be having access to your image assets or fonts and might get linking errors or missing font errors.
In order to avoid these hassles, InDesign provides a way for you to package the document. The packaged document contains all the required assets, fonts, and also instructions to the printing press in one folder along with the .indd file.
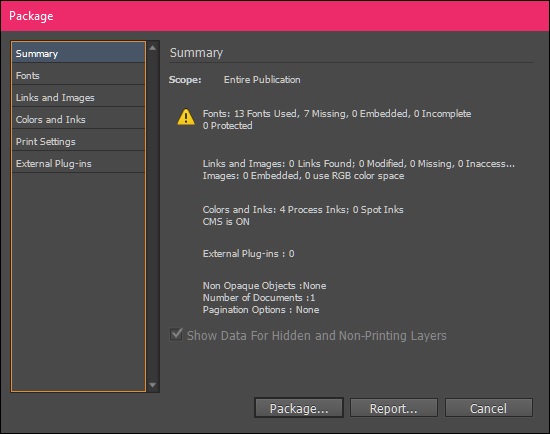
To prepare a document for packaging, open the document, do the required preflighting and go to the File menu and select Package This will open the Package dialog box.
The Package dialog box shows a summary of various components of the documents and any of the errors it has found. You can export the reports if you wish by clicking Report and saving it as a text file. If not, you can simply select the Package option and select a file name and location for the document on your hard drive. This is not the actual packaging yet.
Once you save the package, you will get the Printing Instructions dialog box where you can give your contact information and any instructions you want to tell the printing press.
Most printing presses ignore this information, unless you specify to look at it. It is always better to have a correspondence with the press either by phone or email instead of using the Printing Instructions dialog box. Click Continue when done and give a location for the package.
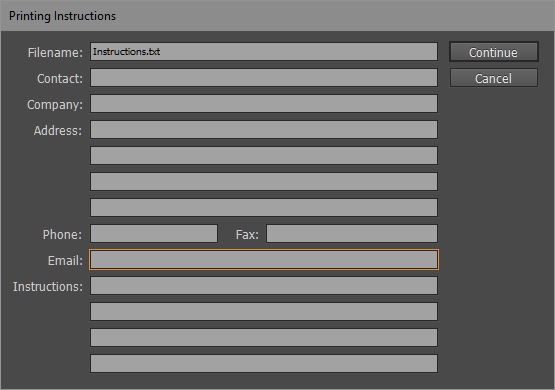
You might get a warning box about the use of copyrighted fonts. Be careful when you package fonts that you have purchased separately as they come with usage and distribution restrictions. Click OK to continue.
InDesign will show the progress of the packaging. Once it is completed, you will be able to find the package along with the instructions file in the destination you have selected.
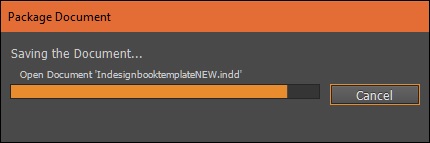
Print Documents and Booklets
Printing Documents
Printing documents is easy with InDesign. To print a document, go to the File menu and select Print This will open the Print dialog box which gives you a lot of fine control over the printing.
The bottom left of the box shows a preview of the document and how it fits into the printed page. The Setup group allows you to set options such as page orientation, page size, position of the content, etc.

It would be a good idea to set all the possible and required print options in this dialog itself if the same options are available in your printer driver as well. Doing so will avoid a lot of potential conflicts between InDesign and your printer driver.
The Marks and Bleed group allows you to print the bleed and slug marks, the color bar, crop marks, etc. which can be useful but not necessary.
Depending on your printer, you might want to change the print output in the Output group to Composite RGB, Composite Gray or Composite CMYK. Generally, for home inkjet printers, Composite RGB or Composite Gray will do. Anything above that, it is always recommended to use Composite CMYK.
An important thing to note before high quality printing is to go to the Advanced group and select the High Resolution preset in the Transparency Flattener area.
You can also save all these settings as a preset so that you can recall them whenever you want.
Printing Booklets
For less complex jobs like printing booklets on your own, you can use the Print Booklet command from the File menu.
The Print Booklet command is very useful to sample your booklet before giving it to the press so that you can have a real idea of how it would look on paper.
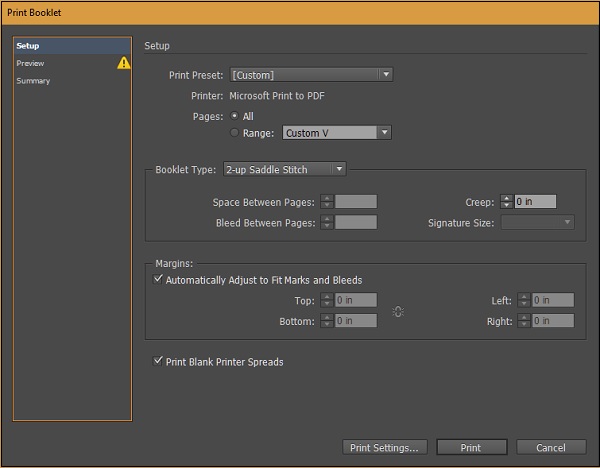
There are however, a few caveats to using this feature. The first thing to remember is that Print Booklet always prints the 1st and last page on one spread, followed by the 2nd and last but one and so on until all the pages are printed. This is because of how the booklet will fold when you stitch it. The other important caveat to remember is the number of pages in the document should be divisible by 4 (you can fold a paper in half to understand why).
You can leave most of the options in the Print Booklet dialog box as defaults. However more often than not, you will find a yellow exclamation near the Preview page indicating that something is wrong; most probably the page will not be fitting inside the booklet.
To rectify this, simply select the Preview page, go to Print Settings and in the Print Settings dialog box, adjust the settings in the Setup group to make the content scales to the page and click OK to return to the Preview page in the Print Booklet dialog box. You will notice that the yellow exclamation is gone and the document has correctly fit into the page.
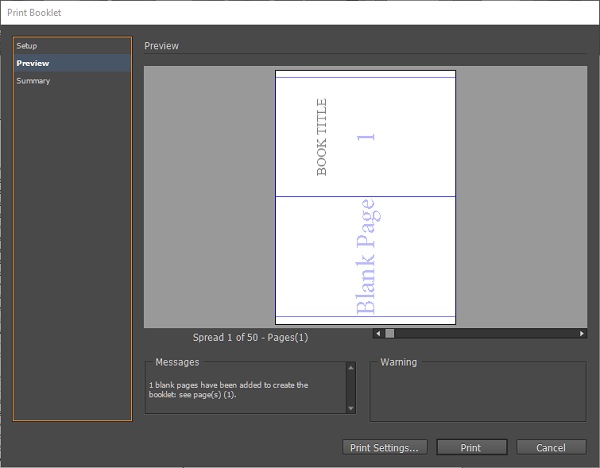
You will also notice that InDesign adds extra blank pages if you have excess or less number of pages that are divisible by 4 to ensure that the booklet format is printed properly. You will also notice page number watermarks are on in the preview. These are just for indication and will not be printed on the final booklet. Click Print to print the booklet.
Export Documents as PDFs
Exporting PDFs is very easy with InDesign. Just go to the Export dialog box from the File menu and select where you want to save the PDF. The Export Adobe PDF dialog box gives you a lot of presets to choose from right out of the box.
Selecting the Right Preset
If you click the Adobe PDF Preset dropdown menu, you will see that there are a lot of PDF format options available. The most used include PDF/x-1a (for North America) and PDF/x3a (for Europe). You might have to consult with your printing press before deciding on the format.
If your printing press supports it, select the PDF/x-4 for even more control over things such as transparency and a wider color gamut. For all other purposes, including on-screen ones, it is recommended to use the High Quality Print preset. It is better to avoid the Smallest File Size preset as much as possible as it can affect the resolution and colors of the images to reduce the file size.
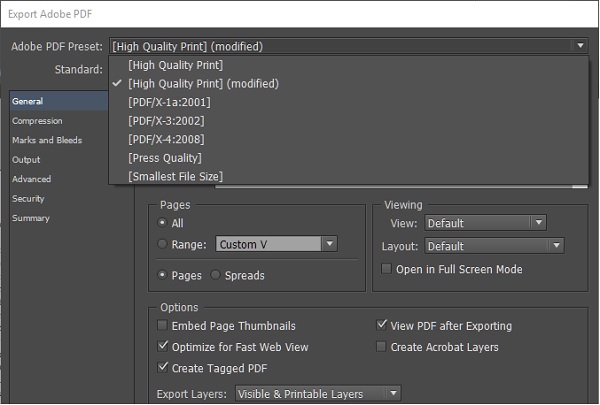
When you set the Compatibility to Acrobat 6 (PDF 1.5) or higher, you get the option to Create Tagged PDF in the Options section of this dialog box. This function allows you to tag keywords in the PDF, which makes indexing by search engines possible. It also allows for accessiblity options for the disabled as screen reader software can read the tagged data in the PDF.
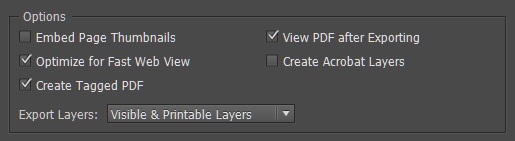
Compression Options
You can determine the amount of compression that InDesign should use while exporting the PDF. It has a large impact on the resulting file size and also on how well the PDF renders for the web. If you are simply displaying the document for the web, a lower pixel per inch (ppi) value would suffice. If you intend to have a high quality printout, then you need a higher ppi. The compression options can be accessed from the Compression section of the Export Adobe PDF dialog box.
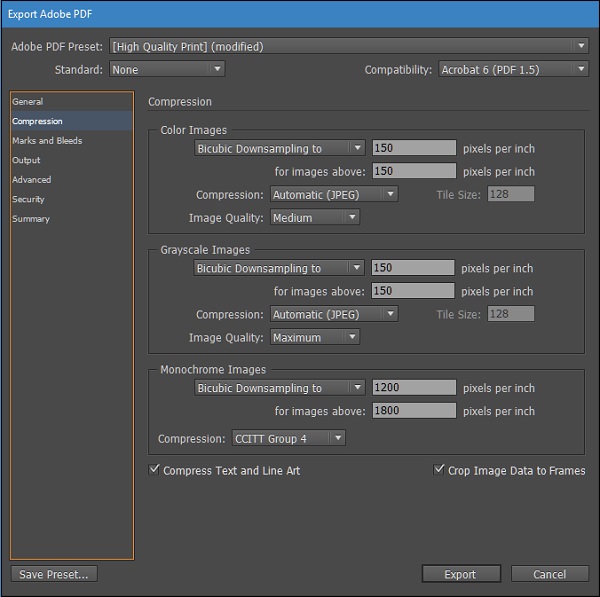
For exporting to the web, in the Color Images section, set the Bicubic Downsampling to box to about 150 and the Image Quality to Medium. Do the same for the Grayscale Images section as well if your document has grayscale images.
Output Options
In the Output section of the Export Adobe PDF dialog box, you might want to review the settings in the Color area.
If you are going to view the PDF on-screen, it is better to leave the defaults as such and make sure that Include Tagged Source Profiles is selected in the Profile Inclusion Policy. This ensures that all images are a part of this PDF. This applies to only the RGB colors.
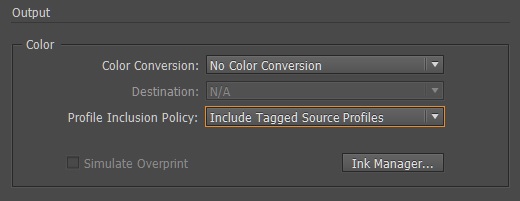
If you are printing, you need to change the Color Conversion option to Convert to Destination and select one of the different destination types, which are about the type of printed paper, in the Destination dropdown menu.
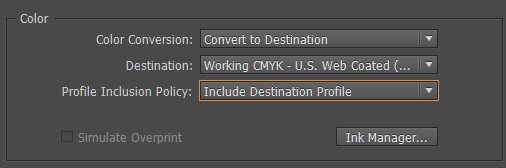
Security Options
A PDF being one of the most commonly used document exchange format, can be vulnerable if you are sharing sensitive data. It is always advisable to password protect your PDF file to ensure confidentiality of information.
In the Export Adobe PDF dialog box, go to the Security section and select the Require a password to open the document checkbox and enter a password. Only those who know the password can open the PDF.
You can also use passwords for conditional restrictions. You can select what a user can or cannot do when he/she opens the document. The earlier password protection feature restricts access to the entire document. Here, you can specify the tasks the user has permission for.
For example, you can prevent the document from printing in low resolution or high resolution or even from printing at all. You can even prevent users from copying the content of the document to the clipboard, commenting, and extracting specific pages or even filling forms and signing. This is perfect if your sharing highly sensitive information with colleagues or outsiders.

Selective Text Frame Export
Sometimes, you might not want to export the whole document but only the text in selected text frames. InDesign makes it easy and offers you choices into the formats that you can export. We will explore two methods here, one is by using the Export command and the second by running scripts.
Exporting Text From a Frame Using the Export Command
We have used the Export command earlier to export files as PDFs. When you want to export just the text from a text frame, make sure the text cursor is inside the text frame and go to the File menu and click Export You will now have a few additional choices.
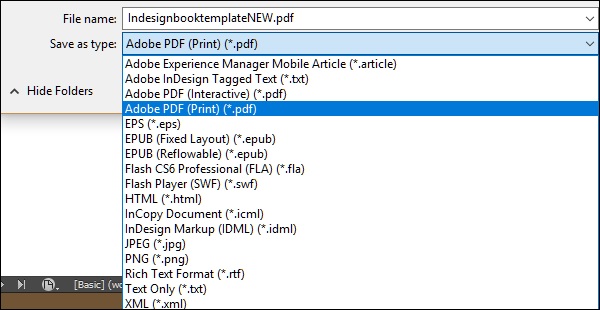
The three main formats for exporting text are Text Only (.txt), Rich Text Format (.rtf) and Adobe InDesign Tagged Text (.txt). Text Only is a simple text format devoid of any formatting. It just exports the plain text. Rich Text Format allows for basic formatting and can be read by many word processors such as Microsoft Word.
Adobe InDesign Tagged Text format allows you to export the text with all the available InDesign formatting embedded in it. But it can only be read by other InDesign programs and not by any other word processor. This is useful if you are exporting text to work on another workstation with InDesign installed.
Exporting Text Using Scripts
InDesign is a very flexible program and its functionality can be extended by small snippets of code called scripts which are custom written to enhance the programs functionality. InDesign can read scripts written in JavaScript (.jsx; Windows and Mac), AppleScript (.scpt or .as; Mac only) or Visual Basic scripts (.vbs; Windows only).
InDesign comes with some built-in scripts, which can be accessed by going to the Window menu, then to the Utilities submenu and selecting Scripts. This opens the Scripts panel, which lists all the available scripts on the computer.
There are two levels of scripts in the Scripts panel − Application and User. Application lists all the scripts that come with InDesign out of the box. It contains sample scripts in JavaScript along with VBScript (if on Windows) or AppleScript (if on the Mac). User lists all scripts that are installed by the user. You can locate these scripts on your hard drive by right-clicking on either the script or the parent folder and selecting Reveal in Explorer on Windows or Reveal in Finder on the Mac.
For exporting all the text from text frames, expand the Samples folder under the JavaScript folder, which is under Application and scroll down till you see the script named ExportAllStories.jsx. Double-click to run the script. This will open a dialog box asking you to select the export text format.
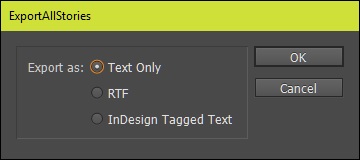
As described earlier, select the desired format according to your needs and click OK to select a destination to save the file. The script works in the background and saves the exported file in the specified destination.
Adobe InDesign CC - Word and InDesign
Using Microsoft Word and Adobe InDesign together is possible and can be an important part of your workflow. There are fundamental differences in how Word and InDesign function. Word is a word processor at its core. It has all the features you need to create elegant as well professional documents comprising mainly of continuous text. InDesign is a page layout program, which can also process text. The primary function of InDesign is to layout page elements and have better control over your document.
Of course, you do not normally use InDesign to write letters or essays and the users normally juggle between these two programs. Understanding these two programs begin with knowing how they handle text.
Word has paragraph and character styles as well which you can find in the Styles panel in the Home tab on the Office ribbon. By default, all formatting in the text apart from headings and titles, goes into the Normal style.

In InDesign as we have been seeing till now, each text frame or even parts of the text by default is grouped under the Basic Paragraph style. However, this offers a lot of customizations and font options that is not normally dealt in Word. Knowing this difference is important when you want to import text formatted with Word styles into InDesign.
You should also remember that in Word, you directly work with text in a blank document but in InDesign everything happens in frames. You cannot just type directly on a blank document without creating a text frame.
Another point to be aware of is, the color scheme used in Word is RGB, while in InDesign it can be either RGB or CMYK depending on the intent of the document.
Word File Import to InDesign
The Place command in the File menu lets you import a Word file into InDesign. In the Place dialog box, make sure that Show Import Options checkbox is checked.
In the Microsoft Word Import Options dialog box, ensure that the radio button, Preserve Styles and Formatting from Text and Tables in the Formatting section is selected. This will ensure translation of most of the Word styles into InDesign.
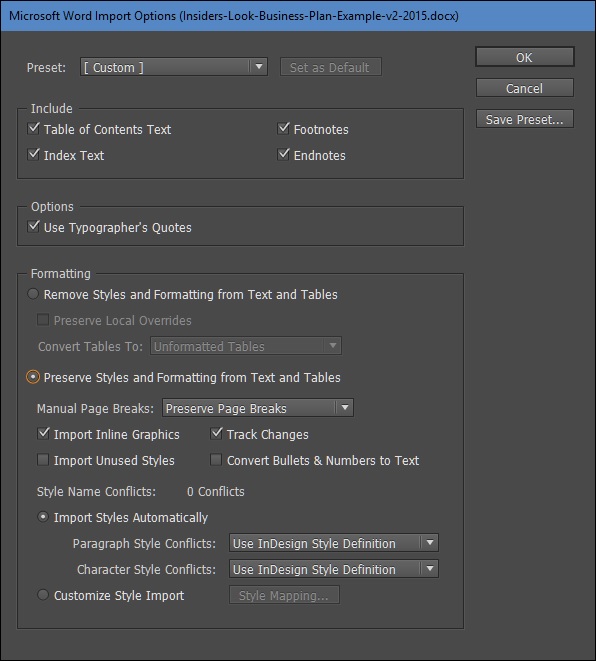
Click OK to get the Place cursor in your InDesign document and drag to draw a text frame and place the Word document inside the text frame.
Most of the Word formatting does indeed carry over into InDesign. Things such as bullets and numbering, basic font settings, leading and paragraph styles do carry over just fine.
However, things such as WordArt, highlights, overridden Word styles and image formatting might not carry over well.
Tables carry over well but you might need to readjust the row and column sizes.

Adobe InDesign CC - Word to InDesign
Retaining Formatting Overrides
The advantage of using the Place command over simple cut and paste is that you can choose to strip off formatting but just keep the overrides or modifications to the style which you can then further tune in InDesign. When importing, using the Place command make sure that Show Import Options checkbox is checked.
In the Microsoft Word Import Options dialog box, ensure that the radio button, Remove Styles and Formatting from Text and Tables in the Formatting section is selected and the Preserve Local Overrides checkbox is checked. This will ensure removal of all Word styles but will preserve font overrides such as bold, italics, etc. when importing into InDesign.
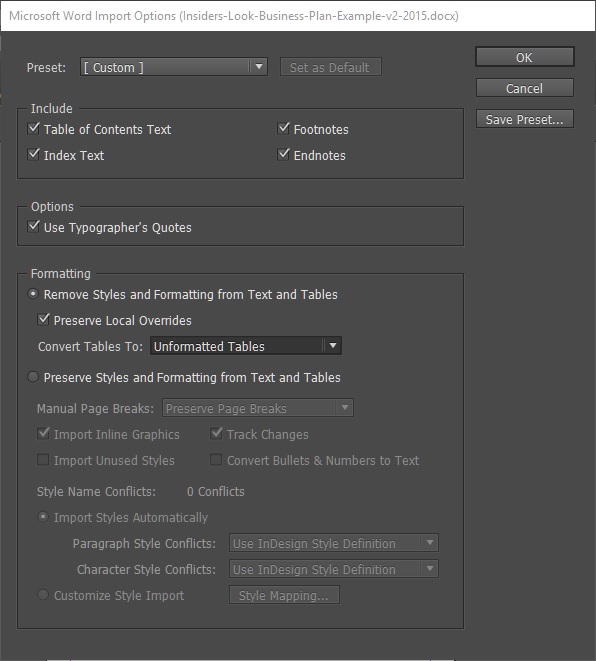
You will see that InDesign has imported the Word document without any of the formatting styles but retained font overrides such as bold, italics, etc.
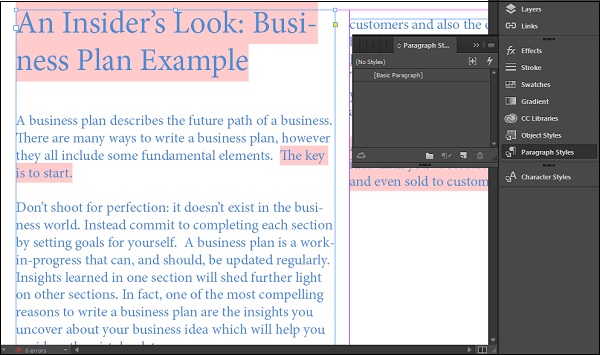
The Paragraph Styles panel shows Basic Paragraph which means all the style of the document is now InDesign default.
From here, you can choose to apply any paragraph or character style in InDesign.
Style Mapping
Style mapping is useful if you want InDesign to correlate the Word styles in your imported document into styles that InDesign can understand. You can map both paragraph and character styles so that when you import the document, the mapped styles are applied automatically.
While importing using the Place command, make sure that Show Import Options checkbox is checked.
In the Microsoft Word Import Options dialog box, ensure that the radio button, Preserve Styles and Formatting from Text and Tables in the Formatting section is selected. Then at the end of the Formatting section, make sure that the Customize Style Import radio button is selected and then click Style Mapping to open the Style Mapping dialog box.
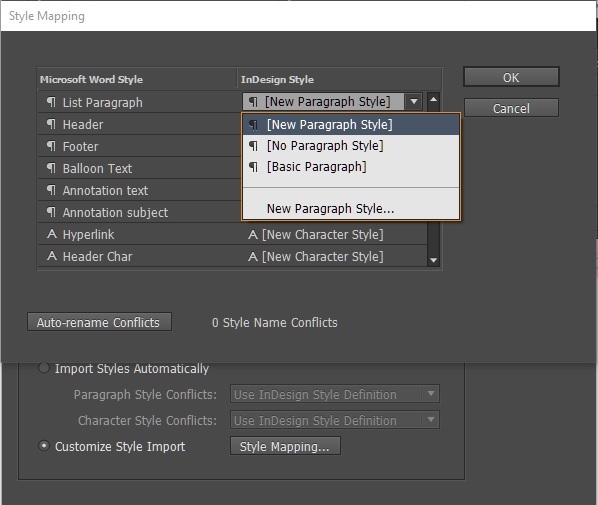
The Style Mapping dialog box shows two columns − on the left is the Microsoft Word style which is present in the Word document that you are importing and on the right is the InDesign style that you want to apply correspondingly.
There are both paragraph and character styles shown (denoted by the paragraph symbol and A symbol respectively) and for each Word style, you can choose the available InDesign style by clicking the down arrow beside each InDesign style.
Once you are done, click OK and OK again to import the Word document with the required formatting.
Photoshop amd Illustrator Workflows
Using Adobe Photoshop and Adobe Illustrator along with InDesign generally completes the creative workflow for most people. All these programs interact well with each other and you might find yourself constantly juggling between these three programs.
InDesign makes it easy to move between all three of them. However, instead of just selecting your image and copy pasting between Photoshop or Illustrator and InDesign, there are some rules to follow.
Importing Images from Photoshop
Photoshop is a bitmap raster image program which means that images can lose or gain resolution with scaling. Most of the images we deal with daily are raster image formats. Images that are able to maintain native resolution no matter the scaling are called vector images which are the kind of images that Illustrator deals with.
The most important thing to remember when integrating Photoshop with InDesign is the file format that you choose to work with. JPEGs are the default and are fine with most cases but if you want to have high quality images, layer, and transparency information, JPEGs are not the ones you should be using. Photoshop supports literally almost all the image formats there is but the best choice remains the Photoshop format, also known as PSD.
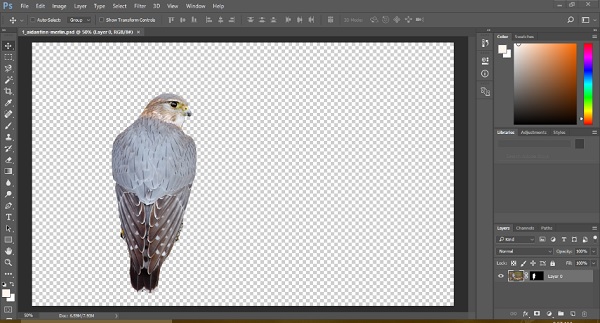
When you work with an image in Photoshop, you might want to include transparency information or isolate the foreground from the background in another layer. Importing this transparency image or alpha channel will help the object to blend easily with the rest of the document when you import it into InDesign.
Always use the Place command instead of simply copy and paste to have more flexibility on your imports.
In the following example, we see that there is a transparency layer behind the bird which has been created in Photoshop and saved as a native PSD file.
We can now use the Place command to place the image of the bird directly in the InDesign document. Make sure that the Show Import Options checkbox is checked.
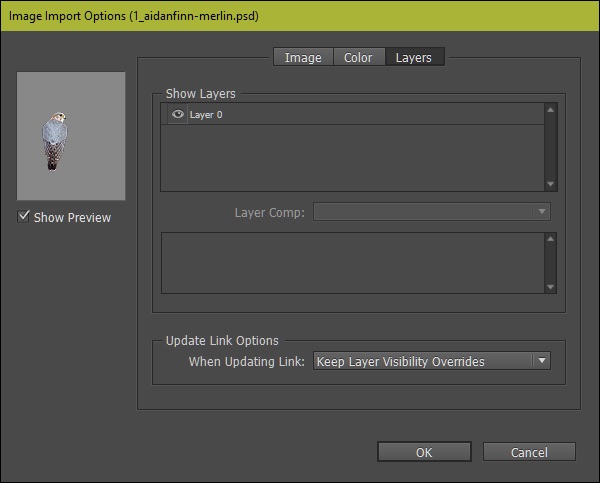
This will open the Image Import Options dialog box.
This dialog box will allow you to select which layer of the image you want to import and also allows you to select the transparency layer. Here it shows the preview of the bird. We can go ahead and import it by pressing OK.
This will reveal the Place cursor with the image. Simply drag a frame with the Place cursor to place the image in the frame.
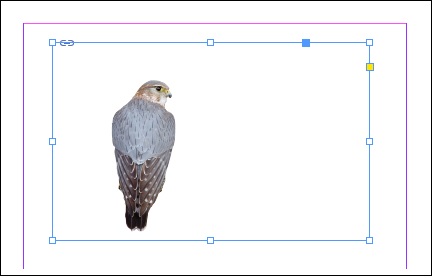
If you have clipping paths in your original Photoshop image, you can select the clipping paths or the alpha channel while importing the image. It is always better to go with the alpha channel to ensure anti-aliasing and smooth blending.
Importing Images from Illustrator
Importing Illustrator files is a little tricky. Similar to Photoshop, you need to save the Illustrator drawing in a compatible format before InDesign can make sense of it. The best formats suited for this are native Adobe Illustrator (.ai) files and Adobe PDF (.pdf) files. InDesign does not yet have support for import Scalable Vector Graphics (.svg) files so if you have .svg files that you want to work with, you might want to save them as .ai or .pdf from Illustrator before importing them into InDesign. Try to avoid .eps files as much as possible.
When you save the file as a .ai file, the Illustrator Options dialog box opens. Be sure to check the Create PDF Compatible File in the Options section otherwise InDesign will not be able to read the .ai file.
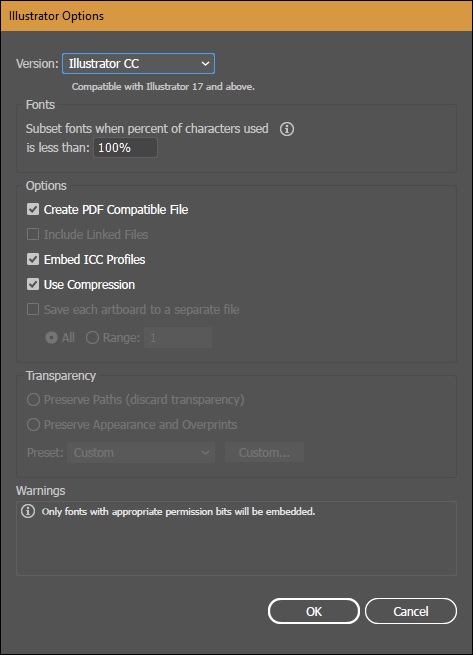
Now, use the Place command in InDesign. This will open the Place PDF dialog box (remember that the PDF is embedded within the .ai file) if the Show Import Options dialog box is checked when using Place or you can also hold down the Shift key when using Place. Here, you can choose which layers you want to import and click OK.
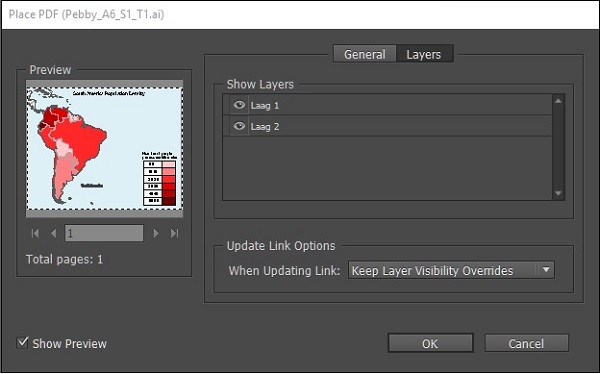
You will see the Place cursor on the InDesign document. Drag a frame to place the vector art within it.
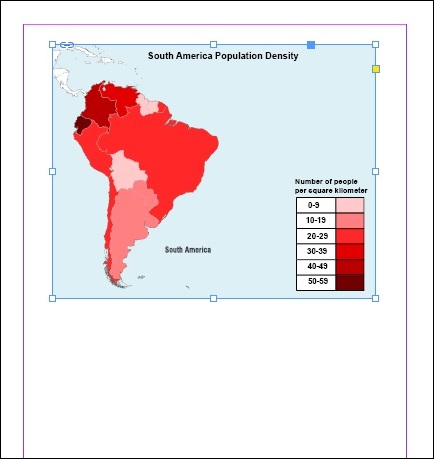
Export InDesign Artwork
Just like it is easy to import PSD and AI files into InDesign, it is also easy to export InDesign artwork into either of these programs. The simplest method to do this is copy and paste. The procedure is the same for both the programs but keep in mind that the objects paths in InDesign are more appropriately imported into Illustrator to retain the vector paths rather than in Photoshop. Photoshop rasterizes the image so you are left with fewer editing options.
It is always recommended to first import the InDesign artwork into Illustrator and then take it from Illustrator to Photoshop.
To copy the InDesign artwork, simply select the desired objects using the Selection tool and press Ctrl+C on Windows or Command+C on the Mac to copy the objects to the clipboard.

Create a new Illustrator document and press Ctrl+V on Windows or Command+V on the Mac to paste the InDesign artwork. You will notice that all the vector paths are carried over to the Illustrator document and you are also able to scale freely without loss of resolution.
However, while pasting the same artwork in Photoshop, you will see that there is loss of resolution and the image gets rasterized. It is still pasted as a vector smart object but in order to change the paths, you need to go back to Illustrator, change the paths, save the file and come back to Photoshop.

Therefore, it is always recommended to import InDesign artwork into Illustrator than Photoshop. If you must use Photoshop, then import it into Photoshop via Illustrator but never paste directly.
Preserve Layers and Vectors
Photoshop can do both vector and bitmap image processing. However, when you import Photoshop vector shapes into InDesign, you will find that the vector path information is lost. As a result, any text that you have created in Photoshop, will become rasterized when you import into InDesign and can lead to low quality prints.
The best way to avoid this situation is to save the original Photoshop image as a PDF file instead of PSD.
However, you should remember that saving as a PDF causes Photoshop to discard layer information. Hence, when you add or remove layers from the original file, it might not reflect in your InDesign document. Again, the best workaround for this is to use Illustrator .ai files. Layer information is preserved in .ai files much better.
In the following example, we see that there is no loss of information in the imported PDF file as the vector information is preserved, when the file is saved as PDF in Photoshop.