- Adobe InDesign CC - Home
- Desktop Publishing - Introduction
- Popular DTP Software
- InDesign CC - Introduction
- InDesign CC - Workspace Basics
- Create the First Document
- InDesign CC - Page Management
- InDesign CC - Section Options
- InDesign CC - Text Frames
- InDesign CC - Story Editor
- Spellchecking Features
- InDesign CC - Find/Change Function
- InDesign CC - Import Images
- InDesign CC - Image Links
- InDesign CC - Edit Images
- InDesign CC - Image Fitting
- InDesign CC - Image Transparency
- InDesign CC - QR Codes
- Selection Tools & Fill Strokes
- Image Color & Transparency
- InDesign CC - Drop Shadows
- Special Effects to Objects
- InDesign CC - Eyedropper Tool
- Find/Change Feature for Objects
- InDesign CC - Swatches Panel
- InDesign CC - Color Panel
- InDesign CC - Gradients & Blends
- InDesign CC - Paths & Outlines
- InDesign CC - Stack Objects
- InDesign CC - Layers
- InDesign CC - Nest Objects
- InDesign CC - Align Objects
- Text Wrap & Anchor Objects
- InDesign CC - Object Transformation
- InDesign CC - Characters
- InDesign CC - Text Formatting
- InDesign CC - Paragraph Formatting
- Paragraph & Character Styles
- InDesign CC - Tables
- InDesign CC - Long Documents
- InDesign CC - Table of Contents
- InDesign CC - Interactive Documents
- InDesign CC - Ebook
- InDesign CC - Preflighting
- InDesign CC - Package Documents
- Print Documents & Booklets
- Export Documents as PDFs
- Selective Text Frame Export
- Word & InDesign
- Word File Import to InDesign
- Word To InDesign
- Photoshop & Illustrator Workflows
- Export InDesign Artwork
- Preserve Layers & Vectors
Print Documents and Booklets
Printing Documents
Printing documents is easy with InDesign. To print a document, go to the File menu and select Print This will open the Print dialog box which gives you a lot of fine control over the printing.
The bottom left of the box shows a preview of the document and how it fits into the printed page. The Setup group allows you to set options such as page orientation, page size, position of the content, etc.

It would be a good idea to set all the possible and required print options in this dialog itself if the same options are available in your printer driver as well. Doing so will avoid a lot of potential conflicts between InDesign and your printer driver.
The Marks and Bleed group allows you to print the bleed and slug marks, the color bar, crop marks, etc. which can be useful but not necessary.
Depending on your printer, you might want to change the print output in the Output group to Composite RGB, Composite Gray or Composite CMYK. Generally, for home inkjet printers, Composite RGB or Composite Gray will do. Anything above that, it is always recommended to use Composite CMYK.
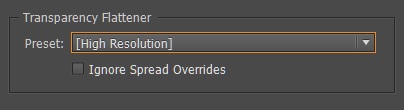
An important thing to note before high quality printing is to go to the Advanced group and select the High Resolution preset in the Transparency Flattener area.
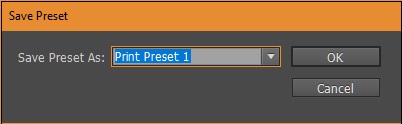
You can also save all these settings as a preset so that you can recall them whenever you want.
Printing Booklets
For less complex jobs like printing booklets on your own, you can use the Print Booklet command from the File menu.
The Print Booklet command is very useful to sample your booklet before giving it to the press so that you can have a real idea of how it would look on paper.
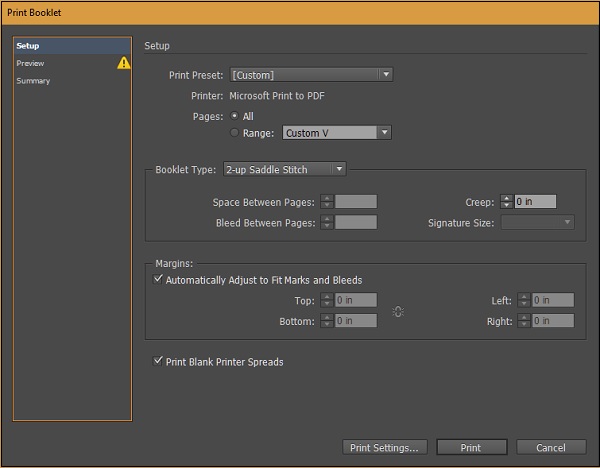
There are however, a few caveats to using this feature. The first thing to remember is that Print Booklet always prints the 1st and last page on one spread, followed by the 2nd and last but one and so on until all the pages are printed. This is because of how the booklet will fold when you stitch it. The other important caveat to remember is the number of pages in the document should be divisible by 4 (you can fold a paper in half to understand why).
You can leave most of the options in the Print Booklet dialog box as defaults. However more often than not, you will find a yellow exclamation near the Preview page indicating that something is wrong; most probably the page will not be fitting inside the booklet.
To rectify this, simply select the Preview page, go to Print Settings and in the Print Settings dialog box, adjust the settings in the Setup group to make the content scales to the page and click OK to return to the Preview page in the Print Booklet dialog box. You will notice that the yellow exclamation is gone and the document has correctly fit into the page.
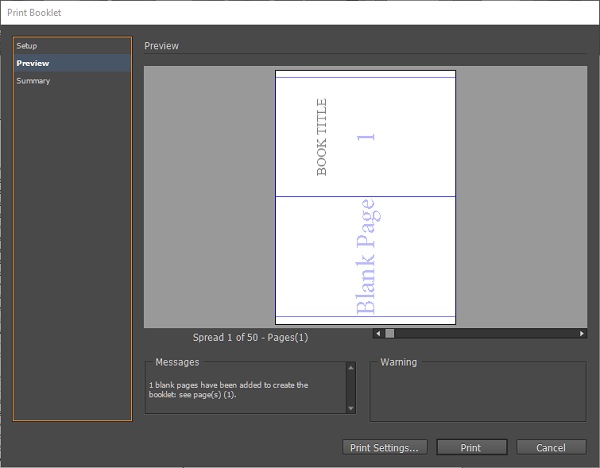
You will also notice that InDesign adds extra blank pages if you have excess or less number of pages that are divisible by 4 to ensure that the booklet format is printed properly. You will also notice page number watermarks are on in the preview. These are just for indication and will not be printed on the final booklet. Click Print to print the booklet.
