- Adobe InDesign CC - Home
- Desktop Publishing - Introduction
- Popular DTP Software
- InDesign CC - Introduction
- InDesign CC - Workspace Basics
- Create the First Document
- InDesign CC - Page Management
- InDesign CC - Section Options
- InDesign CC - Text Frames
- InDesign CC - Story Editor
- Spellchecking Features
- InDesign CC - Find/Change Function
- InDesign CC - Import Images
- InDesign CC - Image Links
- InDesign CC - Edit Images
- InDesign CC - Image Fitting
- InDesign CC - Image Transparency
- InDesign CC - QR Codes
- Selection Tools & Fill Strokes
- Image Color & Transparency
- InDesign CC - Drop Shadows
- Special Effects to Objects
- InDesign CC - Eyedropper Tool
- Find/Change Feature for Objects
- InDesign CC - Swatches Panel
- InDesign CC - Color Panel
- InDesign CC - Gradients & Blends
- InDesign CC - Paths & Outlines
- InDesign CC - Stack Objects
- InDesign CC - Layers
- InDesign CC - Nest Objects
- InDesign CC - Align Objects
- Text Wrap & Anchor Objects
- InDesign CC - Object Transformation
- InDesign CC - Characters
- InDesign CC - Text Formatting
- InDesign CC - Paragraph Formatting
- Paragraph & Character Styles
- InDesign CC - Tables
- InDesign CC - Long Documents
- InDesign CC - Table of Contents
- InDesign CC - Interactive Documents
- InDesign CC - Ebook
- InDesign CC - Preflighting
- InDesign CC - Package Documents
- Print Documents & Booklets
- Export Documents as PDFs
- Selective Text Frame Export
- Word & InDesign
- Word File Import to InDesign
- Word To InDesign
- Photoshop & Illustrator Workflows
- Export InDesign Artwork
- Preserve Layers & Vectors
Selection Tools and Fill Strokes
In this chapter, you will learn about the various selection tools in Adobe InDesign and how to apply fill and strokes colors.
Selection Tools
There are two types of selection tools in InDesign. The commonly used Selection tool (black arrow selection tool) and the Direct Selection tool.
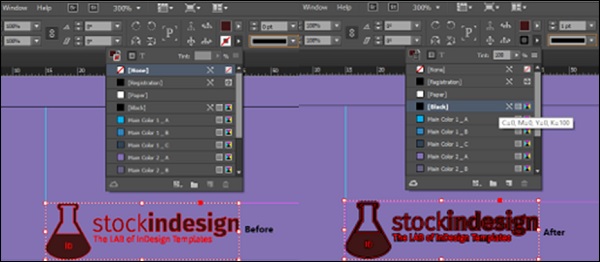
You can perform a selection either by selection and drawing along the document to select desired frames or simply press Ctrl+A on Windows or Command+A on the Mac to select everything. You will notice that the selection shows some frames in red and some in blue and even green. These indicate that these frames are in different layers which you will notice if you have the Layers panel open.
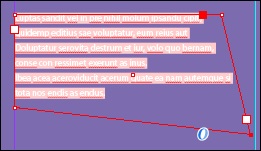
The Direct Selection tool allows you to select a single point on a path and move just one point. In the following example, just the vertex of the lower right of the frame has been dragged while keeping the other points intact. The contents of the frame reflow automatically.
Applying Fill and Stroke Colors
InDesign makes it very easy to change the background color or fill and the border color or stroke of any object image or text.
Let us discuss fill first. Let us say that you would like to change the background color of the object. First, make sure the object is selected. Go to the Control Panel on the top and click the arrow next to the Fill function. The button directly below Fill is the Stroke.
You can select the available colors from here or create your own custom color value using RGB, CMYK, or any of the many available color profiles. Say, you want to apply a Red swatch. Select it from the menu to see the change.
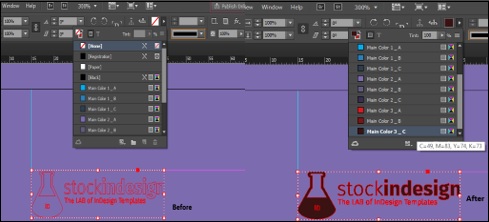
Now, if you want to change the stroke of the object, simply select the Stroke and decide on the color as before. Let us make it black for this example. We see that the borders of the image have now become black. Of course, you can select or define any color you like and also customize the thickness of the border.